Tools and materials for making furniture panels
- Circular Saw.
- Milling machine.
- Drill.
- Hammer.
- Electric planer.
- Belt and surface grinders. You can clean the wood with emery cloth, screwing it onto the block. True, it will take a little longer.
- Reismus.
- Clamps or homemade devices for tightening boards.
- Long metal ruler, pencil, tape measure.
- Lumber.
- Plywood and thin slats for holding the shield together.
- Glue.
Preparatory work
First, let's decide what size furniture panel we need in order to stock up on enough material. In any case, the blanks should be longer and thicker than the final parameters of the shield. We select boards from wood of the same species, dry and smooth, with a minimum of knots. It is also necessary to know the basic properties of wood. We offer a small carpenter’s dictionary so as not to get confused in the concepts:
- Faces are the wide longitudinal sides of the boards.
- Plots are separate bars, planks, cut from a wide board.
- The lamellas are solid, unjointed pieces. Actually the same as plots.
- Looseness is a random arrangement of wood fibers in a workpiece. It occurs when a board is cut from the butt of a tree.
- Sapwood is the outer layer of wood located just below the bark.
According to the advice of old masters on how to make good quality furniture panels, plots are taken that have a width to thickness ratio of 3x1. This lamella is stable because the internal tension of the wood is not enough to split the lath. We've all seen boards that are cracked at the ends. This is the case when the stress of the material caused by improper drying splits the workpiece. This means that we first cut the lumber into slats no more than 15 cm wide. During the cutting process, we also remove all defective sections of the boards.
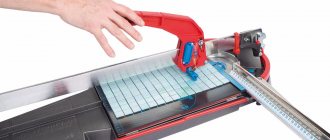
Before assembling the panel, take into account that wood warps in different directions when dried. It is strongest in the direction of the growth rings (tangential direction), and twice as weak in the direction of the core lines (radial direction). We glue the sawn blanks in the order indicated in the very first photo:
Panels a and b: core to core, sapwood to sapwood. This will avoid warping when the board shrinks, which reduces the strength of the adhesive joints.
Shields c and d: we orient blanks with pronounced curling along the lines of annual rings, then the deformation of the finished shield will be much less.
Step-by-step instructions for making furniture panels
- We lay the boards in the desired position, achieving the optimal location of the annual rings. Before disassembling the structure, we mark the material in a way that we understand (for example, by drawing a triangle). The markings will help you quickly find the desired lamella in the future. The ends of the boards must be sanded before gluing.
- To make making furniture panels with your own hands faster, we put the boards in a pack and coat the ends with glue. If you put the plots in a plastic bag, the glue will set more slowly, and we will have time to assemble the workpieces into a shield.
- If the farm has large clamps, we tighten the glued wood with them. Many craftsmen use such a device as a clamp assembled from scraps of boards. The tightening moment is ensured by driving wedges between the stop and the end of the board. You can squeeze the boards between the brackets of metal shelving. The principle is the same - the edges are joined together using wedges and wooden blocks.
- Carefully, sparing no time, dry the glued board. To obtain a flat and smooth surface, we plan and sand the wood, while simultaneously removing traces of glue.
Methods for connecting plots in a shield
How to make a furniture panel with your own hands so that the wood retains its original stability in the future? There are several ways to cope with the warping of the board caused by the curling of the lumber.
We glue the lamellas on the dowels (the bottom panel in photo 6) or use the finishing tips, following the example of the drawing board. To fix short boards, we use a tip with a tongue-and-groove assembly (top panel in the photo), connected flush to the lamellas. The tip may have a protrusion above one (middle shield) or both faces, depending on the purpose of the product.
If the furniture board is intended to be used in conditions of constant fluctuations in humidity, it would be more advisable not to glue the boards together. Compensation for wood due to frequent swelling is achieved by various methods of consolidating plots. The top panel in photo 7 is connected in a quarter, the middle one in a quarter with chamfering from the upper edges. The boards of the lower shield are also joined together in quarters, but with a selection of profile edges on the front side.
Another type of joining plots without using glue is the use of floor strips. The top panel in photo 8 is secured with a regular strip, the middle one with a profiled strip without grooves, and the bottom one with a profiled strip with grooves.
If the furniture board will be used under constant mechanical load, in conditions of high humidity and temperature changes, then the boards must have a more powerful interface. Photo 9 shows examples of such connections. The top panel is assembled on dowels, the middle panel is assembled on a plywood strip. The width of the slats should be equal to the thickness of the plots, the thickness of the slats should be one third of the thickness of the plots.
The example of the lower panel shows a tongue-and-groove connection used for laying floors or cladding partitions. All these methods can be used in the manufacture of collapsible panels (for example, for sliding furniture). Glue is not used in these connections.
Gluing lamellas on dowels requires perfect precision in the location of the holes, otherwise the geometry of the shield will be disrupted. Nests are marked with markers. It is best to drill the ends using a drill stand and stop. The total depth of both holes should exceed the length of the fastening element by 2-3 mm.
If there is no milling machine, the grooves and profiles at the ends are made using a drill mounted on a stand. The appropriate cutter is installed on the tool and the speed is turned on at high speed.
The assembled, dried and sanded shield is filed to the required size. Now you can put it to work - making furniture, doors, window sills, sheathing walls and ceilings. Durability, aesthetics, and naturalness of furniture panels are the best recommendations for a building material.
Boards from boards: choice of glue, tools and lumber, procedure
How are boards joined into a board? What adhesives are preferable for gluing? How to adjust surfaces? Do I need to provide pressure while the glue is drying? Let's try to answer these questions.
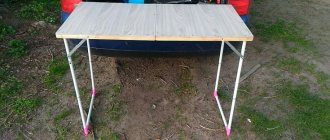
Furniture made from glued panels.
The purpose of joining the boards is to obtain a so-called furniture panel, which is subsequently used as a tabletop, window sill or furniture facade.
The fact is that getting a solid board 40-60 centimeters wide is very problematic:
- Taking into account the need to debark the trunk and its conical shape, such dimensions in themselves are difficult to achieve;
- Additional problems are created by the stresses that arise in the wood during drying. Their consequence is cracks, “propellers” and other defects in the workpiece.
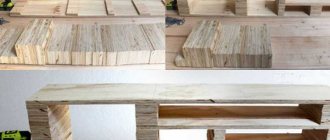
A stacked furniture panel can be assembled from minimum size blanks.
However: you can get a beautiful surface without conspicuous seams only by carefully selecting the texture pattern between the plots (boards or bars from which the shield is assembled).
Note that there are no sharp transitions between texture patterns.
Technical equipment and its features
To produce furniture panels, the following industrial equipment is required:
- Drying chambers for wood preparation - there are vacuum, convective, and aerodynamic types.
- Universal woodworking machines - units from Winner Blazer and Warrior have proven themselves.
- Double-sided thickness gauges for lamellas of domestic production, as well as Ostermann, GRIGGIO.
- Weights for gluing the board: fan - from RAUTEK, INDUK, pneumatic - Stromab.
Working with the cursal device
As well as installations for optimizing end cutting, you can obtain a minimum of waste. There are walk-through machines - for piece processing from Quadro and devices with a Cursal pusher - for obtaining a bunch of boards.
Equipment for splicing along the length allows you to connect short workpieces into lamellas; this feature makes it possible to transform defects into working material. Automatic, semi-automatic lines, Beaver and OMGA tenoning machines.
Adhesive application systems are used on flat surfaces to distribute the adhesive evenly. For gluing timber, the composition is applied directly on the KM-250 machine.
Format cutting machines are designed for cutting materials lengthwise and crosswise. There are: with a ball carriage - Ostermann, a roller carriage - FILATO, format-cutting centers - SELCO.
Additionally, during production, machines are used for artificial aging or brushing of wood. To obtain a unique texture of furniture boards, special abrasive brushes or sanding drums GRIGGIO and domestic models - from - KS200, KS1 - are used.
Glue selection
What adhesives are used for gluing wooden pieces?
In general, any specialized carpentry:
- Casein (made from crushed low-fat cottage cheese);
- Albumin (on egg white);
- Bone (boiled from animal bones);
- Imported Titebond II, etc.
General construction adhesives, no matter how attractive their price, are strongly not recommended for use on wood. The only exception is polyvinyl acetate glue (PVA): its adhesive seam is noticeably stronger than wood in tensile strength in the direction perpendicular to the grain.
When gluing wooden parts using Moment SUPER PVA D3 and subsequent destruction of the structure, fragments of workpieces remain on both sides of the seam; the seam itself does not collapse.
High-quality wood glue from Henkel.
An important point: when using protein-based wood glues (casein, albumin and bone), they are soaked for a long time to swell. The glue is ready for use 1-24 hours after it is poured with warm water.
Investment size
As is clear from the descriptions of the previous sections, the size of investments is directly proportional to the scale of the business being organized. The future owner of furniture panel production must provide funds for the following expenses:
- renting premises (it makes sense to include in the estimate the amount for a one-time payment of 3 to 6 months of rent) and preparing it for business (repairs, installation of a forced ventilation system, gates, checkpoints, etc.);
- purchase of equipment;
- purchase of raw materials for six months;
- paperwork;
- wages to employees (for 3-6 months);
- advertising and promotion of new brand products (creating a website, printing booklets and posters, placing advertisements in specialized media, etc.);
- unforeseen expenses (10-30% of the prepared estimate).
To save money, it makes sense to start operations with an incomplete staff, and when a stable sales market appears, attract new employees.
Preparing for work
Tool
Before gluing the boards into a shield, you need to prepare the tools. The following tools are absolutely required:
| Tool | Functions |
| Thicknesser | Planing of workpieces to obtain the same width along the entire length; planing the finished board after gluing |
| Screw press for gluing (for example, domestic PVA 1.3M) or homemade clamp | Fixing and pressing plots during gluing |
In addition, it is desirable:
| Tool | Functions | Analogue |
| Circular saw with guide | Sawing the finished board to size | Circular hand saw, jigsaw, hand saw |
| Belt sander | Grinding the surface of the board after planing | Vibrating sander, sandpaper block |
The main tool for gluing – the press – should be given special attention.
- Ensure that the workpieces are pressed against each other with a force of about 10 kgf/cm2;
- Avoid bending of the shield and mutual displacement of the plots relative to each other.
The goal can be achieved in different ways.
Workbench with carpentry clamp.
This design is familiar to many readers from school labor lessons. A limiter fixed on the workbench and a pair of clamps compress the workpieces on both sides. Fixation in the horizontal plane can be organized by pressing wooden blanks along the edges with bars, pressed with four to six ordinary carpentry clamps.
The photo shows a PVS 1.3M screw press.
A screw press, or clamp, is another simple device that provides clamping and fixation in two planes. Compression of the shield on the sides is ensured by the movable legs of the clamp: as the screws are tightened, the vertical steel profiles move closer to each other.
Wedge with wedges.
Instead of a clamp, a pair of counter-directional wedges can be used. They are driven between the shield and the stop, squeezing the workpieces.
Tip: in order not to crush the wood of the outer plot, place an additional wooden block, not coated with glue, between it and the wedges.
Lumber
Many craftsmen practice assembling furniture panels from ordinary unedged boards by sorting and selecting wood without defects. However, it is much easier to immediately take the choice of lumber seriously.
As a sample of the requirements, let's look at what a furniture panel with a thickness of 25 mm should be according to GOST 2140, which normalizes surface defects of glued parts. We will give the parameters for the “Extra” grade: in fact, if you are going to start making furniture yourself, then you should do everything to the highest standard!
| Parameter | Meaning |
| Color | Uniform, without noticeable tonal transitions |
| Healthy bitches | Not allowed |
| Knots falling out | Not allowed |
| Knot holes | Not allowed |
| Cracks | Not allowed |
| Cross-layer (deviation of wood fibers from the longitudinal axis of the workpiece) | Let's say |
Don’t be too lazy to sort through the blanks, weeding out the defects.
It’s interesting: the optimal ratio of the width of the workpiece to its thickness from the point of view of uniform drying of the wood is 3:1. If you use atmospheric drying blanks and plan to use the furniture in conditions of significant fluctuations in humidity, then it is better to take sections for a 40 mm thick panel with a width of 120 mm.
Important nuances when gluing wooden panels
Hello, dear readers and DIYers!
During his craft practice, any carpenter at least once had to deal with gluing large wooden panels. And everyone knows from experience: the better the joints between the boards are aligned, the less material will have to be cleaned or removed with a plane in order to achieve an absolutely even plane of the panel. In this article, the author of the YouTube channel “Stumpy Nubs” will tell you how you can achieve high-quality results using very simple techniques.
Materials. — Pine board — Furniture boards — Natural beeswax — Masking tape — Flat dowels — PVA glue — Rubber bands — Nails. Tools used by the author. — Clamps, clamps — Drilling machine — Forstner drills — Hand or electric plane — Band saw, electric jigsaw, — screwdriver — Crowns — Circular saw — Pencil, ruler. Manufacturing process. Accurately aligning the joints of the panel elements is especially important if you have to work with boards ¾ inch thick (18-20 mm) and the entire panel must be of the appropriate thickness. There can be no room for error here.
To do this, deep grooves are cut into the adjacent sides of the boards using a lamellar router, into which strips of hard cardboard or plywood are then inserted.
All kinds of strips, dowels and dowels are also used to strengthen corner joints. Although, in truth, wood glue alone is more than enough for this type of connection to acquire the required strength.
The fastest solution for aligning the joints of combined boards is long correction slats, which you can make yourself from scraps of wood.
The author brings to your attention various fixing methods for small, medium and large panels.
You can choose pine as a material. This is one of the cheapest and most common types of wood. But it’s still better to choose hard wood, since in this case you can get by with thinner planks. The larger the panel being glued, the thicker, wider and stiffer the strips should be.
For panels of small width, blanks are cut to the size of the specific panel being glued. The boards are laid out on clamps in the order in which they should be glued together.
Then wooden boards about 70-80 mm wide are taken (if the shield is made of hard wood). Marks are placed on the planks opposite each joint of the panel boards.
After this, each plank is cut in half on a circular saw. In fact, the clamps are ready.
The edges of the boards are coated with glue, connected, and lightly tightened together with clamps. Next, the joints of the boards are carefully aligned relative to each other in the central part of the forming panel.
But, since the boards of the board being glued are not perfectly smooth, closer to the edges at the joints they can shift relative to each other. This is where manufactured end clamps come to the rescue. They are placed on both sides of the board so that each of the cutouts made on them coincides with the joint of two boards. This way the entire structure will be level. In addition, thanks to the cutouts on the planks, excess glue can freely come out of the joints.
To initially fix the clamps, the master uses ordinary rubber bands.
And then presses the guides with clamps. This type of end clamp is especially useful for forming small panels, such as furniture doors, small table tops, chair seats and backs.
If the panel is made very wide, then creating the necessary pressure in the center of the panel to level the surface will be problematic. This happens because the pressure boards will bend in the shape of an arc.
A slight improvement to the pressure boards will be required here. For this purpose, the master selects two wooden boards about 50 mm wide. The length of each clamping strip should be approximately 150 mm longer than the width of the panel itself.
Now the edges of the panel are marked on the strip on both sides.
Then, turning the bar over, the author sticks masking tape from one mark to another.
And on top of it is another layer, which from its beginning to its end is approximately 30 mm shorter than the first tape.
The next strip of tape will be exactly the same amount shorter than the previous one. And so layer after layer will be applied until the last short strip, only a few centimeters wide, is stuck in the center.
The tape modified the edge of the bar, turning it into a kind of arc. Now the clamping force will be significantly greater in the central part of the panel (than without using the adhesive tape), and will be evenly distributed along the entire length of the clamp.
The clamp itself will naturally bend under the pressure created by the clamps from the edges, and, in turn, will put pressure on the central zone of the panel. This is a great way to work with medium-sized panels (small countertops, cabinet fronts, etc.).
Firstly, the clamp boards themselves should be somewhat thicker and wider, approximately 50X100 mm. And the arched edge itself is formed not by applying several layers of adhesive tape, which, when pressure is applied, will wrinkle and move to the sides, but by changing the shape of the strip itself.
The author suggests cutting a thin strip of wood 150-200 mm wide. Then drive a small nail along the edges of the plank, which will act as a clamp. This should be done at a distance of approximately 4-6 mm from the edge that will bend.
The nails will help fix the strip of wood at the moment when the craftsman begins to bend it towards the edge of the strip. The result is a pattern of an ideal smooth arc.
If the arc on the clamping bar is a little deeper than the material can bend, you can always put a couple of layers of duct tape on the edge of the bar. It is also worth rubbing the edge of the clamp with beeswax or paste to prevent the clamp from sticking to the panel.
The same tips will also come in handy when using special clamps. Their production is described in one of the articles.
Good mood, good luck, and interesting ideas to everyone!
The author's video can be found here.
Source
Become the author of the site, publish your own articles, descriptions of homemade products and pay for the text. Read more here.
Procedure
Now let's move on to how to glue a shield from boards with your own hands.
We use the simplest gluing method - a smooth fugue (without shaped edge milling).
- We pass the workpieces through a thickness planer, planing only the sides that are glued together;
- We put them in a press with one side glued up;
- Apply the adhesive with a brush or roller. If the glue is packaged in a tube, you can apply it in one or two (depending on the thickness of the shield) strips. The instructions are due to the fact that pressing the workpieces will still distribute the glue evenly over the entire surface;
- We turn the plots into the working position and squeeze them with a clamp or wedge them. When using a homemade press, do not forget to ensure that the workpieces are pressed in the plane of the future shield;
- Carefully remove the squeezed out glue and immediately rub the surface with fine sawdust. They will fill small cracks and irregularities, making the plane of the shield smoother;
- Dry until the glue reaches full strength;
Equipment for the production of furniture panels
The composition of the equipment is selected depending on the scale of production. To produce small volumes of furniture panels from ready-made boards, a small kit is sufficient, which will include:
- a circular saw (for example, Warrior W0206 worth about 90 thousand rubles) with a set of replacement saws (on average 5-6 thousand rubles per piece) for cutting boards into lamellas;
- thickness planer (various modifications of the same Warrior will cost from 65 to 150 thousand rubles, depending on the set of options) for cutting boards and finishing boards;
- clamps for fixing the structure while the glue dries (on average 500-800 rubles per piece);
- consumables - brushes, tools for grinding, polishing, glue, etc.
Additionally, you can purchase an installation for removing sawdust (about 21 thousand rubles).
A full-scale line for the production of furniture panels will require more serious equipment.
To prepare raw materials:
- hydraulic manipulator for unloading forest (700 thousand - 1.5 million rubles);
- band sawmill for cutting logs into boards (on average from 150 thousand rubles).
For the production of furniture panels:
- tenon cutting machine;
- grinding and calibrating machine;
- belt dividing machine;
- sharpening machine;
- four-sided machine;
- fan band for gluing the shield;
- format cutting machine;
- drying chamber for wood preparation (vacuum, convector or aerodynamic type).
The cost of such lines starts from 3 million rubles. and depends on the configuration of the specific complex.
For package:
- Packaging machine (from 250 thousand rubles).
If the entrepreneur has experience in the industry, it may make sense to put together a set of equipment from machines from different manufacturers, including using used equipment. However, if you have enough funds, it is better to order the line from one supplier. In this case, the contractor will perform installation, commissioning and provide warranty service.
Do-it-yourself embossed furniture panel: technology, photo, video
Quite often, a furniture board is required for work - this is a wood material used for the production of furniture or decorative elements, usually glued from a set of rectangular blanks, and these blanks are glued together at the ends so that the board is a flat area material. There are a lot of options for assembling shields - this includes simple end gluing and assembly with various dowels and dovetails. In this article we will talk about the manufacture of a not quite ordinary shield, or rather, about its further processing.
Product Features and Benefits
A furniture panel is a structure made of wood in the shape of a square or rectangle. It is made by gluing together individual planed bars in width (usually) or length. The width of the elements is 10-50 mm. As a rule, pine, spruce, larch, oak, beech, ash, birch and maple wood are used to make laminated boards. The products are successfully used as an environmentally friendly, durable and functional replacement for chipboard in the manufacture of cabinet and modular furniture, countertops, stairs, window sills, decorative and building elements.
Compared to other slab structures, furniture panels have a number of advantages:
- increased strength and durability compared to the same indicators for products made from chipboard and MDF;
- maintainability (damaged parts are relatively easily restored without requiring replacement);
- environmental friendliness, hygroscopicity, the ability to create a favorable microclimate in the room;
- high compatibility with other materials;
- excellent grinding quality, allowing the use of a wide variety of coating compounds;
- ease of making threaded connections, special cut shapes, grooves for complex fittings;
- presentable, expensive appearance, wide choice of design options.
Depending on the quality of the wood material used in production, furniture panels can belong to one of the grades - from “A” to “C”. Since the grade is determined on two sides, the marking of the finished product may contain the following designations: A/A, A/B, A/C, B/B, B/C, C/C. They are decrypted this way:
- Grade "A". The bars in the product are arranged in accordance with the pattern and shade of the wood, have a uniform structure, and do not contain defects.
- Grade "B". When arranging the bars, only the shade is taken into account, but not the pattern, the texture is uniform, there are no defects.
- Grade "C". When arranging the bars, pattern, shade and texture are not taken into account; knots up to 5 mm and sapwood are allowed.
Mechanical damage in all of the above cases is considered defective.
The furniture panel can have different configurations. Most manufacturers focus on the production of two types of structures - single-layer (solid, solid-lamella or monoblock) and multi-layer glued panels. The first is produced with a thickness of 14-60 mm from slats, boards or timber with a width of 18 mm. The elements are spliced together with an adhesive connection from solid lamellas in one layer parallel to the direction of the fibers. A multi-layer furniture panel (spliced) consists of two front sides, made of lamellas, spliced together along the length, between which there may be 1, 3 or 5 intermediate layers of lath and plywood (depending on the specifics of production). They are also glued together in thickness and can collectively reach a width of 60 mm (less often - 75 mm).
The maximum dimensions of a furniture panel are up to 10 m for solid-lamella products, and up to 5 m for jointed products. The minimum size of products from most manufacturers is 50x100 mm, but there is always the possibility of individual execution according to customer requirements.
Shield manufacturing technology
Let's divide all our work into two main stages:
Shield assembly
In fact, at this stage everything is quite standard and there is probably nothing particularly fundamentally new here, but, nevertheless, let’s go over the standard technology one more time.
We dissolve the array into blanks
The standard and simplest procedure is to cut workpieces of the required size on a circular saw.
Leveling the height of the workpieces
We pass our workpieces through a thicknesser to level their height and make the surfaces as parallel as possible.
Planing the ends
We plan the ends on a jointing machine, since minimal gaps and tight fit of the workpieces to each other are important for gluing.
Marking the studs
We make markings for future grooves for tenons.
I cut the grooves for the tenons
Using a grinder with a saw blade and a device for cutting grooves, we make the appropriate grooves for further gluing on the tenons.
Shield gluing
We assemble the shield on spikes and glue the ends with wood glue.
Shield fixation
And, as always, we need to tighten our entire structure very well with clamps to ensure minimal gaps and a tight fit of the gluing planes. It is also important to pay attention to the fact that at the moment of fixation the shield does not move or bend in an arc. To do this, we fix it with many clamps in different planes.
Giving relief to the shield
Primary processing of the shield
After the glue has dried, it is recommended to remove the remaining glue and run our workpiece again on a surface planer to level out all the steps and distortions. Then we grind, for example, with an eccentric sander.
Preparing a circular
And now the fun part begins - let’s start sawing crosswise on a circular saw. To do this, you need to make a parallel (even perpendicular!) stop that will go not along the saw blade, but across it. Since such an element, of course, is not provided for in the standard configurations of circular saws, we will therefore make it ourselves from a simple board pressed with clamps to the saw table.
Drank at close range
It is necessary to make a small cut in a homemade stop.
Making the relief of the shield
Now you gradually need to start grinding down the outer part of the board, moving the workpiece across the saw blade. Each time you increase the reach of the saw blade, the volume of wood removed will correspondingly increase, forming the relief. This operation must be carried out sequentially on each side of the workpiece to ensure uniform removal of volumes. Below are several photographs from different angles to make everything completely clear.
Shield surface treatment
Next you need to sand the surface. It’s better and easier to do this by hand using sandpaper on a block.
Then we cover the surface with a chemical composition - these can be varnishes (glossy or matte), impregnations, tinting stains, etc. - the choice of impregnating composition is the topic of a separate article.
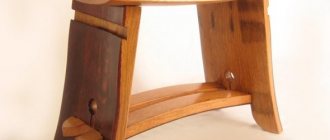
The relief furniture panel is ready.
Production technology
Furniture board is a wood sheet material of square or rectangular shape, glued together along the width and length. It is made from logs of larch, oak, pine, spruce, ash and other species. The average cost of wood is 3-5 thousand rubles per 1 cubic meter. m.
When producing furniture panels, it is necessary to strictly observe all technological operations so that the product meets all norms and standards.
Depending on the scope of application, furniture panels are manufactured:
- Multi-layered. This product is distinguished by the presence of two front sides and several internal layers.
- Single layer. In this case, boards, slats and bars are glued along the wood grain. The result is a shield with a thickness of 1.5 to 6 cm.
Important! To produce high-quality raw materials, it is necessary to choose wood without any defects, excess moisture or structural disturbances.
The main stages of technological production of furniture panels include:
- Drying boards. It is important here that the material has the required percentage of humidity.
- Cross cutting.
- Trimming and cutting.
- Pre-planing.
- Sorting and trimming.
- Splice.
- Planing.
- Gluing.
- Formatting.
- Grinding.
- Packaging.
To perform all the above operations, it is necessary to purchase special machines and equipment.
Operations
Basic operations in the manufacture of high-quality furniture panels.
Drying lumber . It is carried out in three stages:
- preliminary – in the fresh air;
- in a drying chamber at an air temperature of more than 100 degrees;
- the third stage is uniform cooling after evaporation.
Important! After drying the material, the wood moisture content should be 9-11%.
Cross cutting and facing . The final cost of raw materials depends on the quality of this operation. Well-dried wood is cut. Trimming of the material is carried out on cross-cutting machines with a lower saw position.
Trimming and cutting . At this stage of production, the material is cut longitudinally into narrow pieces. Simple edge saws are suitable for this operation.
Preliminary planing . A certain top layer is removed from the material on four sides. This helps assess the quality of the wood and the direction of its grain.
Trimming and sorting . Wood defects (blue stains, knots) are removed and the length of future blanks is determined. Next, the blanks are sorted by color, texture, and length. This operation can be carried out manually or be automated.
Splicing . This operation makes production virtually waste-free. Even small blanks, from 15 to 30 cm long, go into production. Splicing is done on a vertical or horizontal tenon.
Advice! For further use of products in furniture making, the second option is more suitable.
Planing . At this stage, glue residues are removed from the lumber, differences between the glued lamellas are removed, and precise geometric parameters are given.
Gluing . Glue is applied to the narrow side of the finished and processed lamellas, and the blanks are joined into a shield. The glue is applied to only one side of the slats. Next, the products are loaded into the press.
Formatting . At this stage, the furniture panel is cut to final size in length and width. In production, a special double cross-cutting machine is used for this.
Grinding . During this operation, glue residues are removed from the lumber, the size of the material is controlled by thickness, and the surfaces are finished sanded. Sanding of furniture panels is carried out using a wide-belt sanding machine.
Package . After final grinding of the material, it is packaged in heat-shrinkable polyethylene film, which protects the product from contamination and various negative factors.
Manufacturing rules
To eliminate mistakes in the production of furniture panels, you need to know the rules for their manufacture:
- wooden boards are pre-cut into bars of the required size;
- there should be no defects or irregularities on the lumber, since in the future it will simply be impossible to glue the board into a single structure;
- if distortions are detected, they must be removed on a planing machine;
- The glued workpieces must be of the same texture, texture and color.
Final processing
Furniture panels should not only be strong, durable and environmentally friendly, but also attractive in appearance. For this purpose, during their production, special attention is paid to the finishing processing of materials:
- Pre-grinding. This process helps eliminate defects and differences in lumber;
- Secondary processing. At this stage, the slightest differences, irregularities and defects are removed.
Wood gluing
Wood gluing
In the manufacture of blanks for decoupage, brushing and other types of arts and crafts, a large number of different methods of gluing wood are widely used.
Wooden panels from blocks are glued together, parts are glued into product units, fittings are glued to products, and so on.
Why are not thinly sawn wooden boards used in the blanks, but boards are glued together? To gain the required width of the material, and most importantly, so that the plane does not move under the influence of water-based paints and varnishes and during further use!
As for the finished blanks made of pine and plywood: of course, wooden products can also be assembled using nails, but who is interested in protruding caps on the lid of the box and the risk that the product will eventually become loose and be brought in for repairs?! An adhesive joint with PVA-based wood glue, which is non-toxic, fireproof and diluted with water, will reliably retain the shape of the wooden product throughout its entire service life.
How to properly glue wooden surfaces?
High-quality gluing is achieved by observing several very important rules.
1) Before gluing wooden panels, the material (in our case it is pine) must be well dried. For carpentry work, wood moisture content is recommended at 6-7%. With higher humidity, there is a high probability of cracks forming at the gluing points and loss of the original geometric shape of the wood.
2) The surfaces to be glued must be smooth. This is achieved by jointing* wood, milling, thicknessing**.
3) The glue is applied to the surfaces to be glued in an even layer. After applying the glue, it is necessary to tighten (clamp) the parts to be glued well. Carpenter's clamps or clamps will help with this. Wires*** or screw clamps**** are suitable for gluing panels. For gluing volumetric products, quick-release and belt clamps are used.
How to make a furniture panel. Gluing furniture panels
Currently, furniture made independently from natural materials is very widespread. Furniture panels are often used to create such fittings. After all, it has many advantages over similar samples, such as MDF and chipboard, and is distinguished by its practicality and presentable appearance.
People making furniture for the first time are wondering: where to buy the right furniture panel? It happens that the samples provided in stores are not always suitable for the intended design. Experienced craftsmen almost always have wooden boards available. Using them, you can, without much effort, build a furniture panel yourself, relying on the basics of manufacturing technology.
You will need glue, tools and a certain procedure.
WHAT YOU NEED TO GLUE WOODEN BOARDS INTO A SHIELD
- Plane;
- A circular saw;
- Clamps;
- Hammer;
- Gauge for marking;
- Measuring and drawing instruments;
- Equipment for wood processing (surface grinding and belt units). If they are not available, then you can use sandpaper, but then leveling will take longer;
- Wood material;
- Wood glue;
- Electric planer.
IMPORTANT: You need to use good glue to ensure that the boards are joined together well.
- Impeccable high-quality wood glue Kleiberit 303.2. It has excellent moisture resistance and is characterized by powerful fixation. Suitable for both indoor and outdoor use, for gluing various types of wood. Product price starts from 6,600 rubles per unit of 28 kg.
- Kleiberit pur-glue 501. Excellent quality glue suitable for all types of wood, slabs, and ceramics.
TIPS - HOW TO CREATE A SHIELD WITHOUT CLAMPS AND VIMS
After preparing the necessary equipment, tools and choosing glue, we get to work. Shield gluing includes the following points:
Preparation of material
Pine, oak, birch, aspen, ash and deciduous wood will be the basis for the production of products.
We select the material that is smooth, dried, and without unevenness. It is advisable to purchase ready-made bars and cut them into pieces of the appropriate format at an angle of 90 degrees. Roughness on parts can be removed using a planer. We take into account the following nuances: after fastening and drying the boards, we refine them by sanding, so initially the thickness of the parts is a couple of mm larger than the final dimensions of the shield. Accordingly, we select the product in the ratio of width and thickness as 3:1. During drying, we use wood no wider than 15 centimeters, so that unnecessary stress does not arise.
Preparing for work
We adjust the boards in advance so that the product meets expectations.
- Prepare a flat surface. A chipboard sheet is perfect.
- We attach dies to the edges of the chipboard, adjusting their height relative to the height of the workpieces.
- We place the parts between the planks close to each other. The cracks can be removed with a jointer. Please note that if the lines of adjacent blanks are connected, the shield will look perfect. In case of adjusting the lines, move the boards along the length.
- Don't forget to mark or label all the parts for successful assembly of the shield.
Shield gluing
After fitting, we glue the parts together.
- We cover the product with glue in sufficient quantity, avoiding excess and lack of glue, which will negatively affect the reliability of the shield.
- We press the smeared parts together one by one.
- To these planks, located on both sides of the chipboard, we add two more planks at an angle of 90 degrees, and secure them with self-tapping screws so that the structure does not bend.
- Use wedges to improve the fixation of the bars. Press the boards so hard that droplets of glue appear.
- Dry the product for about an hour and remove it from the surface of the DPS sheet.
How long does it take for furniture board to dry?
The glued furniture board should be left to dry for at least a day.
Selection and preparation of material
The finished furniture board should preserve the wood pattern and natural texture.
When planning to make any piece of furniture, you need to choose the right material. Typically, furniture panels with a thickness of 2 cm (or 20 mm) are used in production. This means that at home it is necessary to make blanks of similar thickness. This is where the difficulties begin: boards with a total thickness of 20 mm are not suitable for gluing the shield. Even the most ideal wood will require additional processing when gluing. It will need to be planed or sanded. Therefore, it is necessary to take boards with a reserve.
The best option for making furniture panels is boards with a thickness of 2.5 cm. An allowance of 0.5 cm is removed in 2 steps: when processing surface defects before gluing and when finishing after it. Thus, the workpiece is brought to a thickness of 2 cm.
When choosing a material, you should immediately discard warped or uneven wood. It is better to cut blanks from a solid board at least 5 cm thick: by sawing it lengthwise into 2 parts, you will get boards with the same color and texture. It is also necessary to pay attention to the length of the workpieces. It should have a margin of 2 to 5 cm, which will allow for high-quality processing of the end sections of glued boards.
To make the material with your own hands at home, you need to prepare the usual carpentry tools:
Device of a machine for gluing workpieces.
- planer or jointer;
- surface and belt sanders;
- coarse sandpaper;
- level;
- corner;
- machine for gluing blanks.
You will also need to prepare the wood from which the bars will be cut. It is better if it is wood species such as pine, aspen, birch or oak. Each furniture panel is made from bars of the same type. Typically, the dimensions of the bars have a width-to-thickness ratio of 1:1, but other dimensions can be used, for example, 1:3.