Making furniture with your own hands brings considerable savings in money. Basically, laminated chipboard, a material glued together from sawdust, is used for this purpose.
The main task of furniture edges is lining the end surfaces of laminated chipboards.
After cutting, its edges have an unattractive appearance and require further processing.
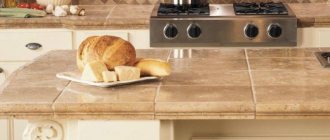
The tabletop is the most vulnerable element of furniture, and its edge must be given special attention.
Types of finishing
At the moment, there are several ways to give the ends of the tabletop an aesthetic appearance. Only 2 of them are suitable for making edges at home:
- Covering with melamine tape. Glue applied to the tape itself simplifies the process, but the resulting edge is susceptible to moisture and is not resistant to mechanical stress.
Today it is the cheapest and most accessible, therefore it is very often used in furniture production. - PVC strip trim. Requires more expense, but the edges are stronger.
Quite a popular furniture edge for cladding the end surfaces of laminated chipboards. All thanks to the ideal price-quality ratio.
Why treat a chipboard countertop?
Everyone has probably heard that water is the main enemy of particle boards. Therefore, proper processing of chipboard countertops has a decisive influence on its service life.
In addition, not only the durability of the kitchen, but also the health of its owners depends on the quality of sealing of the ends, cuts and seams.
The lamination process thus performs two functions:
- increases the strength properties of the slab and its water resistance;
- creates a barrier layer that prevents air pollution in the apartment by harmful substances.
The fact is that the binding component of the wood fraction in chipboard is phenol-formaldehyde resins, which during operation emit formaldehyde, a substance harmful to health, into the air.
As a result, the initial material produced by the manufacturer is laminated chipboard, which is characterized by both moisture resistance and 1st emission class, that is, absolute safety for the environment.
However, in the process of making a tabletop, the blades are cut and various technological holes are cut. Here you have a “gate” that works simultaneously for entry and exit. As they say, “welcome moisture” and “goodbye formaldehyde.” This is why it is so important to carefully insulate all exposed areas of the laminate.
Applicable edges
Modern technologies make it possible to produce various edges. However, not all are suitable for gluing at home. Melamine tapes are produced in widths of 19-54 mm. With a thickness of 0.2-0.4 mm, they allow you to refine the edges of countertops of various shapes.
A large assortment of decors, which, in terms of color, closely match the chipboard.
A PVC strip of the same width may be slightly thicker. For gluing the ends of the tabletop, edges are produced with or without an applied adhesive layer.
PVC plastic obtained by extrusion is able to withstand temperatures from minus 10 to plus 50 degrees.
Types of edges for wood countertops
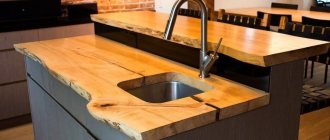
Wooden countertops are very popular as they are a classic option and fit perfectly into any interior. They are environmentally friendly, harmless, do not have a negative impact on human health, and if the rules of care are followed, they are durable. The edge of the tabletop needs to be processed, as this affects not only its appearance, but also its performance characteristics. There are several options for processing surface edges.
One of the edging methods is the use of a U-shaped overlay profile. It is especially relevant for furniture that is often exposed to moisture. Thanks to its special shape, the profile reliably protects the ends of the tabletop from mechanical damage. Among the advantages, they also note the ability to hide existing defects under it. The overlay profile is not recommended for small countertops, as it visually increases the volume of the surface. The advantages of the product include the possibility of self-installation, and, if necessary, reconstruction of part of the edge.
Edges made of ABS, which do not contain chlorine, are considered the most resistant to damage, which increases the safety of using the material. The product is elastic and can be easily installed on various surfaces. ABS edges have a fairly high price, which is justified by their durability. Wooden countertops can also be processed with products made from melamine, PVC, veneer and other materials.
Edges for countertops made of LSDP
The edges of countertops made from LSDP are made of various materials. Among them are:
- melamine;
- PVC;
- acrylic;
- ABS;
- profiles;
- PVC edging.
Edging the end portion of countertops is performed for a number of reasons. This is not only the aesthetic appeal of the interior item, but also its environmental safety. The edge protects the product from negative influences and extends its service life. Countertops with raw edges wear out faster as they are often damaged.
The edge of a countertop made of natural or artificial stone can be processed both at the stage of manufacturing the kitchen set and later. There are various shapes of edges, the choice of which depends on the preferences of the owners and the functionality of the furniture. In addition to processing the edges with special technologies, you can choose an edge that will be glued directly to the end of the tabletop. It is made of PVC, ABS, plastic, veneer and other materials. Furniture edges come in a variety of colors and textures, so they will look harmonious on any surface. They are easy to install and do not require special maintenance.
Video: Oil for work surfaces on larch
This material is devoted to waterproofing the ends of laminated chipboards. To a greater extent, it is relevant for protecting the countertop from water, but when assembling furniture for the bathroom or kitchen, it would also be useful to treat the ends of the parts that make up the box.
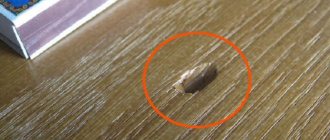
As can be seen from the structure of the laminated chipboard, the part most exposed to moisture is the saw cut unprotected by the laminate. When water gets on it, sawdust swells and the part becomes deformed. I will say right away that moisture-resistant laminated chipboard (green polymer sawdust is visible on the cut) is not a panacea - for an experiment, throw a piece of such chipboard into a bucket of water... So for it, waterproofing issues are just as relevant, although to a lesser extent.
So, let's look at various protective techniques - their advantages and disadvantages.
1. Edge banding
(kitchen countertops are often sealed at the edges with simple PVC or melamine).
To be honest, this technique does not greatly protect the chipboard from swelling - water penetrates into the joint between the edge and the laminate and does its dirty work. It is not suitable as a means of waterproofing
(see photo 1).
2. —
due to the fact that the edging has overhangs that extend slightly onto the surface of the laminate, the joints, which were so defenseless in the previous version, become more closed, and therefore
provide better waterproofing.
But isolated, that is, without the use of sealing compounds, its effectiveness is clearly insufficient. 3. Silicone sealant -
can be used both in isolation and in
in combination with other techniques (processing the ends under edging or decorative end strips).
In addition, you can coat the ends of the laminated chipboard in the boxes with sealant in the places of the ties (those that are not covered with an edge); after tightening the joint, it is necessary to remove the squeezed out excess sealant with a rag - after the silicone dries, the box will be more airtight. Silicone should be used sanitary, that is, with protection against fungus. A “sausage” of sealant is squeezed out of the tube onto the end, and then smeared with a spatula or finger.
I would also like to note that the edge does not stick to silicone, and if it does, it doesn’t stick for long!
4. Treatment with Aquastop -
An excellent alternative to sealant. Apply with a brush twice. After complete drying, it forms a layer on which you can even glue the edge (according to furniture makers - I haven’t tried it myself).
5. Paraffin treatment -
This is an old-fashioned, but nevertheless extremely effective method of waterproofing.
The method looks like this: we put the part on the end, masking tape is glued to both sides of the laminate (so that the end looks like it has sides), then we take a candle and use a hairdryer to melt the paraffin, pouring it into the resulting groove so that it spreads in an even layer over the surface of the end ). And we continue to warm it up. In this case, paraffin will be absorbed into the chipboard like water. Processing is carried out at least twice. After this, we pour paraffin on the end, but do not fry it, so that it hardens, forming a protective layer. Excess is removed with a knife. A cut of the laminate shows that paraffin penetrates into the material to a depth of at least 3-4 mm, which provides excellent, but again not 100% waterproofing.
The main disadvantages of this technique are the labor intensity and, again, the impossibility of gluing the edges.
The varnished surface of the table is very aesthetically pleasing, practical, and also functional. A layer of varnish helps protect the surface and also prevents destruction, as it protects the wood well from moisture and other damage. Varnishing is especially important for worktops in the kitchen - wooden countertops are constantly exposed to mechanical stress and moisture. Let's see what varnish is used for a wooden table, how to properly prepare a wooden surface, and also how to apply the varnish correctly.
Kitchen and other furniture is made mainly of wood. The wood can be natural or it can be various materials made from shavings - MDF, chipboard, fiberboard and others. Tables can be without any coating or the surface can be treated with paints and varnishes.
Among the main advantages of wood are high thermal insulation, attractive and aesthetic appearance, a huge number of shapes, and ease of restoration. Along with the advantages, there are also disadvantages - wooden surfaces become dirty very quickly, the material is quite flammable, and is easily scratched due to even minor mechanical damage.
Also, the disadvantages include the high price of countertops made of natural wood.
An ordinary kitchen countertop, used in most kitchen sets, is a sheet of chipboard covered with a special wear-resistant plastic on top. The bottom and ends of the tabletop do not have such a coating. If the bottom of the tabletop is hidden from view and should not have any special coatings, then the ends of the tabletop need to be treated for several reasons: protection from water, strong heat (from the hob), and decorative function. The ends are processed in two ways: by gluing a special edge for the table top, or by installing a metal end strip. Let's consider the second method in detail.
Tools and materials needed to install the end strip:
- Phillips screwdriver No. 1.
- Metal drill with a diameter of 8 mm (if necessary).
- Metal drill with a diameter of 4.5-5.0 mm (if necessary).
- Hacksaw for metal.
- File with fine notches.
- Transparent silicone sealant (colorless).
- Self-tapping screws 3.0×16 mm (3 pcs. for each end strip).
To correctly install the end strip on the countertop, firstly, you need to choose the right end strip itself. The end strips differ in height, that is, the thickness of the tabletop for which they are intended (28 or 38 mm), the radius of the overhang (3 or 6 mm) and the type of plank coating (matte or glossy). Sometimes there are “left” and “right” end strips for installation on the left and right end of the tabletop, respectively (nowadays almost all end strips are made universal, installed on any side). Below in the photo you can see the entire simple process of installing a universal end strip on a 28 mm thick tabletop. The main thing is to thoroughly treat the end of the countertop with silicone sealant, similar to treating the cut of the countertop when installing a sink.
Step 1. Clean the end of the tabletop from dust, apply silicone sealant.
The end of the tabletop is cleaned of dust.
Apply silicone sealant to the end of the countertop. Cover the entire end with an even layer.
Step 2. Apply silicone sealant to the end strip, fastening the strip with self-tapping screws.
Apply a strip of sealant to the L-shaped edge. We apply the plank to the end of the tabletop, align the plank flush with the front overhang of the tabletop (the protrusion of the plank is allowed no more than 1 mm) and press the plank down so that the side is pressed tightly against the plastic of the tabletop (the sealant should be squeezed out from under the side).
Apply silicone sealant to the side of the plank.
If the holes on the end plate have insufficient countersink width for the screw head (this is usually the case), then you need to carefully (using a drill with a diameter of 8 mm) expand the countersink so that the screw is recessed flush. We tighten all the screws one by one, making sure that the bar does not move from its place.
We fasten the bar with 3.0×16 mm self-tapping screws.
If the end strip is installed on a tabletop of smaller width (less than the standard 600 mm), then it is necessary to drill additional (new) holes in the right places with a 4.5-5.0 mm drill, followed by countersinking.
Step 3. Trimming the plank, finishing.
Using a hacksaw, cut the strip flush with the back overhang of the tabletop. We process the cut with a file. Use a clean cloth to remove excess sealant from all sides.
We cut off the strip with a hacksaw.
We process the cut of the plank with a file.
The cut of the plank has been processed.
The end strip is installed.
There is no need to wait for the sealant to cure; you can use the countertop immediately. The end of the tabletop is reliably protected by a metal end strip from water, high temperature and mechanical damage.
Similar articles:
- DIY kitchen table
- Connecting tabletops at a 90 degree angle
- Installation of a built-in kitchen sink