A bathroom is not just a place where there is a bathtub. In addition to it, there is often a sink intended for washing; moreover, it is a good interior element, which should have a decent frame in the form of a cabinet. The cabinet itself will not only decorate the room, but will also provide the ability to store various bottles and household cleaning products. You can buy it, or you can make it yourself. How to make a bathroom vanity cabinet with your own hands?
DIY bathroom vanity cabinet
Buy or make it yourself?
You always want to make your bathroom not only beautiful, but also functional. And well-chosen furniture and other interior items will help with this. As a rule, a lot of bottles, jars, and rags are always stored in this room, which are needed not only for taking care of yourself and your appearance, but also for cleaning the premises. And when it’s all just put together haphazardly and using whatever, the picture turns out to be unflattering. It is much better to use some kind of furniture to store items.
Small cabinet under the washbasin - DIY options
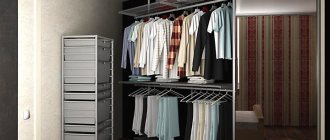
One of these interior items is just a cabinet under the sink. Usually it not only hides the drain running from the sink itself to the sewer pipes, but also has a lot of shelves hidden behind the doors. And on these shelves you can put all kinds of bottles and boxes - there they will not be conspicuous and disturb anyone with their presence.
Of course, the easiest way is to just buy a sink cabinet. Nowadays all kinds of products are produced from a variety of materials, having any shapes and sizes. But it cannot be denied that our apartments are such that they do not always meet any standards. And for this reason, choosing a cabinet for a sink is often not easy. In this case, you should just think about doing it yourself.
Built-in vanity unit
On a note! The question arises - why not order a cabinet from a professional? The answer is simple - not everyone can afford to pay for an expensive custom-made designer item. Sometimes it is much cheaper and easier to do everything yourself. But you will have to spend your personal time. Plus, private craftsmen can be very busy with work, and they will have to wait for more than one month for their cabinet.
It is important to understand that not everyone can make a cabinet - you need to have certain work skills. But if there is a desire, then even a beginner will definitely succeed in creating a cabinet. You just need to put in more effort and study all the necessary information in advance. And it’s better to choose a model that is as simple as possible - complex options may not work out the first time without the proper skills.
Cabinet with drawers under the sink
Types of cabinets
Cabinets can have not only different sizes, but also different shapes. They can also be divided into several types depending on the method of their installation and location.
Cabinets may be different
Table. Varieties of sink cabinets depending on the installation method.
| View | Description |
| Floor | This is the most popular model, and its popularity is due to the versatility of products in this category. Such cabinets are distinguished by their stability and simplicity of design, and you can also place fairly heavy objects in them, since there is no risk of collapse. Typically, such products have legs or a base. Often they can be additionally fixed on the wall, which increases their reliability. Models can completely close communications. But they are unlikely to be suitable for modest-sized bathrooms, as they occupy quite a large space. However, with the right selection of models, they will look good and be useful. But putting a washing machine in a bathroom with such a cabinet can be problematic. |
| Hanging | These are, as a rule, very interesting and light-looking models that take up very little space, as they are located directly under the sink itself. They are especially relevant in small rooms and where plumbing does not allow the installation of a monolithic floor structure. However, the wall on which such a cabinet is fixed must be strong and reliable. Also, usually you cannot put heavy objects in such furniture. They are more difficult to install than floor-mounted ones, which often discourages the choice of such a model. But, nevertheless, this is also a popular form. |
| Corner | It is easy to guess that such cabinets are installed in the corner of the room. Moreover, they can be both floor-mounted and suspended. Allows you to save free space and decorate the interior. The optimal solution for small spaces. The cavity of such a cabinet is usually very spacious and allows you to hide many things and objects from prying eyes. |
Hanging cabinet
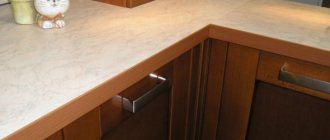
Also, cabinets can be divided into two types depending on the type of bowl of the sink itself. Thus, they distinguish cabinets for a mortise sink, when the thicket itself is installed on the upper surface of the cabinet by cutting out a cavity in it for it. Here it is important to take into account the fact that the plumbing product fits tightly to the edges of the cabinet , and the hole for it is accurate. Otherwise, unsightly gaps may form.
There are also cabinets for an overhead sink. Such a bowl is installed on top of the furniture itself - a small barrier is created on the countertop from the boundaries of the sink.
There is a wide range of different and interesting models of sink cabinets on sale.
Prices for vanity units
Vanity cabinet
On a note! There are also so-called consolidated washbasins. They are connected to the cabinet itself, representing a solid structure. You won’t be able to do this yourself, except in rare cases, and then only with a high level of skill.
Materials for cabinets
In general, vanity cabinets can be made from a wide variety of materials, differing in appearance and physical characteristics. The correct choice of material greatly influences the possibility of making a homemade cabinet and its final service life. So, this type of furniture can be made of MDF, wood, plasterboard, glass, plastic, metal, ceramics. The latter option will not be considered, since it is unlikely that it will be possible to make a ceramic product of suitable shape and parameters at home. So we will talk about materials that are simpler and more accessible to work with.
Photo of a beautiful and original bedside table
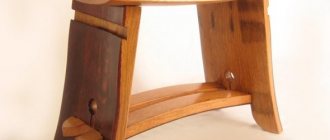
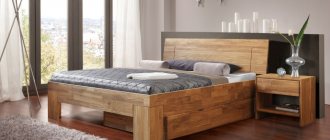
So, wood is an indispensable type of material for creating homemade furniture . It is characterized by ease of processing, long service life, and environmental friendliness. But it is important to understand that in conditions of high humidity, this material quickly loses its appearance and becomes unusable. Therefore, when using wood to create a sink cabinet, it is important to consider that it must be treated with protective compounds that will not allow mold and mildew to develop and can protect the wood from quickly losing its beautiful appearance.
Finished countertop in the bathroom
Also, instead of natural wood, its derivatives can be used. For example, MDF is a material that is less susceptible to moisture than natural wood . Also, such panels can have absolutely any color, which allows them to be used to create furniture for any interior. Working with the material is not much more difficult than working with natural wood.
Glass is not easy to work with, and sink cabinets are rarely made from it. This is a fairly fragile material. But metal or wooden structures can be used as a frame for glass facades and doors. But glass is not afraid of water, and if treated with care, such a cabinet will last a long time.
Glass bathroom vanity with sink
Plastic cabinets are usually not made by hand, but bought ready-made in a store. But it is important to understand that such structures are not highly durable, and they either need to be further strengthened or used carefully. But plastic, like glass, is not afraid of water.
If we talk about drywall, then cabinets are made from it, and then they are lined with some kind of material. It is easy and pleasant to work with, but it does not like water and is not suitable for use in rooms where the humidity level is very high. It is also better to additionally strengthen the plasterboard cabinet with a frame made of a more reliable material, given that the weight of the sink itself is quite large. But in general, creating such a cabinet will not cost much, and it can be done quickly.
Plasterboard tiling
Advice! By combining different materials, you can get a durable, high-quality, reliable and, of course, beautiful product.
Choosing an undermount sink
How to choose the right undermount sink? First of all, decide on its dimensions: here you need to take into account the surface area into which the bowl will be built. To ensure that the sink holds securely, when cutting a hole in the countertop, you cannot make an indentation from the edges of less than 50 mm. An edge that is too thin may crack under load, and everything will have to be repaired. So before purchasing, be sure to measure the width and length of the countertop or cabinet lid - this will allow you to accurately select the dimensions of the bowl.
The dimensions of built-in sinks are indicated in the product data sheet
If your family is large and you often have to wait in line at the sink, pay attention to double sinks. This option is much more convenient than single models, and in design is absolutely in no way inferior to them. Double bowls are produced in a wide range; you can find square, oval, round, asymmetrical models from the most budget to the most expensive and exclusive. They are installed in exactly the same way as standard sinks, except that the hole is cut larger.
Double sink
All plumbing in the bathroom should be in harmony with each other, and the best option is to buy a bathtub, toilet and sink from the same series. If the sink is purchased separately (for example, forced replacement due to damage), try to select a model from the same material and similar in design and color.
Uniform color scheme in the design of the bathroom, sink, toilet, washing machine
Example of finishing a bathroom
A wonderful combination of a metal bowl with a touch of mosaic on the walls
Be sure to consider the location of the mixer. If its installation on the bowl body is not provided, then it will have to be mounted on the countertop, and you need to calculate in advance whether there is enough space there. In those models where the mixer is mounted on a bowl, there may be one or two holes, you also need to pay attention to this.
Sink faucet fixed to countertop
The mixer is mounted on the washbasin bowl itself
Having decided on the model, carefully inspect it and make sure that there are no damages or defects. A high-quality sink should have an even color, the same thickness over the entire area, and a uniform, smooth finish. Various inclusions, stains, and bumps indicate the low quality of the product, and it is not worth buying.
Cladding materials
Depending on the material used, the cabinet may need to be finished with something. That is, you will need to use some additional material. MDF panels do not need this. But simple wooden cabinets, as well as products made from plasterboard and a number of other materials, need beautiful design. The following can be used as facing material.
- Ceramics , if the base is dense and hard enough. Then the cabinet can be made the same color as the walls or floor.
- Adhesive film or self-adhesive film . This material is not the best option, but it is easy to use and comes in a variety of colors. Unfortunately, film is not a durable and strong material. Also, when gluing the surfaces of the cabinet, it is important to ensure that bubbles do not form.
- Varnish or paint are ideal materials for wood. Allows you to create a unique design. It is important to apply the paintwork material correctly, otherwise it will look cheap.
- Veneer is the material that will allow you to turn a homemade cabinet into a real masterpiece. This is a thin sheet of wood painted in a certain color. Also, like ceramics, it can additionally protect surfaces from exposure to water.
DIY bathroom countertop
Popular design ideas
Monolithic design
Fashionable design solutions for bathroom interiors:
- Shells are selected depending on the wishes of the owner. They can be symmetrical or asymmetrical. Double sinks, which are mounted into the countertop or located above it, are popular.
- Use of a single color and material. The requirement applies to the design of all surfaces: walls, ceilings, furniture. More often they stop at pale shades. When choosing a dark color scheme, be sure to add light spots: plumbing fixtures, lamps or decorative elements. Otherwise the room will be gloomy.
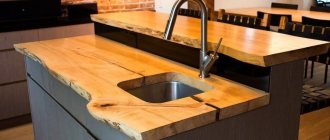
- The popularity of monolithic countertops with a sink is growing. They look stylish and easily fit into any design.
Depending on the cost, they buy a budget model in a retail chain or choose individual production to order. Designer products are more expensive.
Tips for choosing a model
Before you start making a cabinet, it is important to decide what shape and size it will be. In many ways, its parameters will be determined depending on the place where it will be located, as well as on the size of the room and the wishes of the master.
Washbasin
It is important to consider that if the bathroom already has a sink, then a cabinet can be made under it, if it is not equipped with one initially. In this case, the easiest way is to make a floor structure. If the sink is in the corner, then it is easier to make a corner-shaped cabinet.
The size and shape of the cabinet can be affected by the installation of plumbing lines. Sometimes they can be hidden behind furniture or, on the contrary, you will have to select furniture so that the plumbing does not become an obstacle to its installation. In many ways, the size of the bathroom itself can influence the parameters of the cabinet. If shelves are planned in the cabinet, then even before installing them you need to understand whether the pipes are in the way. If they interfere, then the shelves will need to be adjusted to fit or cutouts made in them for communications.
Making a bathroom countertop from plasterboard
Advice! Even before work begins, you need to take measurements and decide what size the cabinet will be. It is important to consider whether a washing machine, laundry basket, etc. will be placed nearby. This may affect the final size of the product. The cabinet can be drawn schematically on paper and all the measured parameters obtained can be plotted on the drawing.
Of course, you need to take into account the style of the room. It is important to choose the most suitable color of the material from which it will be made, and also to figure out how it can be decorated.
The laconic design of the cabinet contains the highlight of this interior.
The procedure for making a plasterboard tabletop
The best way to ensure increased moisture resistance of drywall is to cover it with tiles or mosaics. The mosaic countertop in the bathroom also looks great (the photo shows a clear example of this design). A properly selected tile covering can also decorate the product and allow it to fit harmoniously into any interior. An important factor is also the ease of maintenance of a tiled countertop.
Installing a countertop in a bathroom
In addition to tiles and drywall, in constructing a countertop you cannot do without tools (screwdriver, jigsaw, level gauge, ruler, square) and additional materials necessary during the work process:
- load-bearing and guide profiles;
- plasterboard panels;
- fastening elements (tex and self-tapping screws ø 3.5 mm×25 mm).
The ergonomic height of the countertop in the bathroom from the floor level is 800 mm. At this level, a horizontal aluminum profile ud is fixed in a horizontal position, after which a frame for the future tabletop is formed. To support the upper frame of the frame, it is advisable to install an auxiliary support. A piece of drywall is cut out according to the shape and size of the frame, and a hole is cut in the middle of it along the outer contour of the washbasin. The resulting sheet of plasterboard can serve as a template for the bottom plasterboard sheathing of the tabletop. The lower skin is screwed to the metal frame. After this, they move on to installing rigid tabletop supports. On top of the lower skin, in the cutout areas, load-bearing profiles cd are placed, which are then used for rigid fastening of the lower support profiles with self-tapping screws.
Plasterboard countertop in the bathroom
The supports are formed as follows:
- In the places where the cd profiles are attached, guides are attached from below, perpendicular to the wall. The length of the guides should be about a third less than the width of the tabletop. The second and third guides are located: one is perpendicular to the first, down the wall, the other connects the ends of the first and second, forming a rigid structure (bracket). There should be two such structures - on both sides of the cutout for the washbasin. Both brackets are sheathed on all sides using plasterboard.
- The next pair of supporting profiles is mounted with the shelves downwards above the profiles that provide fastening of the braces. The top sheet of drywall is screwed on top. Then close the ends of the tabletop.
- In order for the surfaces of corner joints to be smooth, it is necessary to ensure a smooth transition between the perpendicular planes of drywall, which is almost impossible to do with ceramic tiles. However, there is still a way out - the plasterboard strip is installed on the end, which is to be rounded, and ground off using a knife or plane. However, there is no need to rush. Extra millimeters should be removed carefully to ensure a smooth transition between the planes of drywall. Now the surfaces are almost completely prepared for tiling.
How to make a cabinet under the sink?
The vanity cabinet has several elements. This is a frame that can be made of wooden blocks or metal, as well as the top surface or tabletop where the bowl itself will directly stand. It can be made from any materials, but at home it is easiest to work with wood or MDF. The cabinet also has side walls, and inside there can be shelves, drawers, etc.
The easiest way to make cabinets with your own hands is from wood or MDF, but no one excludes the possibility of creating a structure from plasterboard or using metal. In order to make a cabinet, you may need the following tools:
- jigsaw, hacksaw;
- screwdriver;
- screwdriver;
- drill;
- measuring instruments.
Prices for popular models of jigsaws
Jigsaw
To make a cabinet you will need a number of tools
You will need the material itself from which the cabinet will be made, as well as a sink, self-tapping screws, metal corners and other accessories such as door handles, hinges, etc. Everything needs to be purchased in advance, but only after a decision has been made regarding the material from where the furniture will be made, all measurements were taken and the required amount of materials was calculated.
Important! If the cabinet is wall-mounted, then the wall behind it in the area where its edges meet will need to be beautifully decorated. It is not worth tiling the wall, since the fastening will be done on the wall, and drilling holes in the tile is not easy.
Installation of telescopic guides
DIY bathroom countertop
I chose one of the simplest and most accessible models for self-production; alternative options are available in the video below in this article, and we will build a structure from plasterboard and cover it with mosaic tiles.
Tools – here you will need a full set of tools for installing plasterboard structures, namely:
- Metal scissors;
- Screwdriver;
- Hammer;
- Marker;
- Tape measure, ruler and square;
- Level;
- Knife;
- It is advisable to have a jigsaw;
- Electric drill with impact function or hammer drill;
- Mixing attachment for an electric drill;
- Container for diluting glue and putty from 15 l;
- Pliers;
- Metal and rubber spatulas.
Minimum set of tools and material for installation of plasterboard structures
Materials you will need:
- Self-tapping screws for plasterboard for metal, and it is better to take nickel-plated ones;
- Sheets of plasterboard brand GKLV (moisture resistant) with a thickness of 12.5 mm;
- Ceiling profiles PN (UD) and PP (CD);
- If the wall is block or concrete, then dowel-nails or anchors are needed; for a wooden house, wood screws are sufficient;
- Tiles, in our case segments of small mosaics, mounted on a linen base.
Advice! Instead of moisture-resistant gypsum board sheets, you can use moisture-resistant bakelized plywood (FB or FBS), but its price is higher, plus it is an order of magnitude stronger, so you will have to drill holes to secure the sheet with a self-tapping screw to the base.
| Illustrations | Recommendations |
| Form. We will make a table that is rigidly attached to the wall along the top horizontal and side vertical plates. · Height – 900 mm; · Depth – 530 mm; · Width – 1100 mm. | |
| Apply markings. The markings are applied with a marker along the outer edge of the structure.
| |
| Mounting holes. Step 1. · We mark future holes on the PN profile and drill them with a 6 mm drill, pitch 150 - 200 mm; · We attach the profile to the wall and transfer the markings to the wall; · There is a special drill for tiles, insert it and drill through the tiles. | |
| Step 2. A tile drill will not take concrete or brick, so we change it to a drill with a pobedit tip and drill the hole with a hammer drill to the required depth. If there are no tiles on your wall, then immediately make holes with a hammer drill. | |
| Frame assembly. Step 1. The skeleton of the frame is assembled from PN profiles, and the loaded parts from a paired PP profile. The photo on the left shows how to fold PP profiles. After connection, “bugs” (screws for gypsum plasterboard profiles) are driven in from both sides. | |
| Step 2 . We have a PN profile running along the wall, you can insert a horizontal outer strip into it, and from the opposite outer corner we cut out a bracket from the PN profile and attach it to the corner with a clamp. This bracket is needed to secure the outer bar. | |
| Step 3 . The assembly of the outer frame from PN profiles is completed (yellow arrows indicate it). Now all that remains is to insert reinforcement from paired PP profiles into the frame and secure them with pins (red arrows indicate paired PP profiles). | |
| Installation of gypsum boards. Cut the slabs to size and fasten them with self-tapping screws on both sides of the frame, the fixation step is 100 - 150 mm.
| |
| Sink insert. Step 1. There is almost always a template drawn on the box from under the sink for its installation; you need to cut out this template and use it to mark the installation location on the countertop. | |
| Step 2 . Next, use a jigsaw or a hand saw to cut out a seat for the sink in both sheets of plasterboard at once. | |
| Step 3. We screw the front end of the gypsum board tabletop with self-tapping screws.
| |
| Step 4 . To have a place to put the tiles, we need to sew up the side wall stand with strips of gypsum board. | |
| Step 5 . Cover the inside of the bed under the sink with tile adhesive mixed with sand. | |
| Assembly design. This is what happened in the end. Now we coat all the joints with tile adhesive to get a monolith.
| |
| Tiling. Step 1. · Mix tile adhesive; · Take a notched spatula with a tooth height of 6 mm; · Apply glue to the gypsum board in a continuous layer; · Mosaics are sold on canvas, take the canvas and carefully apply it to the plane.
| |
| Step 2 . To finish an oval bed under a sink, you need to attach the segment with the mosaic to the installation site, mark the edge with a marker and cut it with a grinder. | |
| Step 3 . We use the same technology to finish the ends and legs of the structure. | |
| Step 4. After the glue has hardened, you need to fill the gaps between the tiles. A special grout is sold for this; you need to stir it and carefully fill all the cracks with a rubber spatula. After half an hour, when the grout begins to set, take a damp sponge and wash off the excess compound from the front side of the tile. | |
| Sink installation. Step 1. In this case, it is advisable to install the mixer right away, because then it will be inconvenient to attach the fittings from below between the wall and the sink. We place the sink on the sealant, simply apply it thicker to the inner edge of the sink and install it in the opening. | |
| Step 2. When planting, some of the sealant will be squeezed out; you need to use your finger or a sponge to form a continuous, smooth seam and remove excess sealant. After a couple of hours, you can install a siphon with a drain, connect the water supply and use the countertop made by yourself. |
Instructions in a few steps
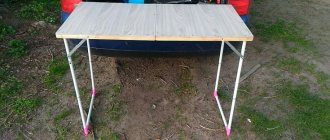
Let's look at how to make a very simple hanging cabinet for a bathroom sink from 40 cm thick pine furniture board.
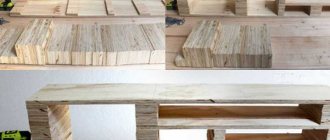
Step 1. First of all, you need to make the appropriate markings on the pine board and saw it. There should be several parts - the sides of the cabinet, as well as its upper and lower parts. You need to saw strictly along the pencil lines drawn in accordance with the dimensions.
Cutting furniture board
Prices for the popular range of miter saws
Miter saw
Step 2. Next, you need to make cuts at the edges of the walls at an angle of 45 degrees. This is necessary to ensure the correct joint of the parts.
Cuts are made at an angle of 45 degrees
Another photo of the process
Step 3. Then both side walls and the bottom need to be laid exactly in one row and connected with tape. You need to glue the elements with adhesive tape on the front side of the shield. This measure will help to smoothly glue the parts into a single box.
The walls are connected with tape
Step 4. After this, you need to carefully turn the workpiece over and coat the cuts (45 degrees) with wood glue, then assemble the box.
The saw cuts are coated with glue
Step 5. Now you need to attach the tabletop to the top of the box. The cuts also need to be coated with glue beforehand.
The top part of the box is attached
Step 6. After this, you need to tighten the box with tape and zip ties.
The box is secured with tape
Screeds are also used
Step 7. Next, you need to ensure the reliability of the connection between the sides of the box. Dowels will be used. To do this, you need to drill deep holes with a drill of the required diameter in the end parts of the future cabinet so that they pass through the lower and upper parts of the box and its end parts. Then you need to pour glue into the holes and insert a wooden dowel there, also coated with glue.
Holes are drilled
Glue is poured
Wooden dowel winds up
Step 8. The cabinet needs to be left in this position alone, and when it dries, you need to saw off the excess protruding dowels.
Excess dowels are trimmed off
Step 9. It's time to start sanding the product. The first step is to sand off the protruding parts of the dowels, then sand the entire surface of the cabinet.
Sanding the structure
Prices for popular models of eccentric sanders
Random orbital sander
Step 10. Places where dowels are inserted, as well as all connections in the area of joints and corners must be puttied. Before further work, the putty must be dried.
Applying putty
The putty must dry
Step 11. Now you need to sand the product again.
Re-sanding
Step 12. Next, the cabinet needs to be painted and treated with protective compounds. By the way, there are certain paints and varnishes that will not only give the tree a beautiful look, but also additionally “preserve” it and protect it from exposure to water. The coating layer must be thoroughly dried. The main part of the cabinet is ready.
Treating the cabinet with a protective compound
Step 13. It's time to start making the facade. It will be made of plywood. You need to cut out the façade part to the required size.
Facade detail is cut out
Step 14. Now the facade blank needs to be sanded.
The workpiece is polished
Step 15. After sanding, smooth plywood must be carefully primed. Do not skimp on the primer composition - this measure will reduce the consumption of paint and varnish material.
Primer is applied
Step 16. Next, the surface of the facade needs to be sanded again.
Re-sanding of the facade
Step 17. Then the facade needs to be coated with a layer of varnish and left to dry.
The facade is covered with a layer of varnish
Step 18. Now you can return to the cabinet itself. It should be additionally reinforced from the inside with a chipboard frame. To do this, you need to cut the elements to the required size and secure them inside the box with self-tapping screws, repeating the outline of the cabinet. The dimensions of the inner chipboard box should be slightly smaller than the main size of the cabinet.
Chipboard parts are cut
Formation of the inner box
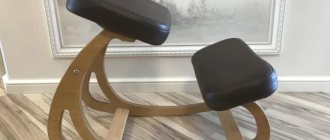
Step 19. Next, inside on the sides of the cabinet you need to attach telescopic guides for the drawer to the self-tapping screws. They should be parallel to each other.
The guides are attached with self-tapping screws
Prices for popular models of screwdrivers
Screwdrivers
Attaching telescopic guides
Step 20. Now you need to make a drawer for the cabinet. It will have a curly shape, in the back there will be a recess, which is designed to ensure that the box fits where the pipes will run. The side walls of the box must be cut from chipboard to specified dimensions, and the bottom must be made from plywood.
Drawer parts are cut out
Another photo of the process
Step 21. It is best to assemble the box using glue with an additional tie with self-tapping screws.
Assembling the box
Box assembly process
Step 22. Telescopic guides need to be attached to the drawer. To do this, they need to be screwed with self-tapping screws to the walls of the drawer from the outside, maintaining a small gap at the bottom between the drawer and the bottom of the cabinet.
Fastening the guides
Step 23. At the top of the back of the cabinet you need to screw fasteners that will allow you to fix the cabinet to the wall. These can be simple but strong corners secured with self-tapping screws.
Fasteners are screwed on the back of the cabinet
Step 24. The cabinet needs to be hung on the wall. It needs to be placed under the sink and the locations for drilling holes in the wall should be marked. Next, you need to drill holes in the wall, install dowels and hang the cabinet.
The cabinet is hung on the wall
Step 25. In the upper part of the cabinet you need to make a hole where the drain pipes from the sink will pass. When the hole is cut, it is necessary to coat it from the inside with sealant.
A hole is made in the upper part
The edges of the hole are coated with sealant
Step 26. All that remains is to attach the facade. To do this, you need to screw in self-tapping screws in the box at the place where the facade is attached, but not all the way, but so that they come out a little bit through the front side of the box. Next, the facade needs to be placed in its “rightful place”, leveled using wedges (in this case, the role of wedges is played by folded pieces of paper) and a little pressure is applied to it. When the façade is removed, there will be small recesses on its reverse side - imprints of self-tapping screws. Now you can drill holes in the place where these marks appear, and then simply screw the facade with self-tapping screws to the box. The cabinet is ready.
Façade alignment
The facade is attached to the cabinet
Step 27. All that remains is to install the bowl on the cabinet.
Finished vanity unit
It is better to coat the bottom of the bowl with sealant and place it on the countertop. The work has been completed. All that remains is to connect all communications.
Video - Cabinet made of aerated blocks
Do-it-yourself installation of a built-in sink
To install an undermount sink yourself, you will need:
- tape measure and pencil;
- jigsaw;
- drill and drill bit 10 mm;
- self-tapping screws;
- colorless waterproof sealant;
- sandpaper;
- fum tape;
- screwdriver.
Table top mounting
Built-in washbasin
The installation of such sinks is carried out according to the same principle, regardless of the materials used to make the bowl itself and the countertop. First, you need to unpack the sink, check its integrity and the presence of fasteners in the kit. If the fasteners are plastic, it is better to purchase metal ones separately in the store - this will be much more reliable. Now you can start installation.
Step 1: Turn the sink bowl upside down and place it on the countertop. Determine its exact location, taking into account the connection of the mixer, level it relative to the edges so that there is a gap of at least 5 cm. After this, carefully trace the contours of the sink with a pencil. If the kit includes a template, it is easier to mark using it.
Marking the tabletop
Step 2. Without removing the sink from the table, measure the width of the side. For metal sinks it is usually 10-15 mm, for earthenware sinks it is a little more. Now set the bowl aside, step back from the marking line a distance equal to the width of the sides and draw another one inside the contour, exactly repeating the configuration. It is advisable to do everything as accurately as possible so that the sink fits tightly into the cutout. The maximum allowable play is 2 mm.
Step 3. Stepping back from the inner contour 1-2 mm to the center of the tabletop, drill a hole with a diameter of 1 cm.
Hole
If the sink is round in shape, one hole at any point of the marking is enough; for a rectangular bowl, holes are made in each corner.
Step 4. Insert a jigsaw blade into the hole and carefully make a cut exactly along the line. Having removed the cut out part, insert the shell into the hole and check how tightly it fits: if it is too tight, you need to cut it a little more.
Drilling a hole for a sink
Step 5. The sink is again laid upside down, after which a sealing tape made of polyethylene foam is glued along the side (usually included in the kit). Glue it so that the seal does not extend beyond the outer contour of the side. Next, take the fasteners, install them on the sides at an equal distance from each other and snap them into place. After this, the mixer is inserted and secured to the sink body, and the overflow hose is connected.
Step 6. The cut is treated with sandpaper, carefully removing burrs and chips, and cleaned of dust. Using a small plastic spatula, apply a layer of colorless sealant and spread thoroughly over the entire width of the cut. The layer should not be thick, the main thing is that the sealant fills all the pores.
You need to glue the sealing tape to the edge and apply sealant
Step 7. Insert the sink into the hole, level it, tighten the fasteners with a screwdriver.
Inserting the sink
In the process of pulling the sink to the countertop, sealant should come out along the edges of the sides - this means that the sink is pressed tightly enough. Do not tighten too much, as the threads on the fasteners (especially plastic ones) may break. Excess sealant is wiped off with a damp, clean cloth and the entire structure is left for a day so that the silicone hardens well.
Step 8. Connect the siphon to the sink, connect the sink to the drain and water supply. All threaded connections are sealed with fum tape to prevent leaks. After this, all that remains is to turn on the water and check the quality of the connection and make sure there are no leaks.
Tabletop mounting from below
To install the sink flush with the surface, you will need a plywood template, a hand router, clamps and polymer glue.
Step 1. The template is laid on the tabletop from the front side, leveled and pressed with clamps.
Fixing the template with clamps
Step 2. Using a milling machine, cut a hole of the desired shape in the tabletop.
Hole cutting
Step 3. Process the sharp edges of the cuts with a 2 or 3 mm radius cutter.
Edge processing
Step 4. Turn the tabletop face down and use a cutter to select a groove in three passes, after which the cuts are sanded manually with sandpaper.
Sanding by hand
Step 5. The edges of the sink and the ledges of the countertop are degreased with an alcohol solution and polymer glue is applied around the perimeter of the cutout.
Applying glue
Step 6. Insert the sink into the countertop and clamp it firmly on all sides with clamps.
Installing a sink, fixing it with clamps
Step 7. Stir two-component glue, pour it around the perimeter of the sides and spread it with a small spatula along the side walls.
Mixing and pouring glue
Step 8. When the glue has hardened, turn the tabletop over and carefully cut off the remaining adhesive mass with a sharp knife.
Removing excess glue
After this, install the mixer and siphon, connect the water supply, then the sewerage system. This method is more labor-intensive, but still quite feasible for someone who knows how to use a cutter. The installation principle is the same for both metal and earthenware sinks, the main thing is to do everything carefully and slowly. Read the shower drain under the tiles on the website.