How to make beautiful and useful shelves from PVC pipes with your own hands
Once you try your abilities in installing PVC water pipes, you will understand that working with the material and the way of connecting plastic elements opens up a wide range of creative possibilities.
From plastic pieces and various elements for connecting them, you can make almost anything that has a frame base, a piece of furniture, or a useful device for a summer house. It could be a chair, armchair, stand, table, bed. Do-it-yourself shelves made of PVC pipes are perhaps included in a separate group, since it presents products that are varied in purpose, size and appearance. To make a shelf from pipes, you do not need to have any special skills or experience. If the planned product consists only of plastic, you will only need a cutting tool and glue. And you can do without the latter by making a collapsible structure.
Items made from polymer structures are neat and aesthetically pleasing even without additional decorative coating. Experts say that modern plastic is a durable, environmentally friendly material and does not pose a threat to human health.
The simplest version of a shelf made of plastic elements is pieces of material assembled together . This original composition is best hung on the wall. Select the diameter of the pipe that you will use in the project depending on the dimensions of the items placed on the shelf. If, as in our version, the cells are occupied by cars, then 15-20 cm will be enough.
For work, prepare:
- a piece of plastic pipe with a diameter of about 15 cm;
- a hacksaw for cutting material (we recommend using a vice so that the plastic does not slip while working with a hacksaw) or a pipe cutter;
- roulette;
- pencil;
- glue;
- clamps or large clothespins;
- sandpaper;
- blue paint in a can or spray can;
- brush.
To hang the product on the wall, use a drill and 2-3 screws with dowels.
- Place marks along the length of the pipe in increments of 20-25 cm. The number of elements depends on what size shelf you need.
- Secure the material using a vice and cut the pieces according to the marks.
- Lightly sand the outer edges of the pieces.
- In order for the product to have an even color, coloring must be done at this stage. Place the plastic elements on a flat surface covered with newspapers or protective film. Paint them on one side. When the paint is completely dry, flip the pieces over and reapply paint.
- Start building the shelf. The composition can be either completely symmetrical or chaotically folded. When giving shape when connecting elements, take into account the features of the interior in which the item will be located.
- Glue the parts together, starting with the middle ones. After applying glue and joining the pieces, secure them with clamps or large clothespins until the glue dries. Then move on to the next elements.
- Place the finished shelf against the wall, mark the places for screwing in the screws.
- Prepare holes in the wall.
- Place dowels in them.
- Screw in the screws.
Job completed, hang the shelf, help your son or daughter organize his collection of favorite toys.
Everything ingenious is simple! Using this idea, you can build a tabletop shelf for wine bottles. The main thing is to choose the right size material and make sure that the base of the structure is stable. For originality, combine elements of different diameters.
Make a floor shelf for shoes in the same way. Of course, here you will need a large pipe, for example, such as is used when installing a sewer system. Take care of proper decoration. And keep in mind that glue is unlikely to be able to hold a heavy large structure. Therefore, it is better to connect the elements using a screw-nut method, having previously drilled holes in the right places.
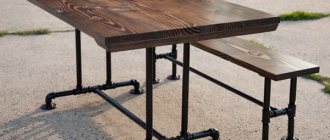
Making a bookshelf with your own hands from plastic elements is an original and definitely cost-effective solution . Starting with the shelf, you can create an interior ensemble that matches your personal style. The work will not require large expenditures of money and time. Even a beginner can handle it.
The dark matte paint and wood details give the piece an elegant and industrial look.
- Roulette;
- PVC cutter;
- 1-inch (2.5 cm) PVC pipe with a total length of 30 feet (about 9 m);
- 1" Poly Pipe, 30ft
- pine board measuring 6x12 feet (1.8x3.66 m);
- a circular saw;
- PVC glue;
- 1-inch three-way plastic connector – 12 pcs.;
- 1-inch 90 degree swivel angles – 4 pcs.;
- 1.25x0.75-inch (3.2x1.9 cm) PVC sleeve - 4 pcs.;
- paint in a vacuum can;
- stain;
- latex gloves;
- 1-inch (2.5 cm) 2-hole galvanized shelf hinges - 12 pcs.;
- drill with drills;
- screwdriver;
- 0.5 inch (1.3 cm) metal screws - 24 pcs.
Before you begin assembling the shelf, use a special cutter to cut the polyvinyl chloride into pieces of the required length:
- 12 pieces 18 inches (45.7 cm);
- 6 pieces 12 inches (30.5 cm) long;
- 2 pieces 17 inches (43.2 cm) long;
- 4 pieces 2 inches long. (5.1 cm).
Now cut the wood using a circular saw into 3 pieces measuring 2 x 12 feet (0.6 x 3.66 m). Sand the edges and surface of the blanks for wooden shelves in advance.
- Take an 18-inch piece and attach a three-way connector to it. To strengthen the connection, use PVC glue. Now attach another 18-inch piece to the connector so that the pipe extends upward. Attach another three-way connector to the other end of the 18-inch piece. Before the glue dries completely, lay the resulting piece on a flat surface and make sure that all connectors are facing the same way. Then attach the third element to the three-way connector in the same way. Finish by attaching another three-way connector to the top of the last 18-inch piece. While the glue is wet, place the pieces on a flat surface, making sure all connectors are the same. Assemble three more legs in the same way.
Each time you connect a piece of plastic to a 90-degree elbow or three-way connector, apply PVC glue to the inside of the connector as well as the outside of the pipe, about 1 cm. After joining, be sure to wipe off any excess glue with a damp sponge.
To avoid uneven coloring, apply several layers. Each subsequent layer of paint can be applied after the previous one has completely dried.
The plastic and wood shelf is ready.
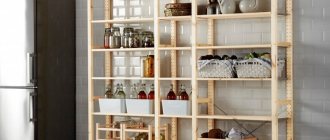
A large shelf-rack will allow you to restore order in any utility room. Plastic containers are easy to store holiday decorations, clothes and other household items. At the same time, all things are kept within reach, and even a child can get them. The entire structure is made of high quality plastic. The material is ideal for damp basements or garages as it is waterproof and mildew resistant.
- 1.25-inch (3.8 cm) plastic piece - 92 feet (28.04 m);
- 1.25-inch (3.8 cm) 4-way connectors - 12 pieces;
- 1.25-inch (3.8 cm) 5-way connectors - 18 pieces;
- 1.25-inch (3.8 cm) end caps for polymer parts - 10 pieces;
- 12 plastic containers, approximately 16 x 18 inches (40.6 x 45.7 cm);
- roulette;
- pencil;
- circular saw or pipe cutter;
- drill with drills;
- screws;
- hammer;
- screwdriver.
Before assembly, use a circular saw or pipe cutter to cut plastic parts to the required size:
- 15 blanks of 13 inches (33 cm);
- 54 pieces of 16 inches (40.6 cm).
- Take a 13-inch piece of plastic and attach a 1.25-inch 4-way connector to both ends so that the through hole is exactly vertical. Use glue when connecting. Wipe off excess substance immediately. Make 6 such connections.
- Attach a 16-inch long pipe to each top hole, which is located at both ends of the resulting blanks. Apply glue to the edge (0.5-1 cm) of the parts to be joined. Do the same steps with all 6 fragments.
- Now connect 3 finished fragments into one rack. To do this, place the free edges of the 16-inch pieces into the bottom holes of the connector pieces. Use glue. As a result, you will have 2 side racks.
- At both ends of the 13-inch piece, install a 1.25-inch connecting piece that has 5 outlets, as shown in the figure below (in the center hole). Use glue when doing the work. In total, collect 9 similar nodes.
- Attach 16-inch pieces to all free holes of the connecting parts (except for the bottom and already occupied - central) pieces as suggested by the diagram below. Use glue to securely attach. There should be 3 such large nodes in total.
Attention! In this project, you can choose which way to strengthen the connection between the parts - with glue or with a screw connection. If you prefer the latter, use screws with a special anti-corrosion coating (galvanized).
- Connect all three pieces into one structure by inserting the free ends of the top 16-inch pieces into the free bottom holes of the connecting pieces. Strengthen the resulting knot using the method you choose. The ends of the vertical elements of the upper part and all the end ones must remain free (see image). The interior of the rack is ready.
- Assemble the inside of the shelving unit with the side posts. To do this, place the ends of the 16-inch end pieces into the corresponding free holes in the side post connectors. Secure the structure with screws or glue.
- To complete the assembly of the structure, plug parts should be placed on the free ends of the upper tubes. This will give the product a finished, neat look and prevent water, dust, and insects from getting inside.
Place the colored containers in the cells prepared for them. You can enjoy filling useful and beautiful furniture. You have seen that it is easy to make both a small device and a fairly large structure from plastic parts. Think, perhaps, with the help of plastic products you can make your life even more convenient and organized without great expense and effort.
Another interesting thing.
Original do-it-yourself crib ideas for a baby
People spend almost a third of their lives sleeping, and newborns sleep almost around the clock. That's why it's so important where he sleeps.
Pallet furniture is ideal for home, garden and terrace. It will easily fit into a modern exterior. Therefore today.
It used to be simple, the doors in each closet were the same, without any bells and whistles. And now it is not clear what the solution is.
Metal folding chairs are popular as a practical and aesthetically pleasing option for outdoor and outdoor furniture; they don't need anything special.
What furniture can you make from PVC pipes with your own hands?
Building a house or renovating an apartment is always accompanied by a lot of leftover consumables. Pipeline repair is also no exception, because after replacing metal pipes with plastic ones, a lot of scraps remain, as well as connecting elements - fittings, which many owners simply throw away.
However, there are also creative people who can make durable and original furniture from such trash, for example, tables or chairs, as well as other household items such as an organizer. In this article we will examine in detail some similar ideas from PVC pipes.
Polypropylene is a hypoallergenic and non-toxic material, so you can make various children's furniture from it without worrying about the health and well-being of the child. By implementing ideas from plastic pipes with your own hands, you can easily assemble a table, playpen, chair, etc.
One of these simple projects could be a comfortable children's high chair, which is assembled from pipes and fittings like a construction set. The size of each part will depend on the size of the desired result, but below we will provide instructions in which we will tell you how to make a chair for a five-year-old child.
To make a high chair you will need the following materials and tools:
- PVC glue;
- Approximately 3 meters of polymer pipe;
- 6 T-fittings;
- 8 corner fittings (90°);
- Durable fabric;
- Fine tooth saw;
- Sewing machine;
- Scissors.
Having completed the children's chair, you will acquire the necessary skills, after which you will be able to design and assemble other children's furniture from PVC pipes with your own hands, for example, a table or a tent. Read also: “What furniture can be made from plastic pipes with your own hands.”
Buying even the cheapest office desk can be a big hassle for some people, so we'll show you how to make a desk out of plastic pipes. This project differs from the previous one in its complexity, so you will have to think through some parts yourself, but we will try to explain everything to you as clearly as possible.
First of all, you need to decide on the size of the table. In our case, we take a ready-made tabletop (915×2030 mm), under which we will assemble the frame. When choosing a tabletop for your own table, pay attention to its weight and follow the rule: the lower the weight, the better for your table. The best solution for a countertop would be a hollow door leaf. You can also assemble the tabletop yourself using flat boards, fasteners, a saw and a drill.
First of all, prepare 12 meters of plastic pipe and cut it into the following parts:
- 5 parts of 7.5 cm;
- 10 pieces of 30 cm;
- 4 parts of 50 cm;
- And 4 pieces of 75 cm.
Among the other parts for the frame you will need the following:
- 4 T-fittings;
- 4 four-way fittings;
- 2 cross fittings;
- 10 plugs for pipes and fittings.
Having prepared all the necessary parts, you can begin to assemble a table from polypropylene pipes. It is better to perform the first assembly without using glue, and after assembly, glue all the connections one by one. Begin assembly by constructing the sides of the frame on which the tabletop will rest.
Next, assemble the back part, which will connect the two already assembled. To give the table additional stability, we recommend adding a third leg to the back wall. When assembling the table, carefully monitor the parallelism of all elements in order to ultimately obtain an even structure.
At the final stage, it is necessary to connect all the parts into a single structure, obtaining a table frame. Check it for strength, correct any unevenness, and then glue all connections.
Having made the frame, you can begin installing the tabletop. This can be done in many different ways, but we will consider the most reliable and aesthetically correct of them.
Plastic rack
Recently, pipelines in houses and apartments are most often made from polypropylene pipes (PP), so this material may be at hand in the garage. It is also quite suitable for making furniture.
The frame can be made of plastic tubes
Of course, a rack made of PP pipes has a slightly lower load capacity. However, in most cases its strength is quite sufficient. It can easily withstand various tools and other small items that are usually kept in the garage, or preserved in the cellar.
The process of manufacturing a plastic shelving includes the same three stages:
- Design;
- Preparation of materials;
- Manufacturing.
Preparation of materials
Since the design of the product is carried out in the same way, we will skip this stage and proceed straight to the preparation of materials. So, in addition to polypropylene pipes, you will need fittings, as well as shelf material and brackets to secure the shelves. Essentially, everything is the same as in the case described above.
Advice! For a plastic rack, you can make shelves from a plastic window sill. Such furniture will be resistant to moisture and other negative influences.
Rack shelves can be made from a plastic window sill
The following set of tools will be needed:
- Welding machine (soldering iron);
- stripping;
- Scissors for cutting plastic pipes;
- Tape measure and pencil.
Advice! The price of a good soldering iron is quite high. Therefore, to make one rack, it is more advisable to rent it.
Manufacturing
Manufacturing of parts and assembly is carried out as follows:
| Illustrations | Actions |
| Mark and cut the pipes to obtain the required lengths for posts, beams and lintels. |
| If pipes are reinforced with foil, their edges must be cleaned. To do this, place a special device called a stripper on the edge of the part and turn it. Stripping using the principle of pencil shavings will remove the top layer of the pipe along with the foil. |
| Warm up the soldering iron. Wait until it turns off, then heats up again and turns off. |
| Insert the end of the pipe and fitting into the nozzle and wait until the plastic softens. The heating time depends on the diameter of the parts and the device itself. Therefore, the device comes with a table indicating the relationships between all these values.
|
| Insert the pipe into the fitting until it stops. Make sure that the fitting sits evenly, without distortions. The parts must be held in this position without moving them so that the plastic cools down. Using this principle, assemble the entire structure. |
That's all the nuances of assembling the structure. As for the manufacture and fastening of shelves, this work is carried out according to the scheme described above.
Crafts from plastic pipes for all occasions
With skill and a rich imagination, interesting and useful things can be made from any available materials, including plastic pipes.
Plastic pipes of different diameters are sold in any hardware store at quite affordable prices. They are used in the installation of water supply, sewerage, heating, irrigation systems, and after construction or repair, unnecessary trimmings often clog the site, while they can serve as an excellent material for creative crafts.
Don’t rush to take construction waste to a landfill - we’ll tell you what can be done from a plastic pipe to turn excess waste into beautiful and functional interior items.
We will not talk about the direct purpose of the product, but about the convenience of using varieties of plastic pipes specifically as a material for crafts. Plastic pipes are light weight, strong and quite durable. They are dirt-resistant, do not collect dust and are easy to clean. Products made from plastic pipes are safe to use even by small children (they do not break, are not heavy, and do not emit toxins).
For creative work, PVC pipes are often used, which are quite rigid and can be easily connected with special nozzles and “adapters,” allowing the creation of collapsible structures. Polypropylene pipes can also be used, but to connect them you will need a special welding machine or compression fittings, and the finished products cannot be disassembled.
Plastic pipes can be used to make not only convenient household items, but also pieces of furniture. In order for such a homemade product to last a long time and be reliable in operation, care must be taken to properly connect the individual sections. Since the connection of polypropylene pipes has already been said, we will consider the connection of only PVC pipes.
PVC plastic pipes can be connected in the following ways:
- into a socket with a rubber seal;
- using an adhesive composition;
- bolts, drilling holes.
The first connection method is characterized by simplicity, but lack of rigidity. Before connecting, it is recommended to clean the internal and external surfaces of the pipes at the junction from dust particles and treat the inserted part of the pipe with silicone grease. First, the pipe is inserted into the socket until it stops, after which it is carefully pulled back by 0.7 - 1 cm. Structures assembled in this way can later be dismantled, which is convenient for seasonal products.
The second method of assembling pipes is characterized by reliable fixation and greater labor intensity. Work on connecting parts begins with sanding the mating surfaces of the socket and pipe for better adhesion. Then they must be degreased with methylene chloride. The adhesive composition is applied along the entire length of the prepared outer surface of the pipe and 2/3 of the length of the inner surface of the socket. Finally, the pipe is inserted into the socket until it stops and turned a quarter turn. For gluing, you need to press the parts for 1 minute. For good fixation, all operations to connect two segments must be carried out quickly enough. The connected elements are left for several hours until the adhesive composition has completely dried.
The third method is more labor-intensive, as it requires marking and preparing holes, but allows you to obtain collapsible structures with a reliable connection.
For corner joints and connecting several sections at once in one unit, it is convenient to use a variety of fittings. Plastic pipe structures can be of any complexity using numerous tees and fittings. Let's look at useful homemade products in order of increasing complexity.
Variety of plastic pipes
It's no secret that plastic pipes come in different purposes, colors and sizes. Their physical characteristics also vary greatly; the pipes withstand different power loads and operate in different temperature zones (for example, for cold and hot water).
The plastics from which pipes are made today are divided into three groups:
- Polyethylene - PE. Do not behave well at high temperatures, the material is elastic and pliable even after exposure to sunlight! Consider the conditions in which your invention will operate; if it is in contact with hot water, then choose a different material.
- Polypropylene - PP. Today, products made from this material are considered the highest quality, durable and toughest. Unfortunately, these are also the most expensive pipes.
- Polyvinyl chloride - PVC. The main advantage is resistance to chemical attack and reduced flammability. In terms of price-quality ratio, we recommend using PVC pipes for various crafts.
Some manufacturers, for the convenience of their consumers, apply color markings to the surface of the tubes to indicate ownership. So, the blue stripe is for cold water, the red stripe is for hot water. It happens that there are 2 stripes on the pipe, which means that it is suitable for both hot and cold.
To increase the rigidity of plastic, manufacturers produce reinforced pipes. A layer of aluminum or fiberglass is inserted between two layers of polymer. Reinforced pipes are much stronger and more reliable, but their price is considerable.
Original and functional little things for interior decoration
Our review of interesting ideas opens with the simplest products made from plastic pipes, which even novice DIYers can make. In addition, such crafts will require a minimal amount of material, and in some cases even the shortest scraps can be used.
From scraps of large and medium diameter pipes you can make a convenient and practical organizer for your office or workshop.
There are two possible execution options here:
- fastening with self-tapping screws to a wall or table, for which one end of the segment is cut off at an angle - a stationary option;
- gluing segments together to form a stable figure - a portable option.
The pieces can be left white or gray, or they can be painted in your favorite color. This organizer is indispensable for schoolchildren and people involved in creativity and handicrafts. With it, everything will always be at hand, and there will be perfect order on the table.
Additional comfort on the desktop will be provided by a drawing tablet and a laptop stand, which can be made from small-diameter polypropylene pipes.
Bookshelves are a special element of the interior. Their presence in a certain way characterizes the owner of the home. A corner shelf in a high-tech style will not go unnoticed.
From numerous short scraps of different diameters you can make a patterned frame for a mirror or photograph. It is enough to glue the cut rings together according to a pre-prepared layout, which can be applied to a sheet of cardboard. It could be floral patterns or something abstract. The dimensions of the frame will depend on the amount of suitable material.
Large-diameter scraps can be used to create a convenient shoe shelf with numerous compartments. This design will not take up much space in the hallway and will ensure proper storage of shoes and quick search for the right pair. The elements are connected using glue or self-tapping screws. To secure the shelf to the wall, you can use a plywood sheet to which the assembled shelf is first glued.
Some crafts made from PVC pipes will really appeal to lovers of fresh flowers. This reliable flower stand is easy to make and looks nice.
Small scraps of sewer pipes are well suited for making flower pots for replanting or propagating indoor pets. Showing your imagination, such pots can be decorated with colored paper, paint or bright stickers.
It is easy to make a stylish vase for artificial flowers and dried flowers from elongated cylinders of medium diameter. If you approach the implementation of this idea creatively, you may end up with an original gift for a significant event.
Another extraordinary idea for the interior is homemade lamps in techno style. There are a lot of design options, but they all adhere to the principle of minimalism: no unnecessary details.
Using unused scraps, you can also make useful things for the hallway or corridor: a hanger for clothes and bags and a holder for garbage bags.
From PVC pipes you can make many crafts for children's entertainment in the yard: an educational mat, a playpen, a swing, a sled, a football goal, a playhouse, an outdoor shower and a theater screen.
A very useful design for kids is a playpen made of PVC pipes.
Children will be delighted with the lightweight swing, which instantly dries out after a warm summer rain.
For winter walks, a homemade sled will be the most reliable and fastest. The design turns out to be quite complex, but with the help of practical videos you can figure it out.
For active games in the yard, you can make safe football goals from leftover plastic pipes.
Many children often dream of their own castle in miniature. Making childhood dreams come true is quite simple and not at all expensive. The frame is made very quickly. All that remains is to select a beautiful dense material for the roof and walls, and the house is ready!
The following structure will help you cool down on a hot summer day. Such an open shower will be a joy not only for children, but also for adults.
You can make a theater screen from polypropylene pipes. It is enough to collect 3 frames, connect them together and cover them with beautifully decorated curtains. Home theater develops children's creative abilities and creates good conditions for an exciting pastime.
Shelving for the garden
After renovation, not only polypropylene pipes may remain in the house, but also a metal profile, from which you can try to make a shelving for your summer house without using welding. To work, we only need a tape measure, a pencil, a screwdriver and a hacksaw.
First of all, it is necessary to design the future rack. Draw a diagram on paper, observing all dimensions. Next, you can purchase an additional profile to the existing one, and also find several sheets of plywood 15 mm thick. You can also make a rack from PVC pipes with your own hands, using the diagram for the profile.
READ ALSO: 10 best manufacturers of polypropylene pipes - rating 2019
Let's look at the manufacturing process using a specific example:
- Take the profile and cut it into pieces: 4 vertical posts, 8 front and 8 rear crossbars;
- Assemble 4 frames that should become shelves in the future;
- Using self-tapping screws, secure the resulting frames to the vertical posts;
- If you wish, you can screw the rack to the wall and paint it, after which you can lay plywood on the frames to make shelves.
We update the interior economically: furniture made of plastic pipes
DIY crafts made from plastic pipes can occupy a key place in the interior. Craftsmen share many extraordinary solutions that can significantly save the family budget. Let's highlight the brightest of them.
The most common and sought-after piece of furniture is a chair. Using sections of plastic pipes and connecting elements, you can make high-quality chairs of various types: children's chairs, folding ones for hiking and fishing, armchairs and even high chairs.
Having mastered the assembly technique a little, you can proceed to more complex designs. A neat two-tier baby crib made of polypropylene pipes is a good alternative for a country house or cottage when buying a ready-made crib is too expensive. Moreover, when the kids grow up, the material can be used to make other useful crafts.
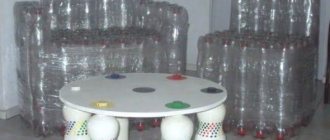
The glass coffee table with a base made of PVC pipes in the next photo can hardly be called an amateur homemade product, since it looks like a designer’s work.
Another original idea is a shelving unit for the hallway or living room. By independently designing a shelving unit with the required number of shelves of the required size, you don’t have to waste time shopping around looking for something suitable.
Unused and excess building materials will definitely be used in a summer cottage. Crafts made from plastic pipes for the dacha will significantly facilitate gardening work, make your vacation more comfortable and help you avoid large material costs. At the same time, the designs look neat and stylish.
Small pieces and a few tees can make a nice clothes and towel rack. It is easy to clean and does not corrode.
Relaxing by the pool or in the shade of the garden is impossible to imagine without a sun lounger. The photo shows a chaise lounge made entirely of plastic pipes, but it can also be combined with dense material.
A carport is another useful use for PVC pipes. It will protect your vehicle not only from rain, but also from the scorching summer sun.
For garden decoration, a garden arch is often used, which can also be made from plastic pipes. A new element appears in its design - bent arches. You can bend the pipes for an arched vault by heating with a gas burner or boiling water. You can also put the pipe on a metal rod and, sticking one end into the soil, bend it in an arc. This method requires some physical effort.
A simple and light gazebo will decorate the garden and protect from the sun and light rain. For the presented option, it is enough to attach waterproof raincoat fabric to the pipes and bend them on the reinforcing bars. To make the structure reliable, you need to ensure that the rods are well fixed in the soil.
The range of applications for plastic pipes is truly enormous and is limited only by your imagination and needs. You need a small woodshed, a gate, a cart or a fishing rod stand - take the required amount of pipe and bring your idea to life.
It is easy to make a convenient chicken feeder from sewer pipes. It makes it very convenient to add grain without entering the pen. Chickens cannot rake grain in such feeders, which saves feed.
A small greenhouse at your summer cottage can also be made from plastic pipes. The simplest option: make a rectangular frame and cover it with film or agrofibre.
A more serious structure - a seasonal greenhouse - will require more time and material. It is better to connect the elements with bolts, so that it is possible to disassemble the structure for the winter. The optimal shape of the greenhouse is arched. To create it, the ends of the pipes are placed on half-meter metal rods driven into the sides of the future greenhouse every meter. The size of the greenhouse depends on the planned use. The greenhouse can be installed on a foundation or on the ground. Film, polycarbonate or agrofibre can be used as a covering material.
Plastic sewer pipes can also become a container for growing flowers, herbs and vegetables. Very often they are used to create vertical vegetable gardens.
To fence the area, you can use a low fence made of plastic pipes, which is durable and requires minimal maintenance (it does not need to be painted annually).
The use of plastic pipes is not limited to the ideas presented. This material is so versatile and easy to assemble (it is easy to cut, bend, has a variety of connecting parts) that it is simply impossible to ignore it in your home workshop.
Comments (2)
After this article, I think that apart from plastic pipes, nothing else is needed for the home!
Yes, there are a lot of things that can be done. So far we have made supports for bushes and flowers, and various feeders for chickens. We also brought the summer water tap out for irrigation from the basement through the vent. In the summer, we hook up the irrigation hoses.
Plastic pipes. Ideas for children
If you have a small child in your home, then do not rush to buy the necessary items for crazy money. Kids are growing up quickly and soon all this will no longer be relevant. Try to show your imagination and make useful things for the children with your own hands.
Manege
In order to limit a small child’s movements around the apartment, a wonderful device has been invented - a playpen. You can buy it, or you can make it according to your individual measurements! You will need a lot of material to make the playpen, so you won’t be able to get by with scraps in the design.
It is best to purchase pipes in the store, having previously calculated how many of them are needed to create the playpen. Do not regret the money spent; after the child grows up, the playpen can always be disassembled and made into something else.
When creating a playpen, take into account the distance between the bars and the size of your baby; it will be a shame if the child crawls between the bars. Experienced parents advise to come up with fastening the structure to a reliable support to prevent the playpen from tipping over.
Swing
To make swings, it is recommended to use reinforced plastic, because... the situation here is related to the movement and safety of the child. Start making them only when you get good at working with simple crafts.
There are many swings. The most interesting and attractive ones in the form of swinging sofas can be found in country furniture supermarkets. They're just expensive. See how they are made, take the necessary dimensions, develop a sketch adapted to your leftovers.
Football goal
Do you live in the private sector or have a dacha? Consider making children's soccer goals from plastic pipes. In fact, the product will consist of several components that will need to be assembled into a frame. To be more convincing, you can purchase a net and stretch it over the manufactured gate. When the little football player grows up, you will disassemble the structure and immerse yourself in creating a new masterpiece.