0
34144
Every person strives to organize his space in such a way that he feels maximum comfort. However, in addition to a decent aesthetic appearance, its functionality is important, so do-it-yourself cabinet furniture is made independently by many residents of country houses and summer cottages. Many people do not have experience in this matter, so they often turn to ready-made instructions.
What should you take care of before making furniture?
When assembling furniture with your own hands, you need to think in advance about the appearance of the object and decide in which part of the apartment it will be placed. This data will allow you to determine the most suitable materials and accessories. Drawings are another important component of the process. After creating sketches with parameters and purchasing tools and building materials, you can begin the actual installation. It is better to strictly adhere to the original idea and pay attention to all calculations, otherwise furniture made by yourself may turn out to be sloppy.
The most important thing in furniture making is the drawing.
Hand tools for making furniture with your own hands
Roulette
There is no need to explain why you need a tape measure and why you can’t make furniture with your own hands without it. Just note that the best option is to buy a tape measure 5 meters long, which has a lock to secure the tape to the desired size, saving you from having to unwind the tape measure again to the desired size.
Awl
An easy-to-use awl is this:
- thick
- with a rubber handle that is positioned horizontally
If you don’t find such an awl in stores, it doesn’t matter. You can do it yourself. To do this, buy a screwdriver (it is also advisable that it has a horizontal and rubber handle) and grind off its end.
Knife
Using a knife, you will cut off the remaining glued edges from the ends of the part. You can use any knife, but, as practitioners say, the most convenient one is a shoe knife. In any case, the knife should not be dull or too sharp. In the first case, you will tear the edge rather than cut it; in the second, you will cut the laminate along with the edge, thereby ruining the appearance of the product.
Square
You will need a square in case you need to make markings for holes. It should be metal 25-30 cm long.
Iron hammer
The main requirement for a hammer is that the lighter and smaller it is, the better. With a small hammer you can get into hard-to-reach places, but with a light one your hand will not get tired.
Rubber hammer
With its help, it is convenient to stuff a plastic profile or edging and carefully connect the parts on pins or dowels. It will definitely come in handy for those who intend to make not one, but several furniture products.
Clamps
Designed to fix parts. An excellent assistant in the manufacture of unevenly shaped parts. The best option is to have three clamps whose length does not exceed 10 cm.
Screwdriver
A screwdriver will help you unscrew fasteners that require tenderness and accuracy that are not inherent in drills and screwdrivers, as well as unscrew fasteners that the latter cannot reach. The best option is to have a screwdriver with a hollow handle, a set of bits, a reverse function and a ratchet. In general, the more screwdrivers of different sizes, the better. For example, a screwdriver 12-15 cm long is useful for unscrewing fasteners in narrow places. And large and medium ones will help you assemble furniture faster and more conveniently.
Pliers
They will come in handy in cases where you need to remove a dowel from a chipboard or unscrew the fastening on which the slot has worn out. There are no special requirements. The main thing is that it is convenient to operate them.
Furniture fittings
An important element is furniture fittings
Fittings are small but important elements, without which the furniture will not be able to perform its functions. You should not save on this part, since the service life and overall level of performance of the future structure, assembled with your own hands, depend on the quality of the purchased fittings.
Furniture handles are attached with screws. Guides (roller and telescopic, or ball) play an important role when assembling drawers, as they give them the correct direction of movement.
To soften the impact when closing and reduce the noise level, silicone dampers are installed on the inside of furniture doors (or the end). Legs are an optional detail, but in some cases they can greatly extend the life of furniture and adjust its optimal position on an uneven floor.
Hinges affect the degree to which drawer doors open. The standard is 180° for opening and 90° for closing. If the manufacturer has not made additives (cutouts for hinges), then they can be added in any furniture workshop. For doors made of glass, you need to purchase special hinges that can hold it without drilling holes.
Furniture fasteners
Fasteners and their types require special attention. These are metal products that are ultimately of decisive importance for furniture, since they provide its strength, geometric correctness and stability.
Wooden dowels
They are used for preliminary and intermediate fixation and to increase the shear load. The dowels are inserted into drilled holes in both pieces of furniture to be fastened together. Later, the parts are attached using a more reliable method.
Fastening dowels
Iron corners
A slightly outdated fastening system, which fully justifies its cheapness with its unattractive appearance, bulkiness and loosening after some time.
Types of iron corners
Confirmat, or furniture screw
A modern fastening element that has replaced conventional self-tapping screws thanks to large threads: because of this, the screws hold tighter in the chipboard. The main disadvantages of this type are the need to use a special drill with different diameters for threading, the head and neck of the Euroscrew, as well as the heads that remain visible. The master will have to select plastic plugs to match the color of the furniture body.
Eccentric couplers
One of the most popular fastening methods today. The main advantage of eccentric couplers is that they leave drilling marks only on the inside of the product. For this fastening you will need the aforementioned Forstner drill. The method is labor-intensive and perfect for sliding furniture doors. In other cases, it is worth focusing on simpler and less expensive options.
Eccentric couplers
Required materials and tools
Before you start learning the assembly process yourself, it is first important to prepare the necessary tools:
- Screwdriver. You will need it to tighten various parts: bolts, confirmations, screws. With their help, prepared parts of the fittings are necessarily attached. There is an alternative method of assembly - using ordinary screwdrivers, but in this case the whole process can take a long time, and not every person has such an opportunity.
- It is advisable to immediately purchase drills of various diameters. In many construction stores they are sold as a set (from 4.5 to 10mm). This will also save time on searching for all the necessary materials, especially since such a tool may be useful in the future;
- A drill for confirmation is purchased separately. In this case, you can drill a 5 mm hole in a very short time. For steps without special costs, the hole expands to 7mm;
- In order to tighten the confirmat efficiently and tightly, it is recommended to purchase a hexagon. As an alternative, some home craftsmen use a screwdriver equipped with special bits, but with this design it is impossible to get into hard-to-reach places;
- Anyone who wants to assemble cabinet furniture should have a Forsnel drill, since it is used to tighten hinges and other fittings;
- Marking supplies: ruler, pencil or bright felt-tip pen, metal square, tape measure, stationery knife;
- Circular saw;
- Electric jigsaw;
- A hammer, preferably with a nail puller (will be needed if you need to dismantle individual elements);
- Construction hair dryer.
If the furniture does not have any special features, when assembling it is recommended to use universal diagrams that are designed for a drilling angle of 90 degrees. Unfortunately, such a device cannot be called a budget option, so such a purchase is only advisable when the assembly becomes a professional craft.
Selection of edges and furniture fronts
These elements perform an aesthetic function, so you need to choose them wisely. Making beautiful cabinet furniture that will look expensive is not difficult if you carefully select decorative parts.
Edge
The protection of the cuts of the body slabs, and, consequently, the strength of the furniture depends on the correct choice of this part. If you do not take care of high-quality insulation, moisture can easily penetrate the furniture structure and destroy it from the inside.
There are several options, one of the best for making furniture with your own hands is PVC edging. This finishing does not require special skills or professional equipment. Standard sizes: 0.4 and 2 mm. To save money, a thin edge is glued to the ends that are inaccessible to the eye, and a 2 mm edge is glued to the outer edges, which will be subject to heavy loads and friction.
Other advantages of this type of furniture finishing:
Edge thickness comparison
- Melamine edging: cheap but impractical option. Glued using a regular iron.
- ABS is similar to PVC, but made from an environmentally friendly material.
- The overlay U-profile is glued to liquid nails. Impractical due to the accumulation of dirt at the joint, but helps hide the defects of a bad cut.
- Mortise T-profile - rarely used, inserted into a groove made by a milling cutter.
Front part of furniture
Kitchen fronts and drawer doors are the “face” of the furniture, so they should look much more presentable than other details that are not so striking. Making this element yourself means saving time, since such things are usually made to order, and the wait can take several months.
Scheme of the front part of the furniture
As for the technical details, the façade part is standardly manufactured 2 mm smaller on each side of the main body. So, for furniture with a width of 600 mm, a façade whose width is 596 mm is suitable. The raw materials of the decorative part are different from those of the main body.
Among the cheapest facades are laminated MDF panels with a short service life. Mostly wood finishes are found. Softforming, which is gaining popularity, is similar to MDF, but differs in a two-color layout and relief on both sides of the panel. Such furniture is suitable exclusively for dry rooms (bedroom, living room). You can often see non-standard facades with curly stained glass cutouts. The glass is usually attached to the lining on the inside of the door.
Postforming
This is the implementation of high-quality, durable decor. It is distinguished by the severity of its forms and is performed without aesthetic frills. The basis is MDF or chipboards, which are covered with thin, seamless plastic. A plastic facade is another expensive, but extremely practical option.
Characteristics:
- smooth surface (glossy, matte);
- laconic design;
- ABS edge or aluminum profile.
At the peak of popularity now are super-glossy acrylic panels for making furniture with your own hands.
Wood and veneer
Expensive but natural materials. There is an opinion that from an environmental point of view, the option loses, since it contains a lot of varnish and impregnations. Painted facades “like enamel” are becoming increasingly rare. The rich color, which was so valued before, has also appeared in competitors, for example, acrylic. A significant disadvantage of such furniture is that it is not resistant to deformation and scratches.
Aluminum-glass facades
The optimal method for making furniture with your own hands in high-tech style.
Scheme of an aluminum-glass facade
Preparation of drawings for furniture manufacturing
Assembly drawings are a personal guide during the work process. If you pay due attention to this part at the preparatory stage, then the master will not have to frantically make calculations and be afraid of attaching something in the wrong place. You can make the assembly task easier for yourself by sketching everything out on a simple sheet of paper by hand or using special computer programs.
It should be remembered that the drawing must be clear and readable at least for the person who will be assembling the furniture.
Furniture drawing
Calculation and detailing
Calculation and detailing of furniture
It is impossible to make cabinet furniture with your own hands without taking into account the consumption of materials. This stage requires drawing up a detailed list of what material each part will be made of, indicating its parameters. The sheet is sent to the nearest accessible workshop, where all elements will be sawn and initially processed (edge).
The list should include consumables for the case, fittings, and fasteners. This way you can easily calculate the final cost of the furniture, taking into account the services of the workshop. The price of an item made with your own hands at home is 30–35% less than the retail price in stores.
Manufacturing
To successfully make cabinet furniture with your own hands, you must carefully follow all the steps:
- preparation of parts;
- processing of sections;
- marking of fittings;
- installation.
Having completed the calculations and begun assembling the product, in no case should you work without a drawing or act at your own discretion. If a new idea arises, you should create another diagram that will take into account all the amendments.
Preparing parts
When working from scratch, you first need to cut out the furniture parts - thick paper or cardboard will do. Next, you will need a high-performance machine with a high cutting frequency. Having placed the workpieces on it, you need to cut the material, saving space if possible. This will help reduce wood costs.
Ready-made options can be found in furniture departments and on the market. In this case, no machines will be required. If the raw materials are not processed, then the parts must first be covered with self-adhesive film or special plastic.
Cut out parts
Cut
Processing slices
Before you start assembling the parts, you need to glue the sections. For this you will need edge tape. Before work, you need to make sure that the humidity in the room is low - it is advisable to dry and warm the workshop well. You will also need equipment; a regular iron and a construction knife will do. Sometimes the edge is initially equipped with a sticky layer, then there is no need to further treat the surface.
Instructions for making furniture from chipboard with your own hands for beginners
During gluing, the iron should be kept at a short distance from the cut to prevent possible displacements and to secure all parts well. If you overexpose it, the edge may overheat and burst. When it is fixed, use a knife to trim the edge and smooth out all the irregularities.
Tape over the sections
Trim edge
Clean up uneven areas
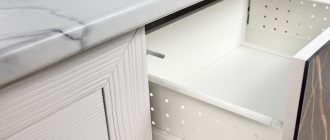
Marking of fittings
Correct technology involves placing the finished parts of future furniture on a flat surface for marking. Following the plan, you need to mark all the places where the fittings will be attached. It is advisable to double-check the dimensions, since an error of 1 cm can distort the entire structure. Next, you need to make holes in the marked places and screw in the fittings.
Mark and drill holes
Screw in the fittings
Installation
In accordance with the plan, the cut parts must be connected. For screeding, it is important to prepare a screwdriver with special attachments. This way the twisting will happen much faster than with a screwdriver. Nails should not be used to strengthen the bottom. The best choice would be self-tapping screws measuring 4 by 16. All edges must be fastened at an angle of 90 degrees using corners. You can nail the back wall to the assembled frame.
In order for the sliding mechanisms to operate smoothly, the guides must be properly fixed. They should be attached parallel to the horizontal edges of the product. Then attach special rollers to the doors, the movement of which checks the operation of the entire mechanism. After installing the sliding system, the furniture begins to shrink, which can cause gaps to appear. This is considered normal and depends on the characteristics of the material.
All that remains is to attach the fittings. All shelves, hooks and drawers must be installed in their places. The product is ready for use. Even an inexperienced person can handle the design of cabinet furniture.
Making cabinet furniture allows you to acquire useful skills that in the future will help you create entire sets for various rooms. All products in the house will have a unique design that will surprise and delight guests. For example, assembling a cabinet takes no more than 3 hours for novice craftsmen.
Furniture assembly technology
You should start constructing any furniture with your own hands from the main frame, that is, from the largest parts, gradually adding small ones. An example of assembling a bookcase:
Furniture assembly
- After the preparatory stage, the side, top and bottom walls of the frame are connected and the diagonal is aligned.
- Then the fiberboard back is attached using self-tapping screws.
- The third stage is fastening the shelves. Confirmats guarantee a stronger connection.
- Places on the side walls on the outside that have been damaged by hardware can be decorated with matching color-matched plugs.
- Now it’s the turn of additional internal parts, for example, shelves may have drawers (additional partitions).
- The last to be installed are the decorative parts (linings, façade, etc.).
Beds, kitchen cabinets, wardrobes and other home furniture are assembled using the same scheme. When using hazardous electrical equipment, generally accepted safety precautions are observed.
In order to make furniture yourself, you need to have the desire, a little care, time and basic knowledge in the field of construction. If everything is done correctly, the end result will be an exclusive and functional piece of decor that will last for many years and will fit perfectly into the interior of the apartment.
Assembly features for different types of furniture
There is no single recipe for designing and manufacturing cabinet furniture. There are significant differences between how to assemble a wardrobe and a chest of drawers. A novice master will be faced with seemingly insoluble questions at every step.
Different furniture is assembled in different ways.
But with experience comes confidence in one’s abilities and understanding of the nuances.
Dresser
In this type of work, the assembly sequence is important:
- First of all, the frame is assembled;
- the side parts of the drawers are fastened to the front and back walls;
- attach the bottom;
- install the guides, having previously made measurements and marks with a pencil;
- then move on to additional elements, if any are present in the dresser model, for example, mirrors or decorative ornaments.
Standard assembly of a chest of drawers is a fairly simple matter.
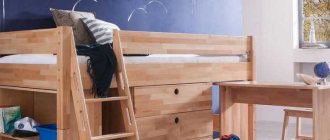
Bed
The bed consists of a basic frame, base and headboard. Depending on the product model, the assembly may have features specified in the instructions.
Only by understanding all the intricacies of the process can you draw a conclusion about whether or not it is worth making such a bed yourself.
But the basic rules are common to all beds:
- first of all, install a base of three frames and a base;
- attach the legs to the frames and check the structure for stability;
- Next, the corners and shelves are fastened;
- connect the backrest to the frames;
- lay the timber for the mattress pad;
- tighten in the places indicated in the instructions with self-tapping screws;
- adjust the hardness of the bed by tightening the screws;
- if necessary, coat the finished product with varnish.
Closet
The cabinet is considered the easiest model to assemble.
You need to assemble the finished cabinet parts following the instructions.
Here the assembly technology is common to all:
- connect the shelves to the side walls;
- attach the back wall;
- make sure that right angles are maintained between cabinet elements;
- install and adjust facades;
- hang shelves;
- hang the doors.
Closet
The sliding wardrobe is a little more difficult to assemble compared to the classic one. Here you need to install a sliding door system and ensure the careful execution of each fastener and component.
Otherwise, the entire structure may tilt and the doors will be blocked:
- assemble the base, if there is one;
- assemble the side walls;
- attach the back wall;
- check corners and diagonals;
- attach shelves, rods and drawers;
- install the upper guide rail;
- insert and adjust the door;
- install the bottom guide;
- stick on the sealing brushes.
It is easier to make a sliding wardrobe if it is a built-in option.
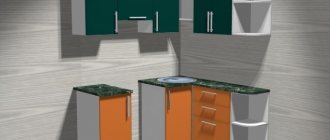
Kitchen set
The kitchen set begins to be assembled from the lower blocks.
Choose high-quality fittings for assembling your kitchen.
This is the basic rule that applies to all models:
- fasten the side parts with Euroscrews;
- insert strips to install the tabletop;
- attach the back wall;
- install and adjust facades;
- collect the top blocks.