Often, handmade furniture interior products are always valued much more than production stamping, but this is provided that they are made by the hands of real craftsmen. So, for example, if you pay attention to the photos of handmade folding tables, it is quite obvious that many of them are very attractive; some would be happy to place them in one of their rooms.
Let's take a closer look at this piece of furniture and find out what is needed to make it with your own hands. The first thing we start with is to find out the need for a folding table.
Why do you need a folding table?
Most often, a folding table becomes a necessity in small apartments where it is necessary to save living space.
The most notable folding table was the book table, which was produced in the post-Soviet space several decades ago and is still present in some small-sized ones.
Also, folding tables are very often used in the courtyards of private households, since such a table must be removed in the winter, otherwise it will rot. That is why it must be foldable so that it can be conveniently stored when assembled.
And the last option is a tourist folding table, the main advantage of which is its low weight and compactness when assembled.
What types of folding tables are there?
If we consider the best options for folding tables, then all this variety can be systematized by the materials from which these tables are made and the mechanisms by which they can be folded.
Let's start looking at table options from the tabletop that is installed on it.
Materials and tools for assembly
The main “person involved” in the assembly in this case is the furniture panel or laminated chipboard. What to choose?
Furniture board
Its advantage is its flexibility in work. The most common on sale are pine panels; they are easy to sand and drill. To process such a shield yourself, you do not need special conditions or specific tools.
The fly in the ointment in this story is the need to treat the pine with impregnation and cover it with several layers of varnish.
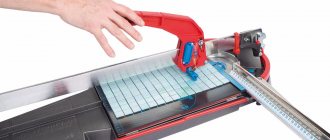
This is a more capricious material for processing: when cutting, chips occur and a protective edge is required for all open cuts. If you have no experience at all in processing laminated chipboards, it is better to order a ready-made countertop of the required size. Sometimes hardware stores provide cutting and edging services.
Although laminated chipboard is not doing well with processing, it is doing well with the choice of color and texture. Here you can have fun, making a table that perfectly matches the interior of the kitchen.
Advice. The thickness of the tabletop plays an important role. It affects both the strength of the furniture and its visual perception. For a kitchen table, a thickness of 3 cm is recommended.
Now let's talk about fittings - ready-made supports and fasteners. Depending on the design features, furniture timber can be used - it prevents the tabletop from sagging. To do this, a rectangle is made from timber, a frame is made - a base. The role of the table is to distribute the pressure that we put on the shield while sitting at the table. The timber can also act as legs.
The set of necessary tools includes:
- screwdriver,
- drill,
- screwdriver,
- saw,
- jigsaw,
- sandpaper,
- roulette,
- pencil,
- oblique knife.
Countertop material
Often, the dimensions and designs of handmade folding tables are determined by the material of the tabletop.
If we talk about tables located indoors, then most often the tabletop material is furniture laminated chipboard.
And the size of such a tabletop largely depends on the physical space that is allocated to this table. Moreover, there can be one tabletop, or you can make it a composite one, then the table takes up much less space when assembled.
For tables that will be located outdoors, the tabletops are usually made from:
- Natural wood, preferably coniferous, so that it is not so susceptible to rotting.
- Or artificial materials such as fiberglass or getinax, since they are not afraid of moisture or temperature changes.
- Of course, you can use moisture-resistant plywood or OSB board.
The benefits of making it yourself
Some of the benefits of working independently are obvious. The products are unique in their kind. Moreover, the design can be thought through to the smallest detail to get the perfect product in all aspects at once. Fans of handmade work will be able to realize their potential, learn something new, or make another piece of furniture while maintaining some common features between them. Not least on the list of advantages is the ability to control the manufacturing process, namely the quality and other features of the model. The master will constantly have access to information about the features of the place or room for which the table is intended. As a result, both the appearance and useful characteristics will be better than those offered by the market. As for monetary benefits, homemade tables have an advantage here too.
Among the disadvantages, the following nuances are noted:
- Manufacturing will take much longer than purchasing.
- There is a good chance that the product will break.
- You will have to first learn some of the nuances of carpentry.
Table frame material
The frame of the table largely depends on its purpose. Thus, tables for indoor use are usually made from furniture chipboard.
And tables for the yard can be made from a metal corner. Tourist tables are usually made from an aluminum tube and a corner from the same material.
Table transformation mechanism
The choice of design and diagram of how to make a table will largely depend on the folding mechanism of the table. The simplest mechanisms can be made with your own hands for tables located on the street.
The tabletop of such tables usually does not fold, since this is not necessary, but only the frame is made foldable, so that such a table is reduced only in its width.
For tables that will be located indoors, the mechanism is usually much more complicated; it is not always possible to make it yourself, so you can purchase a ready-made suitable option.
Master classes on making creative models
Homemade garden furniture has a number of undeniable advantages: a laconic, yet unusual and stylish design, the absence of fragile or easily dirty parts, and reliability. In order to successfully implement your own or borrowed project, it is not necessary to achieve high surface quality. Much more important is originality, the unexpected use of familiar objects in a new quality. Below are several interesting options that can serve as an example or impetus for developing your own garden furniture projects.
Bench made from old chairs
Old chairs that have served their purpose can still perform their main function for some time, only in a slightly different capacity. They make simple, convenient benches for the garden, which even inexperienced home craftsmen can assemble. To make such furniture, you can simply connect several chairs assembled in a row with one common seat. Or use the second method of creating a bench, when the base is two chairs facing each other. Their backs in this case play the role of armrests. Assembling such a garden bench is somewhat more complicated, since it is necessary to remove the drawers and make longer common crossbars.
You can approach creating a product even simpler. In this case, you will not have to remove the front legs, which will increase the strength of the structure and speed up the process of assembling the bench. The back of a piece of furniture can be made from a wooden strip attached to the upper parts of the armrests. After this, fill it with a plywood board, or install several horizontal planks to form a supporting plane.
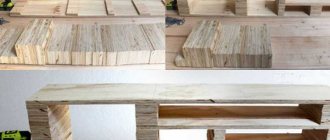
Summer cutting table made from pallets
Pallets are convenient and affordable blanks for creating any home improvement items. They make successful furniture, easily transformed or disassembled into separate fragments. A simple garden cutting table can be made from three pallets, two of which are installed on an edge - they serve as supports. The third is fixed at the top and represents a lid (table top).
This design is as simple as possible, but the main drawback is instability. Meanwhile, creating a more durable connection is inconvenient and impractical, since this will result in the mobility of the furniture and the ability to quickly disassemble the summer country table being lost.
Experienced craftsmen advise using a slightly different option for assembling the cutting surface, which is practically devoid of the disadvantages of the method described above. Such a homemade product is good because it allows both rigid connection of pallets with subsequent grinding and finishing, and simple stacking of them on top of each other until the desired height of the product is obtained.
In addition to tables, sofas or armchairs are made from pallets. The assembly process is not difficult, and the surface relief can be made the way the owner wants. A common solution is sanding and painting the product. Alternatively, you can leave the pallets in their original condition to emphasize the camp style of the furniture.
Types of shelves, storage furniture, selection criteria
Folding table with benches
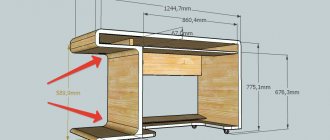
A good option for making furniture for a summer house is a folding table with benches. If necessary, it can accommodate several guests; if not needed, the furniture can be folded and put away in the barn. You can make a separate table with folding legs and two benches, or you can assemble a transforming structure, where a bench with a back turns into a table with benches on the sides.
A ready-made drawing of a folding table with benches allows you to consider the operating principle of this garden furniture and avoid errors during assembly.
Ordinary furniture bolts are used as hinges. The back of the bench “tips over” onto the seat, one half of which slides back and turns into a second bench. You can make all load-bearing furniture elements from wood or use a rectangular metal pipe. The choice of base depends on what tools and skills the master has.
The tabletop and seats of the product are in any case made of wood. The easiest way is to use boards with a thickness of 25 mm (“inch”), which must be planed and carefully sanded. It is recommended to choose deciduous wood - poplar, birch, aspen or alder. If softwood boards are used - pine or larch, you should carefully inspect them for resin pockets. They will release resin that will stain clothing or get on your skin. It is not practical to use such blanks for making garden furniture yourself.
A completely wooden country table is assembled using self-tapping screws, only the moving parts of the product are attached to furniture bolts. If the supporting structure is made of metal, the assembly is carried out entirely on threaded connections.
Drawing of a set of wooden elements for making a transforming bench
Typical drawing of a transforming bench
Bars for legs
Frame boards
Screwing the legs to the slats
We connect all the elements with self-tapping screws
Wood element
Ready-made wooden transforming bench assembled and disassembled
Hanging chair made of hoop and rope
This version of garden furniture is suitable for macrame lovers. The main supporting structures are two hoops connected at an angle to each other. One of them forms the plane of the seat, and the second is a unit that combines the back and armrests of the product.
The hangers are made from nylon cord, braided using the same technique as filling the seat and backrest. For the seat, a hoop with a diameter of 70 cm is used, for the back - 110 cm. The length of the hangers for the garden chair is chosen based on the existing conditions. Typically, the support is thick tree branches or (more often) horizontal beams installed on supports between two adjacent plants, buildings or other structures. To make a chair you will need to prepare:
- about 900 m of cord for weaving;
- slings for suspensions (about 12 m);
- metal-plastic pipes - about 6 m.
The production of the structure occurs according to the following scheme:
- The hoops are made from a metal-plastic pipe with a diameter of 35 mm. The length of the workpiece is calculated using the school formula (for hoops of the indicated sizes 110 and 70 cm, you will need 345 and 220 cm of pipe, respectively).
- The ends of the blanks are connected with inserts made of wood or plastic, which are fixed with self-tapping screws.
- First, the surface of the hoops is tightly wrapped with cord. Then the area of the smaller one is filled with mesh.
- After this, both hoops are connected so that on one side they are connected tightly, and on the other they form an angle of lifting the backrest.
- Next, the side vertical surface is filled with weaving, the method and pattern of which are selected to suit your taste. The slings of the hanging garden chair are braided in the same style as all other surfaces.
For the seat of a hanging garden chair, it is worth making a soft, removable cushion; it will simultaneously serve a decorative and practical function.
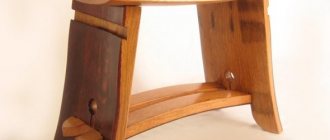
Universal bench-stand for summer residents
The universal “upside-down” bench is a favorite piece of country furniture for all those who like to grow gardening plants. The product serves as a good assistant at work, as a means of relaxation, and can perform other functions.
Types of furniture for verandas and terraces, popular stylistic solutions
In one position, such a country bench is an ordinary seat, and if you turn it over, a comfortable knee rest appears. For production, wooden boards or polypropylene tubes are used. The choice of material is determined by the preferences and skills of the dacha owner. Assembling a wooden universal bench is not difficult:
- Three blanks are cut out - a seat and two side supports.
- The bench parts are assembled using glued dowels or metal corners. For reinforcement, it is recommended to glue wooden bosses to prevent the structure from swaying diagonally.
The disadvantage of a bench made of wood is the lack of elasticity and rapid loss of rigidity of the joints, which is why most dacha owners prefer plastic products. To assemble a “changeover” from polypropylene, you will need to purchase 4 m of tubes with a diameter of 32 mm. In addition, you will need angles and tees (fittings) - 8 pieces of each. The assembly process is carried out according to the instructions:
- Using a hacksaw (or a regular saw with a fine tooth), cut six pieces of length 24 and 14.5 cm. Then 4 pieces each - 34.5 cm and 3 cm.
- Using a plumbing soldering iron, the middle part of the product is made - from 14.5 cm sections and two 24 cm crossbars.
- Then 4 vertical supports of 34.5 cm each are attached to them, onto which corner fittings with 24 cm crossbars are soldered.
- At the bottom of the bench, 3-centimeter inserts with fittings and the same crossbars (24 cm) are attached.
The last step is to install plywood platforms on the working surfaces. You can glue pieces of tourist foam to them to make it softer to sit on or rest on your knees. This garden structure is lighter, stronger and not susceptible to moisture.
Cut two trapezoidal legs
Make holes for ease of carrying and operation
Drill holes for pins
Make holes in the sides
Drive in the pins, coated with glue, and connect to the sidewalls
Finished bench
What tools are needed to assemble the table?
The best instructions on how to make a folding table with your own hands are those created by the table designer himself. It is possible to provide not only the assembly order, but also the necessary tools.
As a rule, the required set of tools will depend on the type of table that the owner has chosen. But, as a rule, this is:
- Drill or screwdriver
- Electric jigsaw
- Roulette
- All kinds of drills and bits.
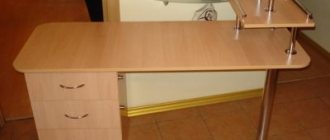
Installation
The folding table stands out thanks to its unusual design, which with simple efforts will increase the area of the tabletop significantly. But these are not all the advantages that a folding kitchen product has.
To assemble such a device, no high level of knowledge is required. For assembly you only need a drawing and a tool. We will tell you about some parameters:
- Each table leg should be 71 cm in height.
- Two parts that cannot be removed.
- Four side parts of the box.
- Planks for transformable tabletops.
Photo of a folding table with your own hands
Please repost
0