Arranging a workspace in the kitchen is very important both for the convenience of the housewife who is busy preparing food, and from the point of view of a holistic perception of the interior. When the colors of the walls and furniture are in harmony with each other, a favorable mood is created and the desire to use your strength to create culinary masterpieces.
The most important element of the kitchen, along with the stove, is the work table - a comfortable and functional surface of which must withstand daily mechanical and thermal loads, exposure to moisture and grease, and aggressive environments. At the same time, it should be easy to wash and not be afraid of cleaning agents and disinfectants. Ceramic tiles are perfect for this. Kitchen furniture manufacturers rarely, on their own initiative, make tile countertops lined with artificial stone or tiles. This is not technologically feasible in production. But you can easily make a tile countertop with your own hands.
Pros and cons of tiles for kitchen countertops
Usually, ceramics are used to finish and decorate the surface of the table, which has many advantages:
- Aesthetics, large selection of shades and patterns;
- Strength, durability;
- Moisture resistance;
- Not damaged by hot objects (frying pan, kettle);
- Easy care: wet cloth, some cleaning products.
Minuses:
- If the installation is incorrect, then dirt will accumulate in the joints;
- Do not wash with liquid containing acids.
Advantages and disadvantages of porcelain stoneware countertops for the kitchen
The raw materials for the production of porcelain tiles are environmentally friendly. The finished material does not release toxic substances into the room and does not contribute to the proliferation of harmful microorganisms. Hardness is sufficient for surfaces of any size. A large selection of colors allows you to choose tiles to suit any design. Small tiles can be laid yourself.
Other advantages are no less important:
- resistance to household chemicals and mechanical damage;
- thermal stability (you don’t need to use a stand for hot dishes);
- resistance to high humidity;
- practicality, easy care;
- maintainability;
- durability;
- attractive look.
The price of porcelain stoneware is 5 times lower than the cost of natural stone. Some consider the disadvantage to be the increase in final cost when using products from foreign manufacturers.
Other disadvantages:
- the installation process is relatively labor-intensive;
- seams are regularly updated;
- in the absence of regular wiping, the shine of the surface is lost;
- Do not use cleaning agents containing acids.
- Another disadvantage of porcelain stoneware is its fragility. The fact is that porcelain stoneware exhibits excellent resistance to impacts and other damage only after laying on the surface. And porcelain stoneware itself can easily break, especially during transportation.
Porcelain tiles can crack even during transportation
If it is necessary to replace such a tabletop, it is difficult to dismantle it.
Necessary tools and materials for tiling a kitchen countertop with your own hands
To cover the table surface with tiles you need:
- Material of the required format;
- Plywood;
- Special adhesive composition for laying out ceramics;
- Devices for filling gaps: rubber spatula, brush, non-rigid material, etc.;
- Level for construction (they use it to measure and change the arrangement of tiles);
- Roulette, pen;
- Apparatus for creating cuts on material;
- Wood saw;
- Hammer;
- Electric screwdriver.
Making a tile base for a kitchen countertop: step-by-step instructions
As a rule, tiles for kitchen countertops are laid on top of the kitchen unit. It should not fail even with a large weight of the finish, so in its design it is necessary to consider the following points:
- We need to attach a few more legs to the furniture. This will strengthen the support and prevent the cabinets from being damaged under the trim, no matter what size it is. It is important to distribute them at the same distance from each other and from the middle so that the load is placed evenly on the plane.
- All cabinets must be connected to each other to obtain a straight, level surface.
- Either particle board or plywood is used as the base for the top layer (ceramics). We give this layer the dimensions of a bedside table. Initially, it should have an allowance of a couple of cm on 4 sides.
- We cover the wood layer with liquids that resist rotting. The main thing is to cover all areas and not miss anything. A coating of disinfectant compounds at the end is encouraged.
It is possible to make the base of a kitchen countertop from ceramic tiles with your own hands. To do this, use plywood sheets as a base.
Table top base made of two layers of plywood
Chipboard should be laid in two layers when the countertop is large. Base laying process:
- Place the first sheet of plywood. We give it a shape identical to the format of the bedside tables. Use the remaining board to fill in the gaps.
- We fasten with self-tapping screws. Treat with disinfectant and water-repellent liquid.
Assembling the base for a tile countertop
This stage is very important; its durability and appearance depend on how well you make the base for your countertop.
How to assemble a quality base:
- Level the bedside tables. Additionally, we fasten them to the wall with screws.
- We fasten the plywood sheet with glue designed for fastening wood. For strong bonding, spread the adhesive mixture in all directions and do not miss a single empty area.
- We secure it in the corners and in the middle of each side with screws (the main part does not need this, since it will receive the necessary fastening from the glue).
- We apply a liquid to the areas where the screws are located that repels water.
Advantages and disadvantages of the material
The tile countertop is heat resistant and resistant to mechanical stress. In the kitchen, such properties will provide additional comfort when working, because hot dishes can be placed directly on the table without fear, and when peeling and cutting food, the coating is not threatened by the blade of a knife.
A kitchen countertop made of tiles does not absorb fat, coloring the juice of vegetables, and soot practically does not stick to it. When cleaning after cooking, dirt from the table can be easily wiped off with a wet cloth. You have to resort to cleaning agents only in difficult cases (if the bottom surface of the dishes is burnt). But even heavy stains on tiles can be easily cleaned with baking soda and a hard sponge.
The durability and hygiene of the coating is complemented by extraordinary decorativeness. By choosing the color scheme of tiles for finishing the kitchen during renovation, it is easy to create fashionable and beautiful compositions. The advantages of a tile countertop include the versatility of the material: it is suitable for decorating a kitchen in any style.
If any element of the coating is accidentally damaged, replacing it will take no more than 1 hour. After 24 hours (this is the time it takes for the glue to harden), the tabletop can be used again.
The material has virtually no disadvantages when used in the kitchen. When using tiles as a table covering, it is not possible to achieve a smooth surface, because it consists of individual elements with gaps between them. But high-quality processing (grouting) of joints during self-installation easily solves this problem.
Laying tiles on the base
The finishing must be laid on a foundation that is dry and completely saturated with disinfectant liquids. For maximum reliability, we apply a cement mixture. It is the connecting link between the outer layer and the base.
Making a cement pad
To create it, you need to prepare a mixture of cement or use an adhesive structure for slabs instead. Dissolve the chemical composition in water in accordance with the proportions (the method of preparation is indicated on the package).
We distribute the beacons along the plane of the table (it is convenient to measure space using them). We place one of them on the wall, and the other on the side edge (end) of the planned tabletop.
Then carefully place the tile on this layer. Excess cement is removed with a spatula (the main thing is not to smear it on the wall).
Laying
The top area needs to be marked to ensure it is free of unwanted protrusions.
Making the marks correctly:
- Mark the middle part of the planned countertop. Draw 2 lines dividing the length and width in half. You should end up with 4 identical rectangles.
- Apply glue to the bond between the top layer and the base when it is dry. You need to start from the outer corner to maintain the integrity of the tile. Use a serrated spatula.
- Place in straight rows according to the marks. Change and correct the location at the building level.
- We cut pieces and use them around the edges and in inconspicuous areas.
How to cover the end of a countertop
The cut must be made neat and beautiful. The dimensions of the finish should not entirely correspond to the dimensions of the bedside table; it is necessary that the edges of the finish extend slightly beyond the boundaries of the base. Cut off the excess and attach to the sides.
Grouting joints
The final stage is processing the seams with a special material. You need to choose a colorless one or the same shade as the tile (so that it is not noticeable).
The seams are rubbed with a rubber spatula, applying grout evenly over all surfaces. To remove excess, glue paper (painting) tape (adhesive tape) onto the plane and gently peel it off. The tape must be removed 24 hours after installation.
Making a contact layer for tiles
The first option is quite simple. A cut sheet of GVLV or DSP with sawings for washing is treated on the inside with a primer. A layer of tile adhesive (the same one we purchased for the tiles) is applied to the top layer of plywood using a notched trowel. A sheet of GVL or DSP is laid on the layer, pressed down with a mallet and fastened with self-tapping screws to the top layer of plywood. The joints between the wall and the contact layer are treated with silicone sealant. A strip of GVL or DSP is attached to the outer side edges with self-tapping screws. The joints between the strip and the side edge are filled with silicone sealant, or covered with tile adhesive, and then coated with liquid glass. On the surface that will be directly tiled, it is necessary to attach a painting mesh and cover it with a waterproofing compound. Here all layers of the tabletop and side edges are already processed.
That's all, after drying the surface is ready for covering.
Hand on heart, I’ll say that throughout my entire career as a tiler, I made countertops this way.
However, while collecting material for this article, I came across a completely new (for me, at least) technology, which turned out to be “good old technology”. Moreover, in the West, where tile countertops are in fashion, it has received well-deserved recognition.
So, the second option. We have two layers of plywood fastened together and securely attached to the kitchen section. The side edges are treated with a waterproofing compound, a painting mesh is fixed to the surface, on top of which everything is treated with a waterproofing compound.
We set up beacons. We need to make a cement pad 1-1.5 cm high. For beacons we will use 1.5x3 cm slats. We install the first slat and fasten it to the side edge of the tabletop so that it rises 1.5 cm above the plywood surface. We fasten it it is strictly level, maintaining the horizontal. The slats will subsequently be removed. Thus, there is no need to secure them with a large number of screws, 2-3 pieces are enough. We attach the second rail flat along the surface. Using a level, we check the horizontal line between the first and second beacon slats. Next, we place lighthouse slats on the sides of the table top. We put them like the first one, fastening them with self-tapping screws. You can use gypsum profiles and racks as beacons.
In the place where the cut was made under the sink, we screw two slats to the piece of plywood that remained as a result of the cut on the back side. It is inserted into the hole under the sink and secured using self-tapping screws that are screwed into the plywood through the slats.
Now we prepare the solution. What to choose as a cement pad for our countertop? This can be tile adhesive, cement-sand mortar made in a factory (since dry fractionated sand is used in its production), cement-sand mortar with the addition of some glue (for more convenient work). The only thing I would like to advise is: when mixing the solution in water, add 1 part latex to 2-3 parts water. We will get a very durable and practically waterproof coating.
The resulting solution is applied with a trowel and leveled with a 60 cm spatula along the installed beacons. When the mortar begins to set, we unscrew the slats, having previously cut the contours along the hole for the sink with a spatula, and take out a piece of plywood along with part of the mortar. We trim the edges. Smooth the surface with a spatula or metal trowel. In order to obtain a more even surface, you can lightly moisten it with a spray bottle. Once the solution has set (after about 4-6 hours for a cement-sand mixture, 12 hours when using tile adhesive), remove the lighthouse slats. We putty the edge with a solution and add the solution to the locations of our beacons. Level it to the level with the main mortar layer and smooth it. We leave our countertop for 2-3 days. At this time, you can start purchasing tiles and related materials.
How to install correctly: features
To install correctly, you need to listen to the advice of experts:
- When adjusting plywood to the format of tiles or porcelain tiles, you need to leave a couple of cm “in reserve” on 4 sides (the tiles should slightly overhang the plywood).
- Cuts and corners of the tabletop must be processed at least 2 times. This should be done especially with the sink cutout to avoid rotting.
- In the cooking area, you need to go over the protective layer several times (to resist heat).
- To obtain a moisture-proof cement layer, when diluting it, add a little tile adhesive mixture.
Before laying the tiles, it is important to ensure that the base is level.
Photos of do-it-yourself tile kitchen countertops
The smaller the size, the more difficult it is to install. The more textured its surface, the more difficult it is to care for. Tiles can be not only of different sizes and colors, but also textured or smooth, glossy or mirrored. The catalogs contain a wide variety of materials made of stone and stone imitation; you can also find tile imitation like wood and metal.
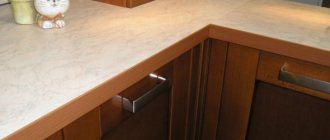
An apron made of the same material as the table surface looks good: you can choose a similar color or one that harmoniously matches it from the same manufacturer’s collection.
Advantages of a tile table
A table lined with ceramic tiles has undeniable advantages:
- Durability and functionality of the surface.
- Ceramic tiles are not afraid of high temperatures and are difficult to damage. So you can cut vegetables or fruits on a ceramic table, and you can place hot dishes on it.
- The tiles are not afraid of moisture, so you don’t have to worry that after just six months the surface of the wooden table will suffer from constant moisture.
- Easy to care for. The tiles are easy to clean; for this you can use a regular fiber sponge and mild household chemicals. You should not use abrasive products to wash and clean ceramics; they can damage the front side of the tile and leave scratches.
- Individual design and a variety of colors. The tiles offer a variety of textures and colors, so you can choose what suits your taste.