Every parent knows the situation when the child’s toys are scattered throughout the house, and there is simply no place to store them and they are put away in closets or large bags. But you can avoid this development of events if you use a special box for storing toys. They are sold in stores, but are quite expensive. You can always make a box for storing toys with your own hands, and the child will be able to provide all possible help. This article will present several ideas for creating a toy box with your own hands. All of them are simple and quite doable at home.
Using a Box to Create a Toy Box
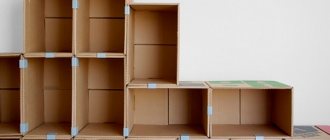
After parents see prices for cute baskets or boxes for storing children's toys in stores, they want to create them themselves. This idea is not so bad, especially since it can be implemented in different ways. To create a box you will need a box made of thick, non-corrugated cardboard. Often they use packaging from household appliances of a suitable size. If there is no such container at home, then it is likely that it will end up with friends or relatives, since many people, after purchase, store the boxes throughout the entire warranty period.
Advice! If none of your loved ones have the box, then you can ask the seller at the department store for it. Usually there the goods are received in exactly this packaging.
Covering a box with paper
The found box must be freed from the lid by simply cutting it off on all sides. We cut holes on the sides that will later serve as drawer handles. For reliability and greater strength in the future, all joints inside the box are covered with tape.
To decorate the box you need to take multi-colored paper. This role is best performed by wrapping paper, as it is quite durable and has many bright patterns on the surface that can be matched to the overall design of the children's room. If paper is used in combination, it is cut into strips of equal width and length corresponding to the height of the box.
Advice! To simplify the work, you can use self-adhesive paper.
Using a brush, lubricate the area of the box to be pasted and begin to carefully apply the paper. You must try to glue carefully to avoid bubbles and wrinkles on the surface of the box. To do this, a piece of paper is ironed carefully from edge to edge. The next sheet is placed with a slight overlap on the previous one. Thus, the box is glued on all sides.
Using scissors, carefully cut out the places where the handles of the box were previously decorated. We decorate the edge of the cut with a thin strip of the same paper. The design of the top cut of the box is created in the same way. The box is ready to use!
Covering the box with fabric
In this case, all corners and joints of the box on both sides are taped to make the finished box last longer. Next, you need to take fabric of one or more colors and cut out 2 sets of blanks from them in accordance with the size of the box. One should be exactly the same size, the other should be a little smaller.
Important! If the cutting is carried out in the shape of a cross, then the fabric consumption is greater than if the blanks are made in separate parts.
The blanks are sewn together to make 2 bags. One is pulled onto the box from the outside, the second is placed inside. Using universal glue, the blank is glued along the entire perimeter of the bottom of the box so that the bags are securely fixed to the box. Be sure to glue at the corners to prevent the fabric from moving. Hot melt adhesive works well as a fixing agent.
After the glue has dried, the upper parts of the blanks need to be folded inward and the box carefully sheathed on top. Using scissors, handles are cut in the planned places. It’s just worth noting that there is no need to cut out too large pieces of fabric. It is necessary to leave about 1 cm for a neat edge design. The remaining fabric is folded inward and hemmed. After the handles are decorated, the box is considered ready. You can leave it as is or decorate it as you wish.
Making a box with handles
In order to make a toy box with handles using a box, you must follow the following algorithm:
- We take 2 types of fabric, thick rope or tape, a glue gun or universal glue.
- Cut a strip of fabric that is enough to cover the bottom completely and wrap inside the box. The length should be such that it completely covers the perimeter of the box.
- Glue this strip to the box. In this case, the excess fabric is wrapped inward on one side and covers the bottom of the box on the other.
- We measure out fabric of a different color so that the piece completely covers the inside of the box.
- We coat the surface inside the box with glue and glue the fabric prepared in advance.
Important! Tucks are made along the edges and fixed at the junction of two types of fabric. - We measure out the tape or rope and glue it along the bottom, along the entire perimeter of the box.
- We measure two pieces of the same tape of the same length and glue them on both sides, forming handles.
- At the top of the box we glue another tape around the perimeter so that it covers the bottom of the handles.
Using wood as a material for a box
To create a wooden box you will need male strength, since it is more difficult to complete than its analogue from a box. But it will also last longer than the box. The resulting box can become an independent piece of furniture in the interior of a children's room if it is appropriately decorated. For example, if you put sofa pillows and a blanket on top of the box, it can turn into a comfortable place to sit.
The instructions for making a wooden toy box are as follows:
- Creating a sketch of the future box indicating the exact dimensions and configuration. For example, will the box have legs or be placed on the floor, or perhaps it will be equipped with wheels for ease of movement.
- Preparation of necessary tools and materials. Plywood or MDF is used as the base for the box.
Advice! If you have old furniture at home and don’t mind disassembling it, then there is an opportunity not to buy the material separately.
- In addition, you will need fasteners in the form of screws and corners, door hinges, wood glue or PVA. The tools you will need are a hacksaw, a screwdriver or a screwdriver.
- If the boards were purchased in a store, you can immediately ask that they be cut to the required dimensions on the spot. If this is not possible, then you can do it yourself with a hacksaw or saw. A jigsaw will quickly and efficiently help you get the parts you need. As a result, 4 walls, a bottom and a lid should come out.
- Assembling the box. To do this, all joints are coated with glue, then every 2 parts are connected with corners. The lid is attached to the finished box on the door hinges. After installation, excess glue is removed with a damp cloth, and the box is left to dry for some time.
- Drawer decor. This stage can be carried out as your imagination requires, for example, carefully sand the box and paint it the desired color. You can draw on the finished surface yourself or using child-themed images using templates.
- If desired, you can attach arms and legs.
This toy storage box will decorate the nursery and help teach your child to put toys back in their place.
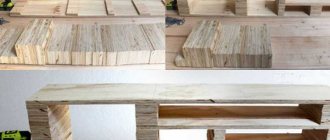
Box of planks
Original wooden boxes for storing toys are made from individual planks. To create this version of the box, you can follow two algorithms. The first involves making the bottom from plywood, attaching 4 bars to it in the corners and connecting them together with separate, pre-treated boards. During installation, thin nails are used, and gaps are left between the elements to improve ventilation.
The second way to create such an interior item for storage also involves creating a bottom from plywood, but also nailing it on both sides. At the same time, the decoration with planks also goes along the perimeter. This will create a box with solid edges on both sides and ventilation on opposite sides.
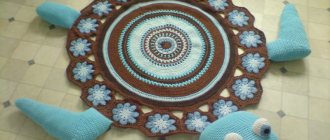
Soft toy box
Such a product can be created using a spiral-shaped frame. You can purchase a ready-made basket for storing toys and remove this frame from there. It is better not to use such store-bought baskets as a place to store toys, since they are covered with synthetic material, which is not beneficial for the child.
The process of making this box is as follows:
- The synthetic fabric is carefully removed from the frame and a pattern from natural material is created using its template.
- For the interior space, a pattern is made from a different fabric.
- The bottom is cut out of the densest material and sewn to the frame.
- The outer and inner bags are put on and inserted into the frame, respectively, and sewn together.
Thus, you get a soft toy box that is harmless to the baby’s health, which can always be tilted if desired. A small child will not bump into it due to its softness, and there will be enough space in it to accommodate all the toys.
Square Basket
A DIY toy basket doesn’t have to be made round. Square organizers in the form of drawers and boxes are even more convenient. If you use American, Japanese or South Korean cotton to create them, you can get a bright storage accessory of very high quality. To ensure that the basket does not wrinkle and keeps its shape well, the walls are additionally reinforced with dublerin. The handles are made of dense material: they must withstand heavy loads and not come off if the child wants to move his toys.
Before sewing a toy basket with your own hands, we determine the size of the product and prepare the material. In addition to fabric and dublerin, you will need cardboard and a glue gun to make the bottom.
- We cut out two identical squares from the material and remove a square from each edge to form a cross-shaped blank.
- We make the same blank from dublerin.
- Then fold the first square diagonally and sew along the outer edges, right side out.
- Open the fabric and stitch the remaining sides.
- We apply the dublerin to the second square and sew with the front side inward. You should end up with two “cubes” without one side. It is better to use a denser and more wear-resistant fabric for the lining than for the outside.
- Apply glue to the cardboard bottom blank and place it into the outer “cube”.
- We insert the second cube and begin to process the edges of the basket: we tuck them in, secure them with pins and baste them by hand. All that remains is to sew the edge and make the handles. Additionally, you can make labels by writing on them what toys are inside, or take a photo of them. Handmade toy basket!
These simple ideas for organizing a child's room will definitely help bring order and make cleaning easier. You just need to remember that children imitate adults, and it is best to teach them to cleanliness by personal example. And bright and unusual baskets for storing toys will definitely help bring comfort and harmony to your home!
We suggest you familiarize yourself with How to properly wash floors? All the secrets of washing dishes without harm to women's hands and mood
Several of these multi-colored container boxes can be made in different sizes for separate storage of various types of construction sets, balls, dolls and bears, children's books, etc.
Some tips from a professional
If a cardboard box is used as the material for creating a toy storage box, then it is worth checking its bottom and walls for strength. If they are soft, then such a box will not last long.
If you are making a wooden box, you must make holes in its walls or leave gaps so that the toys can be ventilated. For the same purpose, cardboard boxes with filling are not closed.
To attract the attention of a child, a toy box made using any technology must be brightly decorated. For example, you can use the patchwork technique, which involves gluing narrow strips of bright paper onto the entire surface of the box in a chaotic manner. Or square pieces of paper can be used for this purpose. You can go further and purchase ready-made decorative elements, for example, animal figurines or other images, bows, which are glued in random order to the surface of the box.
Advice! If there is no space in the nursery to place a box, then you can make several low boxes that can be easily placed under the bed or table.
Storage racks
A very convenient option for storing many toys is to make a wooden rack (open). In it, each shelf can be occupied either by pull-out cardboard boxes or standing books, lying soft toys and many children's necessary items. The main thing is that the child can take them out independently and subsequently put them back.
The rack is made of wood with square cells. At first it can be placed horizontally (while the child is small), and then turned over and placed vertically (when he grows up). Subsequently, such racks can be installed in several different sizes and heights, resulting in a whole furniture system for storing not only toys, but also necessary items for study.