When purchasing furniture, you can notice a clear discrepancy between the prices of materials for their manufacture and the final price of the product. This is especially noticeable when purchasing fairly simple pieces of furniture, such as stools.
Stools are most often made from chipboard.
Stools are most often made from chipboard. It is a fairly cheap material, easy to work with, durable and great for indoor use. Taking one look at a chipboard stool, it’s easy to understand that making one with your own hands is quite easy. We invite you to familiarize yourself with detailed instructions for making various configurations of stools at home.
Taking one look at a chipboard stool, it’s easy to understand that making one with your own hands is quite easy.
General recommendations for making stools
You can make a stool with your own hands, having professional and non-professional elements and devices at hand.
You can make a stool with your own hands, having professional and non-professional elements and devices at hand.
The seat of the resulting chair can be made soft using foam rubber and upholstery material.
Required tools include:
- electric jigsaw, complete with a fine file;
- screwdriver
To decorate the seat of the stool, you can also prepare foam rubber and upholstery materials.
You may also need a drill with a drill and a stapler for construction purposes.
The upholstery can be fabric, oilcloth, leatherette.
To simplify the assembly task, you can first glue the parts together and then secure them with self-tapping screws.
Materials for production:
- chipboard sheets, new, substandard or remaining spare parts from old furniture;
- self-tapping screws, no longer than the thickness of the chipboard;
- confirmations 4 pieces. Dimensions 6.4 mm by 50 mm;
- metal corners 4 pieces;
- adhesive tape for processing sheet edges;
- thrust bearings made of any acceptable materials;
- sandpaper for sanding.
Creating a stool from chipboard with your own hands allows the master not to limit himself to standard models.
Non-professional tools that can be found in any home:
- pencil or marker;
- cardboard for making templates;
- ruler or tape measure;
- knife of any configuration, most importantly sharp.
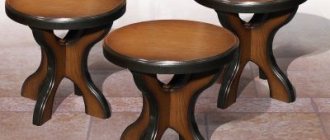
The seemingly simple design of a stool has several dozen different models.
The parts of the stool are assembled using confirmations and self-tapping screws.
To decorate the seat of the stool, you can also prepare foam rubber and upholstery materials. The upholstery can be fabric, oilcloth, leatherette.
You can look at visual examples in furniture stores, from your neighbors or on the Internet.
What tools will you need?
From materials you need to get sheets of chipboard or laminated chipboard, as mentioned earlier.
But you can even make stools from plywood. It is only advisable to use durable material so that it can withstand the load. In addition, you will need the following tools and materials:
- Electric or simple jigsaw. The first is preferable, as it is much more convenient and faster for them to work.
- Screwdriver or drill.
- Drill.
- Self-tapping screws or euroscrews.
- PVA glue or liquid nails.
- Sandpaper.
This is a must-have toolkit. If you want to make a soft seat, you will also have to stock up on upholstery material, padding polyester or foam rubber. Usually fabric or leatherette is used for upholstery.
If you decide to use fabrics, it is best to choose thick ones, as they are less susceptible to wiping. Be sure to also buy a special finishing tape, which will need to be glued to the edge of the finished stool. The choice of tape depends on the color and thickness of the chipboard. You can install plastic attachments at the bottom to prevent damage to the material.
Create a project
Creating a stool from chipboard with your own hands allows the master not to limit himself to standard models. The seemingly simple design of a stool has several dozen different models. You can look at visual examples in furniture stores, from neighbors or on the Internet.
Usually several stools are needed at once, so it is extremely important to choose one shape you like and make identical objects according to the chosen drawing.
When starting the final assembly of parts, it is necessary to pre-treat all cut edges with a special tape.
Usually several stools are needed at once, so it is extremely important to choose one shape you like and make identical objects according to the chosen drawing. When making a drawing, it is important to remember that the design of a stool requires a strict balance between its lower and upper parts. A discrepancy between the dimensions of the seat and the width of the legs can lead to an imbalance, as a result of which the object will be very unstable and therefore dangerous.
When making a drawing, it is important to remember that the design of a stool requires a strict balance between its lower and upper parts.
Choosing material for manufacturing
Stools can be made from different materials. Chipboard, multi-layer plywood, wooden blocks and boards are suitable. The cheapest and easiest to use material is chipboard. Sheets can be purchased in a store, at furniture factories, or you can buy scraps from small companies that make custom-made furniture. Sheets of old chipboard that were previously parts of other furniture are also suitable.
The main thing is to decide in advance on the number of pieces of finished products and calculate the required volumes of materials.
A discrepancy between the dimensions of the seat and the width of the legs can lead to an imbalance, as a result of which the object will be very unstable and therefore dangerous.
The final step in preparation before assembly will be drilling the necessary holes.
We apply graphic markings
Stools can be made from different materials.
Having decided on the model of the future stool, you need to mark a sheet of chipboard, thereby preparing it for further work. If you plan to make several identical stools, then it is better to make a pattern for all parts of the furniture. It is convenient to make the template from thick cardboard.
For further ease of use of the manufactured furniture, the corners of the parts should be rounded. It is better to make even curves using a compass. The absence of this item can be compensated for, for example, with a plate of suitable diameter.
The cheapest and easiest to use material is chipboard.
High speed will ensure cutting of sheets without chips or nicks. After trimming, you need to sand all the edges of the stool with sandpaper.
Depending on the selected shape and model, the dimensions of the elements may be as follows.
No. Stool model Seat dimensions Leg dimensions Crossbar dimensions
- 1 30x30 30x40 20x12
- 2 30x40 30x40 30x15
- (3 pieces)
- 3 40x40 20x35 (8 pieces) 30x20
- (4 pieces)
Sheets of old chipboard that were previously parts of other furniture are also suitable.
Cutting out elements for the future stool
The main thing is to decide in advance on the number of pieces of finished products and calculate the required volumes of materials.
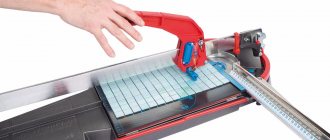
Cutting out elements from existing pieces of chipboard is done using an electric jigsaw.
Cutting out elements from existing pieces of chipboard is done using an electric jigsaw. You can make a good edge cut using a fine file and high speed jigsaw. High speed will ensure cutting of sheets without chips or nicks.
After trimming, you need to sand all the edges of the stool with sandpaper. This processing will ensure a good fit of one part to another and simplify assembly.
The final step in preparation before assembly will be drilling the necessary holes. Make sure the holes are drilled at the same level.
Having decided on the model of the future stool, you need to mark a sheet of chipboard, thereby preparing it for further work.
Assembling the stool
When starting the final assembly of parts, it is necessary to pre-treat all cut edges with a special tape. The tape must be chosen to match the color of the sheet or, conversely, contrasting shades.
The tape is applied to the cut of the legs and seat and glued with a hot iron. The iron must be applied with quick and short movements. The warm tape should be pressed down with a clean cloth. The glue, which is on the back of the tape, sets very quickly and does not require long heating or cooling.
The parts of the stool are assembled using confirmations and self-tapping screws. To simplify the assembly task, you can first glue the parts together and then secure them with self-tapping screws.
The seat of the resulting chair can be made soft using foam rubber and upholstery material.
For further ease of use of the manufactured furniture, the corners of the parts should be rounded.
It is better to make even curves using a compass.
DIY stool made from chipboard
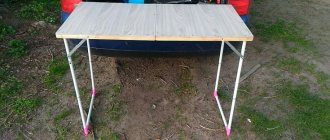
Hello dear DIYers and site guests.
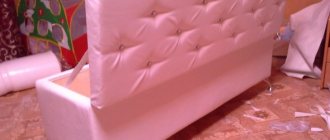
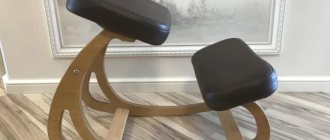
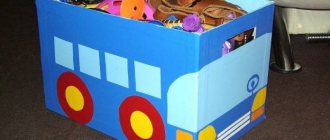
Today I want to show off another of my homemade products - a pouffe stool with a soft seat and a place to store small items inside. To make this thing we need
old shelves from cabinets or a piece of thick plywood, at least one centimeter thick. Tools needed: a drill and a drill with a diameter of 6 mm, an angle grinder with a grinding disc, a circular saw, a tape measure, a measuring angle, furniture bolts and a key for them, two small loops for the saddle, a glue gun, several small nails with a wide head
Now let's begin the process of assembling the stool.
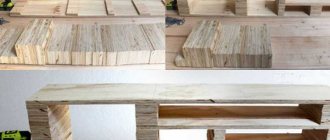
step 1. take the source material. in my case, these are shelves from old Soviet cabinets.
Now we need to mark the blanks. The height of each part is 35 centimeters. I made two parts, the sides, 30 centimeters wide. the other two are 27 centimeters each.
we cut it out. the following blanks are obtained for the future stool
Step 2. Now mark on the side of the workpiece the places for the holes for fastening the furniture bolts. We apply one side panel to the edge of the other, mark the width with a marker and, in any order, make holes in any place convenient for you.
Now that we have drilled holes on the side panel, which is 30 centimeters wide, we apply another side panel, which is 27 centimeters wide. and with a pencil we mark the markings for drilling at its end so that they coincide with the holes on the first sidewall.
drilling one hole in the end of the part 27 centimeters
we drill out others. Step 3. For this, I no longer marked each hole, but simply tightened one furniture bolt and aligned all the edges of the part, and began to drill along the holes of the first part. it turns out much faster and more convenient.
tighten all the bolts. You will need three of them on each side.
Step 4. We carry out similar actions with all the details. As a result, we get a rectangle that is the basis of our stool.
Step 5. The next stage of work was sawing out the bottom and lid of the stool. I got two blanks with the dimensions indicated in the photo
The dimensions of the upper part, which will be the seat, are indicated in smaller sizes, since the foam rubber will be attached to it, and if the dimensions are left as on the lower part (the bottom of the stool), then the lid will close very poorly. Step 6. Next, I took a grinder with a petal disc and sanded all the ends and sides of the rectangle.
Step 7. The next step is to attach the bottom part (bottom) to the rectangle. take 4 furniture bolts and screw them in. they will be quite enough. The part is held tightly. step 8. Now that our stool is assembled, let's get down to what, in my opinion, is the most tedious task. we need to cover it with fabric to give it a finished look. take a piece of fabric whichever you like best. spread it on a flat surface and place a pouf on it.
Next, we attach the fabric to the edge of the stool with a stapler.
We stretch the fabric around the entire perimeter of the part so that it is wrinkle-free. when we approach the already stapled edge, we bend the fabric and also fasten it to the staples.
Since the wooden base is quite strong and staples cannot always penetrate it, we knock it down with a hammer. Step 9. After covering, unnecessary fabric remains at the ends. we trim it.
We leave a few centimeters at the bottom and top so that we can bend and hide the ends.
We fasten the fabric at the ends of the stool with staples.
this is what it should look like. folded and covers the corners.
step 10. take another piece of fabric, but more dense. We will attach it to the very bottom of the stool, covering part of the trim and the open space.
We do the same with the upper part. We fasten the fabric to the edges of the stool.
Step 11. For the next steps we will need 2 pieces of foam rubber and a glue gun.
We put a smaller piece of foam on the seat and glue it.
Step 12. We attach the remaining piece of foam rubber, larger in size, on top of the first. We turn the corners and attach them to the inside of the seat.
It turns out this is the detail.
Step 13. The next step is to cover the foam rubber on top with some fabric. we do everything exactly the same as when we sheathed the bottom of the stool.
Since the thickness turned out to be large, the staples were not pierced. I had to fasten it with nails with large heads so as not to pierce the fabric. The end result is a seat like this:
Step 14. The final stage of this master class is to attach the seat to the stool. You will need a couple of small hinges and small wood screws. we fasten.
Now we use a piece of fabric to connect the seat and the wall of the stool from the inside. This is necessary so that when opening the seat does not recline completely back and does not loosen the fastenings. it also reduces the possibility of breaking off a piece of the wall if opened carelessly
In the end, we get this interesting thing: Thank you for your attention. All the best to everyone! Nikolay
Become the author of the site, publish your own articles, descriptions of homemade products and pay for the text. Read more here.