- How to make a swing with your own hands: interesting ideas with photo diagrams and drawings, for the garden, cottage, playgrounds
- What types of garden swings are there: characteristics and types of structures
- How to make a swing in the country: features of making a garden swing with your own hands
- Material for making a swing with your own hands
- Advantages of wooden swings
- How to make a swing in the country: photos, drawings, sizes and modifications
- Where to place a swing in a summer cottage
- Drawings and photos of garden swings made of wood
- How to make a wooden swing for a summer house with your own hands: drawings and selection of materials
- Additional materials for creating a family hanging swing in a summer cottage
- Instructions on how to make a wooden swing for a summer house on support posts
- Location and fastening of swing posts to the ground
- Methods of fastening the crossbar
- How to make a wooden swing seat
- Metal swing for a summer house on support posts
- How to make a swing from pallets and boards
- How to make a swing from a hoop or hula hoop
- How to make a “spider web” swing from a hoop, step by step instructions:
- How to make a canvas swing
- DIY hanging swing
- Video: how to make a swing for your dacha with your own hands
What types of garden swings are there: characteristics and types of structures
There are many types of products that are used by both children and adults. Self-made models can have a simple mechanism in the form of a seat that is suspended on a crossbar, or have a complex structure, for example, collective-type options.
Note! During the work process, you can use any available materials left over after construction and repair activities. Such furniture is installed under the roof, in the shade of trees, on the lawn, or on a specially prepared area.
How to make a children's swing at the dacha with your own hands.
Garden swings can be classified based on different parameters:
- Depending on the installation method, they can be stationary or collapsible (portable). Portable – products with compact dimensions and light weight. These characteristics allow you not only to move the swing around the site, but also to put it in a car for transportation to another place during your vacation. As a rule, such products are secured to a tree branch or to a pre-made support.
- Swing vertically or horizontally. In the first case, it is a swing balancer, in the form of a crossbar mounted on a support, which is located in the middle. In the second, these are hanging options.
- By age category, all products are divided into children's and adults. Children's designs can have a significant number of modifications. Most often, the main components of such a product are supports, a small seat and fasteners.
- By number of seats - single, double, multi-seat. The design is based on a long bench, which acts as a large seat that can simultaneously accommodate up to 5 people. In most cases, swings of this type are equipped with their own canopy, protecting them from sunlight and bad weather.
- By type of construction – frame, frameless structures. In the first option, tree branches can play the role of load-bearing support. The latter are distinguished by a more complex device, where the crossbar is placed on reliable supports, and the seat is supported by metal rods or chains.
- Depending on the presence of a canopy, there are open and closed options.
- There are no restrictions on form at all. Both the frame and the seat have a wide variety of appearances, may include forged elements, and have an original, unique design. Represent hammocks, sofas, soft chairs, sun loungers, look like boats, rockets, imitate animals and birds.
Click on the photo to enlarge.
Click on the photo to enlarge.
Care
In order for garden swings to last a long time, they should be properly cared for and the following rules should be followed:
- swings made of logs are recommended to be placed under the roof;
- Before the autumn-winter period, annually treat the wooden surface with an antiseptic or wax stain;
- remove collapsible structures in a warm and dry place for the winter;
- varnish the swing 2 times a year, after first cleaning the old layer with fine sandpaper;
- Do not install wooden swings close to ponds and fountains.
Important! Wooden swings should not be covered with polyethylene, as this will retain moisture in the wood and may cause rot.
To learn how to make a swing with your own hands, see the following video.
How to make a swing in the country: features of making a garden swing with your own hands
Arrangement of the territory, the correct choice and appropriate design of recreation areas is one of the important tasks facing the owner of a local area. When decorating your property with flower beds, gazebos, and artificial ponds, you should not neglect such an item as a swing. This is one of the few furnishing options with which you can complement the landscape and enjoy a comfortable and cozy stay in the fresh air.
gallery columns=”2″ size=”full” link=”file” ids=”7541,7553″]
A self-made swing allows owners of private country houses and dachas to relax, calm down, and dream while sitting on a swinging bench; moreover, homemade structures are the pride of their owner, an object that can be boasted to acquaintances and friends.
When choosing ready-made purchased designs, it is not always possible to find and select models that satisfy all requests and are suitable in design style for a specific situation. In this case, the best option would be to make it yourself, because a homemade swing has the following features:
- Construction cost. A self-made swing will cost an order of magnitude cheaper than purchased analogues, and you can use any available material for the work.
- Originality of design. Such furniture, made in-house, will be exclusive, stand out, and become a source of pride.
- Quality. Everyone decides for themselves how good the product will be.
- Model selection. At the design stage, you can independently determine the type of swing, for whom it is intended, whether only children or all family members will use it. The design will be a suspended seat or an entire sofa installed under a canopy with an adjustable backrest.
- Choice of material. You can make a swing from different types of wood, metal, rubber, plastic, combine raw materials, give a second life to old things.
- Experience. When constructing structures, a person gains experience, which can later be used to build other buildings.
Material for making a swing with your own hands
To create a garden swing, three main materials are most often used. This list includes wood, plastic and metal. Undoubtedly, each of these materials has its own advantages and disadvantages.
Note! To make a swing at home, when constructing the product yourself, there are practically no restrictions in the choice of raw materials; anything that can be found on your site will do, be it metal pipes, old sofas or car tires.
Wooden swing in the country.
Let us dwell in more detail on the main components used in the process of making a garden swing with your own hands:
Rope. Allows you to build a rope version in the form of a “bungee”. The most basic way to create a makeshift play structure for swinging is to just tie a long rope to a tree branch or crossbar, and attach a wooden seat or log to it from below, which you can grab with your hands.
Plastic. The material is used mainly for seats that can support the light weight of a child. To build a simple structure, just make holes in the plastic seat and attach it to a rope suspended on a branch or crossbar. Can be combined with other materials.
Metal. To work with this material you will need welding skills. The resulting structures are strong and durable. From the raw materials you can make both ordinary welded and elegant forged structures for the street. The only drawback of corrugated pipes is their susceptibility to oxidation, so the metal surface must be treated with special coatings.
Tree. Classic building material. With its help, you can make a design of any shape and complexity. At the same time, wood is easy to work with, which allows even an inexperienced beginner to create a beautiful swing that will fit into any garden.
Note! When it comes to drawings for garden swings, you will not find a more practical and convenient raw material than wood.
Drawing of a wooden swing of the optimal size for one person.
Wooden swings have only one drawback, which concerns the operation of any products made of wood. Such structures without the use of appropriate protective measures can be severely damaged by the influence of negative environmental factors.
These factors include the impact of:
- rain;
- snow;
- direct sunlight;
- fungi and mold;
- insects;
- sudden temperature changes;
- decay processes.
Helpful advice! To extend the service life of the product, it is necessary to treat the wood with special impregnations, varnishes, and paints.
Wood antiseptic for interior and exterior use: how to choose the best composition (read more)
How to create a project
Thematic resources have a huge number of typical swing patterns with dimensions and detailed descriptions. However, they do not always meet individual requirements or fit harmoniously into the space. When developing your own project, you need to decide on the model, number of seats, type of base, and seat configuration.
Initially, the design features are clarified, then the parameters of individual elements. Each detail is drawn separately. After preparing the diagram and determining the dimensions, you can begin to work.
Advantages of artificial rattan garden furniture, primary colors
Size calculation
When choosing a ready-made one or drawing up an individual drawing, it is important to correctly calculate the dimensions of the future structure. Optimal sizes are determined using basic proportions:
- width of one seat - from 50 cm;
- distance from the ground - from 55 to 60 cm;
- The height of the swing frame should be about 2 m.
In suspended structures, the appropriate distance from the edge of the seat to the side posts is 15–40 cm. The parameters depend on the characteristics of the suspension: chains, ropes. The seat height is calculated depending on the comfortable position of the sitting person’s legs.
Choosing a base and suspension
A safe swing in the country should have a wide, preferably monolithic, base. If you plan to use standard straight legs that do not provide additional support, preliminary preparation of the installation site will be required. This is necessary to prevent the supports from sinking into the soil. Fastening to the ground is done using pins or staples. The supporting frame is made of metal, profile pipes with a diameter of 7 cm or timber. The following types of designs are distinguished:
- Alcove. Similar models are installed in the garden by hospitable owners who often receive guests. The manufacture of such a model is only possible if you have the appropriate experience.
- Cradle. The best option for a dacha, allows you to accommodate three people at once. Swings provide comfortable conditions for relaxation and communication.
- Acrobatic trapeze. Consists of a crossbar attached to hangers. The model is fixed on supporting supports or on a tree.
- Wide trapezoid. It is a small bench with ropes tied to the edges.
Alcove
Cradle
Acrobatic trapeze
Wide trapezoid
When making a country swing with your own hands, chains, ropes or rods with bearings are used. Different suspension options have their advantages and disadvantages:
- Chains. Allows you to change the height of the swing. Pros: durability, strength, protection from moisture and fire, resistance to high loads. Cons: lateral vibrations when rocking, the surface is cold to the touch.
- Ropes. A popular material that is often used in the manufacture of swings. Pros: low cost, convenience and safety when riding, ease of repair and replacement. Cons: susceptible to the negative influence of sunlight, moisture, can withstand less weight than chains, and can come untied.
- Rods on bearings. Reinforced design that can withstand any weight. Pros: strength, reliability, load resistance. Cons: requires regular maintenance.
When installing a garden swing with your own hands, you can use the lower frame or do without it. If there is a rigid platform, special studs are used for fastening. The finished product will stay securely in place. If there are doubts about the stability of the model, a screed is made of timber, which is fixed with brackets.
Chains
Ropes
Rods on bearings
Seat model
The function of the seats is performed by simple benches, complemented by armrests and a backrest. Options that imitate comfortable armchairs or sofas are popular. Some models are full-fledged gazebos that can accommodate a large number of people.
The main difference between benches and gazebos is the level of comfort. In the first case, the swing seat is made of wood, in the second - from suitable fabrics. The choice depends on personal preference and the purpose of the design.
The simplest seats are made from logs or boards. Plastic models are common, but they do not last long. Textile options are the most uncomfortable due to the fact that the body collapses in them under the load of its own weight.
Advantages of wooden swings
Wood has excellent technical and performance characteristics. Thanks to the properties of this material, you can create a truly comfortable and beautiful design.
Features of a DIY wooden swing:
- Environmental friendliness. Since wood is a natural material, products made from it are completely safe for human health;
- External aesthetics. The structures can fit into any landscape and garden design, since the main part of the environment consists of natural materials (stone, wood) and vegetation. Compared to metal products, structures made of wood significantly benefit in aesthetic terms and can support the exterior of any country house;
- Safety . Due to its softness, wood is convenient to work with and use, and can reduce the number of injuries. This advantage is most beneficial if you intend to design a children's swing;
- Simple installation system . Anyone with basic skills in construction and handling wood can start building a swing;
- Versatility. This type of material lends itself quite easily to various types of processing (grinding, cutting, cutting). Thanks to this, any of the DIY garden swings made of wood, the photo of which you like the most, can be made by you yourself without involving specialists in this process. Wood allows the construction of single-seat structures or swings with large capacity, made in the form of sofas.
Advantages and disadvantages of wood
Wood is a popular material in construction. Among the advantages are the following:
- safety;
- beauty;
- availability.
The disadvantages of wood are as follows:
- requires more careful maintenance when compared with metal structures;
- difficult to tolerate unfavorable conditions (moisture, sunlight, sudden temperature changes, insect attacks).
How to make a swing in the country: photos, drawings, sizes and modifications
A homemade swing will be an excellent addition to any summer cottage. They will help make outdoor recreation comfortable and cozy, will delight both children and adults, will allow them to enjoy the flight, and will lift their spirits. A homemade structure will be a source of pride for its owner, testify to his good taste, and decorate the area.
Note! If you have decided to start creating a swing at your summer cottage yourself, first of all you should decide on the type of structure you want to install and determine a suitable place to place it.
To facilitate and speed up the design and preparation stage, use a photo of a swing for a summer house, there are many drawings of which on the Internet.
Which one to choose?
are several tree species worth paying attention to
- Conifers (pine, larch) are not afraid of insect attacks and do not crack over time. But they are susceptible to mold and rot. Special antiseptics help combat this problem.
- Oak is perfect for any type of building. The advantages include durability and ease of use. But the disadvantage of this type of wood is its high price.
- Linden is an analogue of oak - it is strong and beautiful. Due to its low ability to retain heat, it is practically not used in construction, but it is quite suitable for swings.
Where to place a swing in a summer cottage
Any type of construction that is carried out on the territory of a suburban land plot begins with the design stage and selection of the appropriate location.
It is recommended to choose the back of the house to place the swing. Even if your site is fenced off from a noisy street and neighbors, this area will still be the most comfortable and quiet. The backyard in most cases is set up for relaxation, and you can safely use it to install a family or children's outdoor wooden swing for the garden.
Note! The principle according to which the site for construction is selected applies not only to children's swings made of wood. These requirements also apply to other design options.
When placing a children's swing in the garden, it is necessary to provide enough space for swinging.
Whenever possible, you should select a plot of land with a flat surface in your garden. It is advisable that this area be sheltered from the sun and precipitation. The ideal place to create a swing is an area under a tree where thick shadow falls. Installation on a porch protected by a canopy is allowed.
All these conditions directly affect the level of operating comfort, since sitting on a swing seat that is hot under the sun is unpleasant and uncomfortable. And unimpeded exposure to rain can damage the structure.
Portable swings can be moved to any place on the site, depending on weather conditions.
It is also worth taking into account the fact that as the sun moves across the sky, the shadow cast by a tree or other objects will move. For installation, you should select a place where there will be shade at midday. During this period of the day the sun has its strongest and most aggressive influence.
Drawings and photos of garden swings made of wood
If we talk about universal designs, then a hanging swing, installed on A-shaped supports, will become a real recreational object for the whole family. Moreover, they can be installed both in large summer cottages and in small gardens near the house. And the process itself is not expensive in terms of time and effort.
Swing chair design with soft cushion cover.
The list of required tools for work should include:
- tape measure and pencil (the tape measure can be replaced with a measuring tape);
- mechanical or electric jigsaw;
- circular saw;
- hacksaw;
- square for measuring angles (combined type);
- rafter pins;
DIY swing bed.
- test square;
- sawhorses;
- thicknesser and planer;
- hammer, screwdriver, clamps, wrenches;
- chisel (25 mm);
- electric drill with a set of drills (10, 8 and 4.5 mm);
- sanding block.
Note! Of course, purchasing a ready-made design in a store is much easier and faster. But in this case, it is unlikely to fully meet all your requirements in terms of design, size, etc. Creating a garden swing with your own hands from wood according to your own drawings will allow you to endow the structure with all the necessary characteristics.
A swing in a quiet corner of the garden will allow you to enjoy the aromas of greenery.
How to make a wooden swing for a summer house with your own hands: drawings and selection of materials
At the initial stage, materials are prepared to create a garden swing with your own hands, the photo of which you liked the most. Based on the drawings, you can easily understand how many blanks will be required to assemble the structure and what dimensions they should have.
Dimensional table for creating blanks:
| Detail in design | Dimensions of the transverse part of the workpiece, cm | Final length, cm | Required number of blanks, pcs. |
| Frame part of the structure | |||
| Spacer (upper) | 4.5x14 | 23 | 2 |
| Spacer (lower) | 4.5x14 | 96 | 2 |
| Leg | 4.5x9 | 198,7 | 4 |
| Rigel | 4.5x14 | 210 | 1 |
| Seat parts | |||
| Rear pillar | 3.5x7 | 60 | 2 |
| Bar (support) | 3.5x7 | 95,5 | 2 |
| Bar (for seat) | 3.5x7 | 120 | 2 |
| Armrest | 3.5x7 | 60 | 2 |
| Back strap | 2.5x7 | 130 | 2 |
| Armrest support | 3.5x7 | 27,5 | 2 |
| Seat bar | 2.5x7 | 128,4 | 8 |
| Upper bar | 2.5x9 | 130 | 1 |
In addition, to connect the above blanks together into a single structure, fasteners with different parameters will be required.
Creative ideas
Most people prefer to make a classic garden swing with their own hands from metal or wooden beams. If the design is created for children, it is worth considering the design taking into account their hobbies. For boys, the theme of airplanes, cars and other vehicles is relevant; girls will like decorations in the form of ribbons and flowers.
Characteristics of garden and dacha furniture, main materials of manufacture
Thanks to a wide variety of ideas, you can make a beautiful swing with an original appearance. To produce a simple seat, you can use a regular car tire. Using hangers, the tire is attached to a tree branch or a ready-made support. The result is a stylish garden decoration.
Unusual swings made from pallets are extremely popular. There are single-seat models and large sun loungers, which are full-fledged places to relax. Comfortable seats are made from wooden circles, punching bags, and fitness balls. It is important to remember that the amplitude of movement in this case will be quite high.
A convenient children's model is made from a hoop suspended on chains. The seat is wrapped with foam rubber or other soft filler and tied with ropes. Large seats are comfortable for sleeping, relaxing, lying down. The designs are distinguished by their spectacular appearance and have no age restrictions.
The swing bed performs a decorative function and has a wide range of functionality. The model is used for relaxation, sleep, various activities, and outdoor games. Suspended structures are fixed between posts or trees; products with a frame move freely around the garden or summer cottage.
Forged swings have an attractive appearance. Original patterns, smooth lines, metal elements are in harmony with almost any design of the site.
Additional materials for creating a family hanging swing in a summer cottage
The final dimensions of the structure are: 2.1 m (width), 1.235 m (depth) and 1.9 m (height). It is recommended to use impregnated pine as a raw material.
Dimensional table of fasteners:
| Fastener type | Dimensional parameters, mm |
| Galvanized screws | 8x65 |
| Screws (24 pcs.) | 8x50 |
| Screws | 8x38 |
| Screws (8 pcs.) | 10x75 |
| Nails (roofing) | 2.5x40 |
| Nails (convex head) | 2.5x65 |
| Screws with a square head and washers for them (8 pcs.) | 8x100 |
| Bolts with a semicircular head and nuts for them (2 pcs.) | 10x125 |
| Eye bolts with washers for them and lock nuts (6 pcs.) | 100 |
Note! Prepare in advance an antiseptic suitable for wood processing, as well as materials for finishing. These points are thought through at the design and planning stage of the future structure.
In addition to the fasteners, you will need a number of additional materials: a pair of wooden spacers for the corner area (length 38 cm), sandpaper with a grit level of 120, hooks equipped with a safety lock (6 pcs., 5 mm), a chain 4.4 m long (link thickness 2 cm).
A swing with a soft mattress and cozy pillows is a great place to relax.
Instructions on how to make a wooden swing for a summer house on support posts
The best material for making durable swings is wooden beams. Square lumber ensures simple assembly of the structure, easy fitting of parts, and connection of corners. This favorite garden element of landscape designers is happily used by children and adults. You can make such a swing yourself in any size and shape.
Drawing of the support part for a wooden garden swing.
Location and fastening of swing posts to the ground
Stationary structures must be securely fixed in the ground so that they do not turn over during the movement of chains or metal rods. In the selected area, mark a place for the racks and dig holes. We fill the bottom of each hole with sand to protect the structure from distortions and subsidence. The layer must be at least 10 cm.
Click on the photo to enlarge.
Click on the photo to enlarge.
Before placing the supports in the recesses, their lower part should be treated with bitumen mastic or wrapped with roofing felt. In the pit they must be in a strictly horizontal position. Fill them with cement mortar. While the mixture has not dried, the position of the racks can be adjusted. Further work can be carried out after at least 10 days.
Methods of fastening the crossbar
The wooden crossbar to which the bench or seat is attached can be fixed in several ways. If the swing is in a prominent place in the yard, then it is better to use options that are aesthetically pleasing. They are complex in execution, but will give the street structure a special, presentable look.
Click on the photo to enlarge.
Click on the photo to enlarge.
You can securely fasten the crossbar as follows:
- To an overhead beam attached below the intersection of two supports;
- Lay the supporting beam between the crossed side posts;
- Half-tree fastening. Special cuts are created at the joints.
How to make a wooden swing seat
The seat of a wooden swing should also be made of wood. This is one of the simplest, most convenient materials. It is easy to process and provides full scope for imagination. From it you can create a real carved work of art.
Click on the photo to enlarge.
Click on the photo to enlarge.
You can make a simple design from two frames - one part is for the seat, the other for the back. We make stiffening ribs in them and connect them together using corners and self-tapping screws. According to the instructions, we screw special bolts into the front seat beam and the upper part of the backrest. This seat can be used for an outdoor structure or in an apartment.
Rope is much cheaper than metal, it is more pleasant to the touch, but it can fray, so it requires periodic revision and visual inspection of its condition. In addition, this swing material is less durable. This is an excellent option for hanging simple single-place products, hammocks.
DIY wooden swing.
Wooden swing bench, step 1: design sketch and preparation of parts for assembly.
Wooden swing-bench, step 3: fixing the connected parts with self-tapping screws.
Wooden swing bench, step 2: applying glue and fastening the parts together.
Wooden swing bench, step 5: attaching the armrests.
Wooden swing-bench, step 6: treating the product with protective compounds.
Wooden swing bench, step 4: installation of the back and seat of the structure.
The A-frame structure is the most reliable as a support for a swing.
Self-production
When you decide to make a wooden swing with your own hands, take a simple design as a sample. It will turn out to be reliable and will not require professional carpentry skills from you to join the parts.
Let's consider the sequence of assembling a garden rocking chair from logs, branches and slabs.
Before starting work, you need to select smooth tree trunks or logs of small diameter (up to 15 cm). They will be used to make sidewalls. The length of the material must be at least 2 meters. After this you need to make a sketch drawing. It indicates all dimensions and methods of connecting parts.
Attention!
When calculating the length of the sidewalls, the distance between them and the height resulting from their combination, it is very useful to remember the school curriculum, namely the Pythagorean theorem for a right triangle.
Our design conventionally consists of two such right triangles, where there is a hypotenuse (the long side opposite the right angle) and legs (the sides forming a right angle).
The theorem goes like this:
In a right triangle, the square of the hypotenuse is equal to the sum of the squares of the legs.
A graphical representation of this theorem is shown below.
The manufacture of the frame begins with the sides. The locations of connecting notches are marked on the logs. Then use a hacksaw and chisel to select wood and drill holes for the tie bolts.
Grooves are cut out in the lower parts of the supporting legs for installing side ties. You can attach them to the racks without cutting, “overlapping”. However, such a connection will not be rigid enough.
The next step is to install a crossbar (crossbar) from a log. To do this, the sidewalls are placed vertically and secured with temporary ties. Having placed the crossbar on the forks of the racks, it is fixed to them with screws through steel corners.
To increase the rigidity of the frame, it is reinforced with jibs. They can be made from thick branches or scraps of timber.
Having assembled the frame, we begin to make the bench. Its supporting base, to which the backrest and seat boards will be attached, can be made from a profile pipe. Without good carpentry skills, it will be difficult to assemble such elements from wood.
Having cut the pipe according to the dimensions of the drawing, the sections are butt welded and holes are drilled in them for attaching the boards. To hang the bench, steel rings are fixed by welding at the upper and lower ends of the profile pipe. Chains with carabiners will be attached to them.
Through holes are drilled in the crossbar for eye bolts.
Under the nut that tightens the mounting bolt, you need to place a steel washer with a diameter of at least 6 cm and a thickness of 3-4 mm. To prevent unscrewing, screw the locknut onto the nut and tighten it tightly.
For quick attachment and convenient adjustment of chain length, we recommend using carabiners. They are taken one by one into the suspension rings. After this, check the evenness of the bench installation. If necessary, adjust its position by adding or reducing the number of free links.
For more reliable fixation, wooden swings can be buried in the ground. To do this, dig holes 20-30 cm deep, install the ends of the posts in them and fill them with a mixture of crushed stone and sand. To protect against rotting, wood in contact with the ground must be thoroughly treated with an antiseptic.
The swing can be covered with a light canopy on top. To do this, two thick branches are screwed to the upper ends of the racks with self-tapping screws. Several boards are attached to them and covered with slate, reed or metal tiles.
Good afternoon. Today we will make a swing for a summer cottage. I decided to immediately collect in ONE ARTICLE all the variety of swings for the dacha (from simple to complex). So that you can choose the swing model that you like best.
I WILL NOT ONLY show ideas - we will also CONSIDER each model in DETAIL
…
And also - I will tell you HOW to attach the swing to the support beam - all 4 ways.
I will start from the SIMPLE ideas of a swing for a summer house - to more COMPLEX AND MORE INTERESTING ideas.
And the most original swing ideas for children
- with slides, rope climbing frames and built-in wigwams - I put it in a separate article
So let's get started...
A SIMPLE idea - how to make a swing from a pallet.
If you have a wooden cargo pallet (pallet) left on your site (after bringing bricks or other building materials), then it can be used as a basis for a country swing.
We need a wooden pallet (pallet) - a strong rope - and something to hang it from. Or it will be a tree trunk. Or you can make a support on two strong pillars. We then - a little later in the same article
— we will consider
options for support for the swing
(and then I will dwell on this in more detail).
But... if you develop this idea of a swing from a wooden pallet further... then you can make everything much more comfortable... Like this...
And if you have not one - but 2 whole pallets found in your household... then from two pallets you can make a cozy swing with a back... paint... put in sofa foam cushions... And voila 2 shabby pallets - turned into a luxurious swing for the dacha .
Of course, the pallets must first be cleaned, sanded with sandpaper (so that there are no splinters) and painted (with stain or paint) and even varnished (but preferably moisture-resistant).
How to attach such a swing
– I’ll tell you at the very end of the article...
Rocking chairs are the SIMPLE IDEA of a swing for a dacha.
This is what this country swing looks like.
Please note - NOT JUST boards with a hole for a rope - but saddles, which are duplicated below by two more boards. So that the rope fastening holds tighter and there is no strong friction on the rope when swinging.
I think there is no need to explain for a long time how to make such a swing yourself.
ANOTHER MODEL – a swing with a rope for a summer house.
And here is also shown HOW you can attach a rope to a swing. That is, the essence is very simple:
We make 4 cuts (we cut out grooves) - 2 grooves at the end of the board - and 2 grooves along the edges closer to the corners of the board. (it is not necessary to make the edge of the board as semicircular as in the photo - the same principle will work on a rectangular section of the board).
And then, when 4 grooves are cut out, we place the rope in them in the same way as shown in the photo.
Even though the slots remain open
– the rope does not jump out of them. Under the force of tension, it only fits more tightly into the grooves - and a completely reliable fastening of the rope to the swing seat is ensured.
A swing for a summer house is made from a snowboard.
Or here’s another idea for a summer cottage... Snowboards are made from very durable materials. Although such a board looks thin, it is actually very wear-resistant (it is extremely difficult to break). And therefore it can also be used as a seat for a swing in the country.
Do-it-yourself swing for a summer house, made from two logs.
And here is another variation of a swing seat - made from two logs.
In the photo above you can see how easy it is to make this swing from two pieces of rounded beams. A very simple model. We wrap two pieces of rounded logs with rope and fasten them with some tricky sea knot.
A swing made from a board - with a roll in the longitudinal direction.
But the swing model is when the roll (motion vector) is directed in the longitudinal direction. Such a rocking board can be made longer - so that friendly neighbors and children can swing on it.
AND LET'S COMPLICATE THE TASK... now there will be more serious swings...
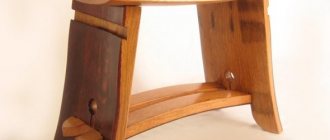
Country swings are made of rounded beams.
How do you like this cozy country corner?
Nice, right?
Let's take a closer look at how to make such a swing yourself.
SUPPORT – two A-shaped structures
from rounded beams - (two letters A are assembled from the beams - as we see in the photo) - we put them on legs and
lay a transverse beam on them
.
And so that this beam lies more securely on our A-shaped posts, we also (see it in the back) reinforce it with additional short beams.
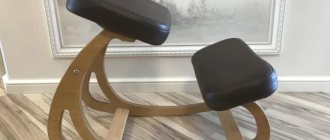
ROCKING CHAIR... here is an interesting rocking chair.
seat
– L-shaped bench made of beams and planks + armrests made of beams.
Seat holder
– also cool – it’s not a chain or a rope.
This is the same rounded beam - which with its lower end is tightly attached to the seat (in the area of its lower seat beam
and
in the area of the armrest beam
).
And the upper end of the beam holder has a movable fastening in the form of a metal ring. And this ring is attached with a fastening carabiner
the suspension support itself.
Detailed drawing
exactly
THIS swing made of timber
- (with dimensions and large photographs from all sides) - in a separate article... In this article you will find everything about bench-type swings.
But here is almost the SAME MODEL of the support post - but in a slightly different variation. And then an elegant lathing was added to the side of the support spreaders.
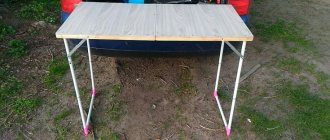
Swings for the dacha - made from rough timber.
Here's a model...
It can be made with a bench seat.
With two board seats, you get a swing for two separate places.
Moreover, note that
We hang them from the same anchors on which the swing-bench hung before. This way you can hang different rocking seats on the same swing support.
Or here’s another combination for the same swing support. Combined swing with a seat-chair and a seat-board.
Fastening elements are standard for swings - chains and carabiners made of metal rings and hooks.
This is what two chains from the back and seat of the chair look like - they meet in one ring and then go to the carabiner for fastening the beam.
And here it is - a fastening anchor with a carabiner for attaching a rope (or chain)
But I got ahead of myself...
In more detail (below in the same article) I will show 6 ways to attach a swing to a support beam
...there we will dwell on carbines in more detail...
In the meantime, we continue to look at what other models there are..
Almost the SAME model - but with a continuation for another swing.
Here is a variation of this model
– where the cross beam extends beyond the lateral boundaries of the support beams and a light rocking board is suspended from it.
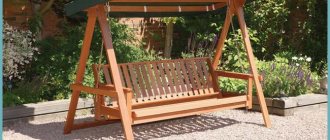
Wooden swing with canopy.
And here is a model of a swing complete with a canopy roof - in case of a rainy summer at the dacha.
And pay attention - there is already a ROPE HOLDER - another system of carabiners.
We will make these A-shaped swings (with supports in the form of beeches A) step by step in a separate article “Swings for a summer house - we do it ourselves STEP by STEP.”
Everything will be simple and clear there - in pictures like this.
You may also have a question...
What should I do if I want to build a swing?
but I don’t have beams - only boards?
Here is the answer -
a double board easily replaces timber in terms of endurance and load.
Well, now let's talk about ways to attach the swing to the support.
Metal swing for a summer house on support posts
Before starting work, you need to decide on the type of product, whether it will be portable or stationary, equipped with a polycarbonate canopy, stretched awning, designed for a child or an adult.
Metal swing in the country house.
For clarity, let’s look at a master class on building a stationary swing structure:
- We take a profile pipe 40x40 mm or 50x50 mm, using a grinder we cut 4 identical sections of 2.5 m long, and another 2 of 1 m each. For the crossbar you will need a round pipe with a diameter of 30 mm and a length of 2 m.
- On the one hand, on all 4 long profiles used as side posts, we cut the edges at an angle of 30°, after which we weld the pipes in pairs at the cut points, resulting in two isosceles triangles.
- To strengthen the structure, approximately at a level of 2 m from the top, we apply short sections, determine at what angle it is necessary to cut both edges of each pipe so that they fit tightly to the structure and form a single plane with it. Having cut the edges, we weld the horizontal jumpers.
- We weld a round crossbar to the tops of the racks, which are shaped like the letter A.
- We form the seat frame. To do this, cut 5 pieces of 1.5 m in length from a round pipe with a diameter of 20 mm, and another 6 of 0.5 m each. We weld the seat into a single structure, for this we lay out three long pipes so that the distance between the two extreme ones is 0.5 m, On top of them we lay three smaller pieces, two in the corners, one in the middle. In the same way we form the back, with the only difference, without one long crossbar on one side. We connect the two parts together at the required angle. On each side we weld two special eye nuts that will be used to fasten the metal chain.
- We cover the frame with wooden slats 30x30, 20x40, 30x60 mm, 1.5 m long, connecting the bars to the metal using bolts and nuts.
- Stepping back 25 cm from each edge, we drill holes in the crossbar into which the eye bolts will be placed.
- Using carabiners, we hang the seat on a metal chain.
- Next we install the swing. To do this, in the place where the structure will be installed, we dig 4 holes 40 cm deep, and fill the bottom of the hole with a sand cushion up to 10 cm.
- Mix the concrete solution.
- We install the swings with risers in the holes, strengthen each iron pipe in the hole with stones, and pour concrete.
- After the solution has dried, the product can be used.
Production technology
First of all, you need to decide which swing to install on the site. Hanging swings are mainly designed for children. If there is a seat with a backrest and armrests, they are suitable for children from 2 years old. Frame swings are suitable for both children and adults. Before starting work, you need to pay attention to the following points:
- create drawings;
- prepare materials and tools;
- manufacture elements and assemble the structure.
The drawing is an important part of the work. You can take any ready-made drawing that suits the type and change the dimensions if necessary. When independently preparing a drawing of the entire structure and individual parts, you need to consider the following:
- the stability of the structure depends on the shape of the base - the most stable in shape are considered to be A-shaped and L-shaped bases; a support of 2 pillars on the sides is allowed if their diameter is more than 20 cm and they are dug in at least 40 cm, and the swing itself is designed for 1 child;
- back height – 40–60 cm;
- seat depth – 40 cm or more;
- the length of the chains or rope from the seat to the attachment point is 90–120 cm, but custom sizes are possible.
Important! When creating a drawing, you need to take into account all the physiological characteristics of the child or family members, but it is not recommended to design with a large supply of support.
After creating the drawing, you need to decide on the type of wood. The most suitable option is larch or pine. For work you will need the following materials and tools:
- logs and boards;
- drill and drill bits;
- saw (chainsaw);
- electric hacksaw, jigsaw, screwdriver (screwdriver);
- eye bolts, metal screws with a ring, carabiners, self-tapping screws;
- hammer, plane;
- tape measure, pencil, square, level;
- chain or rope.
Important! After assembly, it is advisable to immediately treat the wood with an antiseptic and varnish.
For a hanging swing, you only need to make a seat and hang it from a support (tree branches). To sit, you will need half a log or a board of the required length, and you can also make a seat with a back, which needs to be secured with 4 ropes or chains.
Frame
Frame swings are made in the following stages:
- manufacturing of seat and frame;
- assembly of the structure;
- coating with antiseptic and varnish.
To make them you will need the following materials:
- beams 3x5 m for the base of the bench;
- beams 8x8 m for the frame;
- boards 2 cm thick.
Cut the beams into equal sections (approximately 40–60 cm). Connect in pairs so that the angle between the 2 segments is 100–1100 degrees. Use bolts for fastening; it is recommended to strengthen the joints with wood glue. After the glue has completely dried, use self-tapping screws to attach the boards along the entire length or only to the seat and back. Attach a chain or rope to the base with bolts in 4 places: on top of the backrest and below on the seat. Attach a carabiner to the other end of the rope, which is then secured to the frame with an eye bolt.
To make the frame, 2 logs are fastened together in the shape of the letter L (angle 37 degrees). For greater stability, it is recommended to dig the logs 20–30 cm and connect them with a board, the result should be the letter A. A total of 2 such elements are needed. Install them at a distance of approximately 1.5 meters from each other. Attach a 15x5 cm log or board on top, onto which screw eye bolts for the chain. For added strength, a board is also attached to the bottom of the back. After the structure is completely installed, you can begin coating with antiseptic and varnish.
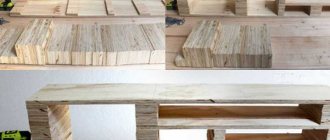
From wooden pallets
This type is quite popular among lovers of original ideas. Any pallets are suitable for production: European, Finnish or American. The strongest and at the same time the heaviest are the American versions measuring 1200x1200 mm. It is recommended to choose Finnish 1200x1000 mm. It is best to use new pallets, but used ones that first need to be repaired will also work. When choosing a pallet, consider rigidity - the boards should not bend under weight, otherwise they may break during use.
To make it, you need to cut the pallet and knock down 2 parts in the form of a sofa.
If you are planning a wide swing from 2 pallets, you need to nail the logs from below, which will bear the bulk of the weight. Next, make armrests from the bars: nail 2 bars on each side to the bench and fasten a board on top, onto which you attach eye bolts. Make a frame from logs and attach a swing from pallets using eye bolts and carabiners.
How to make a swing from pallets and boards
The classic model is a board suspended on a branch or crossbar with four holes along the edges through which a rope or rope is threaded. Instead of boards, you can give new life to old chairs, wooden gratings, and rounded logs.
Pallet swing, step 2: treating the wooden seat with a moisture-proofing compound and varnishing.
Pallet swing, step 3: secure the swing with a cable or strong rope.
Finished designs can be decorated with pillows, blankets and other decorative elements.
How to make a swing from a hoop or hula hoop
From an old metal or aluminum hoop you can build an excellent structure designed for comfortable relaxation.
There are several ways to do this. Let's look at a simple master class, using the example of how to make an unusual hammock from a hula hoop:
- We place the hula hoop on a piece of fabric, cut out two solid circles from it, the diameter of which is 30 cm larger than the rim used. For work we use only thick fabric, it is better to use denim, quilted fabric, burlap.
- We sew a zipper into one of the circle-cut pieces of fabric. To do this, you need to cut the fabric in the middle, not reaching the edges. Make the length of the cut, like the zipper, equal to the diameter of the hoop with a margin of 1 cm.
- Next, using a sewing machine, we sew together the two resulting segments; to do this, we fold them right side together.
- Turning the cover right side out, we make 4 holes in it.
- It is also necessary to drill holes in the hula hoop.
- To make the design more convenient, we cover the rim with padding polyester and place it inside the case.
- To hang the product you will need 4 pieces of rope of different lengths, one pair should be 50-60 cm longer than the other.
- We thread the ropes through the holes made, tighten them on the hoop, and each pair of different lengths should be on different sides.
- All that remains is to attach the structure to a branch or ceiling.
How to make a “spider web” swing from a hoop, step by step instructions:
- We strengthen the welding area of the hoop using metal plates or wire.
- Divide the circle into 8 equal parts and make marks with a marker. For better fixation of the rope, it is necessary to drill 8 symmetrical holes in the cavity.
- We cut 8 pieces of rope, the length of which is equal to two diameters of the circle with a small margin; you must use a strong cord 4-5 mm thick.
- We fold the rope in half, insert it into the holes on both sides, pull it tight, make knots, or, if there are no holes, make a loop on one side and a knot on the other. The sagging of the rope can reach 5 cm.
- Next, we attach the next cable perpendicular to the stretched rope, intertwining it with the first one in the middle crosswise.
- In the same way we start and fix the remaining six segments.
- If there are no holes, use a needle and thread to sew all the fastening points, as well as the middle.
- We fix 4 carabiners to the hoop, installing them symmetrically relative to the center, in the places where the ropes are attached.
- We cover the hoop with padding polyester and make a fabric blanket along the contour.
- Let's start with the longest activity - weaving a web. We start work from the center, make the distance between the rings 4-5 cm, intertwining each rope with each other, hemming the joints with threads.
- Once the structure is ready, all that remains is to choose a place to place it.
How to make a canvas swing
To make a structure from such material, you will need a chain, two metal triangles, and a piece of thick tarpaulin.
To begin, cut out a strip of the required shape from thick canvas. We put both ends of the fabric into metal triangles and bend them down, connecting them to the main part of the fabric. Next, using rivets, we connect each edge to the plane of the fabric. Instead of rivets, you can use regular bolts and nuts.
You can also use this material to build more complex structures in the form of hammocks, cover metal frames with it, and use it as a canopy.
Note! Due to the fact that the canvas is impregnated with fireproof, waterproof, and anti-rotting impregnations, the raw material is perfect as a base or an additional component of outdoor structures.
DIY hanging swing
It is good to install such models in a gazebo or under a canopy, on a patio or terrace, under the canopy of trees or in an open area. The design can be made from different materials; for convenience, the seat is additionally equipped with a backrest and armrests.
Such furniture is attached to a crossbar, a branch, or to the ceiling of a structure using metal rods or chains, long ropes or ropes. For clarity, let’s look at a few examples of what and how you can build a swing yourself.
Note! In terms of design, children's swings do not impose serious restrictions. To create them, you can use any available materials. For example, a rope can be replaced with a chain, a wooden board used as a seat can be replaced with a chair, after first removing its legs. Be sure to use bright colors, as children really like the abundance of colors.
A self-made swing at the dacha or on the territory of a rural farmstead will be an excellent addition to any local area. They will help make outdoor recreation comfortable and cozy, will delight both children and adults, will allow them to enjoy the flight, and will lift their spirits. A homemade structure will be a source of pride for its owner, testify to his good taste, and decorate the area.
(6 WAYS)
Fastening the swing with a carabiner (with a girth around the beam)
Here we see photographs of fastening systems for swings - which are attached either to a rectangular beam (square girth of a carabiner) - or to a rounded beam (round girth of a carabiner).
Through fastening - with a carabiner (with drilling of timber)
Or special anchor devices for through fastening to the timber. Most of the swings from our photographs in the article are attached precisely to these anchors.
You should not mistakenly believe that swings in the country are made exclusively for children’s fun. In addition to swings designed for the weight of a child, there are a lot of quite interesting options that will become an excellent element of landscape design and a place of relaxation.