How to make a porcelain stoneware countertop for the kitchen with your own hands: watch the video and photos, learn the installation features from our article.
The countertop is an important element of the kitchen, so it must be durable and resistant to mechanical damage. If replacement is necessary, it is important to choose the right material. A porcelain stoneware countertop for a kitchen does not differ in performance characteristics from a surface made of natural stone, but the price is lower. The artificial composite lasts a long time, does not require maintenance, and gives the room a modern, unique look. Countertops are made of large porcelain stoneware or small tiles.
Do-it-yourself porcelain stoneware countertop: how to make it from tiles
The canvas can be made from thick or thin, large or small tiles. Although the material is intended for flooring, it is also suitable for finishing tables, aprons, and window sills. By design, these are stacked panels with minimal seams. The end is finished with tiles (other materials can be used).
Materials, tools
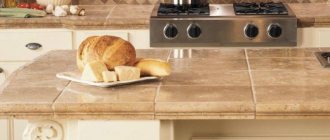
If you choose 10x10 cm or 15x15 cm tiles, you can lay them yourself. Small elements are not heavy; they are laid on a surface made of wood, plastic, or metal. Before purchasing, you need to calculate the number of tiles so that there is enough for the end. A margin of up to 15% is also required for damage due to natural losses during installation.
Installation requires:
- Chipboard (22-38 mm)/plywood (10-15 mm);
- transparent soil that repels water;
- PVA (wood glue);
- rubber grout and spatula;
- sealant (silicone);
- drill;
- electric jigsaw;
- notched spatula;
- self-tapping screws (38 mm).
It is important to understand: in order to make a kitchen countertop from porcelain stoneware with your own hands, you need to buy or rent a special tile cutter.
How to make a tabletop with your own hands
You can order the work of tiling the tabletop from master tilers, but if necessary, you can do the tiling yourself. The old countertop will need to be dismantled and the surfaces measured. You will need to calculate the total height from the worktop to the floor. To the indicator you need to add the thickness of the tile and the height of the adhesive composition. Using a template, you need to outline the shape of the corner cuts, mark the holes for the hob and sink. To make a tile countertop yourself, you will need a set of technical devices.
Tools and materials for work
To cover the countertop you will need tiles and special tools. The master will need measuring instruments: square, ruler, building levels, tape measure. The list also includes a tile cutter, a jigsaw, various types of spatulas - serrated or rubber, chipboard or plywood, glue (carpentry or PVA), silicone sealant, grout, ceramic tiles.
Surface preparation
The reliability of the tabletop depends on the quality of preparation of the base, for which metal, wood, plastic, and concrete are suitable. It is easier to apply cladding to concrete, since the tiles are simply laid on the surface after being treated with glue. It is worth considering the heavy weight of the concrete base.
Before applying the cladding, MDF or chipboard boards must be installed on the working area of plastic countertops. The structures are strong enough to install heavy tiles on top. Due to exposure to humidity and temperature changes, a wooden tabletop must be firmly fixed. The wood must be treated with impregnations to protect it from fungi, mold, and rot. Before applying the glue, grind the tabletop.
Applying glue
Apply glue (carpentry or PVA) to the surface using a spatula. Temperature conditions for such work: 18…24°C. The drying time for tile adhesive is 12 hours. The recommended layer thickness is less than 2.5 millimeters for adhesion.
The composition is distributed with the even edge of a spatula with pressure at an angle of 30°, which helps fill small holes and pores. For hand-made tiles (ceramic and stone), you will need to apply glue to the back side to ensure a reliable connection to the base.
Laying the material
The technique and order of cladding are available for independent implementation. You can lay the tiles after installing beacon slats along the perimeter of the base in one level for precise distribution of the fastening solution.
As soon as the preparatory layer has dried, it is necessary to make markings. Laying porcelain tiles begins from the outer corner of the countertop surface. It is important to control the width of the seams using plastic crosses.
For mosaic masonry, you will need to apply a design to the tabletop. Then rectangular and square ornamental elements are laid out and secured with glue. Laying tiles on the countertop is possible from the same material as the design of the set and interior items. The ends are lined last.
Options for laying end surfaces
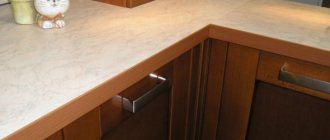
There are several options for designing the ends and attaching corners to the tabletop. Tiles can be laid out from the edge, keeping an indentation of 1 centimeter outwards, then the end elements are mounted end-to-end under it. The next method is to lay end tiles with the lip at the top to cover the edges of the surface tiles.
A simpler option is to decorate the end surfaces with special cornices and borders, which make it easy to level the tabletop to the desired size. The ends can be refined with aluminum furniture profiles or wooden slats treated with oil paint. The upper edge of the profile should be selected 2-3 mm above the surface of the tile. The rail is also necessary to secure each corner of the table. This will help prevent the edges from chipping and spilling liquid on the floor.
Grouting joints and using sealant
After facing work, it is necessary to grout the joints between the tiles. The treatment will help make the countertop aesthetic and provide protection from dirt and moisture. The shade of the grouting material must be selected to match the tile. It is possible to use neutral colors, such as white.
The grout composition must be resistant to moisture, fats, chemicals, and temperature changes. For operating conditions with high humidity, a mixture with an epoxy resin base is suitable. Two-component grouts that are mixed before use are universal.
Apply the mixture evenly, paying attention to the seam joints. When mosaic laying, the mass is carefully distributed, and the excess is removed with a sponge. During the process, it is necessary to ensure that the grout does not form voids, does not protrude above the countertop, and evenly fills the seams.
Surface cleaning
The final stage is cleaning the countertop. Excess adhesive can be removed with masking tape or solvents. Chemical solutions are removed from the surface immediately to prevent streaks from appearing.
Cleaning when using sealant in installation is more difficult. The chemical composition, after drying, becomes an elastic mass, resistant to deformation and firmly attached to the base. You can wipe off silicone sealant from the countertop mechanically, chemically, or in a combination way.
The work is easier to complete if the mixture is not dry. In this case, the surface is cleaned with gasoline, then wiped with a rag. It is recommended to first clean off dried sealant with a blade, then soften it with detergent and remove it with a wooden scraper. The sealant can also be removed with chemical solvents.
Advantages and disadvantages of porcelain stoneware countertops for the kitchen
The raw materials for the production of porcelain tiles are environmentally friendly. The finished material does not release toxic substances into the room and does not contribute to the proliferation of harmful microorganisms. Hardness is sufficient for surfaces of any size. A large selection of colors allows you to choose tiles to suit any design. Small tiles can be laid yourself.
Other advantages are no less important:
- resistance to household chemicals and mechanical damage;
- thermal stability (you don’t need to use a stand for hot dishes);
- resistance to high humidity;
- practicality, easy care;
- maintainability;
- durability;
- attractive look.
The price of porcelain stoneware is 5 times lower than the cost of natural stone. Some consider the disadvantage to be the increase in final cost when using products from foreign manufacturers.
Other disadvantages:
- the installation process is relatively labor-intensive;
- seams are regularly updated;
- in the absence of regular wiping, the shine of the surface is lost;
- Do not use cleaning agents containing acids.
- Another disadvantage of porcelain stoneware is its fragility. The fact is that porcelain stoneware exhibits excellent resistance to impacts and other damage only after laying on the surface. And porcelain stoneware itself can easily break, especially during transportation.
Porcelain tiles can crack even during transportation
If it is necessary to replace such a tabletop, it is difficult to dismantle it.
Choosing porcelain tiles
Porcelain tiles for covering kitchen surfaces come in various sizes.
Porcelain stoneware surfaces are:
- processed, unprocessed;
- glazed, polished, semi-matte, matte;
- anti-slip;
- imitating other materials.
When choosing, it is important to consider that a glossy surface is not practical. Imitations of other materials are porous, requiring the use of special cleaning agents.
Large size porcelain tiles for countertops
The large format is quickly installed, there are few seams, and the amount of waste is minimal. This material is also used for lining the apron, barbecue area and kitchen table in the country.
Self-assembly is made difficult by high-precision cutting, which requires a grinder with diamond blades. If you want to get a cladding that will look expensive, large format is not used.
There are two types of porcelain tiles. These are unpolished and polished porcelain tiles. Both the first and second types have the same scope of application, but they differ in appearance and cost. The price of polished porcelain tiles is several times higher than the price of unpolished porcelain tiles.
Wood-effect porcelain stoneware countertop
An Internet user described how he made a kitchen countertop from plywood, chipboard and wood-look porcelain stoneware. The base was created from 1.5 cm plywood, a chipboard was used as a support. A beam is fixed to the wall; porcelain tiles were sawed for edging.
Wood-effect tiles are popular thanks to the fashion for natural materials. They are often used by professional designers. The quality of the material is high, the appearance is aesthetically attractive. To make the coating last longer, it is recommended to buy AA class material.
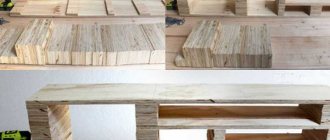
Tabletop made from remnants of porcelain tiles
During large-scale repairs, a lot of materials remain, since they are calculated with a reserve. If there is porcelain tile left, it can be used to finish the kitchen table. The frame is assembled from slats, the chipboard base is primed. The same glue used for flooring is suitable for installing porcelain tiles.
Porcelain stoneware countertops 60×60 cm
Such elements are classified as large. OSB is used for the base. If the thickness is not enough, pieces of chipboard are screwed in with self-tapping screws. The tiles are glued with liquid nails. Aluminum end strips. This is a soft material that is not difficult to cut with a hacksaw. The edges are smoothed with a grinding stone to prevent scratching. A plank made of wood is also suitable.
Porcelain stoneware countertop 30×30 cm
If there are no leftovers, the material is often selected based on price. In such situations, 30-30 cm planks are more profitable. They are laid using the same technology as the overall ones.
Mosaic and small-format porcelain tile countertops
For the base, plywood or plasterboard is used; an old tabletop that requires restoration is also suitable. If there is concrete left after the repair, the base can be made from it. However, please note that it takes 28 days to dry.
Before installation, a preliminary layout is made, mosaic elements or small porcelain tiles are numbered. The pattern must be transferred to the base, the tiles are placed on the surface, and glue intended for the base material is used for gluing. After a day, the crosses are removed and the joints are grouted.
Mosaic and small-format porcelain tile countertops
The base can be different, including plasterboard or moisture-resistant plywood.
podmalForumHouse Member
During the renovation, I made countertops from plasterboard in my kitchen and bathroom and covered them with ready-made mosaics. In terms of aesthetics, it turned out to be satisfactory right away. And now, after three years of operation, and in practical terms everything is fine - spills are not absorbed, dirt is easily removed, and the appearance has practically not changed.
Malena has a countertop in her kitchen made of artificial stone.
Due to temperature changes, when hot and cold were placed on the surface, the seams came apart and restoration was required. However, some time after the repair, the seams came apart again and they decided to replace the tabletop completely. As a base, we used moisture-resistant birch plywood, 21 mm thick, in two layers. Cladding made of porcelain stoneware, dimensions 10x10 cm, glue and epoxy grout.
Making your own porcelain stoneware table: installation rules
Ready-made tables are relatively expensive. If you want to get a practical, comfortable, presentable piece of furniture, you can make kitchen countertops from porcelain stoneware yourself if you have minimal skills in working with tools and the right choice of materials. The finished table will be exclusive, no one else will have anything like it. But it is better to choose smaller porcelain stoneware tiles; they will be easier to lay and trim if necessary.
Preparing the base
One layer of chipboard or two layers of plywood is laid on plastic and wooden surfaces. When calculating the dimensions, it is taken into account that the canvas extends 1 cm from the front side and 2 cm beyond the side edges. Accuracy requires calculations in the locations of the sink and hob. A jigsaw is used to cut holes. Before laying the tiles, the surface is treated with a waterproofing compound and dried.
When using plywood, the first sheet is attached to the cabinets with self-tapping screws. The caps are completely immersed and treated with putty. To glue the second sheet, moisture-resistant PVA or wood glue is required. The edges are fastened with self-tapping screws. If the length of the sheets is not enough, they are fastened so that the joints do not coincide. A sealant is required to process the joints.
The chipboard is attached with self-tapping screws, and the surface is treated with a primer that repels water.
If the base is metal, it must be degreased with a nitro solvent and treated with sandpaper. Then two layers of primer are applied and a steel reinforcing mesh is secured.
End cladding
For the ends, cut tiles, porcelain stoneware borders, and furniture profiles are used. To prevent the cladding from falling during the drying process, it is advisable to secure it with tape, which can then be easily removed.
Laying and grouting
Before gluing, it is advisable to lay out the tiles in such a way as to more accurately determine the location.
Sequencing:
- the layout starts from the cutout for the sink or corner;
- epoxy glue is applied to the base with a notched trowel (with little experience, you should not dilute a lot), the tiles are lightly pressed against the base;
- seam width 1-2 mm;
- rows containing trimmed elements are located against the wall;
- The quality of installation is controlled by the level.
Residues of glue are removed immediately, grouting is carried out after 1-3 days (depending on the drying time of the glue from a particular manufacturer). The material must be made from epoxy. A rubber spatula is required for application; excess is removed immediately. After complete drying, the joints are treated 2 times with soil that repels water. To process the seam at the junction with the wall, silicone sealant is used.
When installing the hob, be sure to use a sealing tape. It is not enough to cover the cutout. It should be without cuts, with neat bends at the corners. For fastening, special plates and screws are used. After installing the panel, the joint is treated with silicone sealant. When installing a sink, the same technology is used.
Stages of tiling a countertop
Let's divide the work into several stages.
Decision-making
This is still the simplest stage. I would like to note that the tiles laid on the countertop should be in harmony with the apron in the kitchen and the tiles laid either on the walls or on the floor in the bathroom. Therefore, it is better to immediately decide on the main tile.
Tile selection
Definitely, in the kitchen it’s porcelain tiles. Mainly because of its durability and practicality. The strength of porcelain stoneware is not inferior to natural stone. Porcelain tiles are distinguished by one of the highest wear resistance, low water absorption - about 0.05%, high resistance to oil, fats, alkaline and acidic reagents that are part of modern detergents.
The only thing you need to consider when choosing porcelain tiles for the kitchen is the type of surface. Embossed or textured surface: subsequently, dirt may accumulate and make it difficult to clean the surface. Polished and semi-polished, it seems to me, will not cause any special problems. Although you need to choose what is more cute. I will not specifically dwell on mosaics, since this is a separate topic, and we will definitely consider it in the near future. I will say one thing: there are many types of porcelain tiles that imitate mosaics or small tiles (7×7; 10×10). If you have no experience working with tiles or mosaics, these options seem to be the best if you really want a mosaic countertop. This is especially true in small kitchens. If the kitchen is large or medium-sized, it is quite possible to tile the countertop and backsplash with tiles of 30×30 or larger sizes (up to a giant 60×60). The countertop of the kitchen work area and the countertop of the “island” or kitchen table, lined with the same material, will look very original.
For the countertop in the bathroom, you can use regular wall tiles or floor tiles.
So, we have decided on the choice of the type of tile, we have roughly sketched out a plan, still only in our thoughts. We can safely go shopping and look for tiles to our liking. A little later we will decide on the number of tiles we need to buy and all the accompanying materials.
Making a base for a future countertop Below we will look at three ways to make a base for a tabletop tile. Each of them has the right to life.
Let's take three sections of cabinet furniture as a basis:
- sink cabinet size 500×560×820
- work cabinet with drawers 500Х560Х820
- working two-door cabinet size 600Х560Х820
The cabinets will be placed in a row. The length of the section will be 1600 mm, width - 560 mm.
For work we need
- Angle grinder (cutting machine) with a disc for tiles (for dry cutting)
- rasp - for processing the edges of cut tiles
- wide spatula - 60 cm
- spatula 12 cm
- high-hold tile adhesive
- crosses for tiles 2.5-3 mm
- rags
- silicone sealant
- wood protective compound
- primer or latex
- wood glue
- liquid glass + quartz sand or waterproofing compound
- jigsaw
- stainless steel self-tapping screws 3.5-3.8 cm within 200-400 pieces
- felt-tip pen
- pencil
- electric drill
- mixer
- wood drill 5-6 mm
- bucket for solution
The rest is as we go along.
For the base of the tabletop we will need two sheets of plywood 1500X1500X20 grade FSF or FB made of softwood.
- FSF - waterproof plywood glued with phenolic resin. Moisture-resistant plywood can be used outdoors.
- FB is bakelized waterproof plywood (impregnated with bakelite varnish). This moisture-resistant plywood can be used in hot, humid climates and even in seawater.
We will attach the plywood in at least two layers with overlapping edges. First, all parts of the cut plywood are properly treated with impregnation (at least 2 times) and a moisture-protective composition for wood or bitumen mastic. We cut plywood taking into account that the fibers should run along the section in all layers. On all sides, the plywood should protrude 3-5 cm from the walls of the section. The joints of the plywood strips should not fall on the hole that we will cut under the sink and, preferably, should overlap the cabinets at the point of their joining.
We cut the plywood approximately as shown in the figure using a jigsaw. We first measure the inner diameter of the sink and cut a hole for it on both layers of plywood, adjusting the transverse ties of the sink cabinet body.
All parts of the structure are treated with moisture-proof impregnation for wood. I don’t mention a specific brand, since each region has its own manufacturers. We treat the edges of all parts of the plywood with a brush especially carefully. I repeat: all the edges of the plywood, including the places where you cut and cut out the holes for the sink! This is very important, since moisture, which can subsequently get into unprotected areas of the plywood, can cause delamination with all the ensuing consequences.
The kitchen section must be level when attaching the plywood sheets; The housings are tied together with special ties.
Our design will be quite heavy, so don’t skimp on the legs for the cases.
We securely cover the kitchen section with plastic wrap to avoid damage to facades and other parts. If we have a stove (gas or electric) next to the section, then we should calculate the height of its location based on the height of our table top (820 mm), adding to it the height of the adjustable legs (40 mm, two layers of plywood), the thickness of the backing layer under tiles (10 mm) and the thickness of tiles with adhesive backing (10 mm). Total: 880 mm. Thus, if necessary, we check the possibility of setting the slab to this level.
Let me summarize: we have parts of plywood covered for two layers of the future table top, the plywood is thoroughly impregnated with a protective compound, dried and treated with liquid waterproofing. We paid special attention to the processing of the side edges, both in the cutting areas and along the entire perimeter of the sheets. Thus, we are confident that moisture that may accidentally get on the plywood will not cause delamination.
We fasten the first layer of plywood especially securely. Our design must be motionless. We choose stainless steel screws, 3.5-3.8 cm long. We attach the first layer of plywood to the side ties of the furniture cabinets from below, 3-4 screws on each side. We attach the side walls (they are highlighted in red in the diagram) to the first layer of the tabletop using metal corners with 1.5-1.8 cm self-tapping screws.
Apply wood glue to the top layer of plywood. This could be wood glue (not a very good option), moisture-resistant PVA (Profi) or more expensive brands of wood glue. There is only one requirement for glue - moisture resistance. The glue is applied to the surface in a zigzag manner, the second layer of plywood is pressed and tightened with self-tapping screws. To prevent the caps from sticking out, you must first use a drill to countersink the places where the screws are attached. We place self-tapping screws around the perimeter of the sheets with a pitch of 15 cm, as well as deep into the sheets with the same pitch. We fasten a strip of plywood 4 cm wide to the edges that will be lined with self-tapping screws. We cut the top layer of plywood using any disc on an angle grinder (the depth of the notches is 5-7 mm).
Using a stapler, we attach a painting mesh with a cell pitch of 0.5-2 cm to the upper side of the second layer of plywood. We place the mesh on the side edges of the sheets and fasten it tightly. The mesh must be tensioned and secured evenly and firmly.
The edges of the plywood can be additionally covered with masking tape (not to be confused with masking tape), burlap and coated with tile adhesive, followed by treatment with liquid glass or coating waterproofing. We pass the joints between the countertop and the wall with silicone sealant or coating waterproofing.
In principle, the countertop is ready for cladding with porcelain stoneware. All we have to do is carefully treat it with a waterproofing compound: you can choose a ready-made option or prefer the composition “liquid glass + latex + water + fine sand” (the recipe is given in the article “Technology for laying tiles on a wooden floor”), dry it and veneer it. This is the first option mentioned above.
However, we will go further. We will additionally make a contact surface for cladding.
Let's consider two options:
- the tiles are laid on a moisture-resistant gypsum fiber sheet (GVL V) or on a DSP sheet (a more reliable method)
- the tiles are laid on a cement layer, which will certainly ensure the reliability and durability of our structure
Stylish ideas from designers: photos
The kitchen countertop determines the style of the room. When choosing, it is advisable to take into account some of the designers' recommendations. They advise using porcelain stoneware in small kitchens, decorated in a minimalist style. When choosing a material similar to wood, the kitchen will become more comfortable. For any design, you can buy polished, glossy material.
Some ideas can be borrowed from the photos below.
Porcelain stoneware countertops for the kitchen reviews
Most reviews about porcelain stoneware tables are positive. Sheet materials hide surface unevenness, but have some disadvantages: they change size with fluctuations in temperature and humidity levels. The problem is solved by installing DSP on plywood.
It is better to order a porcelain stoneware countertop. However, doing such work with your own hands has advantages: the opportunity to take into account your own preferences and make a piece of furniture that will become the pride of the family.
Materials for making countertops
A do-it-yourself tile countertop, lined with ceramic tiles, can be made from the work surface available in the kitchen set, or made independently from moisture-resistant fiberboard (MDF) or plywood. When making a tabletop yourself, it is possible to slightly increase its size or give it the necessary shape: for example, make a recess in it for a more convenient location near the kitchen table or make it in two or more levels - by arranging additional surfaces on which you can place small household appliances or other kitchen utensils.
When making a complete desktop yourself, the ceramic tile countertop is made from furniture fiberboard panels, laminated or industrially painted, choosing the color depending on the interior of the kitchen. The degree of moisture resistance of the material used is very important, since there is usually high humidity in the kitchen, especially during cooking, and it is also possible to spill water or other liquids on the countertop. If you use chipboard that is not resistant to moisture, it will begin to delaminate and insects may settle in it or mold may develop.