0
110594
The work of assembling furniture is considered completed as soon as the hinges on the cabinet door are installed, because the front side is very important. People always pay attention to it when entering a room, so a self-respecting owner will not allow any flaws in the installation. A millimeter of inaccuracy in the calculations - and the entire effect of the new furniture is down the drain. No matter how insignificant and simple the work may seem, it is an illusion. To carry it out efficiently, you need to be a master. The aesthetic perception of finished cabinet doors is only 50 percent of success. It is important that they are installed correctly: the period of operation of the cabinet without repair depends on the balance of the doors.
Design features and operating mechanism
The loop consists of the following elements: cup (1), shoulder (2), striker (3). The cup is inserted into a blind hole in the door, which is drilled with a milling cutter and fixed with two self-tapping screws through holes located on the flange (5).
A counterplate is fixed to the furniture wall with self-tapping screws, which is attached to the arm (2) and the cup using a mounting screw (6) and a mounting groove (7). An adjustment screw (8) is located on the arm to adjust the height of the arm relative to the strike plate and align the door after installation.
Design features of furniture hinges
To work you will need:
- drill: thin drills, milling attachment with a diameter of 35 mm;
- pencil, tape measure (ruler);
- screwdriver or Phillips screwdriver;
- building level.
Adjusting drawer fronts
We are considering mechanisms for drawers for tableware and kitchen utensils - “Tandemboxes” and “Legrandboxes”.
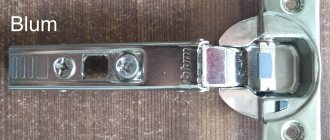
The factory uses mechanisms from two leading European companies: BLUM (Austria) and Hettich (Germany). Both companies have proven themselves to be the best among furniture manufacturers. And each one provides a lifetime warranty on its products. The customer personally chooses which system will be installed in the headset.
How to adjust a Hettich tandem
To begin adjusting the Hettich tandem, remove the decorative trim under No. 1 with the Hettich inscription. The overlay can be with the inscription “ENLI” as in the photo (the Hettich company produces overlays with the company logo for large companies). The front of the drawers is adjusted using wheel No. 2, located on the tandem. When the roller is rotated toward or away from you, the edge of the facade is lowered or raised.
How to adjust a deep drawer with railings
To adjust a deep drawer with a rail to fit evenly to the body, snap the decorative plug No. 3 into the depth of the drawer. After this, release the railing from the fastening on the facade and, using the method of unscrewing/screwing fastening No. 4, adjust the uniform connection of the facade to the body. After adjustment, insert the fastener back and snap the decorative fastener into place.
Adjusting the façade on the Blum Legranbox
The BLUM Legranbox is adjustable from the inside of the drawer. To make adjustments, you will need sprocket attachments. To begin the adjustment, you need to remove the decorative trim No. 1. Bolt No. 2 adjusts the height of the facade. By unscrewing/twisting the screw, you lower or raise the edge of the facade on which the regulation system is located. Bolt No. 3 regulates uniform contact with the body. Deep drawers are supplied without railing. The height of the legranbox has been increased. The adjustment is the same as for a low legranbox.
ATTENTION! For all “TANDEMS” and “LEGRANBOXES” drawer systems, each edge of the facade (left or right) is separately adjustable. If you need to adjust the right side, then the adjustment is on the right mechanism, with the left side the adjustment is similar to the right one.
Installation
First, mark the location of the loops in height. The number of furniture hinges depends on the dimensions and weight of the door leaf.
The distance from the top and bottom edges of the fabric to the loop must be at least 70 mm. Otherwise, the lower and upper horizons of the box may touch the loop.
It is convenient to make markings using a special device - a conductor
Then mark the location of the hole for the cup on the facade. To do this, at the required height from the edge of the blade to the center of the drilling, measure 21-23 mm.
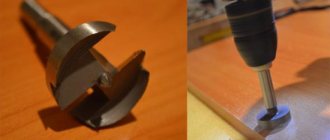
The blade is placed on a hard and stable surface, and they begin to drill a “blind” hole with a milling cutter. All holes are located perpendicular to the plane of the facade and have a depth of 11-12 mm. After work, small shavings are collected with a vacuum cleaner.
If you have no experience working with a cutter, especially with centering tenons 3 mm long, it is advisable to practice on scraps of board.
And another option is to shorten the tenon using a grinder or sandpaper. Otherwise, you can drill through the canvas.
The cup is inserted into the holes, aligning the loop perpendicular to the edge. The holes for the screws are marked with a pencil, the hinges are removed, and the markings are deepened with a thin drill. The cups are placed into the holes and secured with self-tapping screws.
If you have no experience working with a cutter, you need to practice on scraps
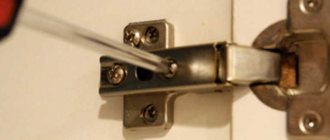
Now you need to attach the facade to the cabinet frame, align it vertically and mark the places where the striker is attached. They are deepened with a drill, and the counter plate can be screwed on with self-tapping screws.
To ensure that the hinges are installed as level as possible, they can be supported with a wooden or metal strip.
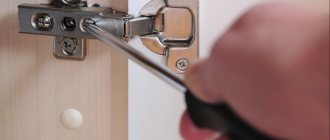
Next, the façade is installed. A shoulder groove is inserted under the mounting screw of the bar. At the same time, make sure that the adjusting screw matches the groove on the strike plate.
Adjustment and Leveling
At this stage, you need to work at the construction level - determine the correspondence of the frame parts to the door leaf. To do this, the level is applied to 3 planes - to the two sides and to the front. They should be as even as possible. That is, there should be no gaps or deviations between the frame and the door leaf.
Alignment begins with adjusting the vertical gap. To do this, pressing the facade against the frame, tighten the fixing screws on the strip. Then close the door and check the possible angles of inclination with a building level.
By adjusting the screws, all gaps between the facade and the frame are eliminated. For example, if the upper corner is tilted to the right, tighten the screws on the upper hinge and loosen the screws on the lower one.
Then they begin to adjust the doors according to their height. Two self-tapping screws located on the “ears” of the strike plate are responsible for this. To begin with, loosen the screws on all hinges, raise or lower the canvas (depending on the situation). Then tighten the screws until they stop, holding the facade in the desired position.
If the door does not press well against the frame body or when pressed the opposite side bounces off, then adjustment of the hinges along the plane is also necessary. To do this, tighten the adjusting bolts located on the bar.
Materials and tools used
Furniture hinge diagram
It is not an easy task to install fasteners on the doors and sides of cabinets. In this case, accuracy is important in order to use them without fear of their breakage. But you can still install the hinge fasteners on the cabinet yourself.
Tools that may be useful for installing hinges
At the initial stage, you need to select the material and prepare the tools that will be used in the work. In this case, the material used to make the cabinet is very important, since its strength will directly depend on this, and each type of wood has its own fastening, which will also need to be taken care of in advance. As a rule, fixation is used from below and from above. If the doors are massive, that is, they have a length of more than one meter and are heavy, then another hinge is installed in the middle. If the door weighs about 20 kg, then it will require 5 hinges.
When assembling furniture, no complex devices are used. To install the hinges you will need the usual tools. It will be attached directly to self-tapping screws (4*16 mm), for which we will need a screwdriver. To correctly measure the distance, you will need a tape measure, and to mark the measurements you will need to prepare a chalk or pencil. To ensure the door stands level, you must use a building level.
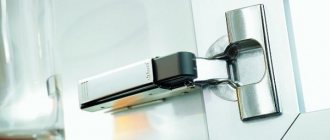
Installing hinges on glass doors
The installation principle is the same as for wooden doors.
Four-hinged hinges for glass doors are distinguished by the presence of a special tab for attaching the cup and a cover for masking the device from the outside.
If you have no experience working with glass, it is better to turn to specialists to drill holes. Before this, you need to establish preliminary markings of the locations of the loop cups. At the same time, they also take into account the hole where the handle will be hung.
Overhead hinges are also used for glass doors, which can be hung without drilling glass.
You need to place and secure the cup in the drilled holes using a tab, and attach the counter plate to the box with self-tapping screws. Afterwards the door is aligned along three planes.
For glass doors, overhead hinges are also used, which can be hung and fastened without drilling the glass. They are mounted inside the box; accordingly, all shelves in the closet must be recessed inward. Suitable for light sashes only. For example, for the bookcase department.
Types of fastening loops
Various hinges are used in cabinet assembly. The most common fastening devices are those with four hinges. In everyday life they are called frogs. These mounts fit all cabinets with doors:
They are divided into subtypes, depending on how they will be installed. The products have a wide range of applications and are used for all types of cabinets.
Before installing the fastening device, you need to take into account the features of the doors:
- for corner cabinets or cabinets of any configuration, choose hinges that will be fastened at an angle of 45° during installation;
- for a cabinet in which the doors are installed on the internal walls of the furniture without closing it, you need to choose an internal hinge;
- for cabinets in which both doors overlap a common side wall, you need to embed a semi-overlay hinge;
- the door designed to cover the sides of the niche is secured with overhead hinges;
- In addition to hinges consisting of 4 hinges, in furniture assembly practice they use fastening devices consisting of 2 parts that are connected by an axis;
- in order to be able to open the doors at an angle of 180°, you need to secure the device with inverse hinges;
- piano hinges with a simple mechanism are used for kitchen cabinets. They consist of steel or brass strips connected with wire. This type of fastening elements can only be installed in kitchen cabinets, since for other furniture this fastening will be fragile.
When choosing furniture fittings, it is important to remember that when installing hinges with four hinges, they are mounted to the side walls of the cabinet with self-tapping screws measuring 4x16 mm. In this case, the cup mount should have a diameter of 26 mm, and the holes will have the same diameter.
Kinds
Four-hinged hinges come in different modifications, which can be selected depending on the location of the panel relative to the box and the cabinet itself in the room.
Invoice
The canvas attached to this loop is completely perpendicular to the body and covers the stand. Used when the door overlaps the side rail of the cabinet.
Invoice
Half waybill
It is used when two doors need to be hung on one rack. Each facade overlaps the end of the rack by half.
Insert
The door leaf is perpendicular to the post, but does not overlap its end.
The overhead hinges also differ in the angle of inclination. This is necessary for installing corner cabinet doors. Depending on the difference between the angle of the facade and the perpendicular to the stand, you can select hinges with an opening angle: -25 °, 30 °, 45 °, -45 °, 90 °.
Insert
Transformer
Used to create composite facades from several doors or in cabinets with drawers that are hidden
Most four-hinged hinges are made with a built-in closer. This makes the door movement smooth and silent.
Transformer
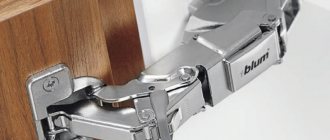
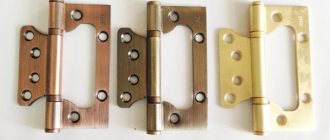
Eight-joint
It has all the characteristics of a four-hinged hinge, only without inserting the cup into the facade body. It is attached with self-tapping screws, so it is only suitable for fabrics with a dense texture.
Eight-joint
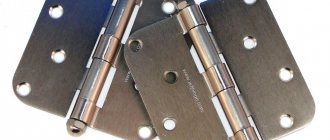
Other types of furniture hinges
Card, piano, and hinge hinges are rarely used for installing cabinet doors. They do not have three-level adjustment and do not lock the door in the open and closed position. An additional fastener is needed. Today they are more often used as an additional decorative element. For example, antique.
Mezzanine
For installation of horizontal overhead panels that open upwards.
Mezzanine
Secretaries
Used for hanging downward opening facades.
Secretary room
We have learned in our practice how proper installation and adjustment of hinges affects the operation of the cabinet as a whole. Some time after assembly, the door of the wardrobe or kitchen cabinet stopped closing - the upper part of the door rested on the frame.
To correct the misalignment and use the cabinet normally, I had to readjust all the hinges. Therefore, during installation, it is advisable to prevent any deviations; any gap can lead to deformation of the entire cabinet structure.