The average family usually consists of 3-4 people, so a small dining table fully meets the needs of each family member. What to do if guests are going to come to you? The answer is obvious: use a table that can be extended if necessary. You can not only buy such a product at a furniture store, but also make it yourself.
In this article we will tell you how to make an extendable table with your own hands. You, in turn, will be able to make sure that the manufacturing process is completely simple.
Equipment, materials and tools
Before you start making an extendable wooden table with your own hands, you need to prepare the following items:
- Laminated chipboard or wood panel for the tabletop;
- tabletop insert;
- chisel;
- screwdriver;
- roulette;
- sliding mechanism;
- drill;
- self-tapping screws for installing the sliding mechanism;
- hacksaw;
- screwdriver;
- Bulgarian;
- frames connecting the legs;
- ruler;
- wooden blocks for making legs;
- calipers;
- sander;
- wooden tenons for connecting frames;
- plane;
- construction knife or scissors;
- hammer;
- paint brush;
- loose sandpaper;
- file;
- jigsaw;
- varnish for wooden surfaces;
- PVA glue or any wood glue.
Required Tools
In order to make an extendable table with your own hands, you will need the following tools and equipment:
Tools for making an extendable table.
- drill;
- screwdriver;
- Bulgarian;
- hacksaw;
- screwdriver;
- hammer;
- chisel;
- plane;
- sandpaper;
- file;
- paint brush;
- ruler;
- roulette;
- calipers;
- scissors;
- jigsaw;
- sander
An extendable table is a very convenient and practical piece of furniture. It will help solve some problems associated with lack of space.
You can make such a table yourself if you apply a little imagination and become familiar with the basic principles of the process.
The best posts
- Design of a site in front of a house or cottage (31 photos)
- Pattern Maker for cross stitch v4: program and video tutorials on installation and operation
- Methods of laying laminate: straight, diagonal, herringbone
- Finishing stone for walls inside the apartment
- Oval and round carpets in the interior (30 photos)
- Scrapbooking basics: how to do it, what you need, materials and tools
- Transformable shawl: diagram with description and video on working with knitting needles
- Crochet and knitted christening dress for girls with photo
Selecting the product type
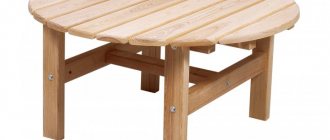
A wooden extendable table can have a round (or oval when extended) shape or be made in the form of a book-table.
The choice of one option or another is individual, but a round sliding table is more practical and has a presentable appearance.
Drawings of sliding tables indicating the dimensions of the finished structure are easy to find on the Internet.
Making the base
Installation diagram of table cover holders.
The main function of the table base is to securely connect the table legs to each other and provide support for installing the tabletop. Tying the wooden legs into a single frame is done using wooden jumpers - collets. Collets are made of plywood or boards 10-12 cm wide and 18-20 mm thick. The length of the collets is determined by the selected table size when not extended.
Related article: Answers from experts: is it possible to glue wallpaper on an OSB board?
To secure the collets, grooves are made in the upper part of the legs on two adjacent sides with a size corresponding to the cross-section of the collet, up to 20 mm deep. The ends of the collets are secured in the grooves. The joint is glued and secured with screws. To strengthen the connection of legs in heavy tables, it is recommended to additionally install wooden gussets at the connection points.
A sheet of plywood 10-12 mm thick is fixed on top of the frame. The size of the sheet is determined by the dimensions of the frame. The sheet is secured with screws. In its final form, the base is a table with a rough top. The top plywood sheet is not a necessary element, since the structure will work without it.
Step-by-step manufacturing of an extendable table
Before you begin assembly, you need to know the basics of design, that is, the requirements that apply to sliding tables of any type.
First, the table legs must be strong and durable enough. Their attachment to other elements should be as reliable as possible. Secondly, the tabletop itself must also be durable and strong.
The entire table must withstand heavy loads and be stable. Its surface should be practical and easy to use.
Dimensions
Most often, the dimensions of an extendable table are selected based on the area of the room in which it will be used. In addition, the expected number of guests who will sit at it is taken into account (it is optimal if there is approximately 60-70 cm of table space per person).
The standard height of the dining table is 73 cm, but if necessary, you can slightly change this parameter to suit the individual needs of the family.
Step-by-step instruction
It is not difficult to build a kitchen table with your own hands. You can use ready-made drawings or create your own. First of all, you should decide on the dimensions of the future product. Then you need to prepare and process the parts and assemble the structure. You can learn more about the manufacturing process using the example of a table made of wood or chipboard.
Drawing and preparation of parts
First of all, you need to decide on the dimensions of the table, its design, and then draw up a drawing of the future product yourself. If the room is small, a small table for 3-4 people will do. For a spacious dining area, you can make a large dining option for 8 people or more.
The size of the tabletop is determined at the rate of 70 cm per seated person. To calculate the perimeter of the surface of a piece of furniture, you need to multiply 70 cm by the number of planned persons. The optimal width of the product is from 80 to 110 cm, the height is 70 cm, but you can make it lower or higher for ease of placement. The number of legs and their shape can also be different. The most convenient and stable option is 4 support elements.
Having taken measurements of the room and decided on the dimensions of the future piece of furniture, it is necessary to make a drawing indicating all the indicated parameters. To work you will need a ruler and a pencil. A sketch is designed on paper, where the length and width of the tabletop, the number of legs, their height, collets, and additional elements are noted.
Based on the sketch, parts are prepared, markings are applied at the points of attachment and connection of component elements.
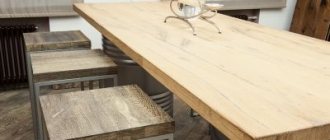
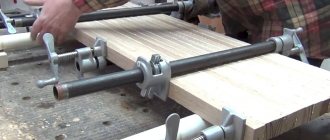
Material processing
An important point is the processing of raw materials. Before assembling a wooden table with your own hands, the boards are sanded to make the tabletop as smooth as possible. To ensure a tight fit of the parts, the edges also need to be carefully processed. The boards are connected with glue and wooden dowels. To do this, holes are made at equal distances from each other, then glue is applied to the processed edges. The connecting elements are driven into the holes, holding the parts together. The tabletop is ready.
Step-by-step making of a table from boards with your own hands, examples of decor
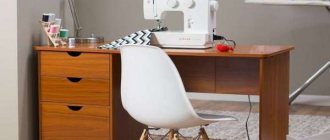
For structures made of chipboard, you can purchase a finished surface of the required dimensions. Only before assembling the kitchen table should the edges be processed. Round legs are often used as a base. The chipboard board must be shaped using a jigsaw, and the corners must be rounded, maintaining a radius of 60°. Apply sealant to the ends and fill the edging.
To make a table from chipboard, you need to cut or purchase a blank for the future tabletop
The ends of the chipboard should be covered with an edge
Assembly of the structure
To assemble a wooden structure, it is necessary to prepare the base. The legs are attached to the short crossbars using glue and screws. 12 hours after the glue has dried, it is necessary to attach the long crossbars to the legs. Then drill holes in them to fix the table top. When the glue dries, the tabletop is attached to the frame using screws. The finished product can be coated with varnish or paint.
To assemble a kitchen table from laminated chipboard, you need to mark the legs on the back of the tabletop. Afterwards, attach the holders using self-tapping screws and put the legs on them, securing them with a key.
It is better for beginning craftsmen to choose pine for making wooden tables, as this material is easier to process.
In order for the design to be of proper quality and last a long time, it is recommended to carefully think through all the details and take a responsible approach to the choice of material. For convenience, you can use ready-made drawings or make changes to ready-made diagrams to suit your taste in order to ultimately get a unique design. Thanks to high-quality raw materials, even the simplest design can be given a noble look.
A table made by yourself can become a real interior decoration. Thanks to exclusive design, you can get an original piece of furniture and at the same time save money. A huge plus is that the finished product will organically fit into the configuration and area of a particular room.
Drill holes with a diameter of 5 mm along the perimeter of the tabletop in increments of 20 cm for fastening the reinforcing frame
From the inside of the frame, drill recesses for the mating part of the eccentric fastening
Assemble the supports so that they form a right angle in cross section
Secure the supports from the inside using self-tapping screws
Insert the mating part of the eccentric connections into the holes in the frame and, turning with a screwdriver, secure the minifixes
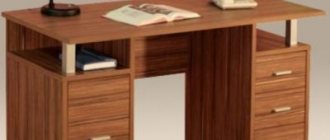
Ready chipboard table
Preparing the main elements
The main elements are the tabletop and legs. The good thing about wooden dining table components is that they are environmentally friendly, reliable, durable and practical. Nevertheless, this material is most often used.
The tabletop can be made of either natural wood (oak, pine, walnut) or laminated chipboard (laminated chipboard).
Hallways 2021: TOP-200 photos of the best new products and modern design. Options for the ideal combination of color and style of furniture in the hallway- DIY stool: manufacturing methods and instructions for creating simple and stylish models (90 photo ideas)
- Do-it-yourself door finishing: 115 photos of the best options for entrance and interior doors
You can make table legs yourself or purchase ready-made ones. Finished legs are round, square or carved. In addition, metal versions of this part are also available for sale.
Selection of base materials
If you decide to make a table with your own hands, you should decide on the material for the main elements. The aesthetic impression of the table design is mainly provided by the tabletop. In addition, it may be exposed to moisture, fat and other active substances used during cooking; may be affected by increased temperature from hot foods; Significant mechanical loads may be applied. Wooden countertops are quite reliable, environmentally friendly, practical and aesthetically pleasing, but they are also expensive and difficult to manufacture.
The most widely used wood for countertops is pine, oak and walnut. When using wood, it should be thoroughly dried and treated with moisture-proofing compounds. If natural wood is used for the surface, it must be periodically polished and also coated with varnish or wax.
Characteristics of materials for making the table.
A simple, cheap, but fairly reliable tabletop is made from laminated chipboard with a thickness of at least 20 mm. The ends of the plates are rounded and covered with a protective material, for example, silicone or polyvinyl chloride film. Such plates can be additionally coated with plastic. The big disadvantage of this material is swelling when moisture gets into the thickness of the material. In other respects, this material is quite capable of competing with wood.
Related article: Installation of MDF skirting boards: basic installation methods (video)
You can make table legs yourself, or you can purchase ready-made ones. The most common option is wooden block legs. The minimum dimensions of the bar are 40x40 mm. For larger tables, larger timbers should be used. So, for a table with a length (when extended) of about 2 m, a beam with a cross-section of 85x85 mm is recommended. The legs can be square, round or carved depending on the wishes and capabilities of the manufacturer.
In addition to wooden legs, metal legs are also used. For example, you can purchase ready-made metal legs in the form of a pipe with a diameter of 70-90 mm. You can make steel or aluminum legs yourself from pipes and various profiles.
Assembling the table from prepared parts
The first stage is cutting and cutting out 2 pieces of the tabletop. If necessary, finish the ends and cover the surface. At the inner end of each part, 2 holes (8-10 mm in diameter) are drilled for the dowels of the removable elements.
Then a U-shaped box is made from the sidewalls, the corners of which are fastened from the inside with an aluminum corner. So that the box can move above the base, the reverse parts of the guides are fixed to the inside of the side parts of the body.
A tabletop is installed on top of the box. These elements are fastened together using aluminum corners.
Now you can proceed to installing the insert. The sliding mechanism, which is most often made of aluminum, is best secured with self-tapping screws, for convenience, turning the table over and placing it on the tabletop. The guides of this device are screwed to long frames, and the sliders are screwed to one of the 2 parts of the tabletop.
- DIY cornice: a detailed description of how to design and decorate a stylish interior element (80 photos)
DIY folding chair: 110 photos, drawings, diagrams and sketches of convenient and easy options for creating portable chairs
- Do-it-yourself pouf: step-by-step instructions on how to build a stylish and original interior element with your own hands (105 photos)
To remove the insert when not needed, 2 slats are attached under the tabletop, which will hold the insert, hiding it inside the table structure.
The design of the sliding table can be changed if instead of 4 supports you use 2 wide ones or even leave one massive leg with a cross or platform. Also, these elements can have different shapes, for example, they can be made from figured or chiseled ones.
Manufacturing of additional elements
In the center, an aluminum corner with a vertical side of at least 40 mm is installed on the surface of the plywood base sheet (or the upper end of the collets). The length of the corner is at least 50 cm. The wide (main) parts of the guides are attached to the corner, two on each side. Both parts of the guides (on the tabletop box and on the corner of the base) are joined and snapped into place.
Tabletop cutting diagram.
The parts of the main table top are moved apart as much as possible and the dimensions of the removable additional elements of the table top are specified. Additional elements are cut and sawed, as well as their surface is prepared in the same way as the main tabletop.
Holes are drilled at the inner ends of the removable elements and dowels with a diameter of 8-10 mm are installed. The dowels are secured with glue. Removable elements are installed between the main parts of the tabletop and secured with dowels.
Related article: Is it possible to wash vinyl wallpaper and how to do it correctly
After complete assembly, the operation of all elements is checked. If necessary, painting or additional cladding is carried out.
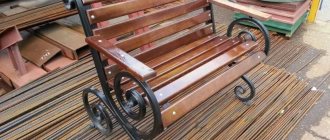
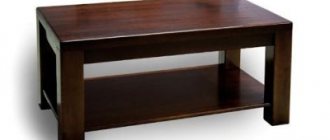
Appearance of sliding tables
This section presents numerous photos of sliding tables of various shapes, sizes and designs. As you can see, such a piece of furniture can easily fit into the interior of any room.
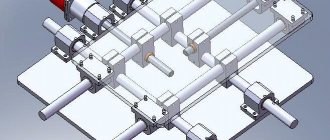
Mechanisms and components for sliding tables
Elements of sliding tables
First, let's look at what elements, in addition to slab countertops, the sliding table consists of:
- supports
- tsar belt (also slab material)
- split table top (half lid)
- a table tie is also called a boss or a scarf (assembling a drawstring belt and attaching supports to it)
- sliding mechanism
- table insert rotation mechanism
- ramp, storage area for inserts, dowels, locks, etc.
Depending on the design and structural features of the table, this list can either be supplemented or shortened.
Now let's look at the mechanisms for sliding tables, dividing them into main groups:
- tsargovye
- boxless
- transformers
Tsargovye mechanisms.
The mechanism consists of a tire and movable carriages (carriages) to which a platform for attaching the table top is rigidly attached.
Types of drawer mechanisms:
- external fastening
- internal fastening
- mechanism book
- end extension (frontslide)
The division into external and internal is arbitrary. So the external mechanism can be placed inside the table, and the internal one outside.
External fastening - different dimensions of the mechanism in the folded and unfolded state (the carriage extends beyond the overall dimensions of the guide rail).
Internal fastening - the overall dimensions of the mechanism in the folded and unfolded state do not differ (the carriage does not extend beyond the overall dimensions of the guide rail).
These types are supplied in three main versions:
- not synchronous
- synchronous
- synchronous with stopper
Synchronous mechanisms have a synchronization cable.
For mechanisms with a stopper, in addition to the cable, there is a lock (stopper)
Book mechanism - similar to the internal mechanism, but has one platform for attaching the tabletop
Frontslide is a mechanism with a drawbar fastening stopper. A common version of the table is in which the side drawer extends along with the supports.
Tsargless mechanisms
Tsarless mechanisms are not attached to the drawstring belt. The drawer drawer either performs decorative functions or serves for fastening supports and is always split. A distinctive feature of this type of mechanism can be the large increase in length when extended.
Types of frameless mechanisms:
- with fastening only to the tabletop;
- with fastening to the tabletop and underframe.
Tables made using mechanisms of the first type move apart together with the supports and half-table top. Inserts can be stored either inside the table, on special hooks, or separately. Depending on the mechanism, some models have the ability to install an additional central support.
The second type of mechanisms is installed on a stationary base (underframe) and has a synchronization cable. Some models are equipped with a stopper. The inserts are located in the space between the underframe and the main tabletop. Mechanisms can be made of steel or aluminum. Depending on the load, the mechanisms are made from different tire profiles.
Sliding mechanisms can also be called transformers, but in this classification we will highlight mechanisms that differ from them:
- height transformation mechanisms,
- mechanisms with automatic lifting of the tabletop insert.
Height transformation mechanisms are designed for the manufacture of tables with dual purposes: coffee table - dining table
Transformers
There are two types of such mechanisms:
- mechanisms of the “V-12” type,
- "DGL" type mechanisms.
Mechanisms of the “V-12” type have two positions: a coffee table (folded) and a dining table (unfolded). When unfolded, the table area doubles.
Mechanisms of the “DGL” type transform the table only in height. It is possible to set any table height within the movement of the mechanism. For width transformation, the above-described drawbar or drawerless mechanisms are used with attachment to the tabletop and underframe. For ease of use of the table, a number of mechanisms for rotating the central (in some cases not central) table insert have been developed. For drawer tables with unlimited space below, the easiest-to-install mechanisms 804 and 001 (modifications 001 and 001V) are suitable. For drawer tables with limited space (tables on one central support) mechanisms K-0401 and a rocker (the rocker has a strictly defined size of the central insert). For drawerless and drawer (without the use of additional partitions) tables, a tube table rotation mechanism is used. For the frontslide mechanism, a tube is also used, but with special fasteners. The rotation mechanism may not be installed. In this case, the insert is stored either separately from the table or inside it. When using rotation mechanisms, the insert consists of two parts that are connected by a loop. There are two types of loops:
- for installation at the end of the insert - card loops (cylindrical),
- for installation in a non-facial surface, a loop for inserting a table (“butterfly”).
Each type of loop is selected depending on the thickness of the insert. I would like to note the hinge for inserting the table (“butterfly”) as reliable and easy to install. To store the split insert, use:
- corner Lid 01
- ramp Along the ramp, the insert slides out and opens (for mechanisms standing outside).
- Table insert ring - designed for easy removal of the insert.
- Tabletop wheel - for internal mechanisms, in order to prevent friction of the tabletop on the underframe, we recommend using a roller to improve sliding.
For all mechanisms without a stopper, it is mandatory to install countertop fixation locks. To maintain a uniform plane of the tabletop, it is necessary to install metal dowels.