The table itself is an extremely functional invention, in demand in the kitchen, in the workshop, and in the office.
A wooden table combines functionalism, environmental friendliness and aesthetics. You can make such a piece of furniture with your own hands.
Material
If you intend to assemble a table yourself, the first thing you should pay attention to is the material of manufacture. Very rarely, a whole piece of wood is used as a material at hand; much more often, wooden boards are used. The advantages of this material: they can be cut to the required sizes on any construction site; It’s also easy to transport them to the assembly site if you have a personal car.
The only downsides that can be mentioned are possible difficulties that may arise during installation, and also the fact that you should pay attention to the correct processing of the material - otherwise the boards may come apart and will not last long.
Sexual
This material is used for flooring, for cladding buildings and premises and, according to the topic of this article, for the manufacture of interior items. The advantages of this material are as follows:
- Most floorboards have a groove, as this is how they are held together.
This allows you to fasten the boards into a tabletop without any problems, while the joints will be identical and look aesthetically beautiful; - Most of the edged boards have already been processed, so after assembling the table you don’t have to resort to additional painting or varnishing the product;
- even if the floorboard is an ordinary edged one, it still fits together with other boards better than the rest.
But floorboards also have disadvantages .
For example, for a board that has been varnished, a buyer can pay a larger amount than for an ordinary board with subsequent self-coating. The floorboard has a limited size, that is, its size will dictate the size of the countertop, or you will have to adjust the length yourself. Important . It is impossible to make legs from a floorboard, only a tabletop. This means that you will have to select a different material for the legs.
Unedged
This board has jagged edges with bark as it is made by cutting a tree trunk lengthwise. Such boards are cheaper, and with their help you can achieve original design solutions. But at the same time, they require additional processing, and joining them is quite difficult.
Oak
They are distinguished by unique strength, density and resistance to many biological and physical influences. Very expensive , but in terms of service life, this material completely pays for itself.
Veneered plywood
DIY folding table made of slats
On the Internet you can find quite a large number of different options for folding tables, each with its own advantages and “weak” points. We offer this option for making a table; we believe that it incorporates the maximum list of advantages and the minimum number of “weak” points of many models. Distinctive features of our table:
- Minimum production time. You will only need a few meters of ready-made slats 50x20 mm, maybe of similar sizes, or two boards 25 mm thick; you will need to cut it into slats if you don’t have ready-made ones.
- Minimum list of carpentry tools. To cut boards into slats and prepare them, you need a hand-held circular saw or an electric jigsaw, an electric plane and a drill. If you were able to purchase ready-made slats, then you can completely do without electric tools; all work can be done with hand tools without much effort.
- The work simply cannot take more than one day. And if you have at least basic experience in carpentry work, then the table can easily be made within a few hours.
- Various finishing options. The simplest is to sand the surfaces a little and leave the table in its “natural state.” By the way, we recommend going with this option; the table does not belong to the category of furniture for which “beautiful designer look” comes first. Another finishing option is to cover it with opaque paints, stains or varnishes. Choose any suitable one for yourself; the finishing does not have any significant effect on the performance of the product.
- The table has a very “correct” engineering design. The greater the weight of the load placed on the tabletop, the more stable and durable the entire structure. Agree, this feature of tables is not often found; as a rule, tables react quite the opposite to an increase in load.
- Universal table. From street trading and a garage, a picnic to a dacha, a bathhouse and a balcony - everywhere the table will find its use and allow you to create more comfortable conditions for those around you.
We hope that you are already eager to have such a table at home and are ready to start making it.
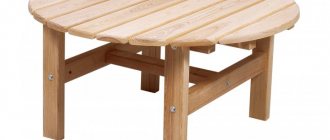
| Ready table |
Preparation of parts
Make all parts from the same slats, the only differences are in their length. The table consists of four legs, tabletop slats, four supporting tabletop slats and two legs. That's all the details, decide on the dimensions and cut the slats to these sizes. If large errors remain after processing with a plane, you will have to sand them with emery cloth. To avoid rubbing the slats with sandpaper, make sure that the tool is in good condition and adhere to the technology for using it. Trust our experience that a few minutes spent on checking the functionality of the tool will always pay off, and not only in the time saved during the work, but also in the final quality of the product. In addition, working tools and compliance with the technology for working with them have a direct impact on safety, and this is your health, you should not risk it.
Table assembly
It is better to start assembly with a wide tabletop. Place the slats of the tabletop on a flat surface and spread the slats on them. To ensure that all the slats are at the same distance, use one of them as a template. Make sure that the tabletop parts are perpendicular; the number of slats on both tabletops should be the same. The distance from the edge of the slats of a wide tabletop should be approximately ten centimeters. Fix with self-tapping screws, tighten them with such force that the heads are completely recessed into the body.
| Tabletops |
The lower crossbars of the second tabletop must fit tightly into the crossbars of the large tabletop; install the parts strictly parallel, otherwise the table will jam during disassembly into working condition. We have already mentioned that there should be no gaps between these parts. Assemble the slats of the smaller tabletop in the same way as the slats of the large one. Immediately place the drawers on the legs; the length of the drawers should be different and depend on the specific distance between the two pairs of legs. Fasten the elements with ordinary wood screws.
The last stage of assembly is to drill holes in the legs to install the leg axis bolt; the location of the rotation axis largely determines the height of the table and its stability. The higher the table, the closer its legs will be, the stability of the table will deteriorate, and vice versa, the lower the tabletop, the wider the legs will be, the more stable the table will be. In order to correctly select the height of the table and its stability, we recommend that you go the experimental route - simulate the behavior of the table on two separate slats and thus determine their optimal length.
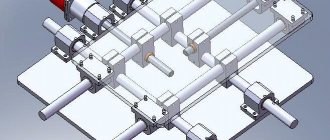
| Assembling the fastening unit |
The heads of the bolts and nuts must be hidden; to do this, make a recess with a feather drill. If this operation is neglected, they will rest against the legs and will not allow the table to be disassembled/assembled freely. After assembly, check the functionality of the table and correct any errors if necessary. You can see how to use the table in the photo, there is nothing complicated, no “special training” is required.
| Drilling holes for connecting bolt heads |
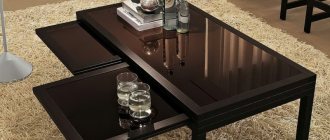
| Unfolding the table |
Some general tips
The table will be used both outdoors in the rain and in warm, dry rooms. This means that fluctuations in relative humidity will be large, increasing the risk of warping and malfunction. Our advice is to carefully select the material, especially the slats for the legs. The material for them must have a minimum number of knots; it is around them that violations of the straightness of the elements appear.
Be sure to place washers under the bolt head and nut; if possible, use modern nuts; they have plastic devices that prevent the connection from unscrewing spontaneously. Use galvanized fastening elements; the appearance of rust in various places on the table will not serve as an additional decoration of the product.
← Do-it-yourself doghouse made of boards Prefabricated sawhorses made of dual-use plywood →
We recommend watching:
Plywood FC | 4mm | 1520 mm x 1520 mm | birch | grade 3/4 | Ш2
350 rub.
Plywood FSF | 9mm | 1500 mm x 3000 mm | birch | construction | NS
1,200 rub.
Plywood LAMINATED FOF | 12mm | 1500 mm x 3000 mm | birch
RUB 3,100 RUB 3,200
Plywood NEEDLES | 9mm | 1220 mm x 2440 mm | coniferous | grade 2/3 | NS
950 rub.
LAMINATED PLYWOOD FOF (CHINA) | 18mm | 1220 mm x 2440 mm | birch
RUB 1,800
Plywood FC | 18mm | 1520 mm x 1520 mm | birch | construction | NS
1,000 rub.
Plywood FSF | 12mm | 1220 mm x 2440 mm | birch | grade 4/4 | NS
RUB 1,140
Plywood FC | 9mm | 1520 mm x 1520 mm | birch | construction | NS
480 rub.
Plywood FSF | 10mm | 1500 mm x 3000 mm | birch | grade 4/4 | NS
RUB 1,500
Plywood FC | 4mm | 1520 mm x 1520 mm | birch | construction | NS
250 rub.
Plywood NEEDLES | 21mm | 1220 mm x 2440 mm | coniferous | grade 2/3 | NS
RUB 1,900
Plywood FSF | 9mm | 1525 mm x 3050 mm | birch | grade 3/4 | Ш1
RUB 1,500
OSB | 9mm | 1220 mm x 2440 mm
550 rub.
Plywood FSF | 4mm | 1220 mm x 2440 mm | birch | grade 2/3 | Ш2
700 rub
Plywood FSF | 30mm | 1500 mm x 3000 mm | birch | construction | NS
5,000 rub.
Plywood NEEDLES | 12mm | 1220 mm x 2440 mm | coniferous | grade 3/4 | NS
1,100 rub.
Plywood FSF | 4mm | 1220 mm x 2440 mm | birch | grade 3/4 | Ш2
600 rub
Plywood FC | 18mm | 1520 mm x 1520 mm | birch | grade 2/3 | Ш2
RUB 1,500
Plywood FC | 6mm | 1520 mm x 1520 mm | birch | grade 3/4 | Ш2
500 rub
OSB | 15mm | 1250 mm x 2500 mm
1,000 rub.
We also recommend reading
11/14/2015 → Tables
Original puzzle table made of sheet plywood
In this article we will tell you how to make your own exclusive puzzle table from plywood. We confidently declare that you will not find such a model in any of your friends. The work requires few materials and a lot of desire.
11/16/2015 → Tables
Console table with two drawers and plank mirror
This table would be appropriate in a bedroom, hallway or bathroom. We will reveal the algorithm for its production, give detailed recommendations and a step-by-step description of the work. There are drawings with dimensions of individual parts of the product.
11/21/2015 → Tables
How to make your own table for a router
The presence of such a table for a router greatly simplifies the performance of many carpentry operations, makes the production of parts faster and with higher quality. A set of drawings and a detailed description of the work is offered.
11/25/2015 → Tables
Folding children's desk-chairs made of sheet plywood
Making home furniture with your own hands is always a pleasure, but making these things for your child is doubly pleasant. We will tell you how to make a folding desk-chair from an ordinary sheet of plywood. The work will require a minimum of time.
Comments
No one has left a comment yet
Drawing
A drawing is necessary, because thanks to it the table will fit exactly into the room. The drawing will also allow you to calculate the volume of material required. But first things first. What problems will the drawing allow you to solve?
- Dimensions . If this is a kitchen table, and the kitchen is of non-standard sizes, the table, accordingly, will differ from the standards.
- Model . Despite the fact that in general terms a table consists of four legs and a table top, there are a huge number of options for how to make it. There are a lot of table models, types of table tops and legs.
- Calculation of consumables . Having basic mathematical skills, you can calculate the volume of required material from the finished drawing. So that after purchasing the board it does not turn out that there are a lot of scraps left, or that there is not enough material.
Advice .
You can download a ready-made drawing from the Internet and modify it to suit your needs.
Manufacturing of kitchen furniture from solid wood
First of all, you need to assemble the tabletop. To do this, trim the boards, making them the same length, and then carefully sand them with a sanding machine. The better the wood is sanded, the smoother the countertop surface will be. In addition, you need to carefully process the edges so that the parts of the product fit tightly to one another. Wood can be deformed under the influence of moisture, and to avoid damage to furniture, it is recommended to lay the boards in a pattern facing each other during assembly.
Glue and dowels are used to connect the parts of the structure. It is necessary to make marks on the edges of the boards in increments of 100-150 mm and drill holes for the dowels. This work must be done using an 8 mm drill.
The edges should be sanded and coated with glue; it is also advisable to pour glue into the holes for the fasteners. Then the dowels must be lubricated with glue and inserted into the holes, connecting all parts of the structure to each other. It is recommended to remove excess glue from the table surface with sandpaper. After this, the surface and edges of the tabletop should be sanded. If the master wants to give the wood texture, then you can go over the tabletop with a metal sponge.
At the next stage of assembling a table from solid wood, you need to make a base with your own hands. To do this, the balusters are connected to short crossbars using screws and glue.
On the inside of each crossbar, two holes are drilled at an angle, into which screws are then screwed. The crossbar should be positioned at a distance of approximately 15 mm from the edge of the leg. Then long crossbars are attached to the legs (at a similar distance from the edges of the legs).
The parts can be connected not only with screws, but also with dowels, that is, in the same way that parts of the tabletop are connected. For this purpose, 2-3 holes are made at the ends of the boards, as well as in the legs. Then these holes and dowels are coated with glue, after which the structure is assembled and fixed with clamps until completely dry.
You need to drill holes in the crossbars to attach the table top to the base using self-tapping screws.
If the master wants to make the table longer or wider, then the structure must be strengthened with additional cross bars .
When the solid wood table is ready with your own hands, all that remains is to treat it with varnish or paint. The product is now ready for use!
Tools
To complete the work, you may need the following tools, which should be prepared in advance:
- hammer;
- chisel;
- hacksaw;
- drill;
- plane;
- nail puller;
- saw.
Advice . If further work with the tool is not planned, then you don’t have to buy it, but rent it.
How to do it?
Once the material has been selected, a drawing and all the necessary tools have been prepared, you can begin assembly . When drawing up the drawing of the table, all its constituent elements, as well as fastenings, were highlighted. First of all, all the necessary elements are cut out and turned in accordance with the dimensions indicated in the drawings. Then, after checking and measuring after production, you can proceed to assembling the parts.
Important . Tools may cause damage. Follow safety precautions.
The assembly procedure is quite simple; general steps can be identified regardless of what model of table you plan to assemble. The assembly steps are as follows:
1. Assembling the legs . The table legs, cut according to the drawing, are fastened with beams using self-tapping screws or nails. For greater reliability, the fastening points should be treated with glue and then tightened with self-tapping screws.
2. The tabletop . To do this, strips are marked on the tabletop that fasten the legs, then using self-tapping screws, nails, screws or fasteners, the tabletop is attached to the structure of the legs.
3. Installation of horizontal screed . Many table models require a tie between the table legs to prevent them from moving apart.
Table with 4 legs
For a table 1.1 m high, with table top dimensions 1.5x0.9, you will need the following materials:
- timber 100x100, 4 pcs. 105 cm each for legs, 2 x 75 cm and 2 x 135 cm for crossbars;
- edged board 50 mm thick, 150 mm wide for the lid, 6 parts 135 cm long and 1 – 90 cm;
- 10x40 slats for assembling the lid, 2 pcs. length 85 cm;
- screws, corners.
The table dimensions can be changed. To implement your project, just change the length of the blanks. To make the furniture wider, you can take boards of greater width or increase their number.
Having sanded and treated all the parts with an antiseptic, you can begin assembly:
- Saw a short board lengthwise into 2 halves 7.5 cm wide, lay 6 long boards on the work surface, and along the edges, perpendicular to them, these 2 halves.
- Place the slats at the junction of the longitudinal and transverse elements, mark and drill holes (1 in each long board and 5 in the short one, so that they are arranged in 2 rows in a checkerboard pattern). Fasten the lid parts together by screwing the slats to them.
- Connect 2 legs each with short crossbars. To do this, drill holes for dowels in the ends of the crossbars and the bottom of the legs, and assemble them dry. If there are no distortions, coat the holes and dowels with glue and connect the parts again.
- Connect the resulting side supports with long crossbars.
- Place the resulting structure of legs and legs on the lid lying upside down and secure with the corners.
All that remains is the finishing touches.
Another option is to connect the legs not with legs, which are located at a low height, but with drawers, which are located directly under the table cover and form a frame on which it rests. To increase rigidity, jibs are installed in the corners between the drawers. The drawer is attached to the lid with corners. The short edges of the table can be designed differently: screw 50x50 bars or thinner slats to the ends of the boards. They need to be placed with the wide edge towards the ends of the tabletop boards, and the narrow edge towards the ground.
Finishing
After the product is assembled, it must be processed. Treatment is necessary so that the product is resistant to the external environment and lasts many times longer than without treatment.
Processing a product means sanding it and then opening it with varnish . Most often, sanding and varnishing are done several times for greater reliability.