Every person has a piece of furniture in their home, such as a desk.
It is needed for preschoolers, students, and office workers. You can not only write with it, but also do handicrafts. Despite the fact that the modern market offers a wide range of desks, sometimes it can be difficult to make the right choice.
We offer you to make a table that will fully meet your requirements, room size, and technical specifications.
Advantages
In addition to the desire to make furniture on your own, you need to have a special tool and some skills.
If you have everything, then you can start making a table for a schoolchild. The advantages of making furniture items yourself include:
- saving money;
- the ability to make furniture of any design, size and shape;
- independent selection of consumables.
What types of desks can you make with your own hands at home?
The main criterion that guides the selection of a desk model is the convenience and functionality of the product. The size and shape of the tabletop are calculated based on your needs - everything you need should fit here.
Popular types of desks that you can make yourself:
- classic - rectangular tabletop. Attaches to legs or support. To improve functionality, it is equipped with niches and drawers;
- table top-window sill - an additional plus of the model - full daylight. To place stationery, books, and notebooks, the window openings are equipped with niches, closed cabinets or shelves. It is advisable to install such tables in small rooms to increase the usable area of the room;
- folding tabletop - as an option, it folds out like a book. The tabletop is a working area and is attached to the wall with clamps. The main condition is reliable fastening; it must withstand physical stress. Folding tabletops are extensions of other furniture - for example, they are screwed to the side surface of a cabinet or fixed directly to the wall;
- corner - such designs are distinguished by additional usable area and rationally use the space in the room. This is an ideal solution if there are two schoolchildren in the family or if you need to create a place on the table for a computer;
- bureau is a model that combines a chest of drawers and a worktop. To save space, it is placed in a large bedside table.
Design and construction
Before creating a drawing of future furniture, it is worth deciding on its design and construction. As for design, it’s worth starting from personal preferences, the general style of the room, and the needs of the owner.
The design of the table can also be anything, from simple to complex shape. If you are new to this business, you should start with a simple table shape without any additional elements .
Most often, such products include classic models consisting of a table top, sides and several drawers.
If you don’t doubt your abilities, you can make a table of complex design with:
- numerous drawers;
- shelving;
- add-ons;
- cabinets.
Tips from designers for choosing
To combine design and functional significance, leading stylists advise following a number of principles when choosing a table model:
- Focus on the age and height of the future owner of the desk.
- Maximum auxiliary equipment: drawers and shelves for storing small stationery, notebooks, notepads and notebooks.
- The choice of desk should also be made depending on the style of the interior of the room.
Due to the lack of square footage in modern apartments, increasing preference is given to furniture with a transformation function: counter tables, corner models or modular writing structures.
Wood, solid wood or furniture board?
You can build a table for a schoolchild from:
- furniture board . In its production, solid oak, birch, beech, and coniferous species are used. To work with this material, you must have experience in making furniture;
- veneer _ This lumber is classified as natural. Its thickness does not exceed 3 mm. Modern manufacturers offer a wide selection of materials of different textures, textures and colors. The advantages of veneer include: environmental friendliness, strength, affordable cost;
- solid wood. Using an array, you can make an exclusive and original piece of furniture. But keep in mind that working with natural wood requires special tools and experience. The advantages of wood include: mechanical stability, naturalness, and a wide palette of colors. Real furniture makers recommend using solid wood: pine, birch, oak. Solid wood products really look luxurious and noble in any interior.
MDF .
It is environmentally friendly, attractive and easy to use. This material is not afraid of moisture and other negative factors. Thanks to MDF lining with veneer, film and plastic, you can choose any shade and effect;- laminated chipboard. Products made from this material keep their shape for a long time. Laminated chipboard is resistant to high moisture and sudden temperature changes. It is durable and has a long service life. A wide palette of shades opens up endless possibilities for furniture makers. This table can be combined with different shades, and it will become the main decoration of the children's room;
- plywood. This material has been known since ancient times. Modern manufacturers produce plywood from special birch and cherry veneers. This material is not inferior in strength to natural wood. Plywood is in great demand in the manufacture of furniture due to its environmental friendliness, aesthetics and affordable cost.
Advice : if you are a beginner, it is better to opt for chipboard. But for real professionals in this field, you can try making a product from natural solid wood.
What to make a computer desk from
laminated chipboard
The material for the countertop is usually laminated chipboard. It is most convenient for the manufacture of cabinet furniture. Laminated chipboard is easy to process, it is simply attached and does not require special skills to connect parts. You can find the necessary fittings for such slabs on sale at any time.
Table 2. Advantages and disadvantages of laminated boards
| Advantages | Flaws |
| 1. Wear resistance. 2. Resistant to sunlight. 3. Easy care, availability of a variety of cleaning products. 4. Availability of different colors and patterns. | If moisture constantly enters the area of the countertop, the material may swell. |
Laminated chipboard is suitable for simple countertops and complex options
MDF
According to the characteristics, the MDF tabletop will resemble the previous version. The difference is that it is less brittle and is not prone to delamination in fastener areas. If you do not take into account the need to handle laminated chipboard more carefully compared to MDF, then these materials are almost identical during assembly and during the preparation (processing) process.
Table 3. Pros and cons of MDF when making countertops
| Advantages | Flaws |
| 1. Safety – suitable even for children. 2. Variety of colors. 3. You can make a window sill-tabletop from MDF. 4. Variety of sizes of the final tabletop model. | 1. Damages that appear during use are clearly visible on a glossy board. 2. It is easy enough to damage the slab so that a visible mark remains on it. 3. Constant contact with water leads to swelling of the slab. |
Tabletop combined with window sill
Metal
Sometimes metal or individual elements with a metal base are used as the base for the countertop. The most common option is to use a metal frame to place a tabletop with work surfaces made from the sheet materials indicated above (this can be sheets of chipboard, laminated chipboard, pieces of plywood, etc.). The frame is made of round steel pipes or rectangular pipes. Processing options: chrome-plated or simple metal elements (the latter need painting).
Metal is used to create computer desks
To make metal countertops, you will need some skills in working with such parts and the availability of the appropriate tools.
Despite the fact that working with metal is not so easy (in particular, stainless steel), it also has its advantages.
Table 4. Advantages and disadvantages of metal as a base
| Advantages | Flaws |
| 1. No damage to the material upon contact with water. 2. Large and wide models are made without joints, which in itself prevents the structure from being vulnerable during intensive use. 3. The practicality of the material is its undeniable advantage. | You need to carefully consider the development of the sketch, since it is almost impossible to select a metal table of the required size in a store. |
Metal table top
Tree
Working with wood when making a countertop is not the most labor-intensive, but it requires more consumables, tools and fittings.
At the same time, to make a wooden table, such types of work as cutting, sanding, planing, and also intermediate operations are performed. If you choose an array for the base of the countertop, you need to be especially careful not to spoil the expensive material.
Woodworking is often carried out in a specialized workshop
Table 5. Advantages and disadvantages of wood as a base
| Advantages | Flaws |
| 1. Combinations with any other materials are available. 2. Allergic reactions upon contact with the countertop are excluded. 3. A wooden PC tabletop will fit into any interior. 4. Long service life of the computer desk, resistance to wear and mechanical stress. | 1. High cost of material. 2. Despite the fact that the material is dense, it will require protection from mechanical and temperature influences. |
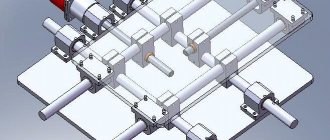
Scheme and drawing
After choosing materials for making furniture, it is worth making a drawing of it. Without a well-designed project, it is impossible to make and assemble a table the first time without making mistakes. To make a table drawing without errors, you need to be a specialist in this field. If you do not have such experience, contact professionals or use special computer programs.
When drawing up a drawing, all the nuances are taken into account: the materials used to manufacture the product, its dimensions, and the features of the product.
Help : with the help of a sketch, it will not only be convenient for you to detail the product, but it will also be much easier to assemble the table.
Simple drawing with dimensions
If ease of manufacture is critical to you, we recommend using the following drawing:
Drawing with boxes
If you value convenience and functionality, take a closer look at this option:
The box itself:
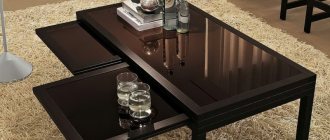
Choice of shape and size
The dimensions of the countertop are largely influenced by the expected load - the number of installed technical means and the type of work for which they are intended. The shape of the surface also depends on the location of the workplace. Its classic rectangular version is considered optimal for placement in a room of the same shape. Standard models usually have sharp corners treated with a special edge.
On children's desks and those used in places with a lack of free space, in order to avoid bruises and injuries, it is better to use tabletops with softened (rounded) corners.
Other forms of surfaces are also used for desks:
- Corner ones are compact, easy to use, practical, functional, save space as much as possible, there are models designed for several workplaces.
- Oval - as a rule, these are rectangular structures with corners rounded to a large degree. Such models are more often used in offices, simultaneously playing the role of meeting rooms.
- Figured - usually made to order as an imitation of antiques or to bring to life special design projects.
Features of making a manicure table with your own hands with a hood
Figured ones are often called ordinary tabletops with a small, several centimeters, recess for ease of use. In fact, these are so-called orthopedic surfaces that allow you to move closer to your workplace. This form has a beneficial effect on the formation of posture and the condition of the spine.
Corner
Oval
Curly
The dimensions of the desk top depend on the anthropometric data of the person and the purpose of its use. The minimum depth is 60 cm (maximum - 80 cm), the width is at least a meter, and the distance from the floor is 70-80 cm.
The thickness of the surface depends on the area, material of manufacture, and also on the frame on which it is placed:
- 10 or 16 mm - such countertops look sophisticated, but require good central support to eliminate the possibility of sagging under load;
- 25 mm is the most common option with good strength; with a length of up to 140 cm, it requires only four supports;
Desk tops with a thickness of 32 or 35 mm are typically used in formal offices or other situations where a solid appearance is required from the furniture.
10-16 mm
25 mm
Tools
Tools you will need :
- jigsaw;
- drill;
- hacksaw;
- chisel;
- screwdriver;
- hammer;
- drill.
If you are planning to make a complex model of a table, also prepare:
- milling machine;
- sander;
- clamps.
As for materials , you need to stock up on:
- lumber;
- bolts, nuts, washers;
- self-tapping screws;
- furniture glue;
- dowels;
- paint and brushes;
- liquid nails;
- varnish;
- tape measure;
- pencil;
- building level.
How to make and assemble a table for a schoolchild?
Let's start making and assembling a desk for a schoolchild.
Making furniture begins with cutting the necessary parts . This can be done in special companies, or using a jigsaw. If you contact a specialized company, they will make a competent detailing of the product, according to the created drawing. All you have to do is simply assemble the parts in the right order.
After making all the parts, you can start assembling the children's table.
Attention : when assembling furniture, refer to the drawing.
For a rectangular table, the assembly diagram will be as follows:
We prepare the details : table top, sides, back wall. If the parts are already trimmed, you can begin assembly. If not, carefully trim all the PVC parts with an edge and a hair dryer.- Armed with a drill, we make holes on all parts for fastening . Here again you should carefully check the sketch.
- We start assembly from the side parts. Here it is worth aligning the parts using a building level.
- We connect the parts with furniture screws.
- We put the tabletop on top and tighten it with confirmats.
- We seal the screw caps with special furniture stickers or plastic plugs.
We looked at the manufacture and assembly of a simple table for a schoolchild. If you want to make a more complex model, then the manufacturing process will require the following:
We take the drawing and prepare the materials (in this case, furniture board);- We cut out 8 blanks for product supports.
- Each leg will consist of 2 parts. Therefore, we glue the parts together and secure them with a clamp.
- We cut out recesses inside the frame of the product.
- We make a long groove along the inside of the cross member.
- We make a protrusion on top of the supports using a chisel and a hacksaw.
- We drill holes in the sidewalls with a diameter of 8 mm.
- For assembly accuracy, insert pencils into the holes made and apply them to the legs.
Using wood glue and dowels, we connect the base and support .- Using a router, we make grooves for attaching the upper part of the product.
- We cut out the side walls with a jigsaw according to the drawn sketch.
- Carefully sand all cuts.
- We make grooves in them.
- We cut out the parts for the drawers , glue them together and reinforce them with furniture nails.
- We attach the facing board to the front part of the product using self-tapping screws.
- Carefully coat all attachment points with glue and leave the item until completely dry.
- We fasten the tabletop to the base with legs using dowels.
- We select fittings for the drawers.
- We carry out decorative work if the product was made of plywood, wood or MDF.
Decoupage
After making and assembling a table with your own hands for a schoolchild, it needs to be decorated . You can do this using:
- coatings with paints and varnishes;
- installing countertops in contrasting shades;
- pasting self-adhesive film;
- decoupage with napkins or wallpaper.
Important : using the decoupage technique you can decorate not only a new piece of furniture, but also an old desk. For decoupage you can use: napkins, wallpaper, drawings, ornaments and pictures.
To give your table an attractive look using decoupage you will need:
- sanding machine or coarse sandpaper;
- brushes for varnish and paint;
- PVA glue;
- acrylic lacquer;
- materials for pasting.
The workflow itself consists of the following sequence:
- Degrease the surface to be treated.
- Cover the table with primer .
- If we are decorating an old table, we cover all its surfaces with the selected tone of paint in two layers. We are waiting for it to dry completely.
- Using glue, we attach the selected pictures and ornaments.
- We cover the product with acrylic varnish . This will keep the table looking attractive for a long time.
Tip : The decoupage technique can also be useful when decorating a laptop table, sand painting, or even a coffee table.
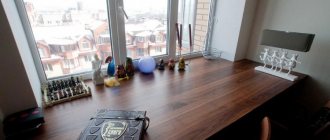
Wooden table top for a table: secrets of making it yourself
Fashionable today, “respectability” is a sign of excellent taste and good financial capabilities. This definition is suitable for people who want to diversify the interior of their premises with wooden products with laminated chipboard tabletops.
The naturalness and natural splendor of wood cannot be replaced by plastic, metal or other artificial materials. If we take into account the environmental friendliness of wood, we can safely say that this material for a desk top is simply an ideal option.
Related article:
Epoxy resin table: original design and affordable production
Basic characteristics of the material, application technology. Options for kitchen countertops and living room tables using resin. Products from slabs.
There is a simple way to make a table top with your own hands. To do this, you will need a special blank, which is called a carpentry panel. Having made the final decision on what to make the tabletop from, you should select wood of the required quality. This process cannot be rushed, since the service life of the product depends on the characteristics of the material.
Important! In order for the countertop to last for many years, it is better to give preference to pieces made of hardwood, such as oak, teak, cherry and cherry.
The easiest way to make a wooden table top with your own hands is
So, to construct a tabletop from wooden planks, you will need the following tools:
- jointer;
- hacksaw;
- drill;
- cutter;
- thicknesser;
- sandpaper;
- marking devices;
- antiseptic impregnation;
- wood glue;
- paint or varnish.
The main parts will be dried boards, and the fasteners will be screws and nails. In this case, it is better to give preference to elements that have the same dimensions. The process of processing boards must take place in several stages - before assembly and after its completion. As for the work plan, it looks like this:
- leveling the surface using a plane;
- sanding each surface element with sandpaper;
- comprehensive antiseptic treatment;
- collecting parts into a single canvas;
- installation of the shield;
- re-processing through the use of impregnation;
- coating with paint or varnish.
Wooden parts for the tabletop must be processed with a plane
Do-it-yourself wooden tabletop: assembly of structural elements
In order to construct a tabletop from chipboard or other wood material with your own hands, a person must have some experience working with a plane. As for the grinding technique, it also does not present any difficulties. But antiseptic treatment has its own characteristics.
The assortment of hardware stores is very wide, but in the process of making a tabletop for a desk with your own hands, it is better to use a solution intended for interior work. An excellent option would be a special protective oil. Natural compositions will reliably protect the structure from exposure to a humid environment and ultraviolet radiation, prevent the occurrence of mold, and also add expressiveness to the pattern characteristic of wood.
If a tabletop is being made for a corner table, then one of the following methods can be used for connection:
- edge gluing;
- “groove-tenon” technology;
- "groove-edge" method.
When the wooden parts are completely prepared, you can proceed to assembly
The first method is simple in terms of execution, but it cannot be called reliable at all. If gluing several small elements is necessary, it is better to give preference to the second solution. However, if we are talking about the most effective method, it is the third option. It is probably well known to all those who have ever dealt with the assembly of lining, which is initially equipped with cutouts along the edges intended for such a connection. In some cases, a rougher tongue-and-groove joint may be preferred. After the elements are secured, the canvas should be coated with impregnation or universal varnish.
To disguise the unsightly edges of a do-it-yourself corner desk top, you need to construct a trim. It is a protective thin edge made of wooden blocks.
Note! Since the lining must be harder than the base, blanks from other wood species can be used. For example, it is recommended to edge plastic pine with more durable beech or birch.
The cracks that are visible between the elements can be wiped with wood dust. The level of reliability of the casing can be increased by additionally strengthening the corners using self-tapping screws - one on each side. The screws should be tightened at an angle, sunk a little into the wood, and the resulting holes should be filled with putty. In this case, the layer that performs a decorative function is applied last.
To connect parts, you can use the “groove-edge” or “groove-tenon” technology
Wooden desk top: how to create reliable protection
Exposed wood is very vulnerable to moisture, woodworms, and tarnish. To protect the coating, you will need to apply one of the special products to the pre-leveled surface. Various oils can penetrate deep into countertops. Absolutely any tool will do:
- vegetable;
- mineral;
- synthetic.
When choosing a specific type of oil, you should keep in mind that it can be either fast- or slow-drying, and can also harden when exposed to air. Thanks to deep penetration, a so-called neutral layer is created, which promotes the rejection of moisture, acids and fatty components. This protection is suitable for thin and thick desk tops.
Important! The oil should be applied using a brush or a piece of lint-free cloth.
Finally, you need to apply a protective agent to the countertop.
The components included in various impregnating solutions are so firmly connected to the wooden product that they must be removed exclusively mechanically, for example, when it is necessary to renew the coating.
This process involves removing the deteriorating film, cleaning dark spots, leveling dark spots with putty, and also leveling using sanding material. It will take about a day for the first coating to dry, after which the next protective layer must be applied.
By waxing the countertop, you can preserve its original color. But wax, unlike other protective agents, is characterized by less durability and requires regular application. Since the mixture contains no chemically active components, the treated structure remains breathable, acquires a slight shine, and also acquires a pleasant, unobtrusive aroma.
Before applying wax, the countertop should be lubricated with flax oil, a mixture of oil and wax, or a product containing rosin, turpentine and oil.
You can use oil, varnish or wax to protect a wooden tabletop.
Note! A worthy replacement for beeswax would be carnauba wax, which is characterized by greater resistance to temperature changes.
By using varnish or paint with colored pigments, you can correct the natural color of the wood. The main requirement is the hydrophobicity of the composition, which must be applied in an amount of 6 to 10 layers. This operation requires a lot of time, but the result will be a beautiful and smooth surface. For greater attractiveness, the edges of the tabletop are decorated with painting or using the decoupage technique.
Photo
Regardless of the chosen drawing and material, you can get excellent results: