Why shields?
Ordinary wood for making furniture will require more knowledge in the field of carpentry; usually the same carpentry boards, for example, are sawn only in a certain direction, depending on how the fibers lie. It is necessary to know all the information about the tree species. A larger arsenal of carpentry tools is required.
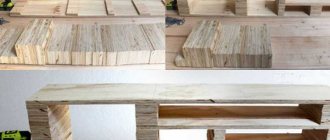
With furniture panels everything is much simpler. They are a kind of semi-finished product, ready for cutting and manufacturing.
Moreover, unlike chipboard, MDF and other wood-based particle boards, panels are more environmentally friendly, stronger, and more durable. True, they require a little more attention during finishing (sanding, impregnation, varnishing). But the result is worth it!
Which ones to choose?
Furniture panels can be made from the following wood species:
- From beech,
- From oak,
- From ash,
- From pine.
For more information about furniture panels in general and each type in particular, see here. Prices are also indicated there. For example, coniferous species (which include pine) are the cheapest and quite practical. Ash is the most premium in color, style, and design. Oak is the leader in strength (and price). And beech occupies the middle price category, and is excellent for bent products, wood carving, and milling.
At the same time, furniture panels made of more durable materials, for example, oak, should be used for those furniture elements that will have to withstand the highest load. And for the rest, you can take cheaper varieties. Especially if you plan to repaint the resulting product in the future.
Grade AA or AB - determines the appearance of the final product (if the texture is not completely painted over). The first ones are without darkening from knots, the second ones are with darkening on one side. Although many people also like this option, when all natural defects are noticeable.
Spliced or solid-lamella panels will also affect the appearance of the product. The second ones are more like an array. And the first ones are considered a little more durable.
Manufacturing of furniture panels
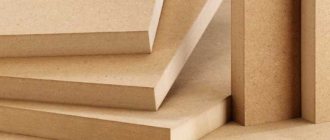
Before we talk about the features of its manufacture, let us explain what a furniture panel is. In practice, this is a natural material in the form of wood sheets. They can have different shapes and are intended for the production of furniture and stairs. The most common furniture panels are made from coniferous wood; a little less often you can find birch or oak on the domestic market.
To create furniture panels, manufacturers use fairly small elements, so the material is quite low in cost. Prices for solid boards are indeed much higher, but the performance parameters are almost at the same level.
If high-quality, well-dried wood was used in the manufacturing process of furniture panels, then it will have high performance parameters. Therefore, when purchasing material in a store, it is important to be vigilant and prefer a higher quality option.
What can be made?
In fact, most of the furniture around us can be made from furniture panels.
The simplest products are all kinds of shelves (just straight and square, rectangular, as well as TV stands, shoe shelves), shelving structures, tabletops.
They will require a little more effort, but can also be made from shields:
- Desk (computer or work desk),
- Cabinet,
- Dresser,
- Closet,
- Bed, etc.
Almost anything!
Where do you need to start?
- The first step is to draw up a plan diagram of the future product, with dimensions. Write a list of required materials in advance.
- Secondly, purchase all the fittings, including hardware, handles, guides, and ties for carpentry work.
- You also need to check if you have all the tools at your disposal. Most often, to make your own furniture from furniture panels, it is enough for you to have a grinding machine, a drill and a hand-held circular saw (or a hand router).
- To finish the product you may need oils or varnishes.
DIY furniture made from furniture board, wood and chipboard
Making furniture from furniture board, wood and chipboard with your own hands is a great way to get something that meets all your expectations. Any piece of furniture made with your own hands will not only be exclusive, but also fit perfectly into the surrounding interior, because its color, shape, size will be whatever the creator of this furniture wants.
You can make a wide variety of furniture yourself from wooden panels - tables, cabinets, chests of drawers, beds, etc. The main thing is to carefully follow the sequence of the described actions and work as carefully as possible. Basic materials and tools used for making furniture from furniture panels:
· Wooden or chipboard furniture panels; · furniture varnish; · self-tapping screws; · electric drill with a set of drills; · chisel; · screwdriver; · grinder; · hacksaw for wood; · ruler and simple pencil; · various accessories: o handles for drawers and doors; o hinges for doors; o guides for sliding furniture elements, etc.
Contents (click on the items to go to the desired section of the article):
1. Table
- computer desk
- kitchen table
- Desktop
2. Wardrobe
3. Chest of drawers
4. Hallway
5. Bed
Make your own furniture from wood: we make a table from wood, chipboard or furniture board
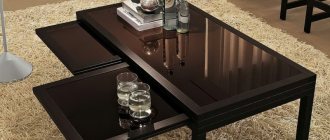
The table is an indispensable part of the interior, so you want such an important item to be multifunctional, strong and serve for many years. Making the table yourself will provide confidence in its reliability and durability. Homemade furniture board can be an ideal material for such furniture. Today there are many variations of tables - computer, desk, kitchen, folding, etc. Let's try to analyze the manufacturing sequence of some of them in all details. Computer desk made of furniture board (wood or chipboard)
A computer desk will allow you to save precious centimeters of space and place all the components of your computer in convenient and easily accessible places. To make such a table you will need 8 furniture panels: three measuring 2000x600x18 mm, three measuring 2000x400x18 mm and two measuring 2000x200x18 mm. Additional materials and tools required for the manufacture of a computer desk: · edged board 12x120 mm; · dowels; · plywood sheet 6 mm thick. The process of making a computer desk.
Initially, a drawing of a computer desk made of wood or chipboard is developed and dimensions are calculated.
From one of the furniture panels (the largest size) we cut out the tabletop, side walls, bottom and top of the cabinet. The corners of the sides located in the upper front part can be trimmed and sanded. In that part of the sides that will be located close to the wall, it is necessary to cut a recess for the plinth measuring 5x5 mm.
To ensure the rigidity of the structure, in the middle of the side of the internal vertical wall we cut out a 200x20 mm recess for installing a transverse panel, which we make from a small panel. We fix all the finished parts with self-tapping screws.
We are making a place for the system unit. Don’t forget to round off dangerous corners and make recesses for the baseboard.
We hide the voids under the cabinet and space for the system unit with slats.
We make a frame for the shelves above the table and attach it to the assembled elements of the table.
A medium-sized sawn furniture board will serve as a blank for the top shelf, and a small board will serve as a middle partition attached to the tabletop.
Above the cabinet there will be a shelf with a lintel, which we make from the smallest furniture board. We install it in the right place.
It's time to make drawers - the walls are made of edged boards, and the bottom is made of plywood. We connect all the elements using self-tapping screws. We install guides for drawers and for a pull-out shelf-tabletop.
We cut out a table top for the keyboard from a 400 mm wide panel. We use the cuttings of the shields on the front elements of the boxes.
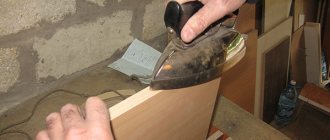
We disassemble the entire structure, process it with a sander and cover each of its components with a two-layer ball of varnish.
We allow the varnish to dry, complete the final assembly of the table, install the handles - and our computer desk is ready! Desk made of furniture board, wood or chipboard
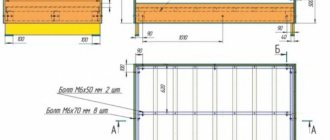
A piece of furniture such as a desk is an indispensable element of a student’s office or room. There is always room for books, notebooks and work documents. To make such a table, you need three furniture panels of different widths - 200, 400 and 600 mm, as well as other basic materials and tools listed at the beginning of the article. Additional materials and tools needed to make a desk:
- sheet of plywood 6 mm thick;
- block 20x20 mm;
- square
The process of making a desk.
In general, the process of making a desk is practically no different from the process of making a computer desk. The only difference is that the desk is a more massive structure containing more drawers, shelves, and niches. First we make a drawing of the product and mark all the dimensions.
We make the tabletop from the largest panel - we cut it out, round the corners, fasten it, and reinforce it with bars.
We cut out pencil cases from medium-sized furniture board. The upper corners of the sides are rounded.
We cut out shelves measuring 400x350 mm, as well as doors for niches. Having cut out the blanks for the plinths, we complete the manufacture of the frame. Having cut two squares measuring 70x70 mm from plywood, cut them diagonally. The resulting triangles must be placed on the back side of the frame. We align the frame using a square and fix it with triangles.
The frame is ready.
We cut out and install the shelves at the distance corresponding to the drawing.
We install the guides.
We cut out the parts of the boxes and fasten them together.
We cut out and install the doors.
We disassemble our table into its component elements and, after carefully treating it with a sander, open it with two layers of varnish. We finally assemble the product. We fasten the tabletop with bolts. We install the shelves and plinth on corner holders. We mount the fittings, having previously made holes in the fastening areas.
All is ready.
Kitchen table made of furniture board, wood or chipboard
The kitchen table is one of the most necessary things in the house. Such a table can always be used in a small apartment, in a large house, or in a country house.
The basic materials and tools required to make a kitchen table from wood or chipboard are listed above. The size of the furniture board used should be 2000x600x18 mm. Additional materials and tools needed to make a desk:
- timber 40x40 mm;
- legs;
- socket nuts with a diameter of 12 mm;
- spanners.
The process of making a kitchen table.
We make a tabletop.
We add rigidity to the tabletop by reinforcing it with bars.
We prepare areas for the legs (drill holes, install fasteners). Attaching the legs
We sand the tabletop and seal it with varnish
Let the product dry and enjoy the result of your labor.
So, we have given examples of hand-made three versions of a table from furniture board. What other furniture can you make from furniture board, wood or chipboard with your own hands?
We make a cabinet from furniture panels (wood or chipboard)
A cabinet made from furniture board, the manufacturing process of which is described below, will fit perfectly into the interior of a nursery or hallway. All dimensions given in the description of the work can be adjusted at will.
The basic materials and tools that will definitely be needed to make any furniture from a panel have been described above. In this case, you will need 7 furniture panels: three with dimensions of 2000x600x18 mm, three with dimensions of 2000x400x18 mm and one with dimensions of 2000x200x18 mm.
Additional materials and tools needed to make the cabinet:
· hardboard sheet;
· plywood sheet 6 mm thick;
· rod for hangers;
· two bars for fastening the rod.
The process of making a cabinet.
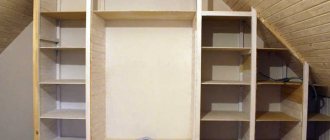
We make the sides of the cabinet from panels, shortening the width of each by 70 mm, since the depth of the cabinet, according to the standard, should be 530 mm. In the lower corner of each sidewall it is also necessary to cut a 50x50 mm recess for the baseboard.
We make the bottom and top of the shelves for the drawers - leaving 775 mm width when sawing the board. The height of the boxes should be 200 mm, and the gap between them should be 20 mm.
The top of the cabinet should be slightly wider than the shelves for drawers - 800 mm.
Using self-tapping screws, we attach the bottom of the cabinet to the sides at a height of 50 mm above the floor, and the middle part at a height of 420 mm. We use a shield 400 mm wide as a shelf for hats; it must be fixed at a distance of 200 mm from the top. We fix the base using corner holders. The hardboard sheet will serve as the back wall of the cabinet. We carefully fasten everything together with self-tapping screws - and the frame is ready.
We fix the retractable mechanism for the drawers close to the sides, since the front sides of the drawers will overlap.
We cut out the drawer elements from plywood. During the sawing process, we make holes every 100 mm along the workpiece so that the plywood sheet does not crack during assembly. We assemble and insert the drawers into the closet. We make the front parts from the narrowest panel, but they will need to be attached only at the very end of assembling the cabinet.
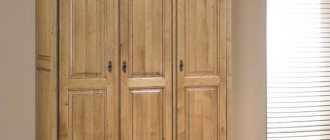
We cut the doors out of a 400 mm wide panel and do fittings - the doors should cover the middle shelf. We cut off the corners on top of the doors and sand them with a machine until smooth transitions between the sides are formed. We drill three holes for hinges on each sash. We install hinges and fasten the doors.
We attach the bars with drilled holes for the rod to the sidewalls using self-tapping screws.
We disassemble the furniture and coat each component with two layers of varnish. Let the varnish dry well and assemble the cabinet.
We make holes for handles in drawers and doors. We install the facades, mount the handles, while connecting the plywood part of the drawers, located in front, and the front part, made of a panel. We check if everything is securely fastened. The cabinet is completely ready. It's interesting to know that your old cabinet can find new life with a simple restoration.
Making a chest of drawers from a wooden or chipboard furniture panel
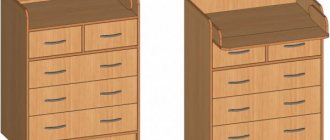
The chest of drawers is a universal piece of furniture. It is multifunctional and practical, so it will find a place in the nursery, in the hallway, and in the bedroom. To make a chest of drawers, the first thing you need to do is purchase a furniture panel measuring 2000 x 400 x 18 mm. Other basic materials and tools that will be required in the furniture making process are listed at the beginning of the article.
Additional materials and tools needed to make a chest of drawers:
- a sheet of plywood, the thickness of which is 6 mm;
- dowels.
The process of making a chest of drawers.
After developing the drawing and establishing the dimensions of all the necessary parts, we cut out the frame elements from the panels and fasten them with self-tapping screws. In the back wall we make a cut under the plinth measuring 50x50 mm.
For aesthetic reasons, the lid is attached to the frame not with screws, but with dowels.
Cut out the sides and ends of the drawers. The external elements are also cut out, but are not attached at this stage. We attach the retractable mechanisms for the drawers (you don’t have to buy them, but make them yourself), and check their functionality.
We disassemble the frame and polish each component. We open the elements of the chest of drawers with furniture varnish, after complete drying we reassemble the frame and insert the drawers.
We drill holes in the drawers and their loose external elements and fasten them with handles.
It turned out to be a great chest of drawers!
Making a hallway from wood, chipboard furniture panels
The hallway, the manufacturing process of which is described below, has a number of advantages:
- multifunctionality;
- aesthetic appeal;
- naturalness;
- the ability to help create order.
Before starting work, you need to prepare the basic material and tools, the list of which is given above. When making a hallway, you will need 10 furniture panels: seven measuring 1600x400x18 mm, three - 2000x400x18 mm.
Additional materials and tools required for making a hallway:
- seven edged boards 2000x120x16 mm;
- two tongue and groove boards 2000x240x18 mm;
- three-meter rail;
- six-millimeter sheet of plywood;
- dowels.
Hallway manufacturing process
We begin the work by making a cabinet 820x400x400 mm. To do this, we use one of the 1600 mm long shields on its components. Don't forget to make a groove for the baseboards. We connect all the manufactured parts with self-tapping screws, except for the bottom strip - we fasten it with dowels.
We cut out the door for the cabinet, install the fittings, and install the door.
We also make the retractable mechanism for the cabinet ourselves from strips of plywood 20 and 40 mm wide. After installing the mechanism, we check its operation.
We cut out the parts for the drawers and connect them with self-tapping screws, having previously drilled holes for them. We also cut out the fronts of the drawers, but do not install them until the product is fully assembled.
We attach the upper part of the cabinet with dowels.
We cut out the parts and assemble the second cabinet 820x500x400 mm. We manufacture and install doors.
A two-meter furniture board will serve as material for the pencil case. We cut out the constituent elements of the pencil case and fasten them together with self-tapping screws. Remember about the recesses for the baseboard.
“Plywood corners will help enhance the rigidity and reliability of the structure.
We outline the places where the shelves will be attached, and calculate the distance between the boards that we will screw to the rail.
We cut out and install the top shelf intended for storing hats. To install it, you will need leftovers from previous cuts.
We disassemble, sand and varnish the entire structure.
After the varnish has dried, we reassemble the hallway and fasten it to the wall with self-tapping screws. At the end we screw the handles. Product completed!
Making a bed from wood or chipboard furniture board
A wooden bed is what you need, because furniture made from pine needles is an environmentally friendly material . The design provides two spacious drawers and sides that prevent the child from falling.
Initially, we prepare the main material and tools, a list of which is given at the very beginning of the article. The main material is furniture board 2000x200x18 mm.
Additional materials and tools needed to make a crib:
- aluminum corners;
- two plywood sheets 12 mm thick;
- mattress;
- wheels for drawers.
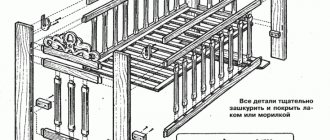
Bed making process and drawings
We first make markings on the prepared materials in accordance with the dimensions of the future crib.
We cut out the parts along the marked lines.
To make the lathing, we attach aluminum corners 180 cm long with self-tapping screws to the sides of the bed from the inside.
We carry out furniture screeding.
It's time to make a figured headboard. We apply a design to the surface of the shield and carefully cut it out along the contour. Sand the edges.
Making legs for the bed.
The remains of the aluminum corners will be useful for attaching the legs.
A sheet of plywood will be used to make boxes.
We fasten the side parts of the boxes to the end parts using aluminum corners, and then attach them to the bottom.
Finally, we attach the front sides of the drawers and screw on the handles. The perfect baby crib is ready!
You can make a lot of other furniture with your own hands from wooden furniture board and chipboard that will fit perfectly into the interior of your apartment.
We also recommend: