51454
Currently, many rural residents cannot afford to purchase new furniture for their home. And city apartments do not always have a large area where it would be possible to place household items. But, despite this, people still learned to cope with these problems on their own. To do this, you can make a wooden cabinet with your own hands, without the services of specialists. Carrying out such a design at home is not particularly difficult, but in order for the furniture to have a long service life, it is necessary to become familiar with the sequence and nuances of the work in advance.
What is needed for production
Today, the consumer market provides various wooden materials for the manufacture of household items. Therefore, before you begin to consider the question of how to make a cabinet yourself, you first need to decide what material it will be made from. According to experts, the best products for this work are:
- plywood - this multilayer material has high wear resistance and strength. In addition, due to its environmental friendliness, it is absolutely harmless to human health. Plywood is produced in solid slabs, which simplifies the process of assembling household items;
- chipboards - chipboard sheets are considered the most popular products for creating home furniture. This is due to the fact that they combine good quality at an affordable price. These products are resistant to changes in temperature and moisture, do not deform under the influence of an aggressive environment and are characterized by increased strength;
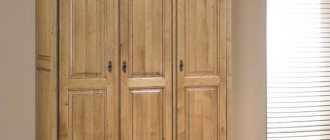
- solid wooden boards - the material from the boards is cut from different types of wood. They are produced in different sizes, certain types of processing and quality of carpentry. For the construction of furniture, boards from pine, birch and oak are mainly selected. These rocks are endowed with high strength and resistance to changes in temperature and humidity.
Installing household items from pine with your own hands is a labor-intensive process, since the rock is not hard enough. But if you choose this material, you can create an extravagant design in any room.
Wooden boards
Chipboard
Plywood
So, having considered the options for materials that will be needed to make furniture, it is also worth familiarizing yourself with the tools for performing the work. The manufacture of cabinets is carried out using the following equipment:
- hand saw for sawing wood;
- grinding machine for polishing the surface of wood;
- protractor, for measuring the angle of inclination;
- ruler or meter tape for measuring dimensions;
- wooden dowels, for fastening the product and filling;
- metal corners for fastening furniture structures;
- wood slab for making shelving;
- mastic for sealing the structure.
In addition, in order to revive a household item with the desired shade, you will need to purchase water-based acrylic paint.
What materials are cabinets made from?
Modern manufacturers offer a wide range of varieties and types of wood used in production. The choice of product texture is based on the customer’s preferences, his budget and the overall design of the room. The many varieties of raw materials used allow designers and manufacturers to create a real masterpiece, implementing the most daring design solutions in the design.
ATTENTION! You should choose a material not only based on its appearance. First of all, you should pay attention to quality and reliability, because the service life of your cabinet depends on these parameters.
Today, both expensive and cheap options are popular. We offer the following review.
Cheap types of materials:
Chipboard : Made from simple wood shavings mixed with a synthetic resin compound. Chipboard boards are made in a variety of shapes, textures and shades, which gives them some versatility. This allows you to combine it with a wide variety of interior design types, choosing the best option for your home.
Chipboard: a laminated type of chipboard. This is the most expensive and best quality version of the raw material chipboard used by the best manufacturers of cheap cabinets.
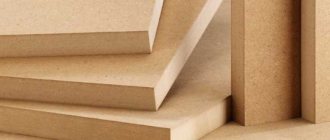
MDF: another popular material, also made from sawdust, but much stronger and more reliable than chipboard. Its distinctive feature is quality and high resistance to moisture and steam. It has a very smooth, almost perfectly flat surface, while being very flexible, which allows you to create curved or convex elements. This allows you to realize the most unexpected design ideas. However, the cost of such raw materials is slightly higher than chipboard and laminated chipboard.
Expensive materials:
Veneer : This is a panel made of chipboard or MDF, covered with a thin layer of wood. This is an expensive raw material used to create luxury furniture. Veneer is an extremely durable, high-quality and durable material.
Natural wood: a material based on natural solid wood. Noble, solid and luxurious - it has the highest characteristics and environmentally friendly texture.
Typically, these blanks are used to make side panels, floors or tops of cabinets. Occasionally, veneer or natural wood is used to decorate facades and doors.
Nuances of work taking into account the type of structure
There are several ways to build a wooden cabinet with your own hands.
Hull
As you can see from the photo, cabinet furniture consists of several component elements, which is why it is also commonly called modular. The peculiarity of such a cabinet is that the owners can, at will, supplement it with various internal and external elements. Initially, the design of the product is developed so that all parts are combined with each other and the body. To build a building, you will need elements such as a roof, bottom, back and side walls. All these elements can be made in the form of removable straight shelves on which things will be placed. It will also be possible to additionally build a pull-out shoe cabinet.
Preparing grooves for fastening shelves
It is better to assemble the structure in a horizontal position
We attach the top bar last
Vertical faceplates
Built-in
A distinctive feature of the built-in wardrobe is that it can be made from scrap materials. The fact is that it is mainly installed in niches of the room or in places where it is not possible to place standard furniture. A solid frame is not required to build the cabinet. It may be missing one or more walls, which are replaced by the floor, ceiling or walls of the building. Filling elements, as a rule, can be made in the same way as for cabinet furniture. But having constructed such a cabinet with his own hands from scrap materials, the consumer must be prepared for the fact that, unlike a cabinet product, this furniture cannot be moved to another place.
The design of each cabinet requires not only the presence of a body and internal filling, but also a front part. The main element of the façade is the door.
When making a built-in wardrobe, it is important to correctly mark the space for future shelves
Shelves must be securely attached
Special logs are required to secure doors
Required materials and tools
To make furniture with your own hands, different materials can be used:
- Natural wood. This is a traditional option for a classic interior. DIY wooden cabinets have many advantages. They are visually attractive, made from environmentally friendly material, and can withstand significant loads. The difficulty with this option is the need to coat the cabinet with varnish or paint, which is not easy to do in an apartment.
- Chipboard. The most common material. It is characterized by low cost and durability, allowing you to obtain different types of construction. Almost all furniture fittings are made for it, so a do-it-yourself cabinet made from chipboard is the simplest and most attractive option.
- Plywood. A high-quality material with top layers of birch, beech or valuable species (walnut, oak, ash) is required. The result is very durable, strong furniture. Do-it-yourself plywood cabinets are made using the same technology as assembling furniture from chipboard. The only problem is the finishing - it’s difficult to paint or varnish an apartment. In addition, getting high-quality plywood from good veneer is quite problematic.
- MDF. This is a modern modification of fiberboard. It is believed that MDF is able to easily absorb and release moisture without losing its performance qualities. In practice, this is very far from the truth. The main advantage of the material can be considered resistance to loads, it crumbles less and shows high mechanical qualities.
The most popular option is chipboard. In addition, you can purchase laminated chipboard (LDSP), which does not require finishing. The craftsman himself will only need to cut the material, cover the ends with an edge and connect them in the required order. This ease of assembly combined with factory quality has made laminated chipboard furniture very popular.
Natural wood
Chipboard
laminated chipboard
Plywood
MDF
The following tools will be required:
- circular saw or jigsaw;
- electric drill with a set of drills;
- ruler, square, tape measure;
- pencil;
- screwdriver with a set of bits, screwdriver;
- set of accessories: ties, hinges, handles, supports, hooks and rods.
Often those who like to work with natural raw materials use various lumber. Assembling a cabinet from boards will require surface treatment - you need to plan and sand them, and for this you will need special equipment.
Many people use ready-made cladding as a raw material for wooden products. For example, this way you can make a cabinet out of clapboard with your own hands. The material is pre-processed and allows you to obtain an original filling of the planes. The disadvantage is the large volumes of sanding and finishing, which create a lot of dust and a strong smell of paints and varnishes. Other options can be used that will suit the master’s taste. It is necessary to take into account that making furniture from scrap materials will require a lot of effort during processing.
Stages of self-assembly of furniture, rules for decoding drawings
Circular Saw
Jigsaw
Electric drill with a set of drills
Measuring tools
Screwdriver
Furniture fittings
Door fastening
Today, the consumer market offers various systems for fastening furniture doors. Each element has its own specific purpose, which depends on how the cabinet is opened.
Swing
Hinged doors are the most common type of furniture design. It consists of a wooden canvas and fastening equipment. The number of panels for a cabinet depends on the number of internal sections. As a rule, if the cabinet has one common section, two doors will be required. If the furniture consists of one narrow and one wide section, three doors will be required. The doors are fastened to the side walls of the cabinet using the following hinges:
- detachable - such a mount is installed on the inside of the cabinet wall;
- universal - these products can be installed regardless of the sides of the cabinet. The hinges are attached simultaneously to the body and doors of the furniture.
After the hinges are attached to the product box, the doors are hung on them.
Hole preparation
Alignment and installation of hinges
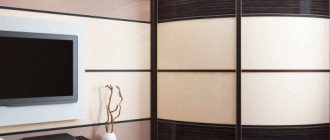
Coupe
Compartment doors are a sliding system where, when the closet is opened, one door overlaps another. Installation of such a design requires certain knowledge and skills, so before installing a sliding wardrobe made of plywood with your own hands, you first need to familiarize yourself with the names of the components and their location.
The accessories set includes:
- special wheels for moving doors, installed in their upper and lower parts;
- upper hanging structure for guiding the canvases;
- a lower guide structure along which the door wheels will move in the grooves;
- cassettes for installing wooden panels;
- locks and closers for easy door opening.
This design is intended for cabinet furniture with a threshold. If a built-in wardrobe is installed, it will be possible not to install lower guide elements on the floor.
Markings and drawings
Before you make a cabinet out of lining with your own hands, you first need to mark its location in the room and draw up a design drawing. Such preliminary procedures will help you quickly assemble cabinet or built-in furniture.
In the cabinet layout diagrams, it is necessary to take into account its width and height. To do this, first use a tape measure to measure the intended installation location. When carrying out measuring work, it is important to consider the distance from baseboards, window sills, pipelines and connectors for connecting electrical appliances. If you lose sight of these points, the wooden cabinet may not fit into the allotted space, or in the future there may be obstacles when opening doors or accessing the power source.
For a DIY cabinet, the drawings can be created using an automated CAD program or by hand. In the first case, the cabinet diagram is drawn up by a special computer system; in the second option, cabinet drawings are made with your own hands. As practice has shown, the second option is simpler, so it is chosen more often. To create a drawing by hand, you will need a sheet of paper and a pencil. Next, sketches of the cabinet are drawn on the sheet.
Description of drawing up a drawing of a wooden product:
- front view of the cabinet - this sketch includes the width and height of the furniture, the height of the base, the size of the sections, the distance of the shelves from each other. When drawing up a drawing, it is important to take into account the thickness of the furniture walls and its contents. You also need to indicate the attachment points for shelves and doors;
- top and side views - in this case, the depth of furniture and shelves is marked on a sheet of paper. When applying filling depth values, it is important to take into account the fastening of the doors. To ensure that the shelves do not interfere with the installation of fastening equipment, they should be located at a distance of 10 cm from the edge of the furniture’s front wall. Also in this sketch you need to indicate the rounding of the shelves with a radius of R.
In addition to the indicated values of the furniture body, you need to draw the dimensions of the filling elements on a sheet of paper. Shelves can be made in different configurations and thicknesses, but they must be of the appropriate size.
How to do it at home?
After all the preparatory work, you can begin to manufacture and assemble the frame. If we are talking about built-in furniture , then its assembly begins on one side and proceeds in order:
- First, the shelves are attached to the side and rear walls using corners.
- Next, a stand is mounted, which is attached to the wall and to the installed elements.
- After this, the remaining shelves are mounted to the walls and the counter.
Important. When assembling the cabinet frame, you must strictly follow the drawing to avoid inconsistencies. Make sure there are no distortions during the assembly process.
To assemble a built-in wardrobe you will need confirmations and dowels . With the help of confirmations, individual elements are attached to each other. And dowels are used to give the structure special strength and reliability.
To drill holes for confirmations, a drill with a diameter of 5 mm is used. The back wall can be attached with small nails or a construction stapler.
Internal shelves and walls can be secured with furniture corners . The corners are fastened with self-tapping screws. To give the structure increased strength, confirmats are used.
Advice. It is better to assemble the cabinet at the place of its installation.
The final stage after assembling the frame is the internal arrangement of shelves, drawers, and clothes rails. It is also worth taking care of proper interior lighting.
Manufacturing of parts
Having made a drawing of the cabinet design with your own hands and prepared the appropriate equipment, you can begin to manufacture its parts. To do this, transfer the dimensions of the furniture elements onto a sheet of chipboard using a meter and pencil:
- upper part of the cabinet in quantity – 1 piece;
- side walls in quantity - 2 pcs;
- bottom in quantity - 1 piece;
- back wall in quantity – 1 piece;
- furniture shelves in the amount of individual consumer preference.
Next, using a saw along the marked lines, they begin to cut out the parts step by step. When performing these works, it is necessary to take into account the thickness of the saw itself, otherwise the furniture elements will be smaller after sawing.
After the parts are ready, they must be covered with melamine film. To do this, a film is applied to the structural elements, which is then ironed. After the cladding has set on the parts, all its excess remains are cut off with a stationery knife.
Preparing parts
Edge fastening
Stages of manufacturing different types of structures
A novice craftsman should familiarize himself with the information on how to make a cabinet from laminated chipboard with your own hands. This is the most convenient, simplest manufacturing option that can give a completely professional result. It is important to decide which cabinet to make - cabinet or built-in. These are structures designed to perform the same tasks, but have different assembly methods.
Methods for painting furniture, necessary materials, tools
The advantage of a cabinet cabinet is that it can be moved to another wall if necessary. Built-in structures fill niches or the entire part of the room, from one wall to another. They are stationary and cannot be moved to another location.
Hull
The procedure for creating a cabinet from scrap materials:
- Carry out preparatory work. According to the assembly drawing, blanks are cut for the side walls, top and bottom covers, shelves, and doors. No deviations from the dimensions indicated on the diagram are allowed.
- The ends are glued with an edge using an iron. Set the heat to about 2/3 of the maximum, then carefully smooth the edge to the surface. After cooling, the protruding overhangs are trimmed with a sharp knife, and the corners are delicately sanded with fine sandpaper.
- According to the assembly diagram, the surface of the parts is marked, holes are made for handles, hinges, shelf supports, couplers, and other accessories. It is recommended to make a template that gives the exact position of the center of the hole. It must first be checked on some piece of chipboard so as not to spoil the workpiece.
- Assemble the external walls, shelves and other elements of the cabinet (without doors). Then it is placed on the floor with the frontal plane down, supports are installed, and the back wall is made of fiberboard. This is a critical stage that requires high precision. It is necessary to carefully check the diagonals so as not to distort the body.
- They put the cabinet in place and hang the doors.
- Install cabinet handles, add decorative elements and other auxiliary details.
The process of assembling a cabinet with your own hands from plywood or MDF is almost the same as described above. Only finishing or lining of the planes with decorative material is added.
Carry out preparatory work: make the necessary measurements and drawings
Cut workpieces according to available sizes
Using an iron, cover the ends with an edge
Make the necessary markings and assemble the external walls and shelves
Install the back wall
Put the cabinet in place and hang the doors
Install handles and add decorative elements
Built-in
Assembling a built-in wardrobe begins with careful measurements of a niche, room or section of wall. It is important to determine the distance between walls at several levels, since the planes are not always parallel or vertical. If there are deviations, you need to record the distance at the lowest and highest points.
After this, a diagram of the wardrobe is drawn up. The peculiarity of such furniture is the absence of side walls, which act as the walls of the room. Step-by-step manufacturing instructions:
- Mark the walls for shelves. Using a hammer drill, they make sockets for dowels and attach supports or shelf holders.
- The vertical inner panel is connected to the shelves, then fixed to the wall with corners. It is important to constantly monitor the vertical, perpendicularity of the panel to the plane of the wall.
- Install the upper horizontal shelves. They are attached to the wall with corners and connected to the vertical panel with self-tapping screws. It is imperative to control the horizontal using a building level.
- All other parts are attached in a similar way. It is necessary to constantly check the diagram so as not to confuse the design elements.
- Guides for sliding doors are installed on the surface of the floor and ceiling. If the planes are not parallel, support platforms are made first. Their position is adjusted to achieve complete parallelism.
- I install doors, handles, mirrors, and other fittings.
The designs of sliding wardrobes are very diverse, but the assembly principle is subject to a general logic.
Mark the walls for the shelves and secure the shelf holders
Install the shelves, controlling the horizontal position using a building level
Install sliding door guides
Install doors, mirrors and other fittings
Assembly
It is better to assemble the cabinet at its intended location. In this case, it will be possible to prevent deformation of the walls and floor of the room when moving finished furniture. Initially, sheets of cardboard are laid on the intended floor, on which the structure of the product will be sequentially assembled.
Step-by-step instructions for assembling the cabinet, carried out in stages:
- the first side sheet is located on the floor;
- fasteners are fixed vertically to connect the bottom and top sides of the cabinet;
- the top and bottom of the furniture are installed and fixed on the sides;
- the second side sheet of the cabinet is placed on top and secured;
- the strength of fastening elements is checked;
- the cabinet is turned over with the front side on the floor;
- the back of the furniture is laid and secured;
- The cabinet rises and is installed tightly against the wall in the designated area.
Next, using a level, you need to create a level position for the cabinet, then fasten the doors, as well as install the filling.
So, having learned how to make a cabinet with your own hands, many beginners will not make serious mistakes when designing the structure. A step-by-step manufacturing guide will help you correctly complete the furniture parts. And if the given assembly sequence is followed, wooden cabinets will be able to stand for decades without deformation.
Assembling a wooden cabinet with your own hands
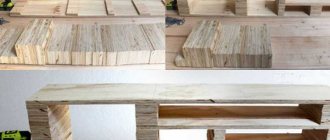
Well, having discussed the details, drawn a drawing, put down dimensions and purchased materials, you can begin assembling the cabinet. To work, we will need a cutting device, at least a hacksaw, and at most a wood cutting machine. The ideal option is a hand-held circular saw, but a jigsaw can also work if you match it with a hacksaw for thick wood, although the cut may be rough and there may be chips. A hand saw with fine teeth will produce a more accurate cut.
Another option is a “grinder” with a wood disc. BUT only with a wood disc
!
You cannot
cut with a circular saw blade using a grinder ; you will not only be cutting wood!
There are special discs specifically for grinders and specifically for wood
! It may look like the photo below.
Wood saw blade for grinder
We measure and cut out the parts according to the assembly diagram, first of all we assemble the panels: walls, lid, bottom, doors.
We collect furniture panels
There are two ways to assemble our walls, lid and bottom into shields:
- using glue, having previously glued the shield,
- and fastening parts together during cabinet assembly.
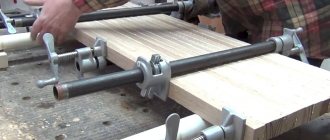
Gluing boards into panels is not an easy task. Clamps are needed to hold the boards tightly during the gluing process.
If you want to study this issue, start with the video below.
As you can see, this is not a simple matter, but it is interesting. You can also buy furniture panels instead of making them yourself. It is much easier to assemble a furniture panel perpendicularly by screwing 3 boards that will be located on the inside of the cabinet, but this method is not entirely aesthetic.
A simpler option for assembling furniture panels is to use boards with grooves using the tongue-and-groove method. The groove is filled with glue and a tenon is inserted into it and secured, preferably with clamps. This is the easiest way to make a furniture panel and there is no need for perpendicular veins.
Assembling a cabinet using planks
You can use another method when the cabinet is assembled one board at a time, that is, having assembled the bottom and fastened it perpendicularly with boards where they will not be visible (from below), we begin to assemble the outer walls, fastening them with shelves and a lid. This method will avoid perpendicular fastening boards inside the cabinet. You can also use these boards as holders for shelves, disguising them in this way. In this case, it is better to use bars of a small cross-section - 20*20 mm, for example.
First the bottom, then two boards along the edges, between them there are shelves and a lid (shelves can be added later if the cabinet consists of two sections and there is a partition in the middle). It is impossible to make doors without perpendicular veins and they are required there.
The shelves and the lid are screwed into the end of the second part using self-tapping screws; the fastening is quite simple, but first it is better to carefully drill a hole with a drill of a smaller diameter than the self-tapping screw so that the self-tapping screw does not tear the board. For these purposes, you cannot do without a screwdriver and/or drill.
To align parts strictly perpendicularly, vertically and parallelly, you cannot do without an assistant and measuring devices.
A carpenter's square and bubble level are must-have tools for building a good, FLIGHT DIY wood cabinet.
Well, then it’s better to watch than read, a few videos for clarity.