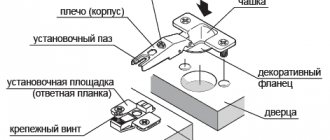
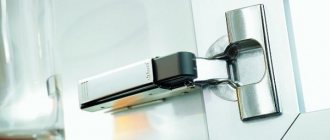
When purchasing cabinet furniture, you probably pay attention to how the parts of the product are fastened together. In some cases, manufacturers use nails, in others - self-tapping screws. But perhaps the most reliable method of fastening is an eccentric furniture tie. We will talk about what it is and in what cases this type of fastening is used in this article.
Eccentric furniture coupler
About the eccentric coupler
An eccentric coupler, or, in other words, rastex or minifix, is one of the most practical, durable and convenient types of fastening furniture elements together. The use of such fasteners allows you to disassemble and reassemble furniture without damaging the material from which the furniture is made.
With the help of a minifix, you can easily assemble T-shaped and L-shaped elements when it is not possible to make grooves in them. Often this option for connecting parts is used when assembling tabletops on dining tables and computer tables, the top and bottom parts of cabinets, chests of drawers, and cabinets.
This type of fastener is hidden, and as a result, it can be used without fear that the appearance of the structure will be damaged.
An eccentric connection is a hidden type of fastener, and therefore it is invisible, but, nevertheless, it gives strength to the structure and is not afraid of reuse.
Tips for choosing
The screed should not interfere with the use of furniture or disrupt the external design of the structure . If you need to hide the joint and connecting part, then you should use an eccentric or conical model, which after installation are invisible to people. To assemble furniture from glass surfaces, a shelf holder is used, which is combined with a silicone or rubber gasket. To connect parts of cabinet products, you should use a confirmat or an eccentric, as they make the screed strong.
When assembling upholstered furniture, fasteners with a carriage tie are used, which are covered with decorative overlays. For built-in structures consisting of a large number of shelves, it is recommended to use corners. If the product does not have a facade, then you should choose a conical or eccentric screed, since their installation does not require through holes.
A holder with a silicone suction cup holds glass surfaces better
To connect the body parts, an eccentric tie or joint is suitable class=”aligncenter” width=”563″ height=”448″[/img] When assembling upholstered furniture, fasteners with a carriage tie are used
To install shelves you will need corners
What is this type of fastening?
Minifix is a fastener consisting of several components:
- eccentric;
- stand or rod;
- futorka;
- dowel;
- sleeve made of plastic or metal;
- stub;
The parts are sold in different configurations and may differ from each other in length, diameter, type of fitting and method of fastening, which can be a screw or self-tapping screw.
Components of an eccentric coupler
Advantages and disadvantages
Like any type of fastener, an eccentric connection has its positive and negative sides. Let's look at them using a table as an example.
Table 1. Advantages and disadvantages of an eccentric coupler
| Advantages | Flaws |
| 1. Furniture can be assembled and disassembled quickly and effortlessly. 2. Possibility of repeated assembly and disassembly of products. 3. The most reliable and durable mounting option. 4. Does not spoil the appearance of the product. 5. Possibility of fastening products at different angles. | 1. High price of fasteners. This increases the cost of the product as a whole. 2. The installation technology is quite complex. 3. The need for perfectly accurate calculations for marking locations for fastenings. |
What does an eccentric coupler look like when it's in place?
Mounting features
Eccentric furniture ties consist of the following parts:
- stand (another name is a rod, it can be either a self-tapping screw or a screw);
- eccentric;
- futorka (performs the functions of a nut).
Sometimes the kit includes a sleeve, also known as a coupling, to screw the rod not into wood or plastic, but into it. If the diameter of the screed is large, a plastic decorative plug is added to the front side. The bushing increases wear resistance and strength - the metal part is not as loose as a hole made in the chipboard. So it is better to choose fittings with couplings to avoid breakdowns and extend the life of the furniture.
The basic principle of operation is quite simple: a coupling is inserted into a round hole on the furniture, a stand is screwed into it, and an eccentric connects them from the side. If some unsightly detail remains visible from above, then a plug is put on.
Eccentric furniture ties are also called minifix or rastex.
- If the minifix is already built into the right place, the bushing and eccentric are inserted, installation will not take much time. The only tool you may need is a flathead screwdriver.
- This type of fittings is very wear-resistant and can withstand repeated assembly and disassembly without becoming loose or losing its quality and strength.
- From the front side, the screed is invisible and does not spoil the design of the product; it can only be seen from the inside, and even here, if necessary, a plug is used.
- The ability to fasten parts at different angles (the most common options are 90, 135 and 180 degrees).
- The fastening adds rigidity to the entire structure.
- Reducing the number of spare parts, for example, if you attach the tabletop directly to the sides, drawers will not be needed.
- Long service life and ability to hold heavy weight.
Disadvantages include:
- Relatively high cost. An eccentric minifix is approximately twice as expensive as a regular confirmat. When using a large number of elements, such a difference can significantly affect the final cost of a piece of furniture.
- A single-piece confirmat requires only one drilled hole for installation, whereas a minifix requires three holes. Because of this, installing furniture screeds is somewhat more complicated.
- Working hours. Screwing in a Euroscrew is much faster.
The number of advantages of minifix outweighs its minor disadvantages, especially when it comes to assembling high-quality, durable furniture for your own use.
Types and sizes
The eccentric coupler comes in plastic and metal. Depending on the material of manufacture, it is used in one field or another. For example, small pieces of furniture can be secured with plastic fasteners, but for large items, such as cabinets or kitchen units, it is advisable to use metal fasteners.
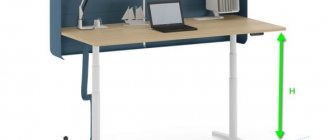
The dimensions of the parts also vary, for example, the length of the stand can vary from 38 to 58 cm, the diameter of the minifix can be of three sizes:
- 12 mm;
- 15 mm;
- 25 mm;
The most commonly used fastener is 15 mm in diameter.
The dimensions of the eccentric coupler parts may also vary.
What is a furniture eccentric screed?
The set of parts for a furniture eccentric coupler, depending on the type and manufacturer, includes from two to four elements: a rod, a coupling for attaching the rod to the body, an eccentric (cylinder) and a plug that covers the end surface of the eccentric.
The strength and invisibility of the parts is ensured by the rotation of the cylinder around its axis. On visible surfaces, large eccentrics are covered with plugs, but it is not necessary to close cylinders with a diameter of less than 15 mm.
The rod is made from aluminum or zinc alloys under high pressure. It is created in such a way that when screwed in, the coupler will always function correctly - since they have a ledge that rests against the end of the coupling or the surface of the part. The T-shaped head is equipped with a special slot, which determines the correct screwing of the rod into the hole. The slot can be straight, Phillips or universal. The reliability of the screed itself depends on the lower surface of the rod, because it is the one that takes on all the force.
The rod can be of different designs, for a classic connection, double-sided or angular.
There are two main types of couplings - plastic and metal couplings. The former are pressed into the surface and secured using special outer rings, while the latter are screwed into special previously drilled holes. With any of the above mounting methods, it is important to know that the strength of the tie depends on how the head is mounted, and if the position of the rod head is too low or too high, then the force in the connection will be weak. This is especially true for parts with an eccentric diameter of 15 mm.
The eccentrics of the couplers look similar to a cylinder, but they have different diameters, heights and thicknesses. The end of the cylinder on one side is equipped with a cross-shaped slot, which ensures rotation during assembly. That is, all the efforts of the manufacturers of the elements of such a screed are aimed at making it as strong as possible, and for this it is necessary to prevent the reverse rotation of the eccentric even under significant loads, vibrations and other factors that may affect its position.
Installation tools
When starting to install a product using an eccentric coupler, it is important that you have the following tools:
- screwdriver;
- screwdriver;
- cutter, or, in other words, Forstner drill;
- drills with a diameter of 5 and 8 mm;
- ruler;
- pencil.
Forstner drill
Forstner drill price
Forstner drill
Scope of application
Furniture fasteners are used for L-shaped and T-shaped connections. Minifixes are in demand when assembling cabinets, tables, and chests of drawers. They connect the lids and bottoms of cabinets, as well as the tops of computer and dining tables, bedside tables and chests of drawers. In addition, eccentric furniture ties are used to fasten parts where it is not possible to drill holes. For horizontal elements, such as shelves, it is more convenient to use plastic ties. Bulky structures are assembled using reinforced eccentrics. Such fasteners are placed in the housing and contain an additional fitting.
The furniture is connected in such a way that the minifixes remain almost invisible. They can only be seen from the inside of the product. This point can be considered an advantage of this type of fasteners, since they do not spoil the appearance of the furniture. The eccentric tie makes assembly of products simple, quick, and also adds additional rigidity to the entire structure.
Instructions for creating holes for an eccentric tie
Step No. 1 – mark the drilling locations. Before you begin installing the hitch, you must accurately mark the places where the necessary holes will be drilled. You can mark manually using a ruler or template, or you can use a special device - a jig. We'll talk about it below.
First of all, you need to mark the places for attaching the screed using a ruler or template.
Step No. 2 - drill a place for the rod. Next, in one of the two parts to be connected, we drill a groove for the rod. It is important that it does not go through, so use a stopper. We screw in the rod, leaving it to protrude 6 mm above the blade.
Next, you need to drill grooves in the material, into which the rod will be inserted later
Step No. 3 - make a groove for the eccentric. The next step is to drill a hole for the eccentric. This is done using a Forstner cutter. And here the depth is important, on average 15 mm will be enough. The groove should not be through, the eccentric should fit into it to its full height and be flush with the surface of the workpiece. On the product, using a template or ruler, measure a distance of 33.5-34 mm from the bottom edge and 5 cm from the side end. The intersection point will be the center of the hole.
The hole for the eccentric segment of the connection is drilled using a special cutter
Step No. 4 - drill a passage for the rod. And the final stage in preparing places for fastening will be drilling a passage for the rod in the same element in which we will place the eccentric, only from the end side of the part. It is done with an 8 mm drill and should be located exactly relative to the center of the niche for the eccentric and exactly in the middle of the end part of the part itself. When working, it is important to use a ruler, tape measure, or, if you have a special jig, a template. Otherwise, misalignment of the grooves may result in you not being able to assemble the furniture neatly and evenly.
Next you need to drill a passage for the rod
Prices for the range of drills
Drill
The holes are ready and all that remains is to connect the parts of the future structure. To do this, we apply one workpiece to another so that the rod enters the passage. We insert the eccentric into the groove and use a Phillips screwdriver to tighten the minifix, thereby firmly and securely fastening the furniture elements together.
Provided that you followed the instructions carefully, the furniture connection will be installed without problems
With correct and accurate calculations and following all instructions, your furniture pieces should fit perfectly into a single plane, without protrusions or distortions.
ECCENTRICES, THEIR TYPES AND APPLICATION
Currently, one of the most common ties for furniture assembly is eccentrics . Due to its low price, relatively easy installation, aesthetic appearance (the fittings are not visible from the outside of the furniture and are neatly located inside the structure) and the possibility of reusable use, the eccentric coupler has long been very popular among furniture makers.
Eccentric couplers are varied: there are couplers made entirely of metal, in a plastic case, reinforced, differing in size and functional purpose.
Also diverse is the range of rods for eccentric couplers , which are mandatory components that complement the eccentrics: standard and angled rods, economy-style rods with a plastic element, rods with a metric thread for a fitting or with a threaded end.
METAL ECCENTRICS
Suitable for the most popular slab thicknesses used in Russia for furniture production: 16, 18, 22, 25, 30 mm. The body of the eccentrics for 16 and 18 mm slabs contains special notches that prevent loosening and unwinding of the screed.
The range of rods for metal eccentrics is quite wide, which allows the furniture maker to use various types of connections:
- corner connection
In the diagrams you can see two types of corner rods, which allow you to connect two slabs at an angle from 30 to 180°, for example, these could be any corner structural elements or non-standard fronts for drawers.
METAL ECCENTRICS, CLASSED IN PLASTIC OR METAL CASES.
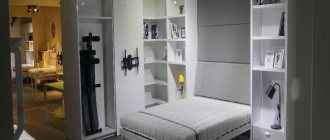
mainly used in the production of sliding wardrobes . These ties are used to assemble the cabinet bodies. Also, such ties are used to install shelves inside the cabinet to ensure sufficient structural rigidity.
The metal eccentric in a plastic casing is suitable for slabs with a thickness of 16, 18 and 25 mm. The plastic body is available in several colors, which allows the screed to be used with different slab options: plain or wood-like, light or dark.
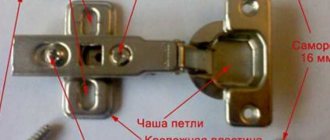
The eccentric in a metal case is suitable for slabs with a thickness of 16 and 18 mm . This eccentric fits perfectly with hinges and shelf supports, thus maintaining the overall color style of the furniture's interior design.
Eccentric without side
Allows you to install the shelf in two options: vertically and horizontally.
Eccentric with side
Provides only vertical installation of the shelf, while the side prevents the shelf from falling out of the rods, providing horizontal fixation.
ECCENTRICS IN THE CASE WITH AN ADDITIONAL FUOR
Used to assemble more massive structures. These eccentrics can withstand high fracture loads and are also available in two housings: plastic and metal.
This group of eccentrics provides the following connections:
- perpendicular
This connection is provided by three types of rods: with a sharp threaded end (self-tapping screw), with a blunt threaded end (Euroscrew) and with a metric thread (for a fitting). Of course, the easiest installation option is a self-tapping rod. The other two rods (euroscrew and under the foot) require additional drilling in the sidewall of the structure, but at the same time they provide a more reliable connection.
- double perpendicular connection
This connection is used when installing shelves coaxially on one side panel. Firstly, this allows you to install the shelves at the same level, which certainly gives the structure a more presentable look. Secondly, it allows the furniture manufacturer to save on material by using only one side panel instead of two. Thirdly, only one through hole is drilled, thereby simplifying the production cycle. These rods can be used with slabs with thicknesses from 16 to 22 mm.
REINFORCED ECCENTRIC BRACKETS
They are mainly used for assembling massive structures that use thick slabs from 22 mm and require a very reliable connection. Often these ties are used to assemble the frame of a bed or sofa.
To install this screed, you need to drill a hole in the slab with a diameter of 35 mm.
Source: https://xn—-7sbzghf7ail.xn--p1ai/articles/poleznye-sovety/73-ekstsentriki-ih-vidy-i-primenenie-.html
What is a furniture jig and how to use it
If you have a furniture jig, this will make it much easier for you to mark and drill holes for any type of fastener. A jig is essentially the same template, which is a special device or bar on which holes of different diameters and at different distances are applied. With their help, you can make perfectly accurate markings and drill passages of the size you need. Various materials are used to make this assistant:
- metal;
- plastic;
- tree;
- wood boards.
The product is a solid base with many holes at different distances required from each other. Additionally, it can be equipped with a mechanism for fixing and adjusting the distance between the holes.
Use a special drilling jig to help you hold the drill at the right angle.
Thanks to the device, you will install the drill exactly at a right angle to the blade, without deviations. This is a great help when working on narrow surfaces, such as the ends of chipboards. After all, if the groove is not located at an angle of 90 degrees, assembling the body elements into a single whole may become impossible.
Types of conductors
Depending on the functions performed and design features, templates can be of several types:
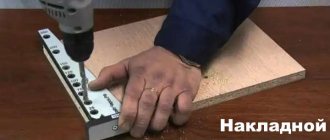
- Invoices. This type of device serves as an assistant for drilling holes on flat elements by placing it on the workpiece. The device is not attached, but only held by hand. Suitable for use on chipboard or fibreboard surfaces.
- Rotary. The rotating device allows you to move it vertically or horizontally and rotate it at different angles. This device is convenient to use provided that the part that needs to be drilled has a complex shape.
- Tiltable. Tiltable assistants are convenient for working with elements that are located in planes that are different from each other.
- Universal. The devices are convenient because they can be customized for the production of furniture of various configurations.
All types of templates can have a sliding or fixed type of fit to the surface. The sliding type allows you to move the product along the surface of the workpiece. Fixed option - firmly fixed in the desired position and does not move.
The conductor is the furniture maker’s best assistant, without him it would not have been possible to connect furniture so beautifully
Prices for drilling jigs
Drilling jig
What to look for when choosing a conductor
When choosing a furniture jig in a store, you should carefully examine the product and pay attention to the material from which it is made. For example, stainless steel products will be high-quality and reliable.
The manufacturer matters too. World-famous brands, as a rule, produce high-quality tools with a long service life and a warranty from the manufacturer.
The more famous the brand, the higher the quality - a rule that works flawlessly in the case of construction tools
When purchasing such an assistant, take an interest in the additional equipment that comes with the kit. The versatility of the device will make your work easier. The more tools included in the package, the more cases you will be able to use it. For example, a set may include
- various bushings;
- drills of various diameters with stops;
- Forstner cutter, for holes for minifixes;
- keys.
There are a significant number of advantages in using this device.
By using a template when manufacturing and assembling cases, you will save yourself from many inconveniences. For example, you don't need to mark places with a ruler and pencil. The jig allows you to fix the distance and drill several absolutely identical holes at the same distance from each other. There is no inaccuracy here.
But a factory-made conductor also has a drawback - its rather high price.
Therefore, craftsmen are quite capable of making such an assistant with their own hands. Our instructions will help you with this.
Instructions for making a furniture jig
Step No. 1 – prepare tools and materials:
- square metal block, section 1x1 cm;
- Bulgarian;
- file;
- calipers;
- awl or thick needle;
- drills with a diameter of 5 mm;
- metal plate for stop measuring 1x25 mm;
- a sheet of sandpaper.
First, let's collect all the tools and materials necessary for the work.
Step No. 2 – make the base and markings. Using a grinder, cut off a piece of the required length from the block. Sand any burrs with a file. Mark the locations for future holes. The generally accepted dimensions are the distance between the grooves is 32 mm, the distance from the centers of the slots to the side edge is 8 mm. To make the markings accurate, use a caliper. It is convenient if you mark the centers of future grooves using an awl or needle.
Make the markings, you can first do it on paper, then transfer it to the material itself that requires connection
Step No. 3 – install the tool. Next, we drill passages in the required quantity. Then we take a metal plate and grind it with sandpaper if necessary. Clamping it with a vice, we bend our plate at a right angle. Align the resulting parts and clamp them with a clamp. Fasten the parts with screws, having previously cut the thread to the desired size. Thus, you can create a very convenient tool for yourself.
Next we drill the holes
Veneered plywood
Installation of minifixes (ties) during the manufacture of furniture from OSB and plywood
During the manufacture of furniture from OSB and plywood, various hardware is used; the specific choice of hardware depends on the installation location and the qualifications of the craftsman. How are individual furniture parts secured?
- Nails. For furniture this is the worst option, the fastening reliability is insufficient. Small nails are sometimes used only for installing the back wall of products and the bottom of drawers.
- Self-tapping screws. In terms of reliability, they have slightly better indicators; they are used for back walls, bottoms of drawers and some structural elements that are out of sight during furniture operation.
- Confirmations. The characteristics of these hardware are much better; they have special plastic plugs that cover the holes of the heads.
- Minifixes or ties. Professional hardware, used in industrial furniture production, has high joint strength, and has decorative plugs for technological holes.
All of the above connection methods, except for minifixes, have several more significant disadvantages. First, these connections are disposable; if you had to unscrew a screw or pull out a nail, you cannot reinstall it in the same place; the pressing force is critically reduced. Secondly, furniture made with such hardware is difficult for an ordinary buyer to assemble at home; not every one of them knows how to independently drill holes, take measurements, etc. Minifixes (ties) are completely free of these disadvantages. Assembling/disassembling furniture is simple, you can perform these actions many times, and in terms of reliability of connection, minifixes confidently take first place. All furniture produced by industrial enterprises is assembled only on minifixes. Let's take a closer look at how they are installed; we hope that you will use our advice when making furniture.
| Minifixes |
Instructions for installing minifixes
There are quite a few types of minifixes, but most of them consist of three parts: a metal eccentric for tightening parts, a plastic coupling for fixing the threaded part and the rod (rod) in the hole. For installation you need a wood drill Ø 7÷10 mm and a cutter Ø 15÷16 mm. As an example, we will take the most common minifixes used to connect 16 mm thick boards or plywood.
| Minifix cutter |
- In the plane of the part that is to be fastened, drill holes Ø 10 mm; a plastic coupling will be installed in it. The depth of the hole should be several millimeters greater than the length of the coupling; this will give you the opportunity to adjust the height of the rod head in the eccentric hole within small limits. When drilling a hole, make sure that its axis is perpendicular to the edge and located exactly in the middle of the slab. Insert the plastic coupling onto the glue; one should fit into the hole with little effort. There are minifixes with metal couplings; they have threads; accordingly, such couplings need to be screwed into drilled holes. The diameter of the holes should be 0.5 mm less than the diameter of the coupling. Insert the coupling flush, the axis of the coupling must be strictly vertical, no deviations are allowed; if there is an angle of inclination, this is a defect; big problems will arise during the assembly of furniture elements.
| Hole for plastic coupling |
| Installed plastic coupling |
- Drill a blind hole in the plane of the second part for the eccentric. You can see how to take dimensions in the photograph; be extremely careful; if you make a mistake during marking, it is impossible to correct it later. You will have to install the minifixes in another place, and this is not always possible due to technological parameters and always reduces the quality of the assembly. In addition, extra holes do not decorate the furniture in any way. In our case, the distance from the center of the hole to the edge is 34 mm; this distance is determined by the length of the minifix rod and the thickness of its head. We will tell you below how to find out these parameters and how they affect the markup. The depth of the hole for the eccentric is 14 mm; the depth is influenced by two parameters: the thickness of the OSB board or plywood and the thickness of the eccentric. You already know that any hole in the slab cannot reach the surface closer than three to four millimeters. Of course, the eccentric must be completely recessed in the hole.
| Marking the hole for the eccentric |
- At the end of the mating part in which the eccentric will work, you need to drill a hole for the minifix rod. The hole should be approximately 0.5 mm larger than the diameter of the rod. If you did everything correctly, the rod will easily fit into the hole, and the height of its head will be enough to ex. If there is a problem with the height, you need to tighten the rod a little or, conversely, unscrew it. In order to be able to adjust, we specially drilled a hole for a coupling of increased depth.
| Hole for rod |
| View of the rod in the attracted part |
| Minifix installation diagram |
| Minifix installed |
After correctly installing the eccentrics, you only need an ordinary screwdriver to assemble the furniture; all operations are performed quickly; most models can be assembled independently without helpers.
What types of minifixes are there?
- Ordinary. The most common ones are used during the manufacture of most furniture models. They consist of a coupling (plastic or metal), an all-metal rod and an eccentric.
Angular. Used to connect individual furniture elements at an angle. The rod has a hinge that can change the angle of inclination of the rod head in relation to the threaded part. They are used quite rarely for a simple reason - most of the corners in furniture are straight, therefore, there is nowhere to use it.
| Corner minifix |
- Double-sided clamps. They occupy an intermediate place in distribution. The minifix coupling does not have a coupling; eccentrics are installed on both sides. It is used only in cases where furniture parts need to be connected along the edges (on the edge).
| Tie minifix |
How to make markings for an eccentric
There's nothing complicated. Measure the total length of the rod without the threaded part and subtract from it the thickness of the head and the minimum thickness of the eccentric (in the place where it has a slot). This will be the distance at which you need to drill a hole for the eccentric.
← Tips for building a three-apartment frame house Architectural and planning features of a two-story frame house →
We recommend watching:
Plywood FSF | 18mm | 1220 mm x 2440 mm | birch | construction | NS
RUB 1,450
Plywood FSF | 18mm | 1220 mm x 2440 mm | birch | grade 4/4 | NS
RUB 1,550
Plywood FC | 4mm | 1520 mm x 1520 mm | birch | construction | NS
250 rub.
Plywood NEEDLES | 18mm | 1220 mm x 2440 mm | coniferous | grade SM | NS
RUB 1,400
Plywood LAMINATED FOF | 24mm | 1220 mm x 2440 mm | birch
RUB 3,300
Plywood FSF | 21mm | 1220 mm x 2440 mm | birch | grade 2/3 | Ш2
RUB 2,500
Plywood FC | 4mm | 1520 mm x 1520 mm | birch | grade 4/4 | NS
280 rub.
Plywood FSF | 4mm | 1220 mm x 2440 mm | birch | grade 2/3 | Ш2
700 rub
Plywood FC | 21mm | 1520 mm x 1520 mm | birch | grade 2/3 | Ш2
RUB 1,700
Plywood FSF | 4mm | 1220 mm x 2440 mm | birch | grade 3/4 | Ш2
600 rub
OSB | 12mm | 1220 mm x 2440 mm
720 rub.
Plywood FC | 8mm | 1520 mm x 1520 mm | birch | construction | NS
450 rub.
Plywood NEEDLES | 9mm | 1220 mm x 2440 mm | coniferous | grade 3/4 | NS
900 rub.
Plywood FC | 6mm | 1520 mm x 1520 mm | birch | grade 3/4 | Ш2
500 rub
Plywood FSF | 18mm | 1500 mm x 3000 mm | birch | construction | NS
RUB 2,150
Plywood NEEDLES | 12mm | 1220 mm x 2440 mm | coniferous | grade SM | NS
1,000 rub.
Plywood FSF | 21mm | 1220 mm x 2440 mm | birch | grade 3/4 | Ш2
RUB 2,250
Plywood FSF | 9mm | 1220 mm x 2440 mm | birch | grade 4/4 | NS
920 rub.
Plywood FC | 21mm | 1520 mm x 1520 mm | birch | grade 3/4 | Ш2
RUB 1,530
Plywood FSF | 18mm | 1525 mm x 3050 mm | birch | grade 3/4 | Ш1
2,000 rub.
Comments
No one has left a comment yet
Other options for furniture ties: a brief overview
As we have already found out from the above, the eccentric coupler is one of the most durable fasteners. But it is not always advisable to use this type of connection. Let's look at what other fastenings are used by cabinet furniture manufacturers.
Confirmat
Confirmat is one of the most popular and easy-to-install connection options. Fastening the body parts using confirmations is not difficult or difficult. This type of fastening can only connect elements at right angles.
Confirmat - another detail of furniture fasteners
To install furniture parts using a confirmat, you will need to drill a groove along the diameter of the fastener head in one of the workpieces, the second hole must be made in the end part of the other workpiece, but the diameter will be smaller - usually two drills of 5 and 6 mm are used. Although, you can also use a combination type drill - this is convenient, since you will work with only one tool, and there will be no need for constant replacement.
For greater reliability, confirmations are recommended to be used together with a small wooden rod - a dowel. Such a rod will prevent the workpieces from moving when secured with a confirmat.
This type of coupling, unlike the eccentric one, does not allow parts of the product to be fastened several times
But when using this type of hitch, you should know that chipboard products should be fastened once. Due to the high hollowness of chipboard, re-joining with confirmat does not guarantee a strong screed.
Confirmat is a connection that, unlike an eccentric coupler, is visible on the surface of the product. Therefore, to hide it, you can use decorative stickers or plugs that match the color of the body surface.
Intersectional screed
This fastening method is used when it is necessary to connect modules to each other, for example, cabinets or mezzanines. The coupler consists of two parts - a nut (bushing) and a screw. Since the chipboard used to make the cabinets has different thicknesses, the intersection screed can also be of different sizes.
Intersectional screed
To fasten two modules with this type of connection, it is necessary to align the elements being fastened and drill matching through holes in the two walls of the housing. Insert a bushing on one side, a screw on the other side and tighten with a screwdriver. Sections are fastened.
Furniture corners
This type of fastening has long been known to everyone. They are made of metal and plastic, and are mounted using self-tapping screws. It is not recommended to use corners in those parts of the furniture that are expected to be loaded.
Furniture corners
Table top screed
This type of hitch is used in the production of kitchen sets. It consists of a screw and a pair of stops. Holes for such a screed are made using a Forstner cutter of the required diameter, and a channel for the screw is cut out with a jigsaw.
Holes for such fastening are also made using a Forstner cutter
How to properly install a furniture eccentric coupler
Eccentric ties are always made together with a dowel connection. When the former create a force between the parts, the latter determine the specified relative position of the parts, which is mandatory for installing a stable screed.
To install minifix furniture, you will need drills with a diameter of 7 and 10 mm, as well as a cutter with a diameter of 15/25 mm. The installation diagram is quite difficult to understand at first glance for a beginner.
Installation of a furniture eccentric coupler is accompanied by drilling three holes in different planes:
- 5 mm in diameter on the inside of the sidewall (vertical).
- 7-8mm in diameter at the end of the shelf or tabletop (horizontal).
- Use a cutter with a diameter of 15 mm on the “wrong” side of the shelf or tabletop (horizontal).
In a similar way, a furniture eccentric tie is installed for fastening the rear walls and false panels. In this case, the role of the horizontal is “performed” by the front part, and the principle of fastening remains the same.
How to install a double-sided eccentric coupler is more clear in the diagram.
To make it easier to apply markings for drilling under the eccentric, it is convenient to use furniture jigs. They are sold ready-made. You can also make them yourself from scrap materials.
The strength of the eccentric coupler is influenced by the quality of the materials themselves and the correct installation. High-quality parts are a little more expensive, but if you want a strong and reliable screed, then you shouldn’t skimp on parts. But even if all the elements of the screed are of the highest class, but the holes are made incorrectly, or the rods are installed incorrectly, then the quality of the screed itself drops significantly. Be careful.