Independent work is full of pleasant bonuses, some of which are: freedom of choice, the ability to take into account the layout of the room, its interior and the wishes of customers (especially if it’s you), ultimately obtaining an easy-to-use design.
In addition, this is an excellent realization of creative potential, acquiring new skills that are useful in everyday life.
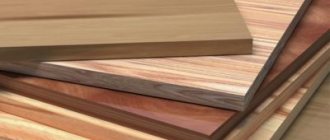
What is better than laminated chipboard?
Laminated chipboard and chipboard are widely used in furniture production, also in the manufacture of exhibition stands, interior decoration of supermarkets, pharmacies, and shops. The reason for this is a number of advantages that these materials have:
ease of processing;- reliability and strength;
- availability of slabs;
- ease;
- heat resistance (will withstand heat from hot frying pans and coffee pots);
- resistance to moisture and mechanical damage;
- relatively low price.
Such material will not delaminate suddenly and will not disintegrate due to increased moisture in the room. Even during processing, it will retain its original appearance, so you can safely screw dowels and screws .
Chipboard is characterized by a too primitive appearance of low-grade raw materials, but laminated chipboard (LDSP), covered with a resistant melamine film, has every chance of passing for natural wood, thereby increasing the aesthetic level of the visit without special costs.
When planning to create a table from the above materials, you should take into account all the negative aspects.
First of all, this is their toxicity (formaldehyde content). The second indicator may be questionable strength. Advice . When purchasing, you should carefully inspect the tile on both sides, perhaps even try to press it with a screwdriver to make sure that it will not be possible to press the object into the surface.
Required tools and materials
In order to make a kitchen table from chipboard with your own hands, you will need hand tools:
- Carpenter's pencils.
- Stationery knife.
- Square and rulers 50-100 cm.
- Roulette.
- Rubber and metal hammers.
- Corner and simple clamps.
- Screwdrivers.
- Pliers.
- Hex key.
- Furniture stapler.
The following tools must be used in production:
- Electric drill - it is recommended to use models that have a reverse function. If desired, you can use a screwdriver - it can operate at low speed.
- An electric jigsaw is an indispensable tool that allows you to create parts of original shapes.
- Sander – necessary for cleaning wooden surfaces.
- A hairdryer and iron are needed when gluing the edges of curved and straight ends of elements.
- It is advisable to have a hand-held circular saw available.
- Workbench with a vice.
You will need one of the materials to make a kitchen table:
- Chipboard or laminated chipboard (plain and laminated boards).
- Ordinary edged board.
- Glued board.
- Wooden beam.
When making tables, you can use a combination of 2-3 materials listed in the list.
Drawing
Let’s assume that you have enough space in your apartment or office so that you can “walk around”, so we will make a table 736 cm long and 536 cm wide.
It can serve as a dining table in the living room, and as a surface for storing fashion magazines, books and other stationery.
But most importantly, there will be enough space on it (as many as 3 tabletops) to place all the necessary things that should remain at hand.
So, the table will consist of :
- countertops;
- planks (4 pcs.);
- shelves (2 pcs.);
- rubber wheels (4 pcs.);
- plastic corners (4 pcs.);
- confirmations (8 pcs.);
- self-tapping screws 3.5*16 (16 pcs.);
- melamine edge or ABS.
You should start by developing a drawing , taking into account all the points (area of space, available materials, further purpose of use). The finished patterns for the base and legs must be placed on a sheet of chipboard. This is done so that it is convenient to trace the contours of the future product with a pencil or pen, after which, for greater clarity of the drawn boundaries, we scratch it with a nail.
All identical parts should be mirror-like , and this is quite easy to achieve. The first part can act as a template for cutting out all the others. After this, you should add up all the elements to make sure there are no inconsistencies.
If we want to stick to the classics, then to create a coffee table we need to cut out 3 tabletops (the 1st will be the table surface, the 2nd and 3rd will be the lower shelves).
When drawing, you should take into account the properties of the material so that you don’t have to sand down defects visible to the naked eye later.
Methods for fastening chipboard blanks to each other
Confirmats are used as fasteners. But they require a drill of a special design; select it according to its length and diameter. The hole for the confirmation has a different diameter for the cap and the top. To cover the hole, purchase plastic caps.
When making a kitchen table from chipboard (chipboard), you will also need to use the following types of fasteners:
- Self-tapping screws 4x16 and 4x50.
- Furniture corners 30x30.
- Dowels (wooden) 8x40. You need to drill holes for them in advance.
- The edges are laminated (choose to match the color of your laminated chipboard sheet).
How to do it?
To ensure that the room where the work is being carried out remains clean and dust-free, you should lay newspapers, wallpaper or cardboard on the floor surface, and upon completion of the process, collect and throw them away.
Important . All elements of the future product should be thoroughly cleaned.
Flanges
will need to be attached to the finished tabletops , to which wheels will later be attached using bolts. If you do not want to damage the floor, preference should be given to rubber ones.- all the end elements of the not yet assembled “puzzle” with a decorative edge .
After this, we proceed to connecting the tabletop with the side planks. To do this you will need plastic corners and screws. - After this, we attach a shelf using screws, under which holes are made in advance with a drill.
- The next stage is marked by attaching the bottom to the vertical slats in a proven way.
Important . All uneven parts should be puttied. - wheels to the bottom of the homemade coffee table , which will serve as legs.
Moreover, they will ensure mobility of the created device, and the table can easily be moved to all rooms in the apartment without scratching the floor surface. To do this, you need to measure and mark with a pencil the future location for the rollers. You can choose so that the supporting part is two to three centimeters from the edges of the base. Thus, they will practically not be visible from behind the table, and they will not spoil the overall aesthetic appearance of the product. For this project, use a drill to make holes and screws to attach the wheels.
Types of dining tables
Type of production: retractable table, transformable table, corner table, classic, folding, reclining, hanging. Taking into account the owner's wishes, the product will be made with a cabinet and drawers.
When choosing the types and designs of tables for the kitchen, you should take into account the size of the kitchen and the components of the table. When the kitchen is small, a suitable option is a folding table and a folding bar table on the corner. Corner tables in the kitchen can be folding or folding.
Convertible table features help when you need to expand the capabilities of your kitchen table. It's easy to turn a magazine table into a large kitchen table.
The retractable table requires little space and fits compactly into the kitchen setup. With the help of a bar stand it is possible to delimit rooms into residential and other zones.
How to paint?
Our table is almost ready. All that’s left to do is cover it with clear varnish . But, again, it all depends on the condition of the newly created object, and what you want to do with it: refresh it or give it an antique look.
Important . Measure the area of the facade, multiply it by 2, because you will have to apply a layer of the substance twice for uniform coverage. Also be sure to purchase rubber gloves to help keep your hands clean.
Before painting, chipboard products must be treated with deep penetration impregnations , so the glue in the sawdust will stop evaporating harmful substances, and the surface will become more moisture resistant.
Do not rush to cover the front side of the table; first check the selected chemical composition on the neutral (invisible) side of the plate. After the first application, pause to let the liquid dry, then fix the result.
Advice . It is better to paint in a non-residential area, or on a balcony/loggia, so the persistent smell will disappear from the apartment much faster, without causing headaches for its residents.
After complete drying, begin assembling the structure.
Advice . If you have mastered the material, then it’s time to move on to tables made of glass, pallets, solid wood or boards.
Varnishing the product
Products are coated with varnish so that the product does not lose its original appearance for a long time. You could say this is a guarantee of durability.
For finishing you will need the following tools:
- Sandpaper.
- Primer.
- Wash.
- Bulgarian.
- Stain.
- Roller and brush.
Using paint you can make a table of any color.
Purchased material is processed faster. If the chipboard was previously varnished, it should be thoroughly cleaned and only then a new coating should be started. Otherwise, after a month the product will begin to lose its original appearance.
Old varnish is removed using chemicals or using a mechanical method (sandpaper or sanding machine).
Before applying colored varnish using a brush, apply several layers of stain or primer. After application, allow the product to dry and only then apply the final coat of varnish. The finished product should last for a day.
[/vc_column_text][vc_column_text]
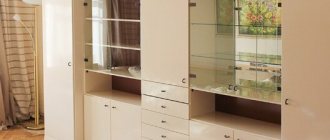
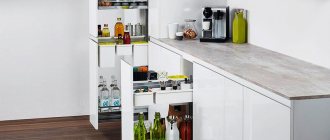
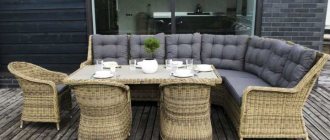
Photo
Laminated chipboard allows you to realize bold design ideas. For example, these: