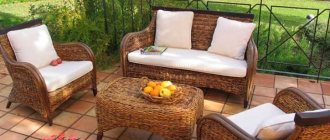
One of the most important places in a personal plot (after the beds, of course) is the recreation area. Special attention is paid to its arrangement, since relaxation in the lap of nature is an indispensable attribute of country life.
Evening “get-togethers” with friends in the open air at a table in the garden, morning tea in the gazebo, or lunch on a hot afternoon under the shade of a pergola: memories of such moments make you look forward to the onset of the next dacha season, forgetting about other, less pleasant sides of the dacha life - digging up beds or weeding.
Materials and tools
Before making furniture from timber, you need to decide on the necessary tools:
- Circular Saw. When choosing, pay special attention to the cutting depth; in compact devices, it is 55-65 mm, this will not be enough.
- Manual or electric plane.
- Vibrating belt sanding machine for wood.
- Sandpaper. When processing wood, it is better to use several types, from the smallest to the largest.
- Drill with a brush attachment for brushing. Brass brush with wire thickness 0.3 mm.
- Drill for woodworking, diameter 16-20 mm.
- A brush used to coat wood with varnish.
It is believed that solid wood furniture has a high cost, but this is not always the case. There are also inexpensive options. For example, furniture panels made of laminated veneer lumber. During manufacturing, thin short lamellas are spliced and glued together under a press into a large-sized shield.
To make window sills, furniture or doors from laminated veneer lumber, you may need additional materials:
- Wooden dowels.
- Wood glue (carpentry).
- Varnish. If you are making furniture for the home, then you use parquet varnish; if you are making furniture for the outdoors, then you need to give preference to moisture-resistant yacht varnish.
Tools
- Decorative impregnation for wood. Since we will be processing the entire table, it is worth buying two cans at once. This impregnation will protect the wood from rotting and external damage, so there is no need to save money. Regular stain is also suitable for these purposes, but professional impregnation will do a much better job.
- Wood saw. Necessary for small cuts and finishing work. It is better to choose a model with small teeth, so the cuts will look neat and even.
- Carpenter's axe. Useful for making grooves in logs and sanding them. It’s better to choose a model with a small handle and a light spine.
- Chisel. Useful for finishing small recesses and sanding grooves. If necessary, a chisel can be used to sand logs, but doing this with an ax is much more convenient and faster.
- Hammer. The tool is paired with a chisel, necessary when working with hardwood.
- Chainsaw. The main tool when working with a whole log. Necessary for sawing into individual parts. A chainsaw is used for rough cutting of grooves and cups.
- Wood varnish. The final finishing material that is applied to provide additional protection to wooden parts. Varnish helps preserve the wood grain and its original color. Apply it in two layers; one can is enough for a medium-sized table.
- Self-tapping screws 6 x 200. Necessary for additional fastening of logs together.
- Screwdriver. Used for tightening self-tapping screws. Although its speed is lower than that of a drill, it is convenient to use due to its portability. The absence of a wire allows you to work away from a power outlet.
- Line for marking gutter lines.
From idea to implementation
Immediately before making a chair, table, bed or armchair from timber, it is necessary to make assembly drawings of the future product. On the drawings of individual parts we indicate the exact dimensions and mark the places of drilling and gluing. If there are carved designs on the product, before assembly it is necessary to apply its outline to the part and cut it out.
To make doors from laminated veneer lumber, all of the above materials and tools will be useful; in addition, you will need hinges, a lock and a door frame. The hinges must be of high quality, since doors made of timber will be much heavier than those made of plywood or chipboard. When creating a door structure, a drawing is also made for accurate and coordinated production and connection of all component elements.
Cabinetmakers make furniture from bars and wooden panels; this combination allows you to use all the advantages of these materials. The bars will make a chic dining table or chair, headboard and stools or garden furniture.
Unique log tables
To complement the benches, tables are also created from logs, which can be simple or more complex depending on the amount of material, free time and skill of the owner. The simplest option for decorating a garden is a wide leg from a block of wood cut to the required height. Since the bottom of the table will be in very close contact with the ground, improvised stands are created from wood and pieces of plastic.
Drawing of a table made of logs.
Such furniture can be created in a few hours if you first take care of sanding and impregnation. It is important that all cuts are made smoothly, without distortions - this way the table will stand very firmly. For many, the problem is not the construction of the table itself, but how to choose a tabletop.
After all, it requires a cut of a sufficiently large diameter. And here you can get creative, using a large piece of durable glass, the back of an old wooden bed cut to specified sizes, a wooden wheel covered with glass.
If there are enough logs, but they are small in size, a table of logs is built with your own hands according to the principle of a log house. For the tabletop, several pieces are sawn in half, which are fixed with transverse strips. Benches are also built for them, reminiscent of original armchairs rather than ordinary garden furniture.
You can decorate the space, complementing the ensemble, with logs installed nearby.
Before you can make a beautiful table for your garden out of logs, you will need to first complete a drawing that will indicate the dimensions and details of the table.
Long logs are placed horizontally, and short logs (30-40 cm long) are placed vertically. You can hollow out holes in the middle to fit the size of flowerpots, round or elongated. It is important to plant flowers in a flowerpot, since simply pouring clay and systematically watering the plants will lead to rotting of the wood. To avoid working too long with hand tools, it is appropriate to use a power saw in the initial stages, and then only a chisel or other tools.
An oblong table with log legs is even easier to create. But before that you need to make a drawing indicating the dimensions of the parts. As crossbars that give stability to the table, you can nail not just wooden planks, but cleaned, processed curly tree branches. With such lacquered furniture, the garden will become very cozy and even unique. Such a table and benches are installed not only under trees, but also in gazebos and on open terraces.
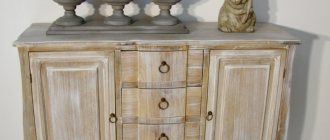
Rules for making a bedside table with your own hands
Before making a bedside table, the first thing you need to do is select a material without knots and go over it with a plane. The bedside table should be massive and heavy enough to be stable.
Not only the tabletop, but also the entire structure can be made from laminated veneer lumber. The top of the table can be made of any shape: round, oval, square or completely shapeless. Cut the tabletop with a circular saw. Legs, if they are planned, are made from bars or furniture panels. And don’t forget to prepare a drawing first.
Original do-it-yourself crib ideas for a baby
Caring parents give preference to natural materials when choosing furniture for the children's room. A children's bed made of laminated veneer lumber is an innovation for many. This kind of wooden furniture was in use among our ancestors. Every year there is more and more plastic, cheap wood and metal in the store. You can easily make a crib for a nursery from natural wood yourself without the help of others. To do this, you need to draw a sketch with exact dimensions, and following it, make a cradle.
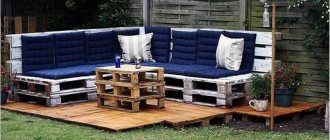
Latest Pallet Garden Furniture Ideas
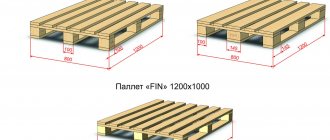
A good option for garden furniture is a set of a gazebo, several benches and a dining table. In recent years, wooden pallets have been very often used to make garden furniture as one of the economical but stylish options. You can purchase pallets directly from the manufacturer or used ones.
Before directly assembling furniture from pallets, it is necessary to carefully process the building material:
- Clean the pallet from dust and dirt (if it was previously used in production);
- Then go over it with a sanding machine. You can grind both the entire structure and individual parts.
- Since the furniture will be intended for outdoor use, treat it with a moisture-resistant primer.
Making garden furniture from wooden pallets will not be difficult, since the structures are already assembled. The main thing here is to show your imagination and realize the craziest idea.
Here are some examples:
- Table for the garden;
- Benches and chairs;
- Sofas and chaise lounges;
- Swing;
- Gazebo or garden structure with canopy.
In addition to wooden pallets, to assemble garden structures you will need:
- Wooden blocks;
- Metal corners;
- Drill with drill;
- Bolts with washers of the appropriate size;
- Primer for wood processing;
- Moisture-resistant varnish;
- Protective equipment (glasses, gloves, mask).
Master classes on making creative models
Homemade garden furniture has a number of undeniable advantages: a laconic, yet unusual and stylish design, the absence of fragile or easily dirty parts, and reliability. In order to successfully implement your own or borrowed project, it is not necessary to achieve high surface quality. Much more important is originality, the unexpected use of familiar objects in a new quality. Below are several interesting options that can serve as an example or impetus for developing your own garden furniture projects.
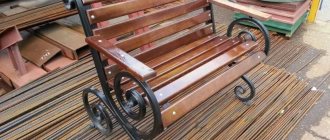
Bench made from old chairs
Old chairs that have served their purpose can still perform their main function for some time, only in a slightly different capacity. They make simple, convenient benches for the garden, which even inexperienced home craftsmen can assemble. To make such furniture, you can simply connect several chairs assembled in a row with one common seat. Or use the second method of creating a bench, when the base is two chairs facing each other. Their backs in this case play the role of armrests. Assembling such a garden bench is somewhat more complicated, since it is necessary to remove the drawers and make longer common crossbars.
You can approach creating a product even simpler. In this case, you will not have to remove the front legs, which will increase the strength of the structure and speed up the process of assembling the bench. The back of a piece of furniture can be made from a wooden strip attached to the upper parts of the armrests. After this, fill it with a plywood board, or install several horizontal planks to form a supporting plane.
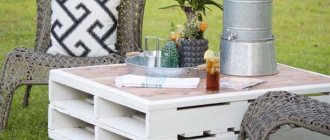
Summer cutting table made from pallets
Pallets are convenient and affordable blanks for creating any home improvement items. They make successful furniture, easily transformed or disassembled into separate fragments. A simple garden cutting table can be made from three pallets, two of which are installed on an edge - they serve as supports. The third is fixed at the top and represents a lid (table top).
This design is as simple as possible, but the main drawback is instability. Meanwhile, creating a more durable connection is inconvenient and impractical, since this will result in the mobility of the furniture and the ability to quickly disassemble the summer country table being lost.
Experienced craftsmen advise using a slightly different option for assembling the cutting surface, which is practically devoid of the disadvantages of the method described above. Such a homemade product is good because it allows both rigid connection of pallets with subsequent grinding and finishing, and simple stacking of them on top of each other until the desired height of the product is obtained.
In addition to tables, sofas or armchairs are made from pallets. The assembly process is not difficult, and the surface relief can be made the way the owner wants. A common solution is sanding and painting the product. Alternatively, you can leave the pallets in their original condition to emphasize the camp style of the furniture.
Features of garden furniture made from pallets, nuances of operation and care
Folding table with benches
A good option for making furniture for a summer house is a folding table with benches. If necessary, it can accommodate several guests; if not needed, the furniture can be folded and put away in the barn. You can make a separate table with folding legs and two benches, or you can assemble a transforming structure, where a bench with a back turns into a table with benches on the sides.
A ready-made drawing of a folding table with benches allows you to consider the operating principle of this garden furniture and avoid errors during assembly.
Ordinary furniture bolts are used as hinges. The back of the bench “tips over” onto the seat, one half of which slides back and turns into a second bench. You can make all load-bearing furniture elements from wood or use a rectangular metal pipe. The choice of base depends on what tools and skills the master has.
The tabletop and seats of the product are in any case made of wood. The easiest way is to use boards with a thickness of 25 mm (“inch”), which must be planed and carefully sanded. It is recommended to choose deciduous wood - poplar, birch, aspen or alder. If softwood boards are used - pine or larch, you should carefully inspect them for resin pockets. They will release resin that will stain clothing or get on your skin. It is not practical to use such blanks for making garden furniture yourself.
A completely wooden country table is assembled using self-tapping screws, only the moving parts of the product are attached to furniture bolts. If the supporting structure is made of metal, the assembly is carried out entirely on threaded connections.
Drawing of a set of wooden elements for making a transforming bench
Typical drawing of a transforming bench
Bars for legs
Frame boards
Screwing the legs to the slats
We connect all the elements with self-tapping screws
Wood element
Ready-made wooden transforming bench assembled and disassembled
Hanging chair made of hoop and rope
This version of garden furniture is suitable for macrame lovers. The main supporting structures are two hoops connected at an angle to each other. One of them forms the plane of the seat, and the second is a unit that combines the back and armrests of the product.
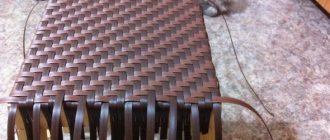
The hangers are made from nylon cord, braided using the same technique as filling the seat and backrest. For the seat, a hoop with a diameter of 70 cm is used, for the back - 110 cm. The length of the hangers for the garden chair is chosen based on the existing conditions. Typically, the support is thick tree branches or (more often) horizontal beams installed on supports between two adjacent plants, buildings or other structures. To make a chair you will need to prepare:
- about 900 m of cord for weaving;
- slings for suspensions (about 12 m);
- metal-plastic pipes - about 6 m.
The production of the structure occurs according to the following scheme:
- The hoops are made from a metal-plastic pipe with a diameter of 35 mm. The length of the workpiece is calculated using the school formula (for hoops of the indicated sizes 110 and 70 cm, you will need 345 and 220 cm of pipe, respectively).
- The ends of the blanks are connected with inserts made of wood or plastic, which are fixed with self-tapping screws.
- First, the surface of the hoops is tightly wrapped with cord. Then the area of the smaller one is filled with mesh.
- After this, both hoops are connected so that on one side they are connected tightly, and on the other they form an angle of lifting the backrest.
- Next, the side vertical surface is filled with weaving, the method and pattern of which are selected to suit your taste. The slings of the hanging garden chair are braided in the same style as all other surfaces.
For the seat of a hanging garden chair, it is worth making a soft, removable cushion; it will simultaneously serve a decorative and practical function.
Universal bench-stand for summer residents
The universal “upside-down” bench is a favorite piece of country furniture for all those who like to grow gardening plants. The product serves as a good assistant at work, as a means of relaxation, and can perform other functions.
Criteria for choosing furniture for a gazebo, tips for placement
In one position, such a country bench is an ordinary seat, and if you turn it over, a comfortable knee rest appears. For production, wooden boards or polypropylene tubes are used. The choice of material is determined by the preferences and skills of the dacha owner. Assembling a wooden universal bench is not difficult:
- Three blanks are cut out - a seat and two side supports.
- The bench parts are assembled using glued dowels or metal corners. For reinforcement, it is recommended to glue wooden bosses to prevent the structure from swaying diagonally.
The disadvantage of a bench made of wood is the lack of elasticity and rapid loss of rigidity of the joints, which is why most dacha owners prefer plastic products. To assemble a “changeover” from polypropylene, you will need to purchase 4 m of tubes with a diameter of 32 mm. In addition, you will need angles and tees (fittings) - 8 pieces of each. The assembly process is carried out according to the instructions:
- Using a hacksaw (or a regular saw with a fine tooth), cut six pieces of length 24 and 14.5 cm. Then 4 pieces each - 34.5 cm and 3 cm.
- Using a plumbing soldering iron, the middle part of the product is made - from 14.5 cm sections and two 24 cm crossbars.
- Then 4 vertical supports of 34.5 cm each are attached to them, onto which corner fittings with 24 cm crossbars are soldered.
- At the bottom of the bench, 3-centimeter inserts with fittings and the same crossbars (24 cm) are attached.
The last step is to install plywood platforms on the working surfaces. You can glue pieces of tourist foam to them to make it softer to sit on or rest on your knees. This garden structure is lighter, stronger and not susceptible to moisture.
Cut two trapezoidal legs
Make holes for ease of carrying and operation
Drill holes for pins
Make holes in the sides
Drive in the pins, coated with glue, and connect to the sidewalls
Finished bench
Methods for restoring furniture made from laminated veneer lumber
Like any wooden furniture, laminated timber structures require restoration over time. Regardless of how carefully and carefully it was treated during operation.
Restoration methods:
- One of the characteristic destructions of solid wood is the formation of cracks. A simple restoration solution in this case would be through drilling of the problem area. Furniture tightening screws are then inserted into the drilled hole.
- Problem areas can be tightened with countersunk screws.
- Screeding is also done by hammering nails, but only at an oblique angle.
- In addition, restoration of the appearance of wooden furniture is carried out by sanding the coating (varnish, paint). Afterwards, the polished surface is treated with a primer and varnish and paint are applied.