Features and Benefits
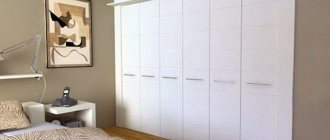
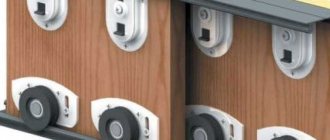
The main difference between sliding systems is the operating mechanism. Traditional hinges are replaced with rollers. The web moves along the rail. Rollers can be attached only to the top of the sash or simultaneously to the top and bottom. In the second case, the load is evenly distributed over two rails. The service life of the mechanism increases, but there is one drawback. The lower element often becomes clogged with dirt. If you don't clean it, the sash will jam.
It is not difficult to install interior compartment doors yourself. The main work consists of correct measurements, installation of the roller mechanism, guides, and hanging the door leaf. The door is suitable from solid wood, paneled, veneered, or any other material.
There are two types of sliding structures:
- the door goes behind the wall;
- the canvas goes inside the wall.
The second option is more convenient, but difficult to manufacture. The system involves the assembly of a pencil case installed instead of a partition.
The popularity of sliding structures is due to a large number of advantages:
- saving useful space due to the absence of a dead zone;
- creating a beautiful modern style;
- simple installation;
- single-leaf or double-leaf design allows you to close an opening of any width;
- increasing the service life of the door block due to uniform distribution of the load along the rail.
The disadvantage is considered to be a decrease in the level of sound insulation and tightness. A gap of about 5 mm is formed at the top and bottom of the door structure, through which extraneous sounds and odors penetrate into the room.
Features of sliding doors
This design is not an invention of recent years, or even centuries. Primitive analogues were used during the existence of Ancient Rome, as evidenced by archaeological finds in the city of Pompeii. The design is also associated with Japan. Unlike the ancient Roman prototypes, the doors of which were made of wood, in the Land of the Rising Sun in the Heian era the canvas was a wooden frame covered with silk. Later they began to cover it with paper on both sides.
The variety of modern design solutions can amaze anyone. There are many models that differ in shape, design, size, and materials used. But, despite the large number of different options, there are only two functional types of these systems, differing in the way the valves move:
- Parallel sliding. They consist of a roller mechanism, guides, one or two doors, which, when opened, move parallel to the vertical surface.
- Sliding and folding. Their doors consist of several sections that move according to the accordion principle.
Sliding doors have a simple design. The basic package includes: a door leaf, a plasterboard frame, and a mechanism for moving the leaves. The canvas moves along the wall along the profile on rollers. Additional elements include motion limiters, fittings (door handle, lock). The latches do not allow the doors to come out of the grooves or move further than the guides. According to the installation method, there are classic (the design provides for the presence of an upper and lower bar) and suspended models (the canvas is attached only to the upper rail or rod without a lower guide).
What is needed for installation?
Having decided to install compartment doors with your own hands, you need to know what materials you will need:
- Railing. It is a beam secured with anchors to the wall surface. Usually a wooden beam with a cross section of 50x50 mm is used. A rail is fixed to it.
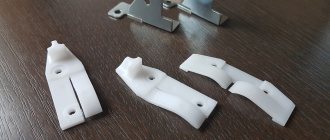
- Mechanism. The set includes rollers, stops, guide blade, and rails.
- Accessories. For sliding systems, special mortise handles and locks are produced.
The tools you will need are a drill, a screwdriver, a screwdriver, a jigsaw, a level, a tape measure and a pencil.
Materials and tools required for installation
Preliminary measurements
Installation tools
Before buying everything you need for installation, carefully measure the doorway with a regular tape measure:
- The canvas should be 5-6 centimeters wider and higher than the opening, if there is only one.
- If you are planning interior compartment doors - installing two or more panels, their total width is calculated based on whether they will move apart or overlap each other.
So, we decided on the sizes.
What else is needed for their installation and decorative finishing:
- Door fittings and fasteners.
When purchasing ready-made compartment doors, fastening and sliding elements are usually included in the delivery package. These are metal guides, rollers, door handles, screws, etc. They can be purchased separately at any large building and finishing materials store.
- Wooden beam with a section of 50x50 mm.
This structural element is necessary if you install the doors yourself with the guide attached to the wall. Its length should be equal to twice the width of the door leaf. If there is no doorway and doors are installed up to the ceiling, the guide can be attached directly to the ceiling.
- Door frame, extensions and platbands.
The frame is a frame framing the doorway, to which the closed door leaves will be adjacent. Extensions and trims (see Installing trims for interior doors) are necessary to disguise fasteners and decorative framing of the opening.
- Anchors for fastening the timber to the wall, as well as additional screws and finishing nails.
- Tools: tape measure, level, plumb line, screwdriver, pencil, milling machine or chisel.
Preparing to install compartment doors
Interior compartment doors: installation
We’ll talk about how to install compartment doors a little later, but first we need to talk about the preparatory work. At the stage of rough finishing of the room, only the sliding systems themselves can be installed if it is planned that the door will “move away” when opened into a niche in the wall.
In all other cases, installation is carried out at the stage of finishing work. Before installation, make sure the opening contour is correct. Its walls must be strictly vertical and parallel to each other. If this is not the case, try to correct the opening.
Attention! If the compartment door will be installed on an opening in a plasterboard partition, a timber frame must be installed above it during its construction.
How to install sliding interior doors with your own hands?
The installation of sliding interior doors begins after the walls are leveled. The room must have a clean floor and the verticality of the doorway must be checked. If there is no floor covering, then its thickness is taken into account when taking measurements.
The main problem with how to install compartment doors is the difficulty of installing the top beam and rail. The railing must be perfectly aligned in level and height, fit tightly to the wall, and securely fixed with anchors.
Before installation work begins, it is determined in which direction the sash will roll. If there are two products, then provide free space on both sides of the opening.
The instructions for installing a sliding door consist of the following points:
- timber installation;
- rail fastening;
- assembling the mechanism and hanging the canvas;
- installation of accessories;
- decorative finishing of the opening.
Installation of timber
The beginning of the installation of compartment doors involves applying markings on the wall for the upper beam. The sash is leaned tightly against the opening. Taking into account the width of the rail and a gap of 5 mm, mark the boundary of the beam location on the wall. The canvas is set aside. A horizontal line is drawn along the mark.
For a right-opening sash, the beam is positioned so that its middle is above the right side of the frame. The level is set to horizontal. Holes are drilled in the timber and the wall and the upper beam is securely fastened with anchors.
Guide installation
When installing sliding doors, the top rail is screwed with self-tapping screws to the bottom plane of the beam. For convenience, it can be secured to the beam in advance. After fixation, rollers are inserted into the rail and driven to check for unhindered sliding.
If the installation of an interior compartment door involves bottom fastening , then the installation of the guide is carried out in three ways:
- A groove is cut into the floor covering. The bottom rail for the rollers is immersed inside.
- The guide is fixed from above to the floor covering without cutting a groove. They close with a threshold on both sides.
- The guide is installed on the end of the lower part of the sash inside a pre-cut groove.
The third method is suitable if, instead of lower rollers, a guide knife is used, which simply holds the opening blade. The element is fixed to the floor covering.
How to assemble sliding doors?
Begin assembling the sliding door by installing the rollers. The location is chosen based on the manufacturer's instructions. The rollers can be installed at a distance from the edge of 1/6 of the sash width or directly on the edge. In the second option, the indentation is formed by mounting plates.
At the end, mark with a pencil the place for the rollers. You can pre-drill holes for free entry of hardware. The mounting plates are screwed with self-tapping screws no less than 70 mm long. Threaded supports and side covers are inserted into them. The roller platform is screwed onto the threads of the pins.
If sliding doors on rollers have a guide knife installed at the bottom, then a groove is made at the end of the leaf 2 mm wider than its thickness. The rail itself doesn't even need to be installed. The depth is usually between 10 and 18 mm. The groove is not selected for the entire width of the end of the blade, but a section without a slot of about 10 mm is left at the edges. These will be the limiters.
After assembling the mechanism, they begin to install the sliding door with their own hands on the prepared guides. The product is rolled along the rail to check its progress.
Installation of fittings
The final step in installing a sliding door with your own hands is the installation of fittings. It is more convenient to attach all elements before hanging the canvas. First you need to install a door limiter - a rubber shock absorber - into the runners. The sash is checked again for free movement, the places for the handles and the lock are marked, and the leaf is removed from the guide.
Grooves are cut for fittings. Wood cutting is usually done with a chisel. Drilling helps partly. After installing the handles and lock, the sash is hung back on the guide.
Finishing the opening
Once the installation of the hinged doors is complete, they begin decorating the opening with trims and trim. The elements give the structure a complete look. In order to hide the mechanism, an additional board is attached to the beam.
Features and installation procedure
You can install sliding doors yourself even without much experience. It is completely possible to do without installers. You will need little time, and also an instruction on installation. We will try to give a detailed description of the process with photo and video materials.
Self-installation of sliding interior sliding doors
SLIDING INTERIOR DOORS. PROS AND CONS OF SLIDING DOORS.
- Purchase the best TOOLS - ORDER DESIGN AND REPAIR.
Replacing coupe and Schlegel door positioners
From time to time you have to redo wardrobes by unscrupulous craftsmen. The customer looks for a contractor who...
The systems may differ slightly, but the general rules remain similar. There are several requirements that must be met before installation:
- The gap should be even, otherwise you will have to take a canvas that will cover all the differences with a margin.
- The load-bearing capacity of the sides of the doorway should be as high as the wall above it.
- The skylight must already be finished: plastered and painted, covered with wallpaper or decorated with decorative panels.
Next we proceed to assembly. First, you can attach the rollers. Various manufacturers have their own advice. Some people advise moving 1/6 of the width of the door leaf away from the edge; in other systems they are attached immediately from the edge, and mounting plates provide the indentation. This is the system we install: in it, roller platforms are installed immediately from the corner.
Marking the installation location of the rollers
We center them, measuring so that the distances are similar. Having positioned the plate, use a pencil or marker to mark the locations for the fasteners. Drill holes in the marked places. The diameter of the drill is 1 mm less than the diameter of the screw.
Securing the Roller Shoes
We expose the plates and screw in the screws. The length of the fastener depends on the weight of the canvas, but not less than 70 mm. We twist them exactly perpendicularly, otherwise unnecessary stress will appear.
Supports for the rollers are inserted into the installed plates. They are fixed with a lid on the side surface. Next, roller platforms are screwed onto the threaded pins.
Roller platforms are screwed onto the pins
It is also convenient to install handles and locks before hanging. They need special, mortise ones. If you took a ready-made kit, the required holes are available. If you have used an ordinary canvas, you will have to trace the outline with a pencil and remove the excess with a chisel. After the handle or lock fits into the recess, the attachment points are marked, holes are drilled under them and the fittings are installed.
Then you can begin installing the guide. With mounted rollers, this will be easier: you understand exactly at what height the bottom edge of the rail should be.
The most successful method is to hang sliding doors on a dry wooden beam. Its cross-section is at least 5070 mm, the double width of the door leaf is 5 cm long. We cut the guide to the same length.
We measure the length of the carrier and mounting bar
Having aligned the guide along the beam, it is secured to the beam with screws more than 8 cm long. The amount of fasteners is more than 3, spaced 10 cm from the edges and in the center (more often, but not less often).
Attaching the guide to the beam
Now you can measure at what height to strengthen the timber. On doors with installed rollers, a guide with a beam is “rolled”. This way you can accurately note how tall the doors are. We drill more than 4 holes in the side edge of the beam for fastening to the wall.
A guide with a beam &rolls onto the rollers on the door
Add 7-10 mm to the acquired mark. The doors should hang and not shuffle along the floor. 7 mm is a small gap, which is sufficient if there are no floor coverings in the gap. If they are planned (later to lay laminate, carpet, linoleum, etc.), then it is necessary to take into account the thickness of these coverings.
Trying it on to the doorway
To prevent the canvas from “walking” during installation, it is wedged with small wooden wedges. You need at least two stops near both rollers.
Having placed the beam against the wall and adjusted its position using a level, we mark its position with a pencil. If the wall allows, you can strengthen it to the wall through and through, but for this you need to use screws longer than 120 mm, or better yet, place it on anchor bolts.
If the wall, for example, is concrete, the installation of dowels is required. To do this, you need to transfer the marks for the fasteners to the wall. This can be done using a narrow and long drill, the diameter of which is smaller than the drilled hole.
Transfer the marks to the wall using a narrow drill
An even more conventional option: a long, narrow nail. It is inserted into the hole and a mark is made on the wall with a couple of blows. Then the procedure is known: we drill holes for the dowel plugs, insert the plugs, hammering them in as needed. After that we install the doors.
Fixing sliding doors on the wall
You need to secure stoppers on the sides of the guide. They are inserted from the sides, and the required position is established experimentally (so that the canvas completely covers the gap when closed, and rolls back quite well when opened. They are fixed using pressing screws.
Installing stoppers on sliding doors
Having opened the doors, we install the flag roller on the floor. It fits into a groove cut into the bottom of the blade. It is necessary to ensure that the doors do not deviate vertically.
Installing Flag Roller
First, we insert it into the groove, mark the holes for the fasteners, drill them, and then fix them with small screws (length about 15-20 mm).
This is what the installed flag roller looks like with the doors open
At this point we can assume that the sliding doors have been installed. They are already one hundred percent functional. Finishing work remains. The mounting beam with the guide is covered with a decorative overlay, matched to the tone of the door leaf. It can be nailed directly to the beam with final nails.
The decorative overlay can be nailed directly to the beam
Only when you put it out, make sure that the wheels are closed. It’s much more attractive this way)) That’s all for now, you’ve installed the sliding doors yourself.
A video tutorial on installing a similar door can be seen below. There are several installation options.
We install cassette-type sliding doors (in a pencil case)
The process of installing the guide and hanging the door leaf actually repeats the same as described above. There is no need for finishing only, but all other steps are needed. Instead of installing a decorative strip, a false wall is installed at a distance of more than 10 cm from the wall. It is usually made from plasterboard profiles, which are covered with wall plasterboard. But it doesn’t matter, you can use gypsum fiber board or plywood, or any other suitable material.
Where does the distance of 10 cm come from? The thickness of the door leaf and the gaps on both sides are 5 cm. At least another 5 cm is added to this for installation of the profile. So it comes out to 10 cm.
Because the main load will fall on the wall, the frame made of profiles need not be reinforced. If such a wall does not seem very reliable to you, you can stick wooden blocks inside and fasten them with screws. This will make the structure very rigid.
The main principles for calculating a pencil case for a sliding door, as well as marking features, and the principles of preparing a doorway for installation, see the video.
Care and operation
When using a sliding structure, it may be necessary to adjust the canvas if sagging is noticed. To eliminate the defect, remove the top panel. An adjusting screw is located on the roller. It must be scrolled while simultaneously checking that the sagging of the canvas is eliminated.
Caring for the sliding system involves cleaning the guides from debris. The rollers are lubricated and replaced when worn. The door closes smoothly. With sudden movements, the rollers may fly out of the guide.
How to remove a compartment door?
Methods for removing the sash depend on the type of sliding system. If there are rollers with one wheel on top and a guide knife on the bottom, then the blade is slightly raised so that the knife comes out of the groove. The bottom is pulled towards you. The canvas is lowered to the floor at an angle. At this time, the rollers should come out of the guide.
If there are double rollers at the top and bottom of the sash, then first unscrew the stops. The door leaf is simply rolled out of the guide. Premium sliding systems are equipped with a closer. The mechanism fastening is unscrewed only from the canvas. The closer remains hanging on the door frame.
The sliding system is convenient to use and easy to install. If you follow the operating rules, high-quality rollers will last for many years.
How to install a sliding door with your own hands: step-by-step instructions, installation diagrams and drawings
This engineering solution allows you to partially eliminate the shortage of free space and quickly combine two adjacent rooms into one large one. In addition, the canvases, when installed correctly, do not creak, and the entire structure is much more durable than a traditional swing structure. The installation of compartment doors, regardless of their differences in size, number of leaves and a number of other parameters, is carried out according to the same algorithm, with only minor adjustments on individual points.
Related article: How to set up a metal-plastic door
Preparatory activities
Taking measurements
This is easy to do if you have a tape measure on hand. For those who are settling into a “new building,” it is much easier. If the house is being renovated, then it should be taken into account that the installation of compartment doors will be much more complicated if the measurements are made inaccurately. And this is quite possible, since the openings must be trimmed.
First you need to dismantle not only the platbands, but also the box. After cleaning this section of the wall, its condition and the need for reinforcement are determined. At this stage, solutions may vary. For example, widen the opening, install a partition made of gypsum plasterboard (multi-layer plywood) instead of the dismantled part of the old one. This will help not only to take the correct measurements, but also to understand how to install the compartment door.
Most recommendations do not take into account that several installation options are possible, so the owner has a choice:
- two small sliding doors;
- one is fixed, the other is mobile;
- how the canvases will be joined - simply close together or overlap each other;
- a wide canvas that slides into the septum cavity. For example, from the same drywall.
Perhaps this is the whole difference in the methods of self-installation of sliding compartment doors. The principle of their functioning is identical - movement along the guides in one direction or another.
Material selection
Everyone has their own preferences in terms of aesthetics, design, and so on, but a number of installation features are worth noting.
- Glass (high strength) or solid wood. What they have in common, in addition to high cost, is significant weight. This means that you will have to install a larger number of carriages and carefully develop the drawing to avoid distortions and snags. Consequently, the installation of doors will be greatly complicated.
- Board materials (MDF, OSV, chipboard). The option is cheaper and easier to install. For each sash (taking into account the low weight), two carriages are enough. In addition, if necessary, you can restore the canvas and eliminate its minor defects without the help of a professional.
- Cloths that are too cheap wear out quickly. When choosing slab materials, you need to pay attention to the density of the products. And it is desirable that they be laminated.
- The top rail is mounted on the ceiling or wall (when the height of the sash is chosen less than the opening). In the latter case, if a wooden block is being prepared, you need to take into account that its side should be approximately twice as thick as the canvas.
- All necessary components (rollers, guides, locks, fittings, fasteners) are supplied with the doors. But if you decide to purchase them at retail, for canvases made independently, you should take with you a developed installation diagram with the dimensions of the opening. The manager will tell you what exactly may be needed and in what quantity (for example, how many carriages should be installed).
How to make a compartment door
Marking production
The instructions for installing sliding sashes are quite simple. The nuance is how to attach the guides. Here you will have to choose from several options. It has already been said that they can be fixed on the ceiling or wall. But how many of them do you need to install a door?
- One top. The convenience is obvious - there is no threshold, which makes it easier to clean the floor in the area of the opening. The downside is low strength. Constant dynamic loads (including drafts) gradually weaken the structure.
- Two (above and below). Installing interior compartment doors with your own hands using this method, despite some complexity and a larger number of components, is preferable. First of all, in terms of durability.
Fixing the guides
Given the increased loads, dowels + screws are mainly used. Although there are also special brackets on sale that make installation easier.
If the fastening is done on the ceiling, then it is necessary to make a small indentation from the wall so that the sash does not cling to it. The main thing at this stage is constant monitoring of the position of the guides. The slightest deviation from the horizontal will lead to problems with opening/closing the canvases.
Installation of carriages
They are dismountable, so the bracket is first disconnected and the roller mechanism is placed in the guide cavity.
Some modifications are first attached to the sash, and only then installed in the profile. The difference is not fundamental.
Canvas design
It is quite difficult to install all the fittings already on a suspended sash, and therefore this is done in advance. At the same time, the staples are also secured (with a detachable mechanism).
Staging the canvases
Each of them is raised, and the components of the carriage are fastened together. This work cannot be done alone, and you will need an assistant. The specifics of the connection depend on the design features of the roller mechanism, but everything is described in detail in the passport; It's impossible to make a mistake.
Opening design
Whether to install platbands, trims, or finish the edges differently is at the discretion of the owner. But it is advisable to cover the guides. Decorative strips are sold in a large assortment, and therefore, when purchasing fittings, it is easy to choose the best option for the interior of the room.
That's all the step-by-step instructions; nothing complicated.
Regardless of whether you own a small apartment or a spacious house, installing interior compartment doors is more than advisable. They will not only make any opening original, but will also bring a number of additional amenities. For example, if the process of moving the sashes is automated. And if you consider that installation is easy to do yourself, saving on specialists, using only household tools, this decision is quite logical and rational.
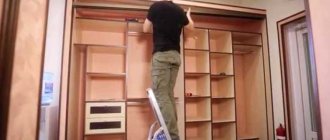
Sliding wardrobe doors in a niche: as easy as shelling pears
Hello.
Usually, when people first encounter something for the first time, it seems very complicated and difficult to accomplish, at least not feasible for them personally.
And most of the time, they are wrong.
Sometimes friends offer me to pay for the installation of sliding doors, which should be located in a niche (the filling of which they made themselves). And with all the desire to earn money (and this desire, oddly enough, is always present), somehow the hand does not rise...
The fact is that this procedure is so elementary that the most that such “customers” can use is advice, or, in extreme cases (if they don’t have a tool), help, which can then be “washed” with several liters of beer with fish (although doctors say that it is harmful - sometimes you can eat it, it’s very tasty...).
So, what do you need to know and what do you need to do in order to close any opening with a sliding system?
- The vertical walls of the opening should be as smooth and vertical as possible, so that there is no gap between the sliding door and the wall (the evenness of the floor and ceiling is not so important, since the system provides a height gap (formed due to the calculated dimensions of the upper guide) for this case) .
- To order the production of the system, you need to measure the dimensions of the opening: height and width.
- Based on these dimensions, you need to calculate the number of sliding doors.
- The finished system just needs to be installed in the opening.
All these steps are quite simple and straightforward.
That is, you first need to prepare a place for installation, measure its dimensions, order sliding doors, and install them.
They are also very easy to install.
First, the upper guide is attached to the ceiling (holes are made in it through which it is mounted into the ceiling using fasteners).
Naturally, if the ceiling is suspended, nothing will work. It should at least be plasterboard (since the top guide does not experience much load and is intended only to hold the sliding doors in a vertical position). It is attached to such a ceiling using special “butterfly” fasteners.
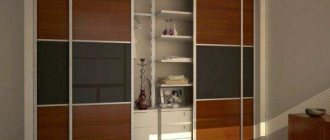
And in the case of a suspended ceiling, you need to make a gap for the sliding system (as shown in the picture below).
Then, the lower guide is placed on the floor, and sliding facades are inserted between them.
In this position, by moving the lower guide back and forth, there is a position where the facades will be in a strictly vertical position in space.
Through pre-drilled holes in the lower guide, marks are made in the floor, the facades and the lower guide are removed.
Holes are drilled in the floor for choppers for self-tapping screws, thanks to which it is then secured.
At the end, between the fixed guides, the facades are installed.
That's all science is.
So, if you need to close the opening with sliding doors, do not contact specialists (if your hands are “in the right place”), you will simply throw money down the drain, since, naturally, no one will do this for beer and fish.
Do it all yourself.
See you.
Procedure for installing compartment doors
At the beginning of their appearance, sliding doors gained popularity due to significant space savings and were often installed in apartments with a small square footage. However, very soon their advantages were appreciated by the owners of large apartments and houses. Indeed, in addition to the original appearance and noiselessness, the design is highly durable, and the installation of compartment doors is quite simple and does not require special costs and can be easily done independently with standard tools.
Operating principle of the design
When installing compartment doors with your own hands, you should know that their design can be of several types; they differ from each other not only in appearance, but also in the installation method and, as a consequence, in the opening principle. Common elements for all types of structures are wheels on the end part and a rail for moving the blade. There are travel stops on both sides. The system itself turns out to be hanging, due to which a smooth ride and the absence of thresholds are achieved.
Types of sliding systems
The choice of sliding doors depends on the original dimensions of the opening, as well as the functional purpose. Thus, to divide a room into separate zones, it is advantageous to use a design of 2 or more panels with movable mechanisms or equipped with doors on the sides.
To isolate two rooms, it will be effective to use a structure containing no more than 2 panels moving along a rail along the wall. It is also possible to install a door that fits into the gap between the regular wall and the false wall when opened. The actual installation of coupe system doors with your own hands is shown in detail in the video in our article.
Article on the topic: What is the best material to buy interior doors from?
The installation of a compartment door differs only in the type of guide rail used. The number of roller mechanisms directly depends on the weight of the structure. If the weight of the web does not exceed 30 kg, installing 2 wheeled carriages is sufficient. If the doors are heavy, when installing a compartment door, it is necessary to proportionally increase the number of roller mechanisms for reliable fastening and proper load distribution.
Homemade sliding doors
Any door leaf can be installed on rollers and will work as a sliding door. The guide and all other component rollers (carrying and flag), stoppers, and stops can be purchased. Hang on them at least a piece of plywood or a door assembled from several boards. This will be the most common and cheapest option. But making a mechanism without the help of others is a more difficult task. One of the options for a sliding door mechanism made from scrap materials (from round pipes of various diameters) in the video. The system was supposed to be installed in a wall cabinet, but judging by the design, it can simply withstand even a solid oak door.
Canvas material
When making compartment doors, it is possible to use either a single piece of one material or a combination of various elements. The canvas can be made from the following materials or combinations thereof:
- Strained glass;
- MDF;
- Laminated chipboard;
- Tree;
- Fiberglass.
The final weight of the structure will depend on the choice of the composition of the door leaf and its decorative design. When installing a compartment door, the width and height of the product used should exceed the opening measurements by 6 -7 cm.
What is needed for installation
To install a compartment door with your own hands, it is important to make sure that the contour of the doorway and walls are even. Quite often, a wooden block is additionally used to install a door into a plasterboard partition. In the case of zonal division of space, the guide rail can be attached directly to the ceiling.
When installing sliding compartment doors, as you can see in the video in the article, the process begins with dismantling all existing elements of the old doors, including hinges. The box is removed, and defects and damage to the walls can be thoroughly puttied and sanded. In addition to the canvas itself, installing a sliding compartment door will require you to have the following elements with you, the use of which during installation can be seen in the video guide in this article:
- A set of suitable accessories;
- Self-tapping screws;
- An anchor for attaching a wooden beam to the wall;
- The block has a cross-sectional size of 5*5 cm, the length of the element should be twice the width of the door leaf;
- Extensions and trims for decoration and hiding fasteners, as well as a frame framing the door opening;
- Roulette;
- Level;
- Screwdriver;
- Chisel;
- Simple pencil;
- Plumb.
Installation of sliding sliding doors and their features
Sliding doors are one or more sliding panels that cover a doorway and differ from conventional swing doors only in the method of fastening and fittings. Consequently, any door leaf (from any material and any manufacturer) can be converted into a sliding door, which significantly expands the boundaries of choice. Recently, glass sliding doors have become increasingly popular.
Sliding doors are one or more sliding panels covering a doorway and differ from conventional swing doors only in the method of fastening and fittings
Sliding doors (sliding doors) have a number of advantages:
- allow you to more rationally distribute space in your home or office, because conventional doors require much more space when opening and closing;
- allow you to create original interiors and fill the room with a feeling of lightness and mobility, etc.
On the other hand, sliding doors have rather weak (compared to swing) noise insulation, and therefore are used mainly for the purpose of zoning the interior rather than creating isolated rooms. When deciding to install a sliding door or sliding door, you should take into account that the walls and floor must be perfectly flat. When choosing a canvas, it is necessary to consider the method of fastening.
You can install sliding doors in two fundamentally different ways:
- installation of sliding doors (compartment doors) to the wall from the outside: this is the most common method, in which a guide is installed on the wall (ceiling) and rollers are installed on the door leaf. In this case, depending on the fittings, the guide can be hidden with a special box (hidden method) or left unchanged (open method);
- installation of sliding doors (compartment doors) in the wall: this method is used extremely rarely, only if it is required by the designer’s idea or your burning desire. With this method of installing a sliding door, as a rule, the walls are prepared in advance: the voids necessary for the free movement of the door leaf are left inside the wall, and a guide is laid at the height of the doorway.
Installation of the structure
When purchasing a sliding mechanism, in most cases, it comes with detailed installation instructions. The principles of assembling such mechanisms may differ slightly from different manufacturers.
Installation of wooden beams
Initially, installing a compartment door system, which you do yourself, requires, as you can see from the video on our website, some measurements and calculations. It is necessary to place the door leaf vertically against the opening and mark the top line on the wall with a simple pencil. Having measured 6-7 cm upward from it and set the level, you need to draw a strip horizontally. Using anchors, orienting along the drawn line, the wooden block is installed.
The plank must be fixed to the wall so that one half of it is located directly above the opening, starting from the framing frame, and the other half is located on the side into which the door will open. This installation method is necessary to completely close and open the door mechanism.
If you fasten a wooden beam without using a level, after installing the compartment door, the structure will open or close spontaneously.
Rail guide
Holes are drilled to the lower end of the beam, at a distance of 15-20 cm from each other. With their help, a metal guide rail is attached to a wooden beam. It is important to secure the rail in such a way that the distance between it and the wall allows the door to move freely.
To install compartment doors that hide into the wall when opened, it is necessary to build a special plasterboard structure adjacent to the main wall. This technique can visually increase the size of the room.
After installation, roller carriages are inserted into the guide rail to check the free movement of the mechanism. After a successful check, the ends of the rails must be covered with rubber shock absorbers. Further installation activities directly depend on the type of door being installed.
Door installation with additional bottom fastening
If a compartment door is installed with additional fastenings from below, gradual damage to the floor covering is possible. However, this design is more reliable during operation. There are several ways to install the lower fastening of a compartment door:
- In the area of the lower end of the door leaf, a U-shaped profile or two thin slats are installed, mounted strictly parallel to each other;
- Laying a groove in the end part for a guide rail or roller mechanism;
- Installing a metal guide rail across the entire width of the doorway on the floor. This option is used extremely rarely, since it results in a threshold.
In the case when the installation of compartment doors is carried out with the creation of a threshold, it is necessary to fasten the profile or grooves for the lower rollers. The grooves are made using a chisel or milling machine. The recess and width of the groove should be slightly larger than the height of the lower guide mechanism and its width.
Profile for lower door fastening.
Brackets are attached to the upper end of the door, with the help of which the surface will be connected to the roller mechanism. To accurately install the lower guide rail, it is necessary to temporarily attach the carriages to the door leaf and move the door to the extreme open position. After removing the door, use a plumb line to fix the bottom rail.
Door leaf installation
When the entire structure is ready, you need to hook the lower groove of the door leaf to the guide rail. After this, the door is fixed on rollers. Using a level, it is necessary to tighten the adjusting bolts until the door leaf is strictly vertical. In the absence of an assistant capable of lifting and holding the canvas, when installing compartment doors, you can place improvised means under it.
A correctly mounted structure does not produce noise during use. However, if there are small children or adults in the house who react sharply even to almost imperceptible stimuli, it is recommended to install a rubber gasket on the upper guide rail. The gasket can be purchased at the store or made independently from a car wheel inner tube or another object with similar properties.
Installation of extensions and fittings
After completing the installation of the compartment doors, it is necessary to attach a stand to the side of the frame on the wall, against which the door leaf will rest when fully closed. Exactly the same rack will be mounted on the opposite side, in the full opening area. The fastening elements are closed using additional elements.
Installation of fittings is done last. Trims and handles are attached to the door surface using a special adhesive mixture or fixed with finishing nails in the area of the posts or top beam.
Types of sliding doors
It is impossible to choose ready-made sliding doors, much less make the product yourself, without understanding the existing types. The classification depends on various parameters. Based on the number of valves, they are distinguished: single-leaf, double-leaf, three-leaf, and structures with a large number of valves. By location: entrance, interior, living rooms, corridors, staircases, balconies. By control method: manual, automatic.
The compartment door can be used in almost any room. It can even be installed in the doorway in the kitchen, toilet, or bathroom. It can cover a closet, niche, dressing room, pantry. Depending on the chosen installation location, shape, design, and method of opening the doors, all existing models can be divided into four main groups: coupe, radius, cascade, accordion.
Coupe
Sliding doors are most common among ordinary people. This is a classic option, similar in principle to curtains. Doors can consist of one or two leaves, but they work according to the same pattern: they move parallel to a vertical surface. The difference is that in double-leaf models the blades diverge in different directions. There are suspended designs, as well as options with top and bottom rails.
Hanging products are the easiest to assemble. To install them there is no need to dismantle part of the wall. The shutters are fixed on a special rod or rail mounted on the ceiling or wall above the doorway. A box can be used to disguise fastening and guide elements. In this design, the canvas is suspended, the distance to the floor is only a couple of centimeters.
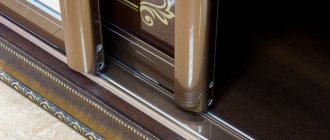
Doors with two guides have a more reliable but complex design. Installation work is complicated by the fact that it is necessary to perfectly fit the upper and lower fastenings, and also to make a long, narrow groove in the floor for installing the profile. For these models, the canvas moves along the rails using rollers, which can be attached either from above or from below.
The recess in the floor is a weak point in models with top and bottom rails. It constantly gets clogged with debris, which interferes with the free movement of the doors.
Radius
In terms of design features, radius doors are practically no different from standard compartment doors. The main difference is only in the shape of the valves, which can be convex and concave, round and oval. There are also combined models. This type is characterized by aesthetic beauty, but in most cases it does not save space, so such products are installed mainly in large rooms.
Radius doors are a development in recent years. They do not have straight lines, and, according to experts, they visually make any room more spacious. The products are in demand by many designers and allow them to create a unique, original interior. Doors have a wide range of applications; they are installed in residential buildings, administrative buildings, business centers, hotels, shopping and entertainment complexes.
Cascade
The main difference from classic sliding doors is that each leaf moves on a separate rail. All doors are connected using a special mechanism and a flexible cable. When one door is acted upon, the second one begins to move automatically thanks to a cable drive. The sliding line can be located either along the wall or inside the doorway. Cascade models do not have a threshold.
The design consists of two or more canvases. When opened, all doors move to one side, bumping into each other. When closed, they form a single plane. High smoothness of operation is ensured by a special closer. These systems can be used as full-fledged doors, serve to divide one room, completely close a room, or partially cover it to the width of one leaf.
Harmonic
Folding products have a fairly simple design, similar in structure to blinds. The main feature is that the doors consist of several sections connected by hinges. When folded, the door takes up minimal space. On one side they are attached to the wall. Guides are installed at the top or bottom along which the canvas is supplied during opening and closing.
Models with one or two doors are popular. The first type is ideal for rooms with a narrow opening, when it is not possible to install standard hinged sliding doors. The second option will fit into a room with a wide opening, for example, in the living room. Also, a screen door can act as a partition, dividing the room into functional zones.
Self-installation of sliding interior sliding doors
Among the many varieties of door designs, sliding ones have been in great demand in recent years. Previously, they did not pay much attention. The reason for everything was an incomprehensible and often frightening design. The rollers always got stuck in the runners, the door warped, and this could not have a positive effect on their demand.
Another intimidating factor for people was the installation of sliding doors itself. Some kind of slats, rollers, runners, stoppers... Since most people want to do the repairs themselves, without turning to specialists for their expensive services, this idea fades into the background. Nothing comes to mind easier than installing the simplest doors. But we will help you save your money and show you how to do all the work efficiently, and most importantly, with your own hands.
Features, advantages and disadvantages of sliding doors
Sliding systems have a distinctive feature that distinguishes them from the doors we are accustomed to. Their uniqueness is the structure itself, which has doors that move parallel to the wall and do not create any interference with surrounding objects. At first it may seem that the whole mechanism is complicated and the installation of such doors can only be done by specialists. But, if you figure out how it all works, the thought comes that installing interior sliding doors is an easy task that anyone can do.
Related article: Which polyurethane foam is better for doors
It doesn’t matter which door model is used, the operating principle remains the same: roller elements that move along guide “rails”. Only the number of guide elements depends on the door model (can be 1 or 2). The entire door “rolls” along the guides using rollers.
Due to all their differences from swing doors, compartment doors have a number of advantages:
- Ease of installation. If you have no idea how to install an interior compartment door, there is no reason to panic. By following all the steps and following the step-by-step instructions, assembling and installing the doors will not be difficult for you.
- There is no risk of the door slamming due to a draft.
- Space saving. Due to the fact that the door opens parallel to the wall, it does not take up extra space in the room and does not interfere with other objects and furniture.
- Rich choice. Thanks to a huge range of sliding doors, you can easily choose the shapes and designs you need.
Despite all the advantages, when installing sliding sliding doors, the following nuances may arise, or, to put it in simple terms, disadvantages:
- Crevices cannot be avoided. Even with the most precise and correct installation, gaps will remain. You cannot do without drafts and unwanted noise.
- Installation accuracy. If you install a compartment-type door with slight deviations on a curved wall, distortions of the doors cannot be avoided. In the future, this will lead to incorrect operation of the door.
- Price. The cost of doors is much higher than swing doors.
Before installing an interior sliding door with your own hands, it is worth looking at all their varieties. Let's look at the main types of sliding doors:
- With 1 leaf. Such doors are more suitable for a room with a small area, with a small door frame. Their compactness and miniature size will not take up a single extra centimeter in the room. When opening, the door moves parallel to the wall, without taking up space in the room. This structure can be attached to both the wall and the ceiling.
- Bivalve. These doors are more suitable for rooms with a wide doorway. The difference here is that instead of one solid movable sash, you get two halves, optionally, one of which is fixed and the other is used.
- Sliding-folding. Another popular type of sliding doors are sliding and folding doors. The mechanism for folding them is similar to an accordion or a book. Such doors are mounted exclusively on the upper guides; the bottom of the door remains free.
In this article we will look at the installation of a single-leaf door and all the nuances that you may encounter during installation work.
Types of cassette sliding doors
There are very few types of these systems, because this is a standard product that differs only in overall dimensions, type of canvas, as well as structural elements. An interior sliding door into a compartment-type wall can be manufactured in standard sizes or in non-standard sizes upon individual order. Standard sizes mean the width of the canvases - these are 400, 500, 600, 700, 800, 800 and 1000 mm. In openings of 1 m or more, double-leaf structures are installed.
The cassette can be equipped with almost any canvas. A common option is when both the cassette and the canvas are purchased separately, and then assembled. It is not difficult to assemble a single structure from parts - the pencil case does not disassemble, but is supplied as a whole.
If we talk about additional devices that add some functions, then a sliding door to the wall can be equipped with a closer or an automatic closing system.
This is all. There is simply nothing more. But this is enough to equip any type of residential and non-residential premises with beautiful, compact and functional solutions. It is very rare, but still, on sale you can find entrance doors that work on this principle. However, they are not intended for installation in houses or apartments. They are equipped with entrances to supermarkets and other similar buildings.
Preparation and installation of sliding doors
It is best to install a new door after finishing the walls and floor. Also, do not forget about dismantling the old door. Before starting all installation work, we prepare the necessary accessories. We will need the most standard set of tape measure, level, screwdriver, chisel.
Let's look at detailed step-by-step instructions for installing sliding doors with your own hands.
Step 1: out with the old doors . First you need to dismantle the old door. We remove the sash from its hinges and proceed to dismantling the box. Often, an old door frame interferes with the installation of a new sliding door. Carry out all work on removing the door frame carefully so as not to damage the corners and walls.
Step 2: leveling the walls . After dismantling the door frame, all sorts of irregularities remain in the form of hardened mortar, brick/plasterboard. Make all corners even and straight. To achieve the tightest possible fit of the doors to the wall, it is necessary that all surfaces are parallel, the maximum deviation is up to 5 mm.
In order to install sliding sliding doors in a room, we make a new frame. Its alignment in the opening is carried out using wedge-shaped blocks. We level the box as much as possible and fasten it to the wall with anchor bolts.
Step 3: Top Guides. When the door frame is installed, we proceed to installing the guides. We lean our door against the frame and mark the top edge on the wall. Then, we do the same procedure, only we move the door directly into the opening. Thus, we measured the horizontal and made sure that it was level. We retreat 70 cm up from the line and fix the beam here with self-tapping screws. We will install a rail on it. We fasten it from the bottom of the beam with self-tapping screws.
Step 4: assembling the carriages and installing the stops . To properly install sliding doors with your own hands, you need to install the carriages in the upper guides. We insert them into the groove of the rail and check how tightly they move. If necessary, it is worth loosening the mechanism. We install a limiter along the edges of the guides. We install it in such a way that the rubber buffer element is directed inward.
Step 5: bottom groove . From the end of our sash, we retreat 10 mm, make 2 recesses with a diameter of 7 mm and a depth of 20 mm. Between the holes made, it is necessary to make a groove into which the guide must be integrated.
This stage was the most crucial. After all, it is necessary to install all fasteners strictly according to the level. After all, all the slightest deviations will negatively affect the operation of the entire door structure.
Installation of doors in a niche
After all possible alignment procedures have been carried out, the door leaf is installed. Due to some fragility of the products, their installation must be done very carefully. Sliding doors assembled according to the compartment type have two types of guides: ceiling and floor. In this case, the floor is the main one, holding the entire weight of the canvases. The upper guide is designed for an even vertical position of the door leaf in relation to the floor and adjacent walls. However, despite this, installing a ceiling guide is only possible on a hard, not suspended ceiling.
The procedure for installing the top rail consists of drilling mounting holes for screws or self-tapping bolts. The holes are prepared strictly on one conventional line and at an intermediate interval of 45-60 cm. After preparing the holes for installation, the guide is installed.
The lower guide is fixed to the floor in the same way. The installation procedure is carried out only with the top rail carefully prepared and adjusted. After installing the guides, the canvas is inserted into the grooves using carriages and they are finally fixed to the surface.
In most cases, roller mechanisms are equipped with a special rubberized coating. This ensures not only the absence of noise when using the structure, but also allows for a long period of operation without lubrication of the wheel mechanisms of the structure.
Installing a sliding door leaf
To begin with, we attach our carriages on both sides of the sash. We make an indent of at least 2 mm from the edge of the sashes.
When our entire structure is assembled, we begin to install the sashes. We hook the lower groove of the sash to the rail. Then we fix the door on rollers. In order to align the door evenly, adjustments must be made using the adjusting bolts. In order to do everything as accurately as possible, we use a building level.
When a properly adjusted sash operates, no sounds should occur. This is especially serious if you have an infant who reacts to any stimuli. When installing compartment doors with your own hands, slight distortions are possible, which will contribute to the appearance of noise of this kind. For maximum noise reduction, you can place a special rubber pad under the rollers or make it yourself (for example, from an old bicycle inner tube or other similar materials).
Sliding door systems
There are two types of devices: mounted and rail-mounted. Both are flawed. Briefly about their pros and cons below.
Top rail suspension system
The hinged mechanism is a support beam to which a guide in the form of a letter &П& with inwardly curved & legs& is attached. The rollers to which the door leaf is attached move along this guide. In technical terms, it is a hinged door on a top rail.
The basic design of sliding interior doors on the top rail
When installing such a door, the floor under the door remains smooth; only the lower roller is installed on the right and/or left in the door clearance. It slides along a groove made in the lower end of the blade. It is needed so that when moving it does not deviate vertically. This design is the most common in installation. Installation is very simple and consists of several steps:
- secure the top rail;
- screw the roller mechanism to the upper end of the canvas,
- roll the canvas into the guide;
- install stoppers at the top (so that the doors do not fall out);
- Having opened the doors, insert the lower roller into the groove and secure it to the floor.
Single-leaf interior sliding doors
That's all. Doors on rollers are installed. But this system, in the form shown in the photo, has very low sound insulation properties. They are actually zero: the passage is simply blocked.
Rail sliding doors
This type of door has two rails: top and bottom. Rollers are also installed at the top and bottom. Thanks to this design, the system has the highest degree of rigidity: it can be shaken, and this will not cause any particular harm.
Rail sliding doors
The disadvantage of having rails in the floor is known: they are difficult to clean. Debris and dust constantly get into the grooves, and you have to keep an eye on their cleanliness. This type of door is most often used in closets and dressing rooms. They are installed as interior doors if mobile children grow up in the family. Then safety is more important than difficulties with cleaning.
Installation of compartment door fittings
And now, our door stands as it should and even opens and closes! It's time to refine our entire sliding structure and attach a handle to the door itself.
Step 1: installing the handle . For compartment-type doors, only mortise handles are used. You need to make a small indentation, secure the base and only then put on the decorative overlay.
Step 2: installation of platbands . Platbands are installed in order to hide the upper beam with the guide. Make a so-called false panel and some kind of decorative frame for the entire doorway. They are attached using special wood glue or nails without heads.
So we figured out how to install a compartment door with our own hands. Installing this door is not as scary as people think. If you follow all the steps in the step-by-step instructions, then no problems will arise during installation.
Self-installation of doors
Making hinged doors for built-in wardrobes at home is problematic, but you can even install them yourself. Often such doors for a built-in wardrobe are made from furniture chipboard, and it will not be difficult to embed similar furniture hinges into it.
To do this, using a special cutter mounted on a drill, holes with a diameter of 35 mm are drilled in the doors, which should not be through. To connect them to the cabinet and install handles, you can simply look at how this is done on kitchen furniture.
A built-in wardrobe with hinged doors is a good choice for rooms with an original design. Such furniture will complement the style of the room and allow you to implement the most unusual design solutions.