Why is professional pipe attractive for making furniture?
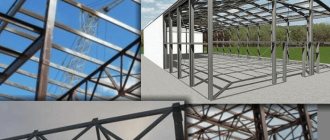
Profile pipes with a rectangular or square cross-section are available in different sizes and with different wall thicknesses. These parameters determine the scope of their purpose. Thick-walled products with a large cross-section are used to construct building frames, fence posts, retaining columns, and decking. And products with more modest parameters are used for the manufacture of facing frames, canopies, canopies, gazebos and greenhouses. Many household products from profile pipes are also made from it, including home and garden furniture. The thin-walled profile of a small section bends easily, which allows you to create from it not only cubic, but also original openwork structures.
Garden bench on a bent frame Source prom.st
This material has many advantages.
- High strength and ability to withstand heavy loads with low weight and size due to four stiffening ribs.
- Dimensional stability under changes in temperature and humidity, resistance to weathering and chemically aggressive substances, which allows you to make outdoor furniture from profile pipes, tables and workbenches for installation in garages and workshops.
- Simplicity and versatility of installation of structures: corrugated pipe is easily cut with an angle grinder; assembly can be carried out either with bolts or by welding.
- Affordable price of material.
- Undemanding to storage conditions.
A standard set of tools available in the arsenal of a home craftsman is quite enough to make a table or other piece of furniture on a metal frame. In the absence of a welding machine, the parts can be connected with bolts, having previously made mounting holes.
Difficulties arise only in the manufacture of bent parts, since this requires a special pipe bending machine. But a large diameter arc can be made without it.
One of the ways to bend a pipe Source simplylivewell.files.wordpress.com
The availability of special protective and decorative coatings for metal makes it possible to give such products any color in order to organically fit them into the interior of the house and extend their service life outdoors.
See also: Catalog of companies that specialize in redevelopment of country houses of any complexity
General recommendations for production
To make a table or chair from a profile pipe, you start, as in any other business, with a project, selection of materials and tools.
Selection of construction and design
The design, shape, size and design of the product are determined by its purpose and the design of the surrounding space into which it should fit harmoniously. Any types of tables are excellent from profile pipes:
- large dining room;
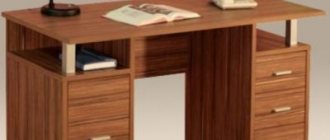
- desk with drawers and shelves;
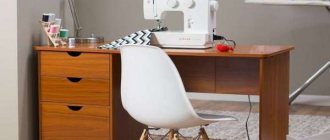
- desk with an inclined tabletop;
- magazine;
- mobile serving table;
- table for a gazebo or recreation area;
Garden furniture set Source 9dach.ru
- folding transforming table with one or two benches;
- a convenient workbench in the workshop for metalwork.
Having decided on the functionality and location, they begin to create diagrams and drawings. Separately draw the frame for the tabletop and the supporting structure. The simplest one consists of four vertical legs connected by longitudinal, transverse or diagonal jumpers. But you can design more original products from professional pipes.
Table frame with X-shaped legs Source cs1.livemaster.ru
It is advisable to make several projections of the frame: the base and all the sidewalls, which have different numbers and locations of parts. This will allow you to accurately determine the required pipe footage, the number of nodes, decorative elements, etc. A detailed drawing will facilitate the practical stage of work.
Construction drawing
Before starting work to make a computer desk with your own hands, you need to create plans in the form of drawings. They will allow you to correctly manufacture the elements from which a single structure will be assembled. First of all, you should determine the parameters of the table, there are only three of them: length, width (depth), height.
For a computer desk, it is important to choose a medium length. Too small will not allow you to sit comfortably, and a large one will take up a lot of space, as a result, it will also be inconvenient to use. The length should be selected according to the areas required for work:
- Personal - this is where the monitor, keyboard, and other work tools are located. For comfort, it is recommended to choose a length of about 70 centimeters.
- Area of the system unit - for its placement it is optimal to prepare a niche with a size of about 25 cm; if you plan to place it lengthwise, you will need a space of about 30 cm;
- Rotation of the tabletop in corner tables - the best indicator is 60 centimeters.
- Cabinet - this particular element is equipped with drawers where additional items are stored. Typically their length is 40 cm.
How to assemble a simple coordinate table with your own hands, tips for craftsmen
The total length of the table should be about 170 cm, which is optimal for corner structures; a straight line can take 100–130 cm. The depth, which refers to the width of the computer desk, is also important. If there is an extension (an additional shelf above the main tabletop), the depth is selected at 70 cm; without it, 45 cm will be sufficient.
If there are drawers, you will need about 65 centimeters of depth, and corner options with shelves at the bottom will be comfortable with a depth of 85 cm. Finally, the height is selected according to the user, if he is alone. Height must be multiplied by 75 and divided by 175 cm, for example, a person with a height of 175 centimeters will need a table 75 centimeters in height.
Having decided on the basic parameters, you should prepare a drawing. If you have the skills and knowledge of design, this can be done on a sheet of paper, schematically drawing a sketch of the table and indicating the dimensions of the various elements. The work will be much simpler if you use special programs, for example “Basis Furniture Maker”.
This and similar services will not allow you to make mistakes in the drawings, they can adjust dimensions, and also mark points for marking and placing fittings. The completed diagram can be printed for use in paper form (as a ready-made action plan). In any case, you can take correctly calculated computer desk plans from the Internet and adapt them to your personal project.
Video description
An example of making a table of an unusual design is shown in the video:
When the frame is ready, it is processed with a grinding disc, smoothing out the welds and removing rust. Then it is primed, coated with paint and allowed to dry.
When making furniture from profile pipes and wood, parts from different materials are fastened with ordinary self-tapping screws. To attach the tabletop, it is laid on the floor or other flat surface, and an inverted frame is installed on it. Mark the mounting holes and drill them into the metal, selecting a drill to match the diameter of the screws. They are screwed in from the side of the frame so that the hardware goes through it and goes deeper into the boards of the table top, but does not go right through them. Why fasteners are selected in advance according to length.
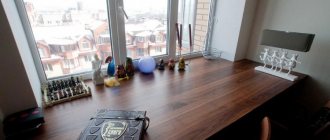
The last stage is sanding and treating the table top made of planed boards with paints and varnishes.
Metal table options
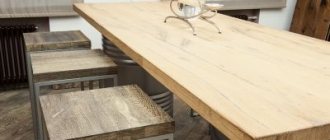
This furniture product cannot necessarily be made of only one metal; to make its tabletop, you can choose another material, for example: wood, glass or plastic.
Here are some options for metal tables that will fit perfectly into any interior:
- forged table;
- metalworking table for processing building materials;
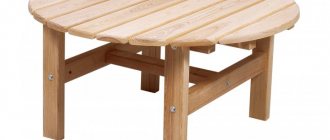
- side table;
- decorative side table;
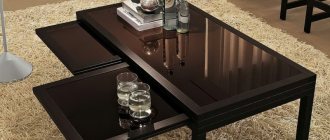
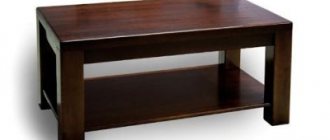
- coffee table;
- bar table;
- console table.
Briefly about the main thing
Profile pipe is an ideal material for making frame furniture. It turns out stylish and beautiful, reliable and durable. To make a table, you need to make a schematic representation of it with dimensions, cut the pipe according to it into pieces of the required length and weld them together or connect them with bolts and nuts. After sanding and painting the finished frame, all that remains is to make and attach the tabletop to it. The bulk of the work will only take a couple of hours.
Ratings 0
Assembly steps
A high-quality and completely durable homemade table can only be prepared if certain steps are followed. First of all, the structural parts are created, then they are connected and the finished product is finished. As an example, we will consider the assembly of a straight-type table with shelves inside and a sliding keyboard stand. Of course, this is not a full-fledged gaming desk, but it is quite suitable for office tasks.
Step-by-step making of a table from boards with your own hands, examples of decor
Preparing parts
Since the drawing was already prepared earlier, you first need to cut out the parts for the table. To do this, you will need a sheet of the selected material, that is, chipboard or MDF, after which a jigsaw is used. With its help they do:
- two identical side posts with dimensions 735*465 mm, which will be the outer supports;
- central post 735*380 mm, this needs to be made in one copy;
- tabletop with parameters 1200*580 mm;
- the back wall measures 1090*290 mm;
- stand used for the keyboard - 830*380 mm;
- several internal shelves of medium dimensions - 450*250 mm.
Now all the structural elements are ready for assembly, you just need to do the work efficiently.
Assembly of the structure
The so-called formation of the desktop is done using dowels and screws; some parts are glued with a special glue created just for wooden parts. Bonding is done in stages:
- Holes are created in the side wall and the rear panel where the bottom shelf will be attached.
- From them, 50–70 mm are measured horizontally and a line is drawn to this point.
- In the horizontal area, two more holes are made, located in parallel positions. This way you will get two identical holes in the side wall, two more in the central one, they are fastened with self-tapping screws.
- In the same way, the top shelf is secured, which should be located at a distance of at least 100 mm from the beginning of the board.
- The cut-out rear wall is mounted, and the alignment should be ensured in relation to the ends of the side and central panels. After marking the holes, the sheet is attached to the screws.
- Another side support, not previously involved in creating shelf space, is also attached to the rear wall. This is done through holes in the back panel.
- The guide element is fixed. To do this, measure about 50 millimeters from the top of the side and central walls and draw straight lines parallel to each other. The rails are fixed.
- The keyboard shelf with already mounted rollers and strips is inserted into the prepared grooves.
- The table top is being installed. Holes are made in the edges of the side supports and the wall located at the back, as well as at the bottom of the tabletop, coinciding with each other.
- Dowels are used, which are coated with glue and inserted into shallow holes on the side and rear panels. Part of the dowels, also coated with glue, should protrude outward.
- A tabletop is placed on the open parts and pressed down for better fixation. It will take about an hour for the glue to dry.
- The shelves on the tabletop can be secured to the same dowels. You should not make the structure too high, as it will be unstable.
At this point, the table will be almost ready, all that remains is to work on its appearance so that it becomes a full-fledged interior detail.
Finishing work
To put the original table in order, you need, first of all, to cover the edges with furniture tape. It is applied to the edge, after which a hot iron is passed over it. You can also use a hair dryer for these purposes.
DIY table decoupage instructions for beginners
If untreated wood was used for work, you need to be prepared for the fact that its surface will not be ideal. To bring the wood to a smooth state, it is first puttied in places of unevenness. They can be identified visually or by touch, but it is better to use a level. Next you need:
- Sand the surface so that it is not rough and remove any additional roughness.
- Cover with stain, which will prevent the appearance of dampness and insects eating the wood. In addition, this composition will improve the fire safety of the material.
- The entire surface is covered with varnish as evenly as possible. There should be no dust or dirt in the room, otherwise the varnish will be damaged.
The table is now finally ready for use and can be placed in a predetermined area. Caring for it will not be difficult; just wipe the surfaces regularly with a damp sponge or microfiber cloth. If the shine disappears over time, it can be easily restored using a special furniture polish.
After assembly, the table is covered with stain and varnish
Shelf for ups and holes for routing wires
Furniture edging tape is glued to the edges