It is no secret that the rapid change in the economic situation has forced members of the middle class to decisively reconsider their expenses downward. Abandoning the usual idea of “saving and buying,” they began growing their own vegetables, sewing clothes and assembling furniture. It should be noted that on this fruitful path, many managed to achieve impressive results.
Real savings for the family budget
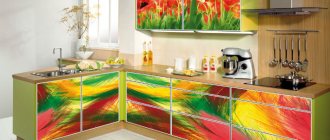
One of the most in-demand skills for a thrifty person will be a DIY kitchen renovation. Making a modern, elegant kitchen set with your own hands is a brilliant anti-crisis initiative
To save a lot of money, it is enough to have minimal experience in working with carpentry tools, listen to the advice of furniture makers, master the art of reading blueprints, and learn how to make markings on wood.
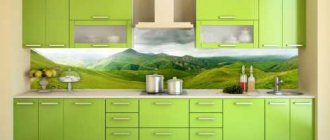
Examples of a finished kitchen sketch
Before you start working on the diagram and drawings, you need to firmly decide on your taste, aesthetic and practical preferences.
In other words, you should carefully study photos of a DIY kitchen on the World Wide Web or in the specialized press and decide which set should appear in a particular apartment.
What can you make for the kitchen?
Handmade is now at the peak of popularity; exhibitions and sales of handmade products are periodically held. If you, having visited such exhibitions, were inspired by the idea of creating something like this, then this article is especially for you. Indeed, in this article you will learn about what craft ideas there are for the kitchen. Be sure that with them your kitchen will be transformed.
Rag birds
All kinds of sewn chickens and ducks in your home will give it comfort and hospitality, and can also become an original gift for a family celebration or for Easter. You can start working with a chicken pendant. It is sewn quickly and easily, and can be hung on a window ledge or on furniture. You will need:
- Template for cutting.
- A ruler, pieces of simple fabric, for example, chintz.
- Needle, thread for sewing.
- Wool thread or embroidery thread/floss.
The pattern here is very simple, almost a geometric figure. The bottom is even, we measure 20 cm using a ruler. Now we make 2 identical halves of the future chicken from it. The fabric is then folded in half.
At the back in the middle there will be a tail made of collected multi-colored threads, wool, or floss. We make the comb from red floss threads. We sew the wings on the sides, and cut them out from another fabric, preferably a contrasting one. They can be decorated around the edges with embroidery or just a ribbon. We sew on the beak by cutting out a small piece of thick fabric.
If you make an elastic band at the bottom, you can hide an egg there for Easter, it will be a gift - a surprise for children.
And if an elastic band is not needed, then you can make the chicken voluminous, then you need to stuff the body with stuffing material and sew it up. You can also simply sew the bottom, sew on a loop and hang such a souvenir in the desired place.
Provencal style. Homemade products
If you take note of these ideas, you can easily make crafts for the kitchen with your own hands. French flair in a different way. The most suitable interior for the kitchen, light and cozy. And made with your own hands, it’s doubly pleasant.
It is based on a pastel palette, slightly shaded with bright spots. Poppies give red, the sea - blue, lilac from lavender fields, yellow - of course, the sun, and lilac - the color of sunset. Start by sewing cushions and back covers for kitchen chairs or stools. You need to take:
- any fabric, but cotton is better,
- sewing and safety pins,
- needles and threads.
- lace, braid, elastic bands,
- chalk, centimeter, scissors.
After taking measurements from the backs and seats, add 10 cm to the seams everywhere, where we still leave room for elastic. If you stretch the elastic along the entire bottom, the fabric will sit in beautiful folds.
The cape should have lace sewn around its perimeter as a sign of the Provençal style, light and delicate.
As a base, a novice master can choose satin or chintz with a small pattern, purple or blue, but not bright, but muted.
If you can also make the tablecloth in the same style as the covers on the seats and backs of the chairs, then your kitchen will have a pleasant twist.
More Provence ideas for your kitchen
If you know some secrets, it will be easy to create your own kitchen decor. Light crafts will allow you to change the atmosphere in this room. Kitchen decoration can involve decoupage of kitchen cabinets with fabric. The kitchen will only benefit from this, it will be provided with comfort.
Painting on plates is a rural style, but it never goes out of fashion, and we’ll immediately tell your guests about the hospitable and handy hostess of this house.
Decoupage can also be applied to dishes, simply artificially age the white ones and apply floral or berry motifs to it.
The tablecloth is not just linen, but trimmed with chintz or multi-colored shreds - this is already aerobatics.
Don’t forget about the flower pots, if you also make them vintage, old and decorated with simple images of flowers or birds, you will see that the kitchen has already been properly transformed.
Any kitchen has a lot of storage containers, for example, cereals. Let's give them a Provençal character and decorate them accordingly; by the way, you can make a whole gift set from several containers.
Light chintz curtains can be used to cover unsightly places or just lower cabinets. They are easy to make, but impressive to see. You can use the patchwork technique.
On linen napkins, trim with lace or patches will also be effective.
An apron in the same color scheme will perfectly complement your look as a housewife.
If you collect and hang real fragrant herbs in the kitchen, the kitchen will be filled with fragrance.
Once you have fully mastered the manual skill, you can upgrade your Provençal kitchen by placing a mosaic decoration on it, also homemade, of course.
Decorated candles and candlesticks will add coziness and charm to your kitchen.
These are just approximate ideas, of course you can add something of your own to them, your innovations, but try to adhere to the same style even in small things.
Homemade products - potholders
Tips for beginners.
We continue to offer you ideas for crafts for the kitchen. Don’t forget that having honed your skills in your kitchen, you can move on to the kitchens of your friends and family, giving them something you’ve made with your own hands, and perhaps you’ll soon acquire like-minded people in needlework, and you might even end up with a club of similar interests.
You can organize master classes, for example, at a family celebration or children's party. After all, potholders, for example, will always come in handy around the house, children will be delighted with cute and simple toys in folk style, napkins will become a home decoration, and covers for a lampshade or a set of covers for the backs of chairs can become a starting point for mastering such a craft for those to whom they are presented.
Mugs or a set of containers using the decoupage technique can also intensify the efforts of their new owners to master an interesting technique for decorating the kitchen.
It’s easy enough to change the kitchen interior with crafts. Nowadays, everything is in fashion that is simple, made at home within the means, and therefore retains the warmth of your hands in its simplicity.
Finally
Now you have learned how to make crafts for the kitchen with your own hands. We have provided their photos and descriptions for you. It seems that small touches and details can transform any kitchen space, especially since they are usually simple to implement and made from natural materials. Create and invent, infect your friends and family with your enthusiasm, take part in exhibitions, and your life will be transformed just like your kitchen!
Ideas for kitchen crafts in the photo:
An island of calm in the ocean of cooking
If the area of the room reaches sixteen squares, then the kitchen should only be an island kitchen. This placement option in this case seems to be the most practical.
On top of that, a beautiful DIY island kitchen is very convenient both for carrying out daring culinary experiments and for quickly tasting new dishes with family and friends.
Budget kitchen projects
After finally linking your preferences to a specific living space, you can move on to the design stage. It consists of drawing up a plan, cutting and a sketch in perspective.
Note!
- Kitchen designer: purpose of the program, operating rules, pros and cons, secrets of arranging objects in the kitchen
- Bar counter height: types of counters, calculation of dimensions, standard sizes, reviews of modern solutions (photo + video)
Gas pipe in the kitchen: instructions on how to beautifully and safely hide a gas pipe in the kitchen
At each of these stages, a number of important tasks are solved. Drawing up a plan includes measuring the area of the walls, ceiling and floor, marking and further drawing all cabinets, pencil cases, and shelves onto the kitchen drawings.
What follows is a detailed image of the frame and sheathing. All that remains is to make the cutting, that is, calculate the dimensions of each element of the furnishings, from the cabinet body to the smallest furniture door, and the project will be ready.
Price for drawing up a kitchen sketch
Thanks to such careful preparatory work, you can accurately calculate how much material, fasteners and fittings will be needed. At the same time, it will be possible to answer with great accuracy the most important question in this matter: exactly how much a cheap DIY kitchen will cost.
Now you can move on to drawing up a design project, or, more simply, a sketch. In order to perfectly accurately outline the design of both furniture and the entire room, including curtains for the kitchen with your own hands, it is necessary to use the so-called perspective technique. It is based on the selection of one or two vanishing points to which all horizontal lines of the sketch will be directed.
This technique makes it possible to bring final clarity to what the result of the upcoming repair should look like. All that remains is to paint the sketch of the furnishings with the necessary colors and shades, and the future interior will appear on paper in a completely completed form.
DIY kitchen assembly
Today, fashionable and stylish kitchen sets are made from ordinary modular elements. Thanks to the ease of working with ready-made blocks, assembly will be quick and fun. It will even somewhat remind you of children's fun with Lego constructors.
It should be noted that the assembly process carried out by yourself will bring significant benefits. The money saved in this way can be spent on purchasing expensive and beautiful accessories.
In addition, refusing the help of professional assemblers will allow you to assemble the set exactly as the owner needs. For example, he may not tighten the screws with a death grip in order to leave himself the opportunity to immediately dismantle the cabinets in a week or two and add some decorative elements to them.
Some features of mutual placement
If the owner of the apartment has firmly decided that he needs a kitchen made of wood with his own hands, then when choosing its layout he will need to take into account a number of important technical points. They relate to the relative placement of equipment and furniture.
Here is a list of the most important of these rules:
- there is no need to place gas communications and rubber hoses in close proximity to water supply pipes;
- the gas stove should be approximately two meters away from the main gas pipe;
- the distance between the sink and the gas pipe must be at least half a meter.
When using a corner layout, you must ensure that the sink and gas stove are not located next to the corner cabinet. The fact is that an inattentive or tired housewife is quite capable of splashing water on a burning burner or simply throwing a towel on it.
Organizer for storing packages
Fabric crafts for the kitchen also have a place. For example, a package organizer. So that they do not spoil the look of the kitchen, they need to be hidden. But in such a way that, if necessary, it is easy to get these bags.
You will need a piece of fabric measuring 40 cm by 50 or 60 cm. The length of the bag depends on how many bags you have. So the cut can be 40 by 50, or 40 by 40, or 40 by 30. Matching threads and cord. Instead of a finished cut, you can take scraps left over from sewing products and sew them into ribbons of the required width (40 cm). We also grind the ribbons together until you get the length you need.
- We connect the long sides together. We tuck the short sides and stitch them, leaving a part for threading the cord. This will be the top and bottom of the bag bag.
- We pull the lace through the drawstring and tie it into a knot.
Organizer for packages
You can compact the packages into a bag. We hang the bag on a hook or nail, and take out the bags from above or below by pulling the protruding edge.
Bag decor ideas. Get creative and make a doll or animal. To do this, sew a face or muzzle. Glue or draw eyes, mouth, nose, hair on them. For volume, fill with padding polyester or holofiber. To prevent the bag from hanging like a pot-bellied sausage, make a skirt for a doll or animal. It can start right from the neck - you don’t have to achieve a perfect resemblance to the characters.
The craft is ready to take its place on the kitchen wall or on the balcony.
Error detection and correction
As you know, the first pancake is usually baked in a lump. This pattern will most likely make itself felt the first time you make a kitchen with your own hands.
Even a very experienced engineer does not believe in the success of a project until it is implemented “in the metal.” Well, a novice home craftsman should even more so be prepared for the fact that some holes will not line up, unnecessary protrusions will appear somewhere, and for some reason the doors will not close.
That is why the furniture assembly will almost certainly be immediately followed by fixing errors and disassembling the set to eliminate all errors. Some of them can be fixed in literally a minute or two, while others will have to take half a day.
It can be especially difficult to adjust mismatched holes in adjacent sections. Even a slight deviation will not allow them to be bolted together.
Stand for hot wine corks
If you love collecting wine corks but don't know where to put them, we have some ideas for you. You can use them to make stands for hot frying pans and pots. Cork material will not allow heat to pass through and will save the tabletop from damage.
As a rule, for a mug stand you need 8 corks, for frying pans, pots and plates - 64. To create it, first of all you need to make a frame, the bottom of which can be made of thin plywood. Next, apply glue to it, insert the corks into the frame and leave until completely dry. It is not necessary to make exactly a rectangular or square stand. If your imagination runs wild, you can make it in the shape of a heart or any other shape.
Indian shisha technique: tandem of colored thread and mirrors
There is another option. Cut each cork into circles of equal diameter and glue them together. Here you also need to use a frame, as in the first option. Place each circle on the bottom of the frame. After the glue has dried, you can paint them any color or varnish them.
Expanding the hole in the desired direction
To solve this problem, which is well known to beginning aircraft and ship modellers, you need to draw a small arc on the wall of one of the cabinets, indicating the actual position of the mounting hole.
To do this you will need a sharp pencil, a magnifying glass and a flashlight. Then the section with the incorrectly located hole must be disassembled and widened with a drill or a round file.
Cabinet doors do not close well (adjustment)
Quite a lot of effort will have to be spent on correcting such a defect as incomplete closing of cabinet doors. It can occur for a number of reasons, including due to banal unevenness of the floor in the apartment. If placing one or two coins under the cabinet does not improve the situation, and in addition it begins to sway, then you need to immediately disassemble it.
Most likely, mistakes were made when installing the hinges either on the inner surface of the headset or on the doors themselves. Most often, disassembling the hinges and reinstalling them, taking into account the detected distortion, can solve the problem. Otherwise, you will have to replace the doors with lighter ones and at the same time check for noticeable distortions in the vertical elements of the cabinet.
If the reason for the incomplete closing of the doors cannot be established, then it will be possible to solve this issue simply and ingeniously - by installing strong furniture magnets on the doors and walls of the cabinet. To find out exactly how to install magnetic latches, you need to watch videos on those YouTube channels that are dedicated to the manufacture and assembly of furniture.
Video instructions for adjusting the cabinet door in the kitchen
Potholders made from old jeans
If you don't have enough oven mitts in your kitchen, you can easily fix this situation with the help of old jeans. Take thread, needle, down filling and extra fabric. If you have previously sewn potholders, you will be able to handle this without any problems.
Prepare two pieces of jeans, sew them together, leaving a small hole for the filling. After this, fill the resulting pocket and sew it up. Cover the seams with flaps. You can also use filler. In this case, place it between two pieces of fabric and sew them together.
Lifehacks you can’t live without in the summer: 10 original ideas
Inexpensive and accessible material
Most of the load-bearing parts of the furniture will be hidden behind the facades. This is why walls, supports and posts can be made from inexpensive material. An excellent option in this case would be cheap and produced in large quantities laminated particle board.
It can be easily combined with any facades. If you wish, you can find laminated chipboard with an original decorative coating, which will be visible when opening cabinets and pencil cases.
We decorate kitchen walls with our own hands
Kitchen wall decor is not always about drastic changes
To decorate the walls of the kitchen room you can use:
- various compositions from shelves on the wall, on which you can place pots with indoors or vases with artificial flowers, photographs, paintings, various figurines, beautiful decorative dishes and other elements that attract attention;
Shelves in the kitchen are a great option for decorating bare walls
But you can also use the shelves to store utensils
- a collage of photographs and a painting on the wall; their reproductions can be used to decorate “bare” walls. In this case, you should take into account the style and design of the room - for a minimalist, high-tech style, abstract modern paintings are suitable, for a city apartment - various landscapes, for a good-quality country kitchen - paintings depicting wildlife;
A photo collage is suitable for vintage or loft styles
Ceramic mosaic is another option for wall decor.
- You can also paint the walls using various stencils, vinyl stickers, or, if you have an artistic gift, come up with a composition yourself.
Painting the walls won't take much time. especially if you like to draw
Bright pictures on the walls look interesting
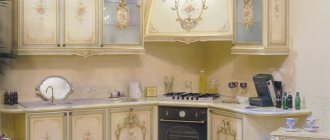
Don't skimp on facades
The first thing that catches your eye when looking at a kitchen set is its facades. Therefore, you need to choose them without haste, trying each draft version to match the colors of the surrounding interior, wallpaper, floor and ceiling decor. Today, MDF is most popular in the manufacture of facades.
Modern stylish facades are usually covered with all kinds of decorative films, giving the material a pleasant color and structure. Perhaps the facades are the only component of the kitchen on which you should not save, even if their cost exceeds half of all the costs of manufacturing the set.
Luxurious facades will become a kind of front kitchen showcase. To compensate for the blow to the budget caused by their purchase, it is enough to choose the cheapest apron for the kitchen with your own hands. It can be made from ordinary tiles with simple patterns.
Methods and options
Let's take a closer look at the abundance of options made to complement the kitchen interior. So:
Potholders
This is the first thing that comes to mind. And, indeed, every housewife has this product. It is an ordinary square or a mitten that protects the hand from a hot object.
However, if we fantasize and approach this from a creative side, then we may end up with, for example,:
- apple;
- butterfly;
- strawberry;
- flower and other things that our imagination is capable of.
Process Features
Let's take a quick look at the main points of sewing a butterfly potholder:
- First, you need to transfer the silhouette of the selected butterfly to the wrong side of the fabric twice. To do this, use a special pencil or a piece of soap.
Future potholder on paper
- We transfer two parts of each butterfly wing onto the fabric.
- We sew three parts together: a butterfly + two wings. We insert batting between the fabric.
- Next, we place one wing on each side of this blank and sew them only along the outer contour of the part.
- Thus, a pocket for fingers was formed in the middle of the potholder.
- The edges of our butterfly can be decorated by trimming them with silk ribbon.
Butterfly pot holder for hot food - convenient, beautiful, useful!
Note! These products can not only be sewn from fabric. For those who crochet, it won't take much effort to create a unique potholder for the kitchen with your own hands.
Panel
This art form covers many techniques:
- sewing;
- embroidery;
- modeling;
- drawing, etc.
I would like to draw your attention in more detail to kitchen crafts made from salt dough. To prepare it, no special ingredients are required, so the price of the craft will be affordable to anyone who just wants to show their creative abilities.
Preparation
The dough for the panel is kneaded in the following proportion: 200 grams of flour + 200 grams of fine salt + 100 grams of water. It is advisable to add 1 tablespoon of vegetable oil for elasticity.
Knead the dough until smooth, which should not stick to your hands or crumble. Next, wrap the resulting mixture in a plastic bag and keep it in the refrigerator for about one hour.
The process of forming elements
Then we perform all the actions that we do with regular dough: roll it out, mold it. We form the details and elements that we have in mind, put them into a single composition and get an original decor for the kitchen.
Next, the elements are painted according to the intended scenario and, after drying, are varnished. This will prolong the perfect look of the composition.
The result of working with salt dough is that the kitchen ideas are endless.
Kitchen towels
These devices are a necessity. You can, of course, buy them - store shelves are littered with these household items, or you can make them yourself.
A great option would be a doll whose dress is a towel. Thanks to the closure (loop and button), you can easily change outfits depending on your mood or situation.
Doll in the kitchen as a towel: photo
Apron
In order to sew an apron to your own taste, you first need to choose a suitable pattern.
An example of an apron pattern
Have you noticed how our mood changes depending on the clothes we wear?
A banal apron can be turned into a source of good mood, because it has already been proven that our energy is transferred to the products that we prepare.
- You can make an apron from scraps of fabric that once turned out to be superfluous.
- Come up with: appliques, braid, ruffles.
- Provide pockets for useful items, etc.
For your information! When sewing an apron, it is recommended to choose thick, waterproof fabric. This will protect the areas of the body it covers from unforeseen circumstances. For example, from drops of fat splashed from a frying pan or water that accidentally fell on you.
To create comfort and a good mood, you don’t need instructions; you just need to put in a little diligence and your kitchen will be filled with positive emotions.
Decoupage
Decoupage for the kitchen is a technique of applying patterns using napkins.
This process can be performed on almost any surface, for example:
- furniture;
- dishes;
- cutting boards;
- bottles, cereal cans, cups and other containers.
Tools and materials to perform this technique
Work process
Let's decorate the cutting board, so let's get started:
- To begin with, the board is sanded on all sides.
- Then we apply acrylic paint to the surface and wait for it to dry.
- Next, take croquelure 1 (special composition) and cover the top of the board with it, using a brush. We wait about 20 minutes - the surface should be a little sticky.
- The next layer is acrylic paint. Let it dry completely.
- Next is a layer of croquelure2, again waiting for it to dry.
During the drying process, cracks form.
- Apply acrylic varnish to a completely dry base; the napkin will fit better on such a surface.
- Having chosen the desired picture, cut it out and glue it with varnish and a brush.
- Next is another layer of varnish.
- You can use oil paint and darken the background of the board. The edges can be treated with an aging compound. After this, we apply another 4-5 layers of varnish and the decor of the board is ready!
Made with love and desire.
Table top and shelf for potholders
A do-it-yourself kitchen countertop is selected not only according to aesthetic criteria, but also according to thickness. It is desirable that it be close to four centimeters. This will significantly simplify the installation of the hob and sink.
After installing the countertop, be sure to screw a narrow shelf above it for storing oven mitts. You can make your own kitchen mitts from a variety of available materials. The main thing is that they are not too thin, otherwise the mittens will be unsuitable for removing hot trays from the oven.
The best ways to decorate your kitchen space
Homemade kitchen accessories should be harmoniously combined with the main concept of interior design. Against the backdrop of a rustic-style kitchen, vases, spice jars, and hanging cutting boards made from natural materials: wood, wicker, rattan will look organic. Meal rooms decorated in Provence style must be decorated with original candy dishes, bread bins, pots for indoor flowers, made using decoupage or shabby chic techniques.
Shabby chic decor elements are an integral part of the Provence style
The rustic style, visually similar to the basics of rustic, country, chalet, is perfect for ideas borrowed from nature.
Cuts from thin wood can be used to create beautiful coasters for hot dishes. To ensure that the stands are practical to use and do not lose their original appearance for a long time, it is advisable to sand the wooden surface and coat it with acrylic varnish. Stands for a teapot can be made from a wide-diameter saw cut, or several small wooden elements can be connected in a circle using a glue gun. It’s easy to add special features to wooden hot stands if you master the basics of pyrography (burning) techniques. It is important to decorate crafts with a wooden base with floral motifs - patterns in the form of flowers, climbing plants, birds, animals, fruits, vegetables. An excellent alternative to wooden blanks are corks from wine bottles, which can easily be turned into a hot stand of the desired diameter using acrylic glue.
For a rustic kitchen interior, make a stand for dishes from cut wood
You can use this technique to decorate the wall above the bar counter
Boards made from solid pine, walnut, and linden are perfect for decorating your kitchen with your own hands. Even a novice craftsman can make an original tray from this natural material: prepare several boards, nails, and furniture handles of a characteristic design. Three pieces of board, the length of which can vary between 30-50 cm, must be connected on top with stuffed wooden elements of shorter length. To make it easier to carry the tray, attach furniture handles on both sides.
It's very easy to make a beautiful tray from well-treated boards
Original DIY kitchen crafts and decor ideas will not only help you conveniently transport dishes, but will also perfectly decorate your kitchen apartment. A wooden tray will look impressive in tandem with an antique porcelain tea set and spice jars woven with vines. This beautiful composition is perfect for decorating open shelves and buffets. Several trays, symmetrical in shape, can be used to create a wall planter. Twine is ideal for connecting the parts of a multi-tiered composition.
If you know how to work with wood, then make a decorative set of kitchen utensils