Preparing for the arrival of a baby, parents are faced with such a difficult task as choosing a crib. Despite the wide selection of these products in stores, they often do not have a quality certificate, are not suitable in size for purchase in a small apartment, or are unreasonably expensive.
If you want an original, non-standard crib, and the prices for it are steep, then arm yourself with instructions on how to make a crib with your own hands.
Tree
Wood is the most preferred material for the production of children's furniture. This is a strong, durable, breathable material. It is easy to clean and disinfect and does not emit harmful substances.
When choosing wood for making a crib, you should avoid soft wood, in particular pine. This material is so susceptible to physical impact that as the baby’s teeth grow, he can simply chew off small elements of the crib.
It is better to choose alder or birch. The strongest and most durable product will be made from beech, but the price of such a product will be much higher than average.
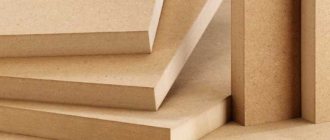
MDF
MDF is made from fine wood chips using high pressure, temperature and carbide resins as a binder.
Despite the presence of artificial resins in the material, the level of dangerous formaldehyde they emit is close to that of natural wood.
Due to its structure, MDF can be threaded. This allows you to bring to life the most original crib ideas with your own hands.
Furniture made from MDF is less preferable than wood furniture due to its short service life. However, if you do not plan to “inherit” the crib to another baby, then it will cope with its task with a bang.
Bed podium finishing
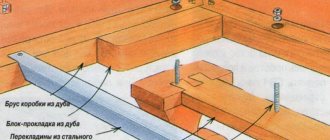
Scheme for attaching the legs and support strips to the sidewalls.
At the initial stage, the podium is covered with hardboard. Sheathing is done around the perimeter with an upward protrusion of up to three centimeters. As a result, a small side is formed. The prepared hardboard strips are attached using self-tapping screws until an even cylinder is formed.
Next, the prepared strips of foam rubber are stapled to the plywood base. The legs are not left without a foam coating.
At the next stage, the upholstery fabric is nailed, which is not fixed along the entire height of the legs. To hide the staples of the stapler, they are driven from the wrong side of the material at its junction, which is then turned inside out. Attaching the top of the material to the bed is similar to the procedure for attaching foam rubber. The material is also fixed at the bottom of the legs. Fastening is done to each leg using decorative nails. At this stage it's time to give free rein to your imagination.
And at the final stage, having finished making the bed with your own hands, a pre-ordered spring mattress is placed on the finished bed.
At this same stage, it’s worth thinking about creating a suitable bedspread that will help decorate the remaining three-centimeter gap at the bottom of the bed. Usually it is covered with a special frill made of curtain material or upholstery fabric. Remnants of fabric used in making the bed can also be used as a frill. The remaining fabric in this case is simply nailed with a stapler.
Related article: How to use wallpaper with sakura in the interior of various rooms
To somehow diversify the bedroom decor, some experts advise creating several frills. Then, every time you change the bedspreads, you can also change the frills, choosing the most original option to match the tone of each new bedspread.
For the convenience of multiple fastenings, it is best to fix the frills to the bed with Velcro.
Thus, by periodically changing the frills, you can experiment with the design of the bedroom and create new and original images and styles of the room.
The best posts
- DIY evening clutch
- Photo wallpaper for the kitchen near the table
- Saving wisely: choosing Roman blinds from Ikea
- What types of shower trays are there: shapes and sizes
- DIY paper bag for a gift on February 23
- Which interior doors are best installed in a wooden house: tips for choosing and installation steps
- What can happen when choosing a white floor for an apartment?
- Do-it-yourself floor scraping: scraping painted wood, a video for planks, old tool
Chipboard
This material is categorically undesirable in the production of children's furniture. In some cases, the material is of very low quality and emits large amounts of formaldehyde, which is dangerous to the body.
Check it out here too!
Instructions on how to make a table with your own hands: step-by-step photo instructions, drawings, assembly diagrams for tables of different types for the garden and at homeHow to make a hanging chair with your own hands - 100 photo ideas for chair design, instructions for their implementation. Creating the perfect vacation spot
DIY furniture made of wood: the best photos of solid wood furniture! The process of making wooden furniture: drawings, diagrams, furniture assembly
Also, chipboard has extremely low strength and wear resistance.
Plywood
When choosing plywood for making furniture, you must pay attention to its brand. Sheets of plywood that look no different in appearance can have completely different properties.
FK grade plywood is moisture resistant, durable, and is usually used for interior work. The ends of such plywood are light in color.
Plywood marked FSF has increased moisture resistance due to the phenol-formaldehyde resins included in the adhesive base.
It is strictly prohibited to use this material indoors, and even more so for the production of children's furniture, since formaldehyde vapors are compounds hazardous to health.
Check it out here too!
How to make book shelves with your own hands: drawings and step-by-step photos. Wall shelves, floor standing, portable, Montessori book shelfWe make a kitchen countertop with our own hands: design, methods of application, design options and decor ideas (135 photos and videos)
How to make garden furniture with your own hands: the best ideas for making unusual and simple outdoor furniture projects (95 photos)
To distinguish FSF plywood from others, look at its ends - their color has a reddish tint.
FKM grade plywood does not contain phenolic compounds and has good moisture resistance. This material can be used to make furniture.
What are children's beds made from?
Manufacturers offer a range of products made from various materials.
Table. List of basic materials.
| Material | What should you pay attention to? |
| Tree | Eco-friendly material that does not cause allergic reactions. During operation there is a high risk of scratches and splinters. Decorative coatings must be water-based. |
| MDF, chipboard | It is necessary to pay attention to the formaldehyde content (the emission class is indicated in the certificates); it must correspond to E0 and E1. |
| Metal | Strong and durable material, but cold to the touch. There is a risk of injury to the baby on the crossbar. |
Metal crib
The main requirement for materials is safety for the baby’s health, which is determined by the absence of lead and formaldehyde, as well as solvents in the paint composition.
Important! You can get rid of the unpleasant smell of new furniture by keeping it on the balcony for two weeks.
A crib for a newborn in a spacious children's bedroom
You can save significantly on furniture for a child by equipping yourself with the necessary materials, tools and making it yourself.
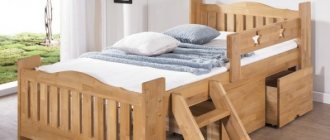
Models for babies
The most popular models for newborns are round and classic rectangular cribs
Classic models, due to their popularity, are made from different types of wood, painted in a variety of colors and are presented in a variety of price categories. Therefore, it is very easy to choose a model that is suitable in appearance, functionality and price.
Things are much more complicated with the choice of a round or oval crib. Typically, the functionality of oval and rectangular cribs is the same, but their prices are much higher. This circumstance usually scares away young mothers and fathers.
Despite the apparent complexity of the design, making such a crib is not so difficult. Just look at the photo of how to make an oval-shaped crib to understand its structure.
Check it out here too!
Designer furniture in the interior: photos, new items, ideas for placement and combinations- How to make a chair with your own hands? Stylish ideas, drawings, design options, descriptions and beautiful homemade models (video + 105 photos)
Instructions on how to make a computer desk with your own hands: drawings, projects and ways to build a modern, functional and comfortable computer desk (125 photos and videos)
Crib - oval
Drawings of such cribs can be found online, or you can make them yourself. The standard width of cots is 60 cm, length – 120 cm, height – 85 cm.
When making such a piece of furniture, it is better to adhere to standard sizes - if they are reduced, it will become impossible to use the modules that form a round crib.
About the canopy
A canopy over a newborn's crib is not a luxury. And not so much a remedy for dust, which should not exist in a nursery or in a well-kept apartment in general. But remember, which adult has not been driven to white heat by an autumn fly or a mosquito itching and itching in the dark? What does it feel like for a baby who doesn’t yet use his hands? And there is really no need to turn on the fumigator or spray repellent in the nursery.
Canopies for cribs
The canopy over the baby's crib is made from natural fabric that allows air to pass freely: chiffon, voile (silk or cotton), organza (silk only), muslin. The optimal design is a tent, on the left in the figure, or a tent, in the center, allowing, if necessary, to completely fold back/retract the canopy. But we remember: in the process of learning about the environment, the child will tug and pull the canopy.
Purchased children's canopies are equipped with a durable bracket with a holder made of light, durable elastic plastic, on the right in Fig. If you make it yourself, the best option is a canopy tent suspended on a cord from the ceiling. An M6 hook-screw screwed into a steel threaded collet cannot be pulled out of the ceiling by a strong adult, and if it is unscrewed, the hole is almost invisible on a ceiling only 2.5 m high. except for the lightest fabric and thin lace, it will not fall off.
Note: the best protection for the crib from annoying insects and dust, under which even an asthmatic will not be out of breath, is a mosquito net. But not a fiberglass window, but a special tropical one. Its meshes are wider than those of airy dress-drapery fabrics and it itself is stronger. This is a rare product here, but still take an interest. Ruched bows also look good on her.
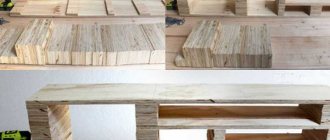
Carpentry work
To bring the idea of a baby crib to life with your own hands, you need to prepare its details.
First you need to make slats 80 cm high. The rods of the crib will be made from them. Their width and number can be changed at will, but usually the number of rods is a multiple of 30.
Using a router, you need to cut grooves on each rail to install the bottom of the crib. It is better to make grooves at 2 levels in order to lower the bottom of the crib a little with age and thereby increase the height of the sides, protecting the growing baby from falling out of it. All rods should be thoroughly sanded.
Next, you need to cut 4 arcs for the sides from plywood 24-30 mm thick. When connecting, the arcs should form 2 circles with a diameter of 60 cm. The ends of the parts also need to be thoroughly sanded, and holes for the slats should be made using a router at an equal distance from each other.
From plywood of the same thickness, you need to make and sand 4 pieces to create the sides. The length of the segment should be 60 cm. Holes for the slats are also cut on them.
According to the diameter of the inner circle of arcs, you need to cut a circle from plywood 10 mm thick and cut it exactly in the middle. You also need to make a rectangle 60 cm long and a width corresponding to the diameter of the plywood circle cut earlier.
These 3 parts make up the bottom of the crib. For better ventilation, several round holes should be cut in these parts.
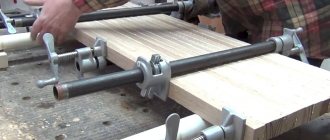
Using a different arrangement of modules, you can assemble both a round crib for a baby and an oval bed for an older baby. The parts are fastened together using PVA glue, skewers and self-tapping screws. Afterwards the crib is primed and painted in any color you like.
Assembly
When assembling furniture from chipboard, the main operation is to fix the end of one part to the face of another with a through screw - a confirmat. This is not the only type of fastener, but it is the easiest to use and is not too demanding on the accuracy and qualifications of the assembler.
A hole is drilled for the confirmation using a special confirmation drill with a working part of 4.5‑5 mm.
Without the skill, you should not try to drill a channel in one pass. It is better to first make a narrow hole in the face, and then, pressing the end of another part, finish drilling and immediately install the fastener.
Important! Marking of installation locations for parts and fastening points is carried out from one edge. You cannot mark some of the points on one side, and the other part from the opposite edge of the part. A slight inaccuracy in cutting and the error of the tape measure will certainly produce a noticeable error. Select the reference planes from which all measurements will be taken on all parts. A theoretical floor is recommended - the lower edge of the racks and the plane of the rear wall - the rear ends of the parts.
Where it is inconvenient to place confirmations or they spoil the view, for example on a tabletop, use corners.
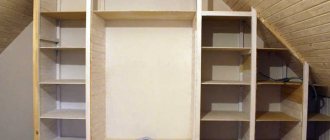
The cabinet shelves are removable and placed on shelf holders in the form of pins with a diameter of 5 mm. Blind holes with a diameter of 4.8 mm are drilled under them in the side walls. One or two cabinet shelves are rigidly attached to strengthen the side walls. Usually these are shelves on which two facades converge, located one above the other.
After assembling the modules, before installing the fiberboard back walls on them, you must check the equality of the diagonals. The size of the rear wall is taken to be 5-6 mm smaller than the dimensions of the module.
Manufacturing and installation of drawers
For drawers, different types of guides are used. Here we will consider installation on roller guides.
The boxes are made of chipboard, and their bottom is made of fiberboard. The dimensions are determined by the size of the section where they are installed, the length of the guides and the number of drawers.
- The length is taken equal to the length of the guides used or greater, within 50 mm. But in any case, at least 3-5 mm less than the depth of the section (cabinet).
- The width should be 25 mm less than the internal width of the cabinet.
- The height of the drawers must leave at least 20 mm of free space above the edge of the side panel (between the side panel and the top drawer, between the side panel and the tabletop or mounting plate).
Important! When assembling the boxes, you need to make sure that they are not driven by a “screw”, and when installing the bottom, carefully control the equality of the diagonals.
Installation diagram of the guides
It is more convenient to sew the guides onto the side walls of the module before assembling it. The lowest guide is attached no closer than 20 mm from the floor of the cabinet (along the axis of the fasteners). Each next one is with a step equal to the step of the facades, that is, the height of the facade plus the gap.
Installation of drawer fronts
Drawer fronts are installed only after all the guides have been installed, the module has been assembled, the drawers are installed, they move easily and do not “dance.”
Important! Be sure to number the boxes. Don't count on them being interchangeable! The number can be placed on the bottom bottom.
Installation of facades is carried out sequentially from bottom to top. For ease of work, all drawers except the bottom one are removed, and work begins from there.
- Holes for handle screws with a diameter of 4 mm are drilled in the facades.
- The front is set to the calculated position and pressed against the front wall of the box. You can hold the facade with your hand, but it is better to use light clamps.
- Through the holes for the handle screws, the front is attached to the drawer with two 4×30 self-tapping screws. After this, the clamps are removed and the correct position of the facade is checked. If necessary, you can loosen the screws half a turn and adjust the part.
- The exposed front is finally secured with four 4×30 self-tapping screws from inside the drawer. After this, you need to remove the temporary fasteners, drill through the holes for the handle screws and install the handle with long screws. “Native” ones are designed for a thickness of up to 18 mm and are not suitable in this case.
The work of setting up the façade is simplified if you use support liners underneath it that correspond to the width of the gap.
Before final fixing the façade, it is better to drill holes at the fastening points with a diameter of 2 mm and a depth of no more than the thickness of the chipboard. On the surface you need to carefully use a countersink or drill to make a countersink for the screw head.
Installation of swing facades
Hinged facades (doors) are installed on special hinges.
The furniture industry produces a large number of types of hinges. The figure below shows three types of hinges, differing in the position of the facade. They all have the same base angle - 90 degrees.
There are hinges designed for facades located at angles of 0, 45, 135 degrees, and their variety is not limited to this. In addition, the hinges vary in opening angle. The standard is 90 degrees, but there are also 110 and 175.
All of them are mounted according to the same scheme:
- In the rear plane of the facade, at a distance of 21-22 mm from the edge, a recess is drilled for the hinge cup.
- The loop is attached to the facade.
- On the wall where the door will be attached, vertical markings are made at a distance of 37 mm from the inner edge of the facade in the closed position.
- The door is placed in its place and the hinge plates are fastened with self-tapping screws according to the markings.
The hinges should be located at a distance of 70-120 mm from the top and bottom edges of the facade. When the door height is more than 900 mm, 3 hinges are installed, when the door height is more than 1500 - four.
The video below demonstrates the "stick and fasten" installation method. It does not require marking for the hinge keepers on the cabinet wall and works even if the hinges have a non-standard mounting size.
You just need to remember to set the adjustments of all hinges to the middle position before installation, and when installing, keep the facade 0.5-1 mm above the calculated level. This difference does not need to be measured. It is easily determined by touch. You just need to keep your fingers at the junction of the lower edge of the facade and the furniture body.
Important! When distributing hinges along the height of the door, make sure that they do not rest on the shelves.
To deepen the hinge cup, you will need an end mill - a Forstner drill with a diameter of 35 mm. The drill must have carbide cutters and a short “nose”. Such a tool will make an even hole of the required depth and will not spoil the front side of the facade.
Photo of a baby crib with your own hands
Read here - How to make an ottoman with your own hands - original options on how to make an ottoman at home, choose your option and follow the instructions!