To buy new furniture, you need to pay a large sum at a time. Everyone wants to save money and often ask the question: “Is it possible to make a cabinet out of wood with your own hands?” There are no difficulties in creating it yourself. If you stock up on the necessary tools and patience, everything will work out.
Furniture made with your own hands from wood is highly valued, and the cost of the product is significantly lower than factory options. But don’t rush to purchase the material and start manufacturing. Let's consider the features of wood, particle board, plywood and furniture panels.
Natural wood
Natural wood
Coniferous wood (pine/spruce) is considered the most suitable for making furniture at home. It is soft and easy to handle. If we talk about more durable wood, walnut or oak, they are hard and dense varieties, which makes the work much more difficult. Wooden furniture can only be made with special tools for smooth cutting, processing corners, chamfering and sanding. Without this, the product will have an untidy appearance. In addition, natural material requires an appropriate coating so that the surface is not afraid of moisture and is not scratched. The price of natural wood is high.
Deciding on the design
- For a small room, the optimal solution is a wardrobe. It can be installed in the corridor or hallway.
- For the bedroom you will need a spacious design. Clothes and shoes must be stored in this room. The equipment includes racks, shelves, drawers, and hanging rods.
- The kitchen set is equipped with a large number of drawers and modules with doors.
- It is better to put bright furniture in the nursery. The decorations for the closet are mirrors, ornaments and colorful drawings.
- A narrow pencil case is suitable for the bathroom. You can attach a mirror to it, and there should be several shelves inside. It will take a carpenter a little time to make the structure.
Prepare your tools. You will need a saw, a grinder, a tool to measure the angle of inclination, metal corners, wooden dowels, a tape measure, and a blockboard. Additionally, you will have to purchase mastic and the necessary paints and varnishes.
laminated chipboard
laminated chipboard
Cheap material from which furniture is increasingly being made in the modern world. The material is quite dense, but at the same time easy to process. Strength is at a high level, as is resistance to external influences. The last stage of chipboard manufacturing is coating with a polymer film or a special varnish, which provides resistance to water and scratches. In addition, it is not afraid of high temperatures, so most often they make kitchen cabinets from laminated chipboard with their own hands or in a factory. When it comes to furniture for clothes in a room, cabinets made of chipboard would be appropriate.
Corner wardrobe on the loggia: photo report
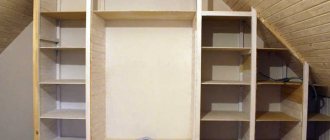
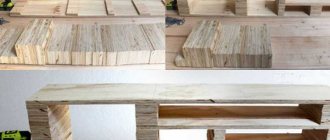
At first, the loggia was covered with clapboard. Immediately after this, they began to make a cabinet from the same lining. It was decided to go for a corner one so as not to cover the window so much. On the opposite side, the cabinet occupies almost the entire width, slightly short of the balcony door.
The racks were not attached. They nailed the bars on the ceiling and to the floor, and the walls to them. They turned out to be short - three planks. Planks were nailed to the wall paneling, on which the same paneling, cut to the resulting cabinet shape, was laid.
Stages of construction of a corner cabinet made of clapboard
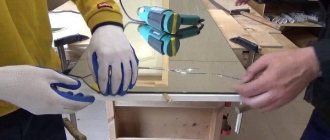
At the top and bottom of the doorway, clapboard was placed across the opening. We measured the remaining distance, subtracted 1.5 centimeters for inaccuracies, and cut the paneling on the door to that length. It took six of them. They knocked it down using four cross bars and knocked it into the door. Hung using regular hinges.
We hung the doors and made shelves below.
Two shelves are nailed in the free space between the cabinet wall and the balcony paneling. A little later they added a little higher with rounded edges. The last step was to nail the plinths under the ceiling and on the floor (to close the gaps), then sand the lining with sandpaper and paint it with stain.
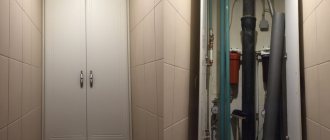
The result of the work even after three years of operation
Plywood
Plywood
People often ask the question: “How to make a cabinet out of plywood with your own hands and will it be appropriate?” Essentially, plywood is slabs of natural wood that are glued together under pressure and temperature using a special resin. Due to the wide range (depending on grade, format and thickness), the material is suitable for the production of a wide variety of furniture.
Types of interior wooden partitions
A wooden interior partition is a simple design that you can make yourself if you wish. In private construction, 3 types of partitions are usually used, each of which has its own design features.
Frame-panel
This is one of the most common options for wooden partitions, which provides additional heat and sound insulation of interior spaces. From the name it follows that such partitions are made on a frame basis, then sheathed with panels.
For the frame, a beam with a cross section of 60 x 100 mm is usually used, which forms a horizontal and vertical frame. The distance between the elements can be calculated based on the thickness of the insulation, which will fill the free space. For these purposes, mineral wool or polystyrene foam is usually used.
The following options are suggested for wood cladding:
- plywood. A practical and affordable material that is easy to process and install, however, plywood can delaminate over time, so it is not suitable for rooms with high humidity;
- Fiberboard. Fiberboard, which is made from wood processing waste and cellulose by hot pressing. The composition often includes fire retardants, polymer additives and antiseptics;
- Chipboard. Chipboard, which is made on the basis of shavings and sawdust, the connecting link is resin or formaldehyde. The products cannot be called environmentally friendly, although the manufacturers claim that the content of volatile compounds complies with the standards. Chipboard is not recommended for the construction of partitions that are planned to be subsequently moved or installed in the nursery. Damage always remains in the fastening areas; the fibrous structure does not hold fastening elements well.
When choosing wood siding, you can pay attention to OSB - oriented strand board, which is a strong and durable material. Disadvantages include high cost and dependence on a humid environment
Carpentry
This is a paneled structure that usually does not require finishing, which provides significant benefits during construction work. In production, valuable wood is usually used, which is coated with several layers of varnish.
Here you need to take into account that such partitions do not require the use of insulation, and therefore are not able to provide the premises with heat and sound insulation. The design performs a purely decorative function and is used for zoning space, for example, separating the dressing room from the total area of the bedroom.
Solid
Solid partitions are built from the material that was used in the construction of the house (timber, logs, frame structure), therefore they have a fundamental appearance, although they do not heavily load the base. The structural elements are fastened together with metal spikes, giving the wall additional rigidity and stability. The partition is connected to the load-bearing bases using triangular bars and nails.
Thermal and sound insulation indicators directly depend on the characteristics of the lumber, but if desired, they can be increased by stitching the surface with foam plastic.
Furniture making
The process of creating a cabinet depends on the chosen material (the difference is insignificant). You need to choose what to make from based on the purpose of the furniture:
- A do-it-yourself laminated chipboard cabinet is perfect for the kitchen;
- for a small wardrobe you can use ordinary wood chips;
- if we are talking about a wardrobe, plywood is the best option;
- For large wardrobes it is appropriate to use furniture panels.
As for wood, this is a universal option for any furniture, therefore, as an example, let’s consider a do-it-yourself wooden cabinet.
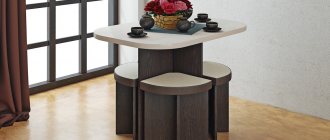
A simple DIY table made of wood and ready-made furniture legs
This option is even simpler, including because the master is not limited to certain sizes.
Ready-made furniture legs are made of wood and/or metal, can be single or in the form of flat/shaped supports, smooth or with decoration.
In some models, the height can be adjusted (within certain limits) using a thread or a telescopic mechanism.
A mounting platform or a single mount allows you to mount such legs on almost any tabletop. One limitation is that it must be solid, not prefabricated. The national team will need kings.
7ccef1cc1b60697ec5aacbd4331f76aa.jpe
There is an interesting nuance when using such legs. A small supporting area requires mandatory reinforcement of the wooden tabletop, so after marking the fastening points, special washers are driven into these places.
Threaded parts are then screwed into them.
Unfortunately, this assembly method does not ensure the stability and strength of the table - in soft wood (for example, in a furniture panel made of pine), the fastenings do not hold well, and the table quickly begins to wobble.
A more reliable option is to assemble using carpentry joints reinforced with glue and/or self-tapping screws.
Step-by-step instruction
1
2
3
Start by creating a diagram. Consider carefully:
- what is furniture for?
- what material will it be made of?
- where will it be located;
- take measurements;
- make a drawing,
- Add dimensions and internal content to the drawing.
Pine furniture is popular. The frame can be assembled from timber or boards. First, we treat the material with an antiseptic and cover it with special products to protect it from moisture and scratches. If you want to add color to the furniture, painting should be done immediately, before you start assembling the box. Manipulations with coloring agents are best carried out in a dry place protected from drafts. Once all the coatings have thoroughly dried, you can begin preparing the tools and assembling the structure. What you will need:
- boards (timber if necessary):
- screwdriver;
- nails;
- self-tapping screws;
- corners for furniture made of aluminum;
- confirmation;
- roulette;
- building level.
1
2
3
We place the floor of the future structure and the side parts in the place where the furniture will be located next. At the “bottom” we mark places for future fastenings and make holes using a drill or drill bit with a diameter of 0.4 centimeters. This size is suitable for confirmation fastenings. We install the side parts, the central partition (there may be several of them) to the floor and fasten everything together using confirmations. Afterwards, we attach the lid and the top shelf. We make sure that it is evenly placed using a building level. We align the diagonals and proceed to attach the back wall, starting from the bottom up. This step-by-step process will allow you to evenly attach a sheet of plywood or chipboard (from which the back part is usually made).
To make the structure and place it in the correct position, it is better to use a laminated chipboard rib.
If open shelves are thought out in the drawing, we make them first, starting from the top. We use 2 confirmations on one side of the product and 2 on the other.
Important! We place the lower stick at the bottom level and secure it with dowels; other options are not appropriate.
Required materials and tools
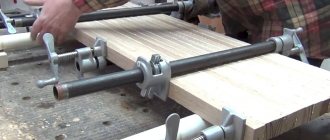
To make a wooden cabinet, use solid pine boards, plywood or chipboard (MDF). If we are talking about the last two items, then when making blanks it is enough to cut out parts from a large panel. Pre-glue the boards into panels using epoxy resin or wood glue with strong fixation with clamps.
Also consider what materials you will need:
- paints and varnishes;
- glue;
- stain;
- putty for wood;
- height-adjustable legs;
- pens;
- loops.
The list of required tools includes:
- hacksaw or electric jigsaw;
- grinding machine, sandpaper;
- tape measure and square;
- building level;
- screws, metal corners, dowels;
- brushes, rollers, foam sponges, small spatulas.
If you plan to produce paneled facades, you will need a milling machine and skills to work with it.
As for the door
A do-it-yourself pine wardrobe should have a sliding system. The facades are sold ready-made, which means there should be no problems with installation.
Step-by-step installation of a sliding system
We begin to build in the guides. We fasten them at the top and bottom with screws. We install plastic wheels on the lower frame of the door, and rubberized ones on the upper frame. We install stoppers into the rails and insert the facade into the guides. First we install the top, then press the door into the guide below. We attach a strip of skewer to the side. The main box is ready.
What type of wood to choose
One of the most critical stages is the choice of source material. Each type of wood is endowed with special mechanical and physical qualities. It is necessary to know the features of different types in order to determine which one is ideal for solving a particular problem. All wood can be divided into two categories - deciduous and coniferous.
Hardwood
This series contains the most valuable species, endowed with extraordinary strength, high density, expressive texture and attractive natural shades.
Wood has the highest value:
- beech;
- nut;
- mahogany.
If there is no reason to spend money on expensive raw materials, you can get by with more affordable ones
Pay attention to the advantages:
- cherries;
- oak;
- ash
These rocks also have high strength, but will not require such significant costs as representatives of the first category.
Oak wood is very durable and resistant to rotting. Due to the content of tannins, which react with dyes during etching, it allows you to achieve intense color effects. Processing the material is not difficult - it lends itself well to simple tools. Making parts of unusual, curved shapes from it is not a problem.
Ash is as hard and durable as oak. However, this material requires regular treatment with antiseptic compounds. Otherwise, when the first wet season arrives, it will begin to rot.
Conifers
Coniferous wood never loses its popularity. This is explained by its availability and a wide range of positive qualities. The most popular materials are those made from pine, followed by spruce.
The strength characteristics of pine are slightly lower than those of deciduous trees. This disadvantage is more than offset by high resistance to biodegradation, mold and mildew, excellent thermal conductivity and extraordinary flexibility during processing. High air and moisture permeability guarantees decent quality of treatment with protective compounds.
369f2b0d09f6bb42f5bc293b3f013721.jpe
0c876577b8227692eb88115b44330baf.jpe 034219d47ce08496ac51c87ea38cf87c.jpe
Spruce is more susceptible to rotting compared to pine, but has less hygroscopicity and thermal conductivity. Products made from this material retain their original shape much longer.
If you choose between these two species, you should give preference to pine.
Regarding filling
It all depends on the number of things that are planned for storage.
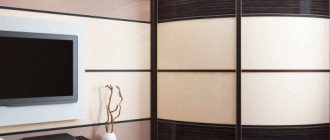
Wooden wardrobe with TV stand
The mezzanine at the top is used to store rarely used items. In the lower part you can place shelves or a net for shoes and drawers for underwear. Wide and narrow shelves are used to store clothes, and a rod is used to place hangers.
Showing your imagination, you can make a cabinet out of wood, placing a work area in the middle. An interesting option would be a sliding wardrobe made of solid wood with space for a TV or a corner cabinet made of solid birch for a children's room. Depending on the facade, the furniture will fit into any interior. You can place a photograph or drawing on the doors, which will be relevant in the modern style, or add modeling in a classic style. It is not uncommon to use a stained glass pattern or a completely mirrored facade.
How to make a balcony cabinet on a wooden frame
First, cut 4 racks to the required height of the cabinet. If you plan to make it all the way to the ceiling, measure each one separately, rather than cutting identical ones. The height is often quite different. The cut racks are fastened. The distance between them determines the depth of the cabinet, but most often depends on the available space. As much as there is, so much is used.
If there are three blank walls there are no problems. The bars are attached to dowels. Place the block against the wall, check its verticality, and drill holes through for fasteners in the right places. The plank is removed and plastic plugs from the dowels are inserted into the holes in the wall. Having installed the bar in place, screw it to the wall.
Examples of mounting racks
If you are making a cabinet on the balcony, one side is attached to the wall, and the other - to the frame elements or only at the top and bottom - to the ceiling and floor (we use reinforced metal corners).
Another option for such a case is if you need to cover the window glass with something - put a wall near the window (for example, from laminated chipboard), fix it at the bottom and top with corners to the floor and ceiling, and then attach it to the wall (and to the flow and the floor) frame bars.
Place a side panel made of laminated chipboard near the glass, and attach shelves to it
Then cross bars are nailed to the posts. They give the entire system a high degree of rigidity and the shelves will rest on them.
Option with shelves extending all the way to the glass
The knot is larger
To avoid wasting space near the glass, this part is also occupied by shelves. Since the width of the furniture varies, two separate small cabinets are often made: for the lower and upper halves. They often also differ in depth: the bottom one can be made wider and heavier and larger items can be hidden there. In this case, the upper cabinet can be made less deep. In this case, the top of the lower cabinet can be used as a tabletop.
Can be made from two parts of different widths, and maybe depths
Another option for a two-part loggia cabinet and an example of its use
Next, it’s just a matter of what and how to make the doors. The best option is to make sliding ones. Their diagram is in the figure. There are a lot of spare parts, but you can figure it out.
Sliding door equipment
Recommendations for DIY
So you have learned how to make a cabinet yourself at home, but before you get started, read the basic recommendations:
- To create a drawing, you can use a ready-made photo of the structure and diagram, adding your own dimensions and additions to them if necessary.
- For a homemade pine cabinet, you need to use a special coating in several layers.
- If there is a need, the facade of the structure or the painting can be changed, but this requires additional manipulations, which will take a little more time.
- If you don’t have a lot of money to buy materials, but you have old cabinets or boards stored in the attic at the dacha, these are also suitable as the material used.
Be patient when starting work. Unfortunately, it won’t be possible to accomplish everything in one day.
Frame partition
A frame-sheathing partition is the simplest and most economical option.
To mount frame interior partitions with your own hands, you need to prepare a frame made of wooden beams. The dimensions of the beam will depend on the size and weight of the future partition.
For load-bearing beams and frame ribs, timber of the same section can be used. Using timber of a smaller cross-section for the internal ribs under the cladding will reduce the cost of the structure. The following tools and materials will help you make partitions with your own hands:
- Level. Plumb. Pencil. Drill. Saw. Screwdriver. Self-tapping screws or screws, mounting dowels. Metal corners. Screwdriver. Bars: for vertical and horizontal racks.
This will make it possible to avoid further subsidence of the floor at the installation site of the partition.
It is better to install partitions on the subfloor.
The best option is if the wooden partition is installed on the subfloor, and not on the finishing coating. In this case, all the logs are clearly visible, and if the need arises, an additional beam can be installed using crossbars.
The guides can be attached to the floor in different directions: along the beams or perpendicularly. If the room has high ceilings, then the weight of the partition will be considerable.
Therefore, the base needs to be strengthened, for which an additional beam must be installed. If interior partitions are mounted on the second floor, then in this case it is better to build a lighter structure. This will allow you not to worry that the beams will bend under the weight of the partition and the geometry of the house will be disrupted.
The next stage of work is marking.
A stretched cord will allow you to mark a straight line along which the guides will be attached. Fastening begins from the ceiling, then guides are installed on the floor and walls. The frame ribs are installed at a pitch that corresponds to the width of the sheathing sheets, but no more than 600 mm apart.
During work, you must constantly use a level and plumb line and check the accuracy of the installation. When the frame is mounted, all its parts must be carefully treated with antiseptic impregnations to protect the wood from drying out, fungus, and mold.
The space between the internal ribs is filled with insulation. To fasten it, you can use a special mesh, stretch steel wire between the slats, or use any other convenient method. Then sheathe the partition with the selected material.
The interior partition can have a sliding design. To do this, you need to purchase moving parts. They can be installed on the outside of either side of the partition or secured inside.
Drywall is not always involved in dividing a room; often a novice builder is faced with the question of how to make a wooden partition with his own hands.
Such structures have special characteristics, and they are not difficult to build. Let's try to make a wooden partition together with our own hands.
Drawing of the future cabinet
The design drawing is of great importance for all further stages of product creation. It is compiled taking into account the size of the closet itself and the layout of the apartment. The purpose of the cabinet also matters in choosing a model and working out the details of the drawing. If you need a cabinet, for example, for tools, you should make it wider and lower, and if for books - high and narrow. Next, you need to decide on the number of shelves and compartments, and for this you need to know what will be stored in the closet.
The cabinet has a unique design.
Of course, it’s unlikely that you’ll be able to do everything perfectly the first time.
After the cabinet model has been selected, it is necessary to transfer its plan to paper and depict it in the form of a drawing. First, the frame of the future product is designed, the dimensions of the walls, doors and bases of the cabinet are indicated. Then you need to depict the shelves and the internal components of the product, indicating the length and width.
It will help place all the necessary things in the room, and with its originality will add a touch of extravagance to the living room.
Today, about 40 types of wood are used to make furniture, which have different characteristics.
Peculiarities
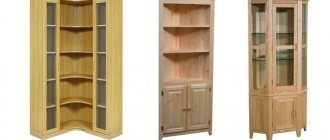
Wooden cabinets fit perfectly into any interior. This allows them to be used both in city apartments and in the country. It is enough to correctly calculate the dimensions and determine a suitable design that will be an ideal complement to the appearance of the room.
Wooden cabinets have many advantages:
- environmental friendliness - only natural material is used that is not subject to chemical treatment;
- heat and water resistance - when heated or wet, the cabinet will not lose its properties and will not be damaged;
- variability - you can create your own unique closet with maximum convenience and ideal design;
- decorations – wooden furniture can be decorated with carvings, paintings or various inserts;
- placement methods - the cabinet can be built in to save space or placed in a classic way;
- possibility of disassembly - wood allows you to disassemble the furniture many times if necessary;
- elimination of damage - if scratches or chips appear, it is enough to sand the damaged area and treat it with paint, mastic or putty.
Creating a wooden cabinet yourself is not difficult and does not require large financial costs. In some cases, the process of preparing parts and assembling evokes such pleasant emotions that it turns this work into a hobby.
Important! In order for the cabinet to have all the properties inherent in wood, you should purchase materials from trusted stores where they were stored properly.