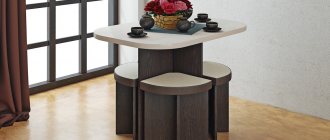
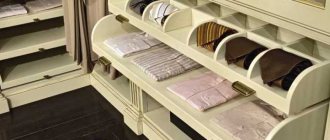
Regardless of the size of the apartment, you always need a place to compactly store a huge amount of things - clothes, shoes, linen, books and many other necessary (and not so necessary) things. And such a place is a closet.
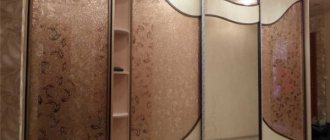
The ideal option is a coupe - it saves space in the absence of swinging doors, it is spacious, and the design can decorate any room. Mirrors will visually enlarge the space, MDF inserts will make the interior unique, and soft triplex with a pattern of your choice will turn your furniture into a work of art.
DIY sliding wardrobe for the hallway
Which wardrobe should you choose? The answer is simple. If you have settled in your home seriously and for a long time, if you do not like rearrangements, if there is a free niche that you definitely want to use, then you need a built-in one. But if moving is still possible and you, due to your character, have a hard time parting with your favorite and comfortable things, then your choice is an ordinary cabinet made according to your individual project.
Furniture, in the construction and design of which everything is thought out by you and for you, is more than a piece of furniture: it is your creation, your pride, a way to express your individuality.
You can, of course, just go to the store and buy an option that more or less suits you in color, filling, size and price. One of tens of thousands produced on the conveyors of furniture factories. You can order production according to an individual project in one of the many showrooms. Or you can do it yourself, putting a piece of your soul into a thing that will be before your eyes every day. In one piece of furniture, realize yourself as a designer, constructor, sawmaker, assembler. And let some of your friends not like your creation. This is YOUR work and no one has the right to criticize it.
Step. 1. Decide on the type - built-in or cabinet-mounted.
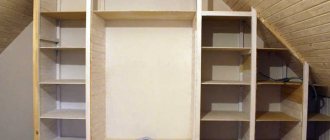
Built-in
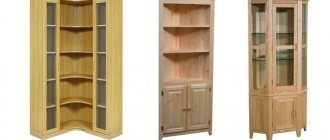
Built-in corner wardrobe
Advantages
- Mounted in niches and closets, it saves space significantly. Here you can compactly store a variety of things - from jars of jam and tools to items of daily use.
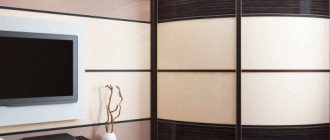
- Thanks to the design of sliding doors, the niche disappears, the angularity of the room disappears, and in its place a unique interior detail appears.
- There is no empty space between it and the wall - a place where dust constantly collects.
- It’s easier to make a built-in wardrobe – there are fewer parts, since the shelves are attached to the walls.
- Sockets and switches can easily be placed inside it.
Flaws
- The built-in one is absolutely non-transportable, and even if you decide to disassemble and transport it to another room, converting it to new dimensions will take a lot of time, effort and nerves.
- It does not have a back wall and you will need to prepare the niche before installation.
You can make a built-in wardrobe without having a niche with two main walls. It can be partially “built-in”. Its design may include a sidewall or a roof.
Hull
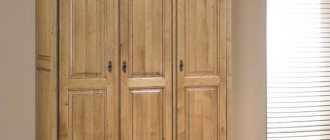
Double door wardrobe
Advantages
- Can be installed in any convenient place in the room or hallway.
- Can be used as a partition in a room to zone a room.
- No additional wall preparation is required. On the contrary, a closet can be used to cover up wall imperfections.
Flaws
- “Excess”, unused spaces: between the ceiling and the roof, between the side wall and the wall.
Assembly
Assembling the structure
To assemble the cabinet you will need:
- Pencil and rectangle.
- Drill and drill bits 5 and 8 mm.
- Roulette.
Tools
Instructions:
- To assemble parts into one complete structure, purchased confirmats are used. First, we look at our project and mark the attachment points.
- When all the parts are marked, we begin the drilling process. For holes in the plane we use a drill with a diameter of 8 mm. The hole must be through. The depth of the hole at the ends is no more than 60 mm, and the diameter is 5 mm. In the places where the floor supports are installed, we make holes at several levels. When the cabinet is ready, you can safely move your shelves to the desired level.
- To assemble the structure you will need the help of one person. The work will go faster and the build quality will be better. We connect all the parts of the cabinet and install it in place. We level the cabinet using a level.
- Now you can begin installing the facade. We screw the upper guides along the edge of the cabinet lid. We retreat from the edge of the bottom of the cabinet a maximum of 10 mm and secure the lower guides. Before tightening the screws, insert the stoppers into the roller track.
- Now the two of you can install the facade in place. One person moves the upper part of the facade into the guide, and the other sets the wheels in the desired track. A hex wrench is used to adjust the front. The adjustment screws are located at the bottom of the façade end. By raising or lowering the lower roller, we set the façade to the desired position.
Completing of the work
When the wardrobe is loaded with things, the adjustment will need to be repeated. The work on installing the wardrobe has now been completed. Now you can proudly consider yourself a master and try to assemble a more complex structure. We already have experience, which means the assembly will be much faster and of better quality.
Do you want to share with us your experience assembling a wardrobe? Leave comments on the article. Our readers will be interested to know the secrets of your successful cabinet assembly.
Video: assembling a wardrobe
We invite you to watch a video on assembling a sliding wardrobe.
Step. 3. Choice of material.
Main material
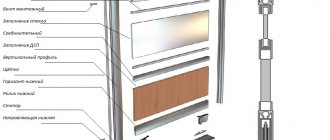
- The most common is laminated chipboard (LDSP). This is a very practical material. It is easy to process and affordable. The variety of colors provides ample opportunities for design solutions. Laminated chipboard is manufactured industrially. The sheets have different sizes and thicknesses. For production, slabs with a thickness of 16 mm are used, and for inserts in doors - 10 mm thick.
- 3.2mm thick fibreboard (fibreboard) is suitable for the back wall;
- MDF is beautiful, durable, more environmentally friendly, used for making furniture in rooms with high humidity, but a much more expensive material;
- Wood is the most environmentally friendly of materials, but, unfortunately, it is poorly suited for the manufacture of wardrobes.
- Due to its fragility, drywall is generally not recommended for furniture making.
Sliding door system. Currently there is a fairly large selection of different systems on the market:
- aluminum;
- steel;
- hanging;
- frameless, etc.
Each of them has its own advantages and disadvantages. For example, in aluminum systems, convenient vertical handle profiles are ideal for hallways and children's rooms. Steel systems are distinguished by their elegance, which is especially important in the bedroom. Hanging systems will fit perfectly into the interior, where they should be invisible.
Sequencing
First decide on the location where it will be installed. Find the options that you think are most suitable on the Internet and compare them with your capabilities.
Keep in mind that this design implies the presence of three walls around the perimeter; make a drawing using the above text.
At least one side will be visible from the room. Therefore, it is better not to use used materials; it is not difficult to buy laminated chipboard for these purposes.
Choose a color, order cutting, this will add to the cost of the product, but keep in mind that it is not advisable to saw this material by hand, chips will form along the edges, which cannot be hidden.
Do-it-yourself stone tabletop: step-by-step master class with photos! Preparatory work, drawing creation, materials and toolsDIY wall clock: 80 photo ideas for inspiration. DIY wall clock design - bright clocks made of plastic spoons, clocks with a moon print, eco-clocks made of moss, cork wood, knitted cuckoo clocks, clocks made of a piece of plywood
DIY rocking chair: types of rocking chairs and materials, process of making a rocking chair. 75 photo ideas on how to make a beautiful and comfortable chair yourself
You can save on gluing the edge tape; it is easy to apply at home using an iron or soldering iron.
Consider the zoning of the compartments; they should be accessible when the door is open, see the chapter drawings.
For internal partitions and shelves, used materials that are collecting dust in your garage are quite suitable. This version of the product involves the use of a sliding system with lower support rollers, upper and lower guides.
The peculiarity of this particular product is that the compartment doors will work in the space limited by the walls of the closet, so when calculating the dimensions, apply the above information.
Built-in wardrobe
The most convenient way is to make preliminary markings directly on the walls of the niche with a pencil. This will make it possible to avoid errors in the dimensions of parts.
For example:
- top shelf = width of the niche x depth of the internal filling (that is, the depth of the cabinet minus the door);
- stand = niche height – top shelf height – material thickness;
- shelves on the right = (niche width/2 – 5-10 cm) x depth;
- shelves on the left = (width of the niche - shelves on the right - thickness of the material) x depth.
Additionally you may need
| Side stands: | strip 3 = niche height x 7 cm, strip 4 = niche height x 10 cm. |
| Base: | strip 1 = (niche width) x 7 cm – 2 parts, strip 2 = (niche width – one or two side posts) x 10 cm – 1 part |
Additional parts are needed if it is not possible to level the side walls and floor. The rectangle in which the sliding doors will be mounted must be perfect. This can be achieved by installing a box for them in whole or in part. If the walls are uneven, gaps between the walls will be visible, and if the floor or ceiling is uneven, the door may even jam or jump out of the grooves, not to mention opening and closing spontaneously - it will slide down the slope under its own weight.
Cabinet wardrobe
Decide:
- how will you attach the back wall made of fiberboard if it is located in a niche, from wall to wall, and if there is no answer, then you should consider the option with a built-in wardrobe where there is no back wall;
- whether your cabinet will rest on legs or on sides;
- what type of sliding door system you will use.
Carefully read the instructions for this type of door, paying special attention to the maximum and minimum permissible dimensions. The durability and reliability of the system itself depends on this.
Direct drawing. Armed with a ruler, a pencil and an eraser, proceed to the most important part of the work.
Let's consider the option with support on the sidewalls.
Main material parts:
- roof = cabinet length x depth;
- support = (cabinet depth – thickness of material for the plinth – 20 mm – width of the plinth) x height of the plinth;
- back wall (fibreboard) = (cabinet height – base – 2-4 mm) x (cabinet length – 2-4 mm);
- sides = (cabinet height – material thickness) x depth;
- bottom = (roof width – two material thicknesses) x depth;
- base = cabinet length - two thicknesses of material) x 70-100 mm;
- rack = (cabinet height - base - 2 material thicknesses) x (cabinet depth - doors);
- shelves = (cabinet width – 3 thicknesses of material – width of the adjacent niche) x (cabinet depth – doors).
Here it is worth paying attention to the fact that the doors of the wardrobe are wider than 1/2 of the internal width, there is an “overlap” of the doors, and if you plan baskets or drawers, they simply will not move out of the closet, that is, the size of the niche with shelves under the baskets should be less than half.
Attention! Do not leave the roof unsupported by a support; it may sag.
Preparing for assembly
Once the finished parts have been delivered, you can begin preparing them for assembly. You will need an iron for this work. Carefully attach the purchased edge to the end of the part so that the beautiful side is on top. Carefully walk over it with a heated iron. Make sure the iron is not on steam mode.
Press the heated edge well and wipe thoroughly. Carefully sand the cut edges with sandpaper. There is no need to rush when preparing parts. Try to achieve the highest quality of work so that your wardrobe looks neat and beautiful.
From the base parts, assemble the base of the podium for the bottom of the cabinet. The base must be present.
Step. 9. Detail
Table of parts for making a cabinet
Based on the finished drawing, make a list of parts indicating their dimensions (specification).
Mark the parts whose ends need to be covered with a decorative edge and, taking into account the thickness of the edge, adjust the dimensions of the parts.
Mark the parts where you need to make “cuts”, for example, under the baseboard on the sidewalls.
Accessories
Everything related to the facade has already been ordered, but for the interior design of the cabinet you need to purchase furniture fittings. For our project you need to buy:
- For fastening hardboard using self-tapping screws or nails.
- In the middle compartment of the cabinet, to adjust the height of the shelves, you need shelf rests.
- Confirmations dimensions 70x5 mm.
- Rod holders.
- Self-tapping screws measuring 16x4 mm.
- Two rods for hangers measuring 775 mm.