Repair and decoration
06/04/2018 Anastasia Prozheva
In a small apartment, even a family of 3 people can feel cramped, especially if there is a child. Children need more space to play; there is a need to allocate a separate sleeping place for them in order to save some space. To solve this problem, you can make a loft bed for your child. And this can be not just a comfortable sleeping place, but an entire home sports complex.
Bed frame assembly diagram.
Loft bed: basic options
Before you assemble a loft bed, you need to familiarize yourself with the available options.
A loft bed is an excellent solution for small apartments, which makes it possible to save a lot of space in the room.
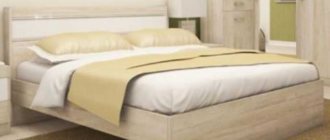
This design is a full-fledged sleeping place, installed at a height of about 180-190 cm from the floor, which is climbed using a vertical or inclined ladder.
To build a bed, sanded dry boards are needed.
Thus, such a bed does not take up space on the floor, so under it you can place a table, a sitting area, shelving, or use this space in some other suitable way. you can make a loft bed with your own hands. The instructions for the bed allow you to assemble it quickly and with minimal investment of time and money.
Most often, such structures are placed in the corner of the room, between 2 adjacent walls. The bed itself can rest on 2 or 4 racks. In the first case, the side opposite the racks is firmly fixed to the wall. An option is also available without posts at all: in this case, the bed is supported using a special mount screwed to the ceiling.
Sometimes the loft bed is not located in the corner, but only one end is adjacent to the wall - in this case, there are also design options with 2 or 4 posts.
Like ordinary floor beds, loft beds can be used for both children and adults. If you are going to make a loft bed for adults, then, of course, you will need more materials. In general, such beds are made from natural hardwood, but there are also options with a metal frame.
Related article: Different ways to install kitchen sinks with your own hands
Return to contents
Metal models and prices
In the photo there is an Ikea metal loft bed.
The issue of strength when looking at the metal structures of beds for adults is not relevant. Indeed, the metal pipes from which the bed frames are made are quite reliable and can withstand the constant loads of 2 adults.
This is interesting: A double loft bed is a rational solution for a small room
The metal frame is decorated with wooden overlays
Popular loft bed for adults Ikea - SVERTA model
Regarding the cost of metal furniture:
- Ebay and Amazon trading platforms the price range is from 185 to 375 Euros. As a rule, this price does not include the cost of a mattress and sofa.
Typical item on the Ebay marketplace
- Manufacturers in Russia sell furniture in the range from 9.8 thousand rubles to 24.5 thousand rubles for a metal model.
Offers from domestic manufacturers on the Russian market
Loft bed: highlights and design features
To build a bed you will need plywood.
Loft beds with 2 tiers are always equipped with high sides. A special ladder is securely attached to the bed, which, as a rule, can be rearranged without any problems. A loft bed with a work area can be made of solid wood, MDF or chipboard. Of course, the cheapest to manufacture are models made from particle boards, but in terms of environmental safety they are significantly inferior to furniture made from real wood. To maintain a child’s health, it is best to make a bed with a work area made of pine. It will serve perfectly for 10-15 years without cracking, deformation or warping. And the pleasant smell of pine and the special healing properties of wood will always have a beneficial effect on the child’s well-being and mood.
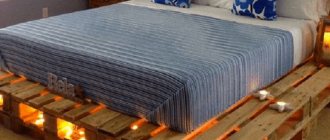
Loft beds with a work area can combine everything a child needs for learning and playing. Such a bed can be wide or narrow, high or low, and can be complemented with various elements for the user’s comfort. A loft bed with a work area is equally suitable for boys and girls. The play area on the lower tier can be easily fenced off using a light chintz curtain, which will provide the child with his own cozy corner in which no one will disturb him.
Return to contents
DIY loft bed: stages of work
At the stage that precedes drawing up the drawing, you need to decide what design your bed will be. This instruction describes the procedure for making a bed located in the corner of the room and supported by 4 posts. A wooden inclined staircase adjoins the end of the loft bed. The option of making a sleeping place for an adult is being considered. A bed for a child is made in the same way, only the bed itself is made smaller.
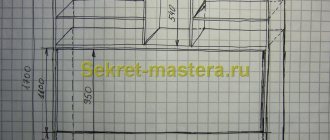
Loft bed dimensions.
The height of the posts is about 185 cm, and the dimensions of the bed are 195x70 cm. All materials used to make the loft bed must be of high quality, smooth, dried and with a minimum number of knots.
A very important stage of the work is drawing up the correct drawing. A drawing with all dimensions is not only a design project for a future bed, but also a diagram of the assembly of the product, which will help you imagine it in space and not get confused during the work process. The design of such a bed can be very diverse. It all depends entirely on your own preferences. After drawing up the drawing, the stages of purchasing materials, manufacturing parts and assembling the product follow.
Related article: Which is better: plywood or drywall?
Prepare the necessary tools and materials. You will need:
- Board 20 mm thick.
- Board 30 mm thick.
- Beam with a section of 22x22 mm.
- Beam with a section of 40x50 mm.
- Beam made of hard wood (beech) 30 mm thick for crossbars and overlays.
- Dowels.
- Countersunk head screws.
- Semicircular wedges made of oak or beech.
- Matt lacquer.
- Wood glue.
- Finishing nails without heads.
- Matt lacquer.
- Sander.
- Electric hacksaw.
- Hammer.
- Screwdriver and drill.
- Ruler.
- Pencil.
- Roulette.
- Clamps.
- Paint brush.
Return to contents
Required tools and materials
It is much easier and faster to make a wooden loft bed with your own hands: wood is much easier to process, has less weight and looks more attractive. A metal structure requires experience with a welding machine.
The bed frame should be made of wooden blocks and boards. MDF, fiberboard or chipboard of low-emission class are used for the manufacture of chests of drawers, shelves, tables, and so on, if they are provided on the first level. The most affordable wood is pine, preferably first grade.
Structures made of beech or oak are very durable, but such material will be much more expensive.
- For the frame you will need a wooden beam with a cross section of 100*100 m or at least 80*100 mm.
- Slats for cladding, railings, stairs, 20 or 30 mm thick. It is better to purchase planed boards, and order cutting of the material on the spot.
- The bottom of the lounger can be made of plywood, but still, the best option is a slatted bottom with batten holders. You can buy it at any furniture store.
For fasteners you need: screws, preferably with a countersunk head, finishing nails, wood glue.
The set of necessary tools includes the following:
- circular saw or jigsaw;
- screwdriver or drill with attachments;
- hand sander or fine-grain sandpaper;
- hammer and clamp;
- tape measure, ruler, level.
The finished product will need to be opened with varnish - transparent or matte, to taste.
If desired, you can treat the wood with stain to give it a different shade.
Photo of a self-made loft bed
Making the base and stairs
Drawing of a bunk bed.
The base of the loft bed is a structure of 2 side transverse frames connected by longitudinal parts, and 1 additional post. The side modules are assembled using tenon joints. The crossbars are successively located at a height of 31.5 cm, 60 cm and 98 cm. The longitudinal boards are connected to the transverse parts.
After the base is assembled, holes with a diameter of 10 mm and a length of 15 mm must be drilled in the upper ends of the racks, into which dowels measuring 1x3 cm will be glued.
To assemble the stairs, it is necessary to select grooves 42 cm deep and 30 mm wide at the inner ends of each rack. Beech beams are glued into them.
The climbing ladder will be located at the end. Because the angle of inclination of the stairs is very small, for greater convenience the steps should be placed at a short distance from each other (especially if it is a bed for a child). The crossbars themselves must be made very stable and wide enough.
During construction, one very important point must be taken into account: the distance between the side rails and the width of the stairs in the place where a person will climb must be such that the forearms of the immediate owner of the bed can freely fit, otherwise climbing and descending may become, although small, quite sufficient an unpleasant problem.
Return to contents
What is a loft bed and what types of designs are there?
The “loft” design is a type of bed that is located at a height of about 1.5-1.8 meters, thanks to which the space below can be used for other purposes. You can make such a product with your own hands, but to do this you need to have at least minimal skills in working with furniture.
Initially, you need to decide on the type of fastening of the structure of the future bed - one or another option should be chosen depending on the purpose of the product.
Table 1. Types of bed fastenings
| Mounting type, illustration | A comment |
On four supports | This is the standard and most common way to install a loft bed. The entire structure is supported on four legs, which allows it to be moved periodically. This type of fastening is suitable for those who plan to move the bed to another part of the room in the future. |
Fastening to the wall and on two supports | This type of fastening allows you to obtain a very stable structure, but its main disadvantage is the inability to further move. Therefore, even before purchasing or manufacturing, it is advisable to immediately decide on the location of the bed. |
Ceiling mount | This is the most original option for installing a bed, which allows you to completely eliminate the presence of supports that clutter up excess space. It should not be forgotten that this type of fastening requires only strong ceilings, otherwise the structure may collapse at any time. |
The first design option is the most popular, especially among beginners. It is worth choosing it in cases where it is not possible to mount the frame directly to the wall or ceiling.
An important feature of all types of beds is the staircase. It can be installed in a straight position or slightly inclined. In the second case, the design will be safer and suitable for children. It should be taken into account that it takes up more free space.
It is easier and more convenient to climb up an inclined ladder
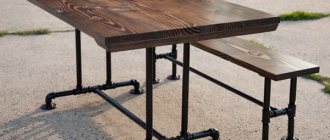
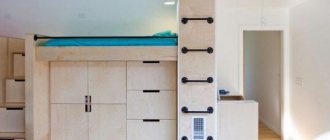
In any case, there remains an additional area below the bed that can be equipped for your personal purposes. There are the following options for using free space:
- Wardrobe and table. In this case, it is necessary to install doors on the side of the structure, and in the remaining space there will be a small table.
- Shelves and drawers. Free space can be delimited using longitudinal and transverse partitions. This will create one closet below that can accommodate a large number of things.
- Desk. If the bed is located at a distance of 180 centimeters, then a large table can be arranged under it. In this case, the need to install additional lighting fixtures should be taken into account, because the structure creates a shadow. That is why it is recommended to place such a bed closer to the outlet.
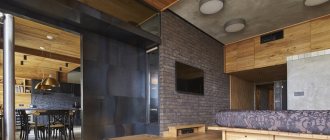
- Sofa. In the remaining space you can install absolutely any furniture, including a sofa. So, it can be used for watching TV, reading and as an extra bed.
- Wardrobe. Such an area can only be located under a high bed. Typically, a dressing room involves installing open and closed shelves. If necessary, you can hide this space from prying eyes using a curtain.
An example of organizing a dressing room in a free area under a loft bed
The following staircase placement options are available:
- On the front of the structure on one side.
- At the end of the bed - in this case, bumpers are installed along the entire perimeter of the front side of the product, and space is left at the end for a ladder.
- Retractable ladder - this option is chosen only in rare cases when making a structure with your own hands, despite the ease of installation. The module is a type of steps (sometimes with drawers), and it extends by installing special rollers. Fixation to the base in this version occurs using metal loops and hooks. The advantage is that the module can be easily pushed in and out if necessary.
- Staircase with podium. This is another safest and most popular staircase option for children. The height of such a podium with railings will be half the size of the bed itself, resulting in a miniature staircase at an angle.
Options for installing bed ladders
Assembly order
After all the dimensions have been calculated, you need to cut out the parts. you can do it yourself or ask a craftsman at a large building materials store. After this, you need to fit them to each other and assemble the product from finished parts.
Assembly drawing for a bunk bed.
The end posts of the bed will be fastened on 3 sides with bonding boards located at a distance of about 20-30 cm from the floor. To do this, it is necessary to make nests on the side posts with a depth of about 25 mm. Wooden tenons are provided on the embedded parts. Before connecting the elements, the joints should be coated with wood glue. Using a similar scheme, a frame for a berth is created.
Related article: Paint consumption per 1 sq. m of surface depending on the texture and density of the composition
The base for the berth is reliably strengthened and given sufficient rigidity. For this, long slats (2-3 pieces) are used, laid and securely fastened lengthwise. On them there are transverse boards laid from side to side.
Restrictive bars must be provided on the long edge of the loft bed, which is not adjacent to the wall. The angle of inclination of a ladder placed at the end of the bed will be quite small, so it makes sense to use wide boards to make the side rails and the ladder itself.
At this stage, the main part of the work is completed: the frame is made. If you used fresh wood, then after assembling the product and checking it for stability, you need to sand it and cover it with stain. After the stain has dried, the bed should be coated with furniture varnish.
Return to contents
Loft bed: pros and cons
The design of the bed, located not on the floor, but under the ceiling, has certain advantages:
- the most obvious is saving space, from 2 to 3.6 sq.m;
- interesting and modern design that fits well into the interior of a nursery or young people’s room;
- multifunctionality - under the bed you can place a sofa, workplace, wardrobe, dressing room;
- can be used by choosing a model with drawers in the steps.
However, there are also disadvantages:
- first, such a bed will in any case be less safe than a traditional one, even with a gentle staircase, railings and sides;
- some owners of such sleeping places complain that the upper tier is poorly ventilated, especially in the summer;
- high price.
Installing a bed on the upper tier
The bed frame is fixed to the base posts by inserting the upper end dowels of the base into sockets pre-drilled in the ends of the legs of the product. A longitudinal board is detached from the headboard, onto which an additional base post is attached. The board is installed on the back.
The ladder is installed in the designated place and locked with a support element. The trim is adjusted to size, glued to the backing board and additionally nailed with finishing nails without heads. The bed slats and mattress are put in place.
The instructions presented above for creating a loft bed with your own hands contain a general algorithm of work that you can use to make a loft bed - a functional and comfortable piece of furniture that allows you to organize and use the space of the room as efficiently as possible. you can use the algorithm above to create a bed of the configuration described, or, choosing a different configuration, adjust it slightly as you go.