Design services cost a lot, but there is no guarantee that the result will satisfy the customer. That's why many people try to do a kitchen project on their own. There are no special difficulties in its development; you just need to know a few norms and rules for the distribution of equipment, basic techniques for planning and finishing a room.
This article will talk about the secrets of successful kitchen design, the intricacies of the layout and location of zones in the kitchen, and the nuances of color and style solutions. And everyone can try to design their own kitchen using the Kitchen Designer.
Layout
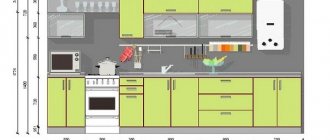
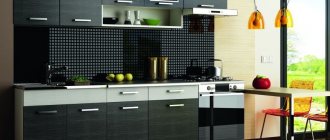
Kitchen design begins at this stage. They determine which side the set will be on, what shape it will be: L or U shaped. If the room is narrow and elongated, it can be placed along one wall. For a small kitchen, modules arranged in the shape of the letter L are suitable. For a large kitchen, an island or U-shaped option is suitable.
At the second stage of kitchen design, it is necessary to determine the number and type of appliances (built-in or free-standing) that will be installed. Mandatory units include a refrigerator, stove and sink. Additional amenities include a dishwasher, washing machine, drying cabinet, and freezer. For built-in equipment, it will be necessary to make additional modules; for solo models, leave free space.
The next stage of kitchen design is the proper placement of appliances in the main functional areas. There are only three of them:
- Food storage area. This includes a refrigerator, cabinets with groceries. The freezer does not fit here, since it is rarely used, maximum 1-2 times a day.
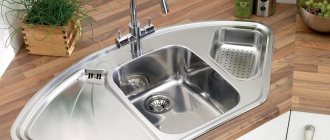
- Food preparation area: sink and at least one work surface.
- Food preparation area: hob and oven.
Ideally, all these zones should be located within walking distance of each other, that is, at a distance not exceeding 2.5 meters. Some owners make the common mistake of trying to combine them. For example, place the stove next to the sink or refrigerator. In this case, the danger of a short circuit increases; splashes of water and detergent constantly fall on the hob, leaving stains on it. The refrigerator, in turn, may fail prematurely due to overheating.
What rules should you follow when measuring your kitchen?
When installing the headset, you must consider some rules:
- there should be no sockets, switches or open wires behind the oven;
- if the kitchen stove is connected to an outlet, the distance to it must be at least 30 cm to prevent the possibility of fire;
- If the upper tier of cabinets is equipped with a door opening system “up”, then the distance from them to the ceiling must be taken into account. Otherwise, the facades will hit the ceiling;
- all drawers, hinged doors, systems must open and close freely.
If insurmountable difficulties arise during the measurement process, you can turn to professionals for help.
When purchasing furniture in our online store, a specialist makes measurements and calculations for free. You just need to leave a request!
Choosing the color of the room
Before designing a kitchen, you need to decide on the color scheme of the room, which will depend not only on the wishes of the owner himself, but also on the size and lighting of the room.
You can visually increase the area of a small room by choosing furniture and wallpaper in light colors: beige, light green, yellow, pale blue. A kitchen made in these colors will appear wider and the ceilings higher. A visual increase in space can be achieved by using glossy and mirror surfaces.
In large rooms, the effect of emptiness can be avoided by using rich, warm shades. You can visually reduce the space with black, dark purple, emerald furniture, brown wallpaper and a blue or dark beige ceiling.
There are also neutral colors that do not affect the perception of the volume of the room. These include gray, dark red, green. A kitchen in which these shades predominate will appear the same size as it actually is. When creating a kitchen design project, it is worth considering that vertical lines elongate the room, and horizontal lines expand it. Wallpaper or inserts with a large pattern visually increase the volume of the room; on the contrary, they reduce the volume of the room with a small one.
If the windows in the kitchen face north, then the room may lack natural light. In this case, the kitchen should be designed based on reflective colors: white, cream, light green. The lighter the shade, the more sun there will be in the room. And vice versa, if the kitchen faces the sunny side, you can safely opt for dark furniture in cool shades: purple, blue, black.
The first stage of measuring the kitchen
To take measurements correctly, the room must be prepared. Ideally, the kitchen should be perfectly clean, without objects getting under your feet or hands. Access to any point in the room, including gas pipes, ventilation and heating radiators, must be free.
- If the room has been renovated, it must be completely completed. Floor covering laid; the walls are leveled, plastered and painted, or finished with tiles, wallpaper, and other finishing materials. Most often, it is at this stage that the kitchen apron panels are installed, or this area is laid out with the selected tiles. The ceiling is painted or whitewashed; if suspended or plasterboard structures were planned, then they are installed. Window blocks and window sills were replaced; curtain rods for curtains or curtains are hung.
- Are you planning to simply replace the set with a new one, but the kitchen itself is in perfect order? This means you should take out old furniture, including a kitchen table or corner, and household appliances. Remove wall decor, shelves and other accessories, curtains.
- The entire space is put in order: debris, cobwebs and dust are removed, the floor is washed. There should be no foreign objects under your feet or on the windowsill.
During the process, it is worth looking at the condition of the walls and wiring, communication pipes and flooring. Perhaps some places need cosmetic repairs, or it's time for a major replacement of linoleum or plumbing equipment.
Once the kitchen is prepared, you can start taking measurements. For this you will need:
- several sheets of paper or notebook;
- writing utensils;
- construction or laser tape measure (whichever is more convenient);
- stepladder or high stool (a structure made of several stable pieces of furniture to prevent you from falling).
In addition, you need to decide on the type of kitchen unit.
Will it be angular or straight? Do you need a bar counter? Where is the sink and household appliances supposed to be installed? Is a second tier of cabinets needed, or is it better to get by with a few open shelves? Or maybe an elegant combination of these two solutions will do? It’s worth sketching out a design project for the future kitchen on paper (or in a graphic editor) in order to have an idea of what and where exactly to measure.
Defining style
A room designed in a certain style always looks organic, regardless of the type of direction. Among modern trends, minimalism and hi-tech are the most popular. These styles feature modern materials and unusual shapes. Minimalism does not imply any unnecessary details - everything is only the simplest and most necessary, and decorations and decor are not welcome in such a room. High-tech kitchens are kitchens in which contrasting colors, regular shapes, and modern materials predominate. Preference is given to glass, plastic, metal, and chrome parts. The interior is worked out as carefully as possible to provide the owners with maximum comfort.
Not everyone is chasing new trends - many prefer the good old classics or create kitchen projects in the modern or country style. The main thing when choosing a style direction is that a person feels as comfortable as possible in it.
How a kitchen is created
First, indicate the dimensions of the room.
Click and in the menu that opens, click on “Room dimensions”. Enter your dimensions, clearing the default width, height, and depth values.
To get started, go to the “Display in lines” mode. Click on the right menu column.
The “Display in lines” mode is turned on and will allow you to see the sizes of sections and their position in space.
Position windows and doors, especially if they affect the kitchen design itself.
Drag the lower and upper sections from the catalog into the room. Arrange them the way you intended.
In the process, use the menu functions you have learned: change the dimensions (width, height) of sections, rotate, replace modules, set exact dimensions.
Working on design in the “Materials” section menu
Preparing the premises
Perhaps no one will take it upon themselves to say that new furniture looks good with old wallpaper. Therefore, before designing a kitchen, it is necessary to determine what repairs will be made, what materials will be used and what changes will be made.
The proposed repair can be divided into several positions:
- floor;
- ceiling;
- walls (including apron);
- wiring;
- ventilation and sewerage.
The floor in the kitchen has to be washed much more often than in other rooms. Therefore, wear-resistant, moisture-resistant materials are chosen for it: porcelain stoneware, tiles and linoleum.
The tile and porcelain tile flooring is cold and hard; dishes that fall on such a floor will break immediately. Linoleum is cheaper, warmer, softer, but it is not particularly durable, and it also fades when exposed to sunlight. The materials used to decorate the ceiling are no different from the materials used in other rooms. They use drywall, paint, stretched fabrics, and some are still whitewashed the old fashioned way.
The walls in the kitchen get dirty much more often than in other rooms, because splashes of grease during cooking, all kinds of drops and smudges constantly appear on their surface. Therefore, many people prefer moisture-resistant materials that are easy to clean: washable wallpaper, plastic panels, ceramic tiles. Between the top and bottom rows of cabinets, in places of maximum contamination, an apron is usually laid. It can be made of glass, ceramic tiles, or even mosaic.
To evaluate which project will look best, you can create several options for decorating the room in pictures or three-dimensional 3D models. Immediately in the figure it is necessary to mark the locations of sockets, sewer pipes and hoods.
Algorithm for designing a kitchen set ↑
Once you have started designing a kitchen yourself, it would be a sin to stop there and not try to design a kitchen set. Since the most common layout option is a corner kitchen, it is this that is given as an example of detailing. To work, you will need a clean copy of the kitchen sketch in the top view and a scan of the corresponding wall.
Construction of a diagram and drawing of kitchen furniture ↑
To draw furniture, follow a number of steps, simultaneously checking with visual photo examples:
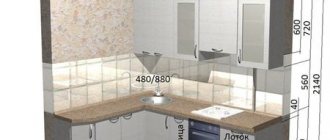
- Considering the standard length (3050 or 4200 mm) and the depth of the tabletop (600 or 800 mm), draw its outer contours.
- Use a dotted line to mark the line of the lower cabinets; to do this, step back 50 mm (use scale) from the walls and facade, as well as 30 mm from the counters and pipes.
- Draw furniture tied in size and configuration to certain places in the kitchen - a corner cabinet (its width should be at least 800 mm), a hob under the hood, a sink next to the sewer, etc.
- Functionally distribute the free space between cabinets with drawers or hinged doors and cargo racks.
At this stage, the “skeleton” of the lower part of the corner kitchen can be considered ready. Next, on the same diagram, using a pencil of a contrasting color, you need to draw a plan for the location of the wall cabinets:
- In the corner, draw a trapezoidal cabinet measuring 600x600 mm. At a distance of 300 mm from the kitchen walls, draw a line for the upper facade.
- Select cabinets with standard dimensions - a cabinet with decorative shelves (300 mm), drawers for the hood and a boiler (according to their dimensions).
- Consider the rational placement of hanging furniture in the remaining unoccupied space.
Transfer all the obtained dimensions to the front image of the wall - this way you will create a sketch of the headset in a side view. The two sketches of a corner kitchen obtained in this way with dimensions are quite enough to present them to a specialist in the production of kitchen sets or to start detailing and manufacturing your own furniture.
Detailing of the headset for cutting ↑
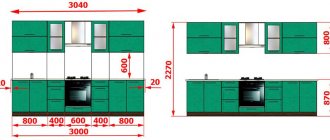
To calculate the size and quantity of all kitchen elements, number all cabinets on the sketch, combining models that are identical in shape and size into groups with the same numbers. After that, study the calculation procedure for one of the most common cabinet configurations. For example, for a lower kitchen cabinet with one shelf in the middle it looks like this:
- The overall height is calculated as the difference between the total height of the lower tier (according to the standard - 850 mm) and the thickness of the tabletop (38 mm). With these dimensions it is 812 mm.
- The height of the sides can be found by subtracting the length of the support legs (100 mm) from the height of the lower bedside tables. In total, the height of the stand is 712 mm.
- The width of the side side with a tabletop depth of 600 mm according to the standard is 500 mm, but if there are protrusions, counters, or pipes behind the furniture, it must be reduced according to their size.
- The depth of the cabinet bottom is equal to the standard width of the side (500 mm), and its width is calculated as the difference between the width of the cabinet and two thicknesses of the facade material (for laminated chipboard it is 16 mm).
- The width of the upper strips, which serve as stiffeners, is 80–100 mm, and their length is equal to the width of the bottom.
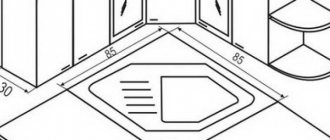
Scheme of a floor cabinet 300x500
Sketches for calculating a floor-mounted corner cabinet and a cabinet for a built-in oven:
Thus, to make a floor cabinet measuring 300x500 you will need:
- side walls 500x712 – 2 parts;
- bottom 500x268 – 1 piece;
- shelf 500x268 – 1 child;
- stiffening ribs 80x268 – 2 parts.
Following the same logic, you can calculate all the remaining kitchen cabinets.
Bathhouse project with kitchen
A bathhouse is an indispensable attribute of a country holiday. What could be more wonderful than taking a steam bath in a scalding hot steam room and eating kebabs in the fresh air, washed down with cold beer? That is why owners of cottages and summer cottages are increasingly ordering bathhouse projects with a summer kitchen. This layout allows you to save free space and reduce construction costs, since three rooms are combined in one building: a terrace, a bathhouse, and a gazebo for relaxation.
Kitchen design in this case begins at the construction stage. Some decide to create a bathhouse drawing on their own, others turn to designer-architects, and still others buy ready-made designs. As a rule, such buildings have one common roof, and the kitchen stove acts as a heater in the room itself.
Many people design bathhouses with a bathroom; in this case, they install a sink in the kitchen and create a single drain into the sewer. A room for cooking and relaxation, in which you will have to spend a lot of time, is best placed on the warmest and sunniest side of the building.
In the north, where the summer period is very short, you can find projects of bathhouses with an internal kitchen. It is expected that after the steam room, the owners will sit quietly in a heated room and drink tea. Such bathhouse projects do not require the installation of a set and a stove; the maximum that is placed in such a kitchen is a dining area, a refrigerator and a kettle.
Saving a project
The planner has provided a function for saving the project.
Click on in the lower right corner. If you are saving the project for the first time, the designer will prompt you to log in. Click “Register” and enter your name, email, phone number and password. This data will be sent to you by email
After authorization, click on again to save the project. A link to the project will be sent to your email.
The link to the kitchen created in the planner is in the “Project Information” section, in the left column of the planner menu. To go to this section, click on.
Open 3D designer