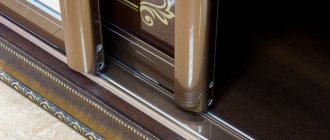
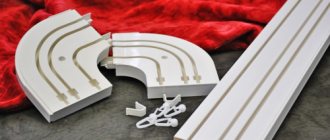
The popularity and widespread use of a sliding wardrobe for arranging a modern interior is due to its practicality and compact storage of household items. Compartment doors, sliding in parallel planes, do not take up additional space when opened, which is an important advantage compared to traditional hinged doors. However, the daily, active movement of sliding panels during operation often leads to the appearance of backlash, loss of smoothness, distortion or jumping of the panels from the guide rail. Periodic inspection and adjustment can prevent unexpected breakdowns and extend the service life of the opening mechanism.
Why do you need to adjust the hinges on cabinet doors?
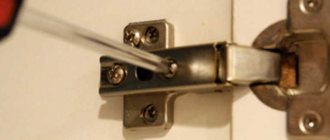
A common cause of warping and sagging cabinet doors is improperly adjusted hinges or operation for a long time. Therefore, door leaves need to be adjusted to the optimal position from time to time. The design of the most common hinge options allows you to adjust the façade in three planes.
Before adjusting the hinges, it is advisable to work with a building level. It is applied to three planes: to two sidewalls and to the front. This way you can determine in which direction the door deviations relative to the body occurred.
Vertical adjustment
When adjusted vertically, the sash moves back and forth. This allows you to align the vertical and diagonal sagging of the canvas, and align its edges with the side wall of the furniture body. A fastening screw located on the counterplate is responsible for this process.
A fixing screw located on the strike plate is responsible for vertical adjustment.
- first, set the screws on all hinges to the same position, slightly loosening them;
- press the facade to the body;
- tighten the fastening screws, ensuring that there are no gaps between the door and the facade.
After this, close the door and check for unevenness. Then they act according to the situation. For example, when the upper part of the facade is tilted, the fastening bolt on the upper hinge is tightly tightened. At the bottom, loosen slightly.
By adjusting the bolts, the door is optimally positioned at the same level as the cabinet body. Next, we begin to adjust the doors according to their height.
Horizontal clearance
By tightening the two screws located on the ears of the strike plate, you can move the doors up and down. This eliminates sagging or upward displacement of the doors relative to the body.
By tightening the two screws located on the ears of the strike plate, you can move the doors up and down
- loosen the screws on all hinges;
- raise or lower the canvas (as appropriate);
- tighten the screws almost to the limit.
The best option is to select self-tapping screws with fine threads; they are tightly fixed in the door leaf and help to most accurately adjust the height of the facade.
By plane
The adjusting screw is responsible for changing the position of the facade along the plane; by turning it, you can move the sashes to the right or left. This eliminates distortions of the door relative to the body and the adjacent door.
To eliminate distortions to the right or left, you need to tighten or loosen the adjusting screw. Carry out opposite manipulations with hinges located at different heights until the door is perfectly aligned.
To eliminate distortions to the right or left, you need to tighten or loosen the adjusting screw
What is important to consider when setting up loops
There are 4 conditional laws for adjusting loops, which are important to consider during operation:
- Before work, check the evenness of the cabinet on the plane; it must be leveled.
- First of all, align the door vertically.
- In some cases, optimal results may not be achieved when adjusting the height. The reason is that the door width is too wide. Therefore, tighten the screw that adjusts the width of the gap. It should be no more than 5 mm.
- When working with modular furniture stacked on top of each other, work begins with the upper cabinets. In this case, the weight is distributed correctly, and the adjustment will be most accurate.
If an anaerobic fixative is not available, enamel or paint can be applied.
To prevent the screws from quickly unscrewing, anaerobic thread lockers are applied under their heads.
Frequent malfunctions of the door closer, self-repair and adjustment
A door closer is a special mechanism designed to automatically close operational, fire safety, entrance structures and structures equipped with an access control system. Often its parts and connections wear out and fail. The doors do not close, and may also move too slowly or, conversely, quickly, with a knock or slam. When the breakdowns are minor, specialists adjust the parameters of the device; in case of complex defects, they repair the door closer.
Depending on the type and model of the door mechanism, its defects and breakdowns, repairs are carried out either independently, but at the same time they find out the cause of the malfunction, or they call the technician who installed the mechanism.
Correct, efficient, trouble-free operation, which is a guarantee of the comfort and safety of people, is a property that shows what a closer should be. Proper initial installation, adjustment of device parameters, compliance with all operational requirements affect the quality of its work.
How to care for fittings
In order for the furniture to last a long time and not cause discomfort during use, you need to regularly care for the hinges.
4 simple rules will help with this:
- The first adjustment of the hinges is carried out immediately after installing the door on the cabinet.
- The interval between the following adjustments depends on the correctness and intensity of use of the cabinet door. If you use the cabinet daily, you need to adjust it 4-6 times, and if you use it irregularly, 2-3 times a year.
- The cabinet facade is regularly inspected for distortions, sagging and door deviations. If deviations appear, adjustments must be made.
- In order for the hinges to last longer, not make sounds, and open doors easily and smoothly, they need to be lubricated. For this purpose, motor and diesel oils and lubricants are used: “Ciatim”, “WD-40”. The hinges are lubricated 1-2 times a year.
In order for the hinges to last longer, not make sounds, and open doors easily and smoothly, they need to be lubricated
Manufacturers of fittings for kitchen cabinets and bedroom furniture
Expensive oil closers use higher quality and more expensive oil. Let's look at the most popular manufacturers of kitchen furniture fittings:
- BLUM fittings . Austrian company producing various kitchen accessories. The most popular manufacturer of lifting mechanisms in Russia is bloom. The price of products is very varied (from 140 rubles to 800 rubles).
- Vauth Sagel . The second most popular manufacturer, popular in Russia. The German company is recognized as the best in the world. The price for closers is from 300 rubles to 1000 rubles.
- Hettih . German company - manufacturer. The cost of mechanisms and handles for furniture ranges from 150 to 400 rubles.
- Siro . Austrian company. The price of door closers ranges from 130 rubles to 500 rubles.
- agoform. The German company is a manufacturer of fittings for kitchen furniture. The cost of the company's products varies from 200 rubles to 900 rubles.
Video presentation of Bloom fittings:
Kitchen cabinets are used daily, which wears out the fittings. It is necessary to timely care for and clean the door closers from dirt.
- When a squeak appears, you need to tighten all the screws on the hinges.
- All fittings and roof rails in the interior are cleaned with a soapy solution and clean napkins.
- The hinges must be lubricated periodically.
- Do not clean the door closer mechanism with soda or other granular cleaning agents.
- You cannot “help” door closers close the doors all the way.
The mechanism of the closers is very simple, so breakdowns with proper operation are practically excluded. If a breakdown does occur, it is better to call a specialist or replace the broken door closer with a new one.
There are many manufacturing companies with different prices for accessories, so it is quite easy to select and install door closers according to your capabilities and needs. Installing the mechanism is also not difficult. The main thing is to follow the instructions exactly. You need to take care of kitchen fittings in the same way as all other household items. Proper installation and maintenance will allow you to enjoy silent closing of kitchen cabinet doors for a long time.
Methods
There are several ways to adjust a kitchen cabinet door, but none of them will cause you any difficulty if you first study its characteristics.
If you are reading this article, then you have a question about how to adjust the hinges on the doors. You can perform this action using one of several methods:
- vertical;
- placing on a plane;
- height adjustment of the curtain wall.
To figure out how to do this correctly and quickly, let’s look at the characteristics of each method.
Adjust vertically
This is the very first and main element of setting up furniture fittings. This method is necessary if the front of the cabinets is positioned crookedly and incorrectly, which makes it stand out from the background of the entire structure, or if there are two cabinet doors and one is higher than the other.
Using this adjustment option, we do everything step by step, dividing the total into 4 actions:
- Open the doors and, if necessary, remove the caps on the hinges.
- We tighten the screws on two hinges; they are located along the edges of the side walls and doors. It is these parts of the overall system that position the sashes vertically. First, you need to place two bolts at the same level, which will allow for high-quality adjustment of wall or floor cabinets.
- After this, we close the doors and inspect the furniture to notice other irregularities. In the case when the slope goes to the right side, tighten the bolt of the upper hinge, and loosen the lower one a little. Well, accordingly, on the contrary. If there is a slope to the left side, twist the lower part.
- We repeat points 2 and 3 until the front part reaches its normal position. Only after completing this can you move on to the next steps.
Door height
To adjust the height of kitchen cabinet doors, look at the screws. They are installed on two so-called “ears” of an elongated shape. A loop passes through this addition, which provides the level of height of the facade. Adjusting the doors with this option is also done step by step:
- First, loosen the screws that hold the adjusting structure.
- If it is difficult, we raise or lower the doors and tighten them again.
You must tighten it carefully, until it stops, but so as not to strip the thread.
It is important, when starting to adjust the height, prepare self-tapping screws with fine threads in advance. It is the correctly selected elements that will help in setting up and securing the desired position.
Operating principle
The door closer operates quite simply, which is due to its standard and simple design. The features of its action include:
- the main mechanism is a special spring located in a metal capsule, and it is filled with a special liquid or oil;
- the product is equipped with special valves that make it possible to adjust the speed of closing the doors;
- due to the closer, pressure is applied to the front of the door, which guarantees its smooth and silent closing under the influence of its own weight;
- this leads to the fact that the door acts on a special stop, which acts as part of the closer;
- the liquid covering the spring is lowered into a special capsule sleeve;
- it is held in the sleeve by a special system of seals;
- the adjusting part of the product ensures a narrowing or expansion of the outflow channel, therefore control and regulation of the door closing speed is ensured;
- in the process of closing the door, it begins to exert a stronger influence on the closer;
- the adjusting part of the product expands quite strongly, so the piston outflow channel decreases;
- this causes the piston to slow down, so the door closes really slowly, without sudden movements, and there are no knocks or other extraneous sounds.
If you choose high-quality hinges and closers, they are guaranteed to protect facades from various damages, and will also be durable and easy to use.
Gas closers are often installed on inexpensive cabinets. They work in such a way that the door closes as quickly as possible until a specific moment, after which it begins to act on the closer, which uses gas located in a special capsule for operation. This principle of operation ensures silent and slow closing of the door at the end, but the product itself is considered quite fragile and short-lived.
Adjustment on plane
This type of customization of the front part of the furniture provides the ability to change the location of the facade on a common plane. This adjustment option is necessary only if you notice a weak level of pressing of the shutters to the body or if, when opening and closing, the doors move in different directions, interfering with opening and closing.
The steps for performing the action are as follows:
- If the cabinet door is pressed weakly or if it bounces, turn the second adjustment bolt (it is located where the hinge itself is located).
- We tighten the existing bolts a couple of millimeters. It is important to twist in “your” direction.
- Pay attention to the fact that there are gaps between the doors and the overall body of the furniture.
- If necessary, you can continue to adjust the hinges on a flat surface.
To make the work more comfortable, use a Phillips screwdriver and do it slowly and carefully to avoid stripping the bolt threads.
There are ways to adjust the doors of kitchen cabinets with closers. With its help, you can perfectly accurately adjust the façade.
Why else might the door not close?
Modern furniture has functional hinges.
What can cause misalignment of swing doors:
- This disease very often happens with the kitchen door under the sink. This is facilitated, firstly, by frequent opening and closing, possibly with slamming. Secondly, moisture causes the door material to swell, deform and weaken the hinges. It is necessary to re-adjust the hinges using the above method; in a critical situation, the door leaf will have to be replaced.
- Small children can ride on the cabinet door, causing it to naturally sag. Keep an eye on your children and explain that such games lead to damage to expensive property.
- The close fit of furniture frames to each other, for example, wall cabinets, kitchen cabinets, leads to friction of adjacent doors, which ends in bending of the hinges. In this case, adjustment may not help. To avoid this, when hanging cabinets, you need to leave a small gap between adjacent sides of the cabinets.
- Distortions of the sashes may appear due to uneven surfaces on which the furniture cabinets are installed. The deficiency is eliminated by leveling using pads of various thicknesses under the base.
Take a few minutes to adjust the hinges.
By spending a few minutes adjusting furniture hinges and combating door warps, you will get the ideal appearance of the facade, satisfaction from a job well done, and will extend the service life of the awnings for a long time.
There are many interesting hinge shapes on the market today.
Operation of configured fittings
We figured out the installation and adjustment, but in order to maximize the service life, you need to learn how to independently adjust and lubricate the parts. It is these factors that make it possible to protect the fittings and increase their wear resistance.
As for general recommendations regarding the care of loops:
- The first adjustment of hinges and other fastening parts is carried out immediately, as soon as they have been screwed into the desired place.
- As for the number and frequency of subsequent adjustments, this completely depends on the frequency of use of the belays and their designs, namely on the frequency of opening and closing the doors.
- If the doors open several times a month, the parts will need to be adjusted no more than three times a year. If the furniture is used daily, the parts will be adjusted more than 7 times a year.
- Carry out a thorough inspection of the appearance of all façade parts. If you notice distortions or a low-set vestibule, you will need to fine-tune its hinges.
- To maintain the quality of furniture fittings, periodically lubricate the hinges. To do this, you can use motor oil that has a natural or artificial composition.
- To eliminate the noise and sensitivity of difficult use of furniture when opening or closing cabinet doors, use motor oil 1-2 times a year on all hinges.
How to replace it correctly with your own hands
Correctly replacing a broken furniture hinge consists of the following steps:
- You can replace it if you call a specialist, but in order to save money, you can replace the furniture hinge yourself. In place of the old hinge there are holes from screws or screws. Just take a special glue with the addition of small sawdust and cover the holes with a viscous composition. Wait a couple of hours and tighten the screws again. But we warn you right away, this method is not durable if you screw it in without the glue drying.
- Cover it with the same glue with furniture sawdust, then let it dry. We screw the hinges into the old place, only we choose the depth 3 millimeters deeper, but leave the same diameter. It has been tested more than once and the fasteners last a long time.
- It is necessary to move the bases of the sang and screw them on. Tip: replace the old fastener with a new one, because over time the hinge may become deformed.
- If, due to frequent breakdowns, the place for fastening has turned into a sieve, then you can make a small overlay from any material and screw the hinges back on. Using a special screwdriver, tighten firmly until the end.
With the knowledge gained, we can confidently say that if any of the above breakdowns occur, you will be able to cope on your own.
Source: pro-dom-mebel.ru
Choosing fasteners for kitchen cabinets: types, advantages, installation process
Modern kitchen sets include not only cabinets, but also wall cabinets, which are mounted on the wall using special fittings. They are used to store dishes, food and other kitchen utensils. Since the mounted modules with the contents inside are quite heavy, their fastening must be reliable. When choosing canopies for kitchen cabinets, you should be guided not only by personal preferences, but also by the features of the wall, as well as its material and other nuances.
Kitchen wall cabinets are usually installed at a certain height. If the set is made to order, then the installation is subsequently carried out by workers, but if desired, the furniture can be installed independently. There are certain standards for the location of lockers so that they can be conveniently used by a person of average height. People who are too tall or, conversely, short will have to adjust the furniture placement parameters and adjust them to suit themselves.
Situation when repair of the door closer on kitchen furniture is necessary
If the cabinet door does not close well or does not close at all, the door closer on the kitchen furniture should be repaired.
The kitchen is not only a place where food is prepared - it is a place where the whole family gathers at the table in the evening, it is the hearth of any home. It is for this reason that it is so important that all appliances and kitchen furniture in the kitchen are in good condition. If something is wrong, it is advisable to repair the kitchen furniture. It is so important that the color scheme of the kitchen set pleases its owners, however, the most important thing is not the color of the chosen kitchen, but the serviceability of its design. Numerous cabinets, shelves - they are all supported by a special mechanism called a closer.
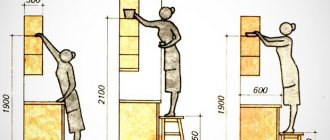
Height
Despite the generally accepted meanings, the main thing is the comfortable use of furniture, which is directly related to the growth of its owner. The hostess or owner should easily reach the middle shelves of wall cabinets without the help of a chair or stool.
You should know that the minimum distance from the tabletop to the bottom edge of the cabinet is 450 mm. This will allow you to comfortably use the work surface and place the necessary small household appliances there, such as a coffee maker, microwave, electric kettle, etc. But most kitchen furniture stores consider the optimal distance to be 600 mm.
To make it easier to determine the most convenient level for hanging cabinets, you should familiarize yourself with the calculations of the ratio of human height and the distance to the top shelf of the module:
- height from 1.55 to 1.6 meters – height to the top shelf 1.75 meters;
- from 1.6 to 1.7 m – distance to shelf 1.9 m;
- from 1.75 to 1.9 m – height 2 meters.
Taking into account your height, you can easily determine the optimal distance for yourself to the top shelf of the headset.
Types of fastenings and their features
After choosing the height for mounting the cabinets, you should decide on the type of fastening. It can be different: corners, pendants and tires.
Corners or pendants
Previously, special metal hangers were used when installing cabinets. They were attached to the rear ends of the module walls. Today, such devices are no longer used, as they have quite a few disadvantages. For example, the inability to adjust the position of cabinets after installation on the wall. And how evenly they will hang depends only on the accuracy of the markings on the wall.
Corners are almost the same as pendants, only they are attached to the roof of the cabinet. When using them, it is important to determine the upper limit at which they will be set. You must strictly adhere to one horizontal line, otherwise the wall cabinets will be installed unevenly.
Installation on corners or pendants is a rather labor-intensive process (compared to a tire) and requires perfect precision. If there is a mistake, you may need to make new holes in the wall.
If the walls were not leveled during the kitchen renovation, then fixing them to the corners will be the best option. An outdated method does not mean it is bad, you just have to spend a little more time on installation than when using other types of fasteners.
Tire (bar)
A mounting rail or strip for hanging cabinets is much more convenient and saves time. This kind of work can be done even alone, which cannot be said about installing it on corners.
How to install
The installation of expensive mechanisms on luxury furniture is carried out by professionals at the factory. Theoretically, you can buy, for example, an electric programmable door closer, but it will cost more than a cabinet. Therefore, we will focus on gas models available to the amateur.
Installation locations and installation
One of the simplest models is considered to be mortise. When it comes to upper-level wall cabinets, such a shock absorber is mounted on the upper or middle sector of the cabinet opposite the doors. In the lower sector, on the contrary, it is cut in from below so that it does not interfere.
A mortise closer installed in the side wall of the cabinet should not interfere with operation.
The insertion technology is simple. The thickness of the rod in such mechanisms does not exceed 10–12 mm, and the thickness of kitchen furniture slabs ranges from 16–21 mm. Having decided on a place you need:
- Take a drill corresponding to the diameter and length of the closer rod;
- Mark the installation point in the center of the cabinet end and mark it with an awl;
- Carefully drill a hole to the depth of the rod;
- Insert the closer into the hole.
There is no need to attach the mortise closer to glue. Once you insert the rod into the hole, it won't go anywhere. And if you glue it, then if it breaks, you won’t be able to replace it.
Pencil-type shock absorber insertion diagram.
There is one nuance in the installation of pencil mortise closers - it is difficult for an inexperienced craftsman to drill a blind hole evenly in a thin cabinet wall. If you deviate slightly from the axis, the drill will come out through the side wall, thereby irreversibly damaging the cabinet.
Tools and preparatory work
In order to install wall cabinets with your own hands using canopies and a mounting strip, you should prepare the necessary tools in advance:
- Hammer or drill (depending on the wall material).
- Screwdriver and screwdriver.
- Construction level, tape measure.
- A hacksaw for metal.
Before you begin the process of installing wall cabinets, it is necessary to carry out some preparatory work. The most important thing is to make sure the walls are strong. If the set is installed on drywall, then a wooden beam should be secured under the front surface for strength. Otherwise, you may need butterfly dowels in large quantities.
With a corner set, the corner of the kitchen should be treated with special attention. If you lay it out carefully, there will be no gaps when installing the corner cabinet. It is better to lay the electrical wiring in advance so that you do not have to dismantle the furniture later, which is extra work and a waste of time.
For the hood, it is better to mount a socket under the ceiling directly above it. So, you can get rid of wires in the area of the stove and work surface. And in terms of safety, this is a big plus.
The final finishing of the wall with wallpaper, tiles or plaster must be completed before installing the kitchen. After hanging the modules, this will not be possible.
Frequent malfunctions
Malfunctions of the door device can be as follows:
- damage or breakage of the rod;
- the appearance of cracks in mechanism elements;
- bend, kink of the lever;
- linkage sticking;
- wear of seals;
- breakage of fasteners.
The following factors lead to these defects:
- improper operation of the mechanism;
- external influences on the door block (impacts, strong wind);
- placing a stone or foreign object to secure the door in the open position.
Damage can be corrected by repairing the door closer yourself. If the defect cannot be eliminated, then the mechanism is purchased.
Door closer device
This device consists of the following mechanisms and parts:
- spring;
- cast aluminum housing;
- precision piston;
- control valves;
- gears;
- needle bearing;
- rubber seals;
- fasteners.
The mechanism of operation of the closer is arranged as follows.
The main element of the design is a spring mechanism, which, when compressed, accumulates the energy necessary to close the doors. The compression process occurs by transferring the force of the lever rod to the spring. Toothed gears and racks drive the piston, while oil flows through internal passages into the free part of the housing. Adjusting the fluid flow rate affects the closing speed.
If the oil does not enter the released body of the device and leaks due to depressurization, then the door mechanism does not work. The problem can be solved with the help of repairs.
Leakage of working fluid
Oil leakage occurs due to large fluctuations in ambient temperature. Leaks often appear during the cold season. The thickness of the oil fluid directly depends on temperature changes.
The second reason for oil leakage is depressurization of the box, which occurs when it is damaged. If the defect is not severe, it must be eliminated using a simple sealant. If the crack is large or the oil has completely leaked out, sealant repair methods will not give a positive result, so the closer is replaced.
In cases of weak liquid filling at the factory, it is added to the door device. In this case, choose synthetic motor oil or shock absorber fluid. Oil is filled through control valves.
Damage to the lever mechanism
In case of malfunctions in the operation of the mechanism, pay special attention to the rod, check its condition and presence of damage. At the slightest malfunction, repairs are carried out.
You can fix the problem yourself. Before repairing a damaged rod, you should read the instructions for repairing and installing the door closer and act according to them.
Installation process
First of all, you should install awnings on your kitchen cabinet. This process is not complicated. If the rear wall of the module is made of fiberboard, then it is necessary to cut two small holes in it for the mounting tabs. After this, press the canopy against the top panel of the cabinet and secure it with two self-tapping screws to the side wall.
If the back panel is made of laminated chipboard, then you will have to make a cutout directly under the canopy and fix it flush with the laminate. But this option is quite rare.
To mount a metal rail for hanging cabinets on the wall, you must perform the following calculations:
- Add up the height of the lower cabinets, the distance between the wall and floor modules, and the height of the upper cabinets. For example: 920+600+600 (pedestals, apron, top module).
- From the resulting result, 45 mm should be subtracted for the shrinkage of the canopy. The result will be a size that should be marked on the wall.
- Next, you need to mark a horizontal line along the level and attach a metal strip. It has holes for fastenings every 15-20 mm, but you don’t need to drill all of them, just fasten the screws in the corners of the mounted modules.
To make adjusting the cabinets easier, before installation, you should slightly loosen the fastening tab and allow it to move freely up and down. After this, you can begin hanging the cabinets, and then adjust them on the wall so that all modules hang evenly. The hanging elements can be fastened together with intersectional ties for strength and convenience.
Installing a kitchen yourself is not as difficult a process as it might seem. First of all, it is important to decide on the fastening, and if preference is given to canopies and planks, then installation can actually be carried out alone, without outside help. Before installation, it is necessary to complete all repair work and finish the walls in the kitchen, as well as prepare the necessary tools. It would be a good idea to familiarize yourself with the installation process in advance by watching video tutorials on the Internet.
Troubleshooting
Repairing a door closer with your own hands is not difficult.
If rod defects occur, carry out the following actions:
- If there is rust, anti-corrosion cleaning is done and treated with a special protective lubricant.
- If a small crack or break occurs, the welding method is used, after which the welds are ground to a smooth state without slag inclusions, sagging, or formations.
- Distortions or bends are carefully leveled using a hammer so that the lever does not burst under the influence of force.
If the door speed is abnormal, the device is adjusted.
How to repair
To repair breakdowns in the closer device, the following tools are required:
If complex defects are identified, a hammer or welding machine is required to correct them.
The procedure for carrying out repair work is as follows:
- Carefully inspect the closer body. There should be no leakage in a housing filled with oil.
- Check the security of the mounting screws. If the part is tight or loose, tighten it to the required level.
- Inspect the door block, the place of fastening and contact with the frame for cracks and dents that lead to distortion of the structure.
- Check the operation of the closer levers.
- Adjust the speed of closing and opening doors, slam, maximum swing angle.
- If damage is detected, repair the part.
- After the procedure, install the closer in place.
If the defect cannot be corrected independently, this situation can be resolved by replacing the closer.