0
73816
In order to make a high-quality set yourself so that kitchen furniture made by yourself becomes a source of special pride, immortalized in photographs, you need to at least have an idea of where to start. We suggest you familiarize yourself with the stages of work and what is required for this.
The benefits of making it yourself
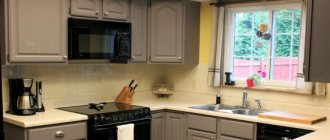
DIY wooden kitchen for a country house
Personal participation in the furniture business provides a number of significant advantages.
– Personal quality control of products at each stage of production. Employees of furniture companies do not always show proper responsibility, and therefore their products often contain various defects. This can be avoided if you do the kitchen yourself.
– Freedom in choosing shapes, models and designs. You can design a kitchen set taking into account all your wishes.
– Selection of quality materials and fittings. The owner is interested in purchasing high-quality components for his future furniture.
– Cost savings. Labor costs are excluded;
– Pleasure from the process. Creating a kitchen out of wood with your own hands is a creative and exciting process.
Unusual kitchen in rustic style, made by yourself
Plywood as a basis for the future headset ↑
Wooden kitchen is a very vague concept. The materials for it include both expensive solid wood glued together from natural wood beams and budget slabs pressed from sawdust and various binding resins (including formaldehyde). But if you’re going to make a kitchen with your own hands, you should choose the golden mean – plywood. It is quite affordable, easy to process and more environmentally friendly compared to the same chipboard.
What does a novice furniture maker need to know about plywood?
- Plywood is a kind of “pie” made from thin sections (from 0.1 to 1.18 mm) of solid wood - veneer. There is always an odd number of layers, and they are laid perpendicular to the direction of the wood fibers. The sections are joined using high-pressure adhesive, resulting in a durable, wear-resistant material.
Samples of plywood of various thicknesses
- Composition - for the manufacture of plywood, veneer is used from coniferous (pine, spruce, fir, larch, cedar) or deciduous (most often birch, linden, oak) tree species. Based on the number of layers, it is divided into three-, five- and multi-layer.
- Sorting - changing the grade depends on the defects of the wood, which has 28 points. Class “E” plywood is considered the best - during its production the presence of knots, cracks, chips and wormholes is not allowed. It is used in finishing work and in the manufacture of furniture, since the smooth surface is ideal for any finishing treatment and looks beautiful when opened with varnish, paint, wax or oil impregnation. The remaining grades (from 1 to 4) allow an increasing number of defects, and if with grades 1 and 2 you can still try to save money, then with grades 3-4 I should experiment - the large amount of waste and low quality of products are not worth it.
Plywood varieties
- Marking - depending on the adhesive composition, plywood is distinguished as FK (urea glue), FKM (melamine resins), FBA (albumin-casein glue), FSF (phenoformaldehyde), FB (bakelite varnish), BS (alcohol-soluble bakelite glue). Of course, not a single composition reaches absolute environmental friendliness (after all, products of the chemical industry!), but FBA plywood, the glue for which is made on the basis of protein, is considered the safest for health.
Important! Plywood based on formaldehyde glue has emission class indicators for harmful substances (like chipboard). For residential use, it is recommended to purchase materials marked E0 or E1.
- Surface treatment - unsanded plywood is designated “NSh”, with one sanded side - “Sh1”, with both sides - “Sh2”.
- Dimensions - standard plywood sheets can be either square or rectangular. The minimum length is about 1.5 m, the maximum is a little more than 3 m. And the thickness varies from 3 to 30 mm.
Waterproof varieties FK, FKM, FB, BS are suitable for the production of kitchen furniture, but the last two brands are not cheap. Therefore, square sheets of unsanded FKI-II grade plywood with a side of 1525 mm and a thickness of 6, 10 and 18 mm are most often used.
A finished kitchen made of plywood, made by yourself, looks like this:
Laconic and functional design of plywood kitchens
Important! Plywood, in which the fibers of the face layers of veneer are located longitudinally, is characterized by good flexibility, and transverse is used in places where rigidity is more important.
Deciding on design and construction
Simple and reliable wooden kitchen frame
Particular attention should be paid to the design of the kitchen frame. Kitchen cabinets come in frame and frameless varieties. In frame ones, the frame serves as the basis, making the structure quite stable and durable. It should be noted that the frame is not the most common type of facade for wooden furniture. For a DIY kitchen set, a frameless façade is more suitable. In this design there is no base frame, and the doors are fixed directly to the frame. The absence of a frame significantly expands the cabinet space, making it more convenient and functional. It is important to remember that the appearance of such a kitchen set will be a little unusual. Therefore, adherents of traditional forms are better off opting for frame furniture.
The process of assembling a frame kitchen on site
As for the frames themselves, they also have different variations. The most common are prefabricated and glued. Prefabricated frames are cheaper, but lower quality. A responsible master will not skimp on quality and will opt for a glued frame.
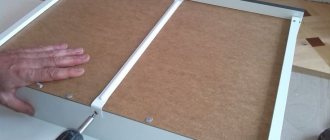
DIY installation of a finished kitchen frame
Choosing the right design is also very important. It must be carefully considered, taking into account the placement of the stove, oven, sink, dishwasher and washing machine. The main design highlight of DIY wooden items is the emphasis on naturalness, simplicity and environmental friendliness. By embodying this idea, the product acquires its true meaning, uniqueness and character. Since the entire composition is a complex and intricate system, it is better not to overload its individual parts with decorative delights. The cozy texture of wood more than compensates for such minimalism.
Original DIY wooden kitchen in rustic style
Preparatory stage ↑
The greatest difficulty for beginners in making a kitchen with their own hands is taking correct measurements and drawing up sketches of future furniture. After all, if everything is done correctly, all that remains is technical work: making blanks and assembling the set. Therefore, we will consider in detail everything you need to know about planning.
How to make a kitchen unit project - drawings and calculations ↑
To make a high-quality wooden kitchen set with your own hands, you need to take care of an accurate visual aid - a drawing of the future project. To do this, you will have to spend time measuring the free space, thinking through the models and layout of the desired furniture.
Plan of upcoming work:
- Kitchen measurements - you need to take into account not only the presence of various protruding parts and communications, but also the possible curvature of the load-bearing surfaces. Therefore, we measure the length of the walls at three levels: above the baseboard, in the center and at the ceiling and select the smallest value.
How to take measurements correctly
- The basis of the drawing is to transfer the obtained figures onto paper, as well as accurate data on all elements that extend beyond the plane of the walls. This includes building components (door frames, window sills, baseboards) and communications (water and gas supply pipes, sewerage, heating, ventilation holes and sockets with switches).
Measurements of protrusions, niches and openings
Attention! After preliminary marking the future location of furniture and household appliances, include additional sockets in the diagram. This way you will not only increase the convenience of work, but also reduce the load on the kitchen power supply line, which according to the standard is not designed for the modern number of electrical appliances.
- We draw up a sketch of the headset. We mark the location of the main pieces of furniture on the drawing, focusing on standard parameters, the dimensions of which can be found on any furniture website. If you still have empty spaces, you can either cover them with false panels or provide retractable cargo systems for them. When making calculations, be sure to take into account the space for installing all necessary household appliances.
Visual sketch
Headset drawing with dimensions
- Detailing - after creating a general design for the set, we draw up a detailed diagram indicating the dimensions for each piece of furniture. The blanks will be cut according to these drawings. The markings include all parts - sidewalls, horizontals, base strips, insert parts (boxes, baskets or drying racks) and fittings. When calculating dimensions, be sure to take into account the thickness of the plywood.
Detailed diagram for making a floor stand
Advice! To facilitate the work of novice designers, there are special computer programs (PRO100, AutoCad, Basis Furniture Maker, etc.) that can create a complete color 3D sketch of the kitchen interior based on your data, and some of them (for example, BlumDynalog) can even provide detailed detailing and material cutting diagram.
An example of drawing up a kitchen sketch in the PRO100 program
For help from specialists - ordering components ↑
In principle, cutting plywood sheets according to detailed sketches is quite simple. Problems can only arise in the absence of professional tools - the cuts need to be made perfectly even. Therefore, the optimal solution at this stage is to contact specialists who will quickly and efficiently cut the purchased plywood into the required fragments. In just a couple of hours of work you will receive a complete set of blanks for your future plywood kitchen.
Cutting plywood
Important! When contacting a construction or furniture company, you must have the same detail of all items discussed in the previous section. Moreover, it is advisable, in addition to the dimensions of the components, to also indicate the locations for the necessary holes - both for leveling protrusions in the kitchen and for fasteners. Then you won’t have to worry about drilling and cutting yourself.
After receiving all the blanks, you will have to spend a little more time to bring the parts to the desired state. First of all, it will be necessary to sand (process with sandpaper) the cuts and cuts so that the edges become even and smooth. And coat all components twice with an antiseptic primer (or simply dry them) to increase the service life of your homemade plywood kitchen set.
Workpiece processing ↑
The resulting pieces of furniture must be cleaned to improve resistance to moisture, temperature changes and minor mechanical damage. Particular attention should be paid to those components that, after assembling the set, will be visible - the facades and the worktop. And, of course, you should cover unprotected cut areas at the ends.
Protective coating options:
- The easiest way to finish is painting with any waterproof paint.
A spray gun will help you quickly paint wooden parts
- The next alternative is to treat it with decorative stain and cover it with varnish or oil-wax impregnation. This method is excellent for high-quality plywood, as it does not cover the wood patterns of the veneer.
- One of the most controversial options is the application of self-adhesive film. Although the finished facades look very good, it will take a lot of time and effort to complete this work. In addition, in order for the furniture to retain its appearance for at least 2-3 years, the film must be of high quality and expensive. Cheap analogues will begin to peel off quickly, and in less than a year the new kitchen will require a new renovation. In addition, pasting should be carried out on perfectly flat surfaces, but even on them, if not done carefully, unsightly folds and bubbles may form. In a word, if you are dreaming of a colorful kitchen with any images on the decoration, it is better to make it directly from laminated chipboard or MDF with photo printing.
- And the most reliable (and most expensive) way is to apply plastic as a protective coating. But this can only be done in a workshop with specialized equipment.
Important! It is recommended to apply protective and decorative coatings before assembling the furniture. However, in the case of painting, you can also process a ready-made kit.
Required Tools
Tools for assembling a kitchen set with your own hands
To work independently on an array, you will need the following equipment:
– hacksaw for cutting;
– tape measure for taking measurements;
– confirmations;
– screwdriver, emery sheet, hexagon, primer;
– a manual router – you will need it in order to efficiently profile the edges and holes for fittings;
– Forstner drill;
– level for accuracy of placement of parts;
– iron – it helps to glue edge tapes well;
- electric drill;
– jigsaw;
– plane (preferably electric).
Other kitchen furnishings ↑
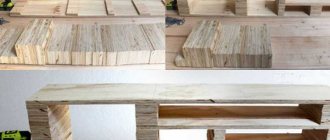
If you have assembled a good-quality wooden kitchen with your own hands and have not lost your enthusiasm, then you can easily continue working by moving on to the dining set. A small table and several stools, made in the same style, will be a good addition to the kitchen set.
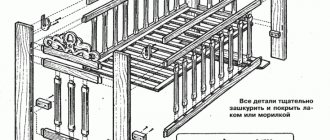
The tabletop and seats can be made from high-quality plywood with a sheet thickness of 18 mm. For the frame, the same or slightly thinner (12-16 mm) plywood, sawn into narrow (about 10-12 cm) boards, is suitable. For the legs, you can take timber of the required size.
Stool made of beams and plywood
On a note! If you have the necessary equipment, you can also turn the figured legs in a woodworking workshop, where you will order cutting of the main parts.
You can also make dining furniture from boards with your own hands. True, in this case there will be a little more work.
- The boards must be matched to each other using the “top to bottom” principle, focusing on the pattern of rings.
- The end sides should fit tightly to the adjacent ones along the entire length, so they should be processed with a jointer.
- The most reliable and rigid connection is considered to be the placement of boards on furniture dowels. Holes are drilled along the center line of the end in increments of 10-15 cm. Wood glue (or silicone sealant) is applied along the entire length of the end surface, and dowels are also glued. The rod is driven into the holes of both adjacent boards, which are connected by tapping until the gap completely disappears.
- The resulting shield is dried, and excess glue is removed using sandpaper.
- The corners of the table top are rounded with a plane and sanded.
- The top surface is covered with varnish or other decorative coating.
The frame and legs are dealt with in the same way as with plywood.
Dining set with curly legs
Manufacturing process: step-by-step instructions
- Preliminary preparation
Before you begin assembling it yourself, you need to prepare all the components and parts of the future array. They are cut out from the selected material using a jigsaw. Their saw cuts need to be sanded. Sandpaper works well for this purpose. To prevent moisture and mold from entering, a melamine edging tape is placed on each of the cuts. In order for the dimensions of all elements to be clearly verified, it is advisable to create a cutting map. There are special services for this on the Internet. This preliminary work will allow you to avoid errors in cutting. In addition, this diagram will take into account the size of the saw cut.
The initial stage of the kitchen furniture manufacturing process
- Assembly of elements
Assembling upper cabinets in the kitchen
After taking into account all the measurements, individual parts and elements have been prepared, they need to be laid out in order of assembly. This will make the assembly process more streamlined.
Kitchen cabinets are assembled according to the following algorithm:
- If there are drawers, then the guides are installed first. In this case, be sure to use a level.
- If shelves are provided, you need to drill holes to attach them.
- Separate holes are drilled for inter-wall fastening.
- Its side walls are attached to the bottom of the cabinet.
- The top part is attached.
- The legs are attached.
Once all the products are assembled, you can begin their installation.
Kitchen furniture assembly
- Installation
If the kitchen assembly process coincides with the renovation, then all construction work should be completed before installation begins. The walls and floor of the room must be prepared for fastening furniture. You can take a piece of MDF as an apron. Installation usually begins with the lower elements. To do this, use a level. After all the products are connected to each other (Euro-ties are used for this), a common wall is fixed behind the entire array.
DIY kitchen installation and assembly
In the countertop you need to mark the location of the stove, work surface and sink. At each section, corresponding holes are cut out and treated with construction sealant. The tabletop itself is attached with self-tapping screws to the finished cabinets.
Installing a countertop is a responsible process
After this, the upper elements are installed. The most optimal distance between the tabletop and the bottom of the upper cabinets is 650 mm. In order to determine the height of the canvas for fastening the upper elements, it is necessary to add to the indicated distance the height of the cabinets and 10 mm occupied by the fastening structure. The upper tiers are secured with special canopies installed on the rear walls.
At the end of the kitchen installation, you fix the doors in the open position with your own hands. To do this, the door hinge is fixed on the door, and then mounted in the wall.
Installed doors in open position
After installing the headset itself, electronics, built-in elements and various accessories (handles, rails, dryers, etc.) are installed.
Installation of an oven and built-in hob
The main stages of making a wooden kitchen yourself
The process of manufacturing kitchen furniture consists of several stages that should be performed in strict sequence, then the result will be positive.
Stage 1: material selection
Before purchasing material, you need to decide on the type of wood, learn about its properties and operating features. A kitchen is a room in which all surfaces, including furniture, are exposed to moisture, condensation, temperature changes, high temperatures, grease and other contaminants. Therefore, the material must be easy to care for, moisture-resistant, and resistant to mechanical stress.
Array
Now on the construction market you can buy more than forty types of wood, which differ in their qualities. One of the key properties is the hardness or softness of a particular variety. The wood of oak, beech, walnut, and yew has high hardness and strength. It is worth understanding that this material is more difficult to process, so it is best suited for the manufacture of massive, solid elements.
Variety of wood species
Soft woods such as pine, spruce, and poplar are used to make shelves, cabinets, and decorative elements.
Note! Regardless of the material chosen, special attention should be paid to the degree of drying, density, and the absence of defects in the form of knots and cracks.
No less important than the performance properties is the appearance of the wood, its shade and texture.
Table 1. Wood species
| Wood type | Description |
Ash | Furniture made from ash is of high quality, durability and excellent performance properties. The versatility of the texture is ideal for decorating both classic and modern interiors. |
Oak | Oak furniture exudes an atmosphere of solidity and stability. The material is characterized by increased density and hardness, resistance to deformation and mechanical stress. Oak is not afraid of moisture and temperature changes, so it is ideal for the kitchen. |
Beech | Beech wood has a refined shade and texture. Tinting of such furniture can be done in any color. |
Alder | Alder wood is used to make classic facades. The material is easy to process, so it can be decorated with carvings. |
Pine | Inexpensive material with high performance qualities. Due to the content of resins in its composition, the material acquires waterproofing properties. Natural antiseptics and phytoncides participate in the formation of a healthy microclimate. |
Birch | Of the hardwoods, the most budget-friendly is birch, which is distinguished by its durability and low maintenance. To prevent wood from rotting in high humidity conditions, it is carefully treated with special compounds. |
Prices for different types of solid boards
Solid board
Stage 2: measuring and design
Before starting to design a set - choosing the number of modules, measure the kitchen space. To do this, you need to decide what its layout will be: straight, L-shaped, parallel, island, peninsular.
A preliminary design allows you to get the desired result
You can develop a drawing on a computer using one of the many design programs. A special article will tell you about the main nuances of making kitchen furniture drawings yourself.
You will need to take the following measurements and record them on the sketch:
- Determine the height and width of the room.
- Determine the distance from the corner to the edge of the tabletop.
- Determine the distance from the tabletop to the window, doorway, window sill.
- Determine the height of the tabletop, the lower and upper points of the hanging modules.
- Determine the location in the space of the gas pipe, communications, sockets, switches, and ventilation holes.
Basic measurements
Table 2. Planning process
| Illustration | Description |
Step 1: freeze | On the kitchen plan, the dimensions of the room are noted - its width and height, the location and dimensions of window and door openings, structural elements, niches, protrusions, communications (water pipes, heating radiators, location of the gas pipe, meters), sockets and switches, the lowest point of suspended ceilings multi-level structures. |
Step 2: Choosing a Module Layout Method | Based on the resources of the room, the most optimal planning solution is selected, taking into account that in addition to the furniture in the kitchen, it is necessary to allocate space for a functional dining group. |
Step 3: “arrangement” of modules | In accordance with the measurements obtained and the selected planning method, equipment and modules are “arranged” on paper. It is important to remember the “working triangle” rule, according to which the stove, refrigerator and sink are placed nearby so that they form the vertices of a conventional triangle. Between these objects there must be a working plane of at least 400 mm. The optimal plane is at least 500 – 600 mm. The equipment is located close to communications (water supply, sewerage, gas pipes). |
Step 4: detailed drawing | They begin a detailed elaboration of the drawing, on which the kitchen set is drawn to scale and all dimensions of the modules are indicated. Each module is drawn separately, determining the number of parts it consists of, the method of their connection, the number and type of fittings for connection, the method of decoration and processing. |
Based on the measurements obtained, you can calculate the amount of material and fittings required.
Video - How to take measurements in the kitchen
Stage 3: purchasing material and tools
To work with wood, a standard set of tools is required: a hacksaw, a jigsaw, a hand router, a drill, a plane, a grinder, a Forstner drill, and confirmats. When making furniture not from solid wood, but from chipboard, you will need to purchase an edge strip, which is glued with an iron.
Woodworking tools
Prices for popular models of jigsaws
Jigsaw
Iron for gluing melamine edge
Note! Sawing of parts from chipboard can be ordered in a furniture shop, where they will not only cut out high-quality parts to the specified dimensions, but also use special equipment to apply a PVC edge, which is much stronger and more durable than melamine. To do this, when developing a detailed diagram, it is necessary not only to indicate the dimensions of the parts, but also the location of the edge application.
Furniture edge
Stage 4: preparation and assembly of parts
As noted earlier, you can get high-quality parts for assembly with an edge applied to the ends by contacting a specialized company. In the future, it will only be necessary to make holes for the fittings and assemble the set.
Edgebanding in a workshop environment
The advantages of ordering sawing in a workshop are as follows:
- Saving time and effort.
- There is no need to purchase the appropriate tools or equip the premises.
- High-quality results and perfect fit, requiring no modifications during the assembly process.
When cutting parts yourself, you need to prepare a so-called cutting card, which will allow you to get the maximum number of parts from one sheet of material. You can use a special computer program for these purposes.
Cutting card developed in a special computer program
When creating a cutting card, consider the following:
- When placing parts, 10 mm are retreated from the edge of the sheet.
- Between the parts leave a space for cutting of at least 4 mm.
- When arranging the parts, leave space for a through cut.
- If it is necessary to cut a whole sheet, then the indents from the cut line are 4 mm.
Details must be signed
Note! The cutting of parts should be as accurate as possible, taking into account the fact that the parts will still be polished, their size will decrease slightly, and if the parameters of the parts are initially inaccurate, gaps and cracks will appear after assembly.
Stage 5: assembling the frame
You should start assembling the headset by forming the frame. For its manufacture, sheet material is used, the thickness of which is 18 mm.
Table 3. Frame assembly
| Illustration | Description |
Step 1 | Guides for drawers and closers are fixed to the inside of the side parts. Make holes for the shelves. |
Step 2 | The bottom is attached to the sides using self-tapping screws for wood, confirmations or minifixes. The joints will be more reliable if they are pre-coated with sealant or wood glue. |
Step 3 | Attach the spacer element under the tabletop. |
Step 4 | When all horizontal lines are mounted, use a level to check the geometry of the resulting box, measuring both diagonals. When assembled correctly, the diagonals should be equal. |
Step 5 | Install a back wall made of thin plywood. Fixation around the perimeter of the box is carried out using furniture nails or staples. |
Step 6 | Fix legs for floor cabinets and fasteners for hanging on wall drawers. |
Prices for popular models of screwdrivers
Screwdrivers
Note! To prevent the heads of furniture bolts from being visible from the outside, they are covered with decorative overlays to match the wood.
Furniture plugs
Stage 6: hanging the facades
Facade structures include a front element with a drawer handle and hinged doors.
Drawer elements
A drawer is made as follows: a frame is assembled from the side elements, the guides are fixed, the bottom and the front element are attached, through which the handle is drilled. After the frame (frame) of the box is assembled, it is recommended to check the coincidence of the diagonals and only then attach the bottom and front.
Telescopic guides for drawers are modern fittings that allow you to effortlessly open even massive structures. Would you like to learn in detail about the installation of telescopic guides and the correct calculation for their installation? Read the special article.
The main task, despite the simplicity of the design, is to correctly and evenly secure the façade.
Table 4. Box assembly
| Illustration | Description |
Step 1 | On the inside of the box, self-tapping screws are screwed in on both sides. |
Step 2 | It is necessary to screw in so that the self-tapping screw remains flush on the outside. |
Step 3 | The facade is applied and a gasket is placed between it and the top cover of the cabinet, the thickness of which is equal to the calculated value. It is convenient to use pieces of insulation wire of the required diameter. So, if the calculated distance is 4 mm, then the wire is taken of this diameter. |
Step 4 | The self-tapping screw is screwed through the holes for the handles to temporarily fix the facade in a given position. |
Step 5 | Tighten the screws so that they fit into the façade array. |
Step 6 | The “temporary” screws are removed. |
Step 7 | Using a drill, drill a through hole for the handles. |
Step 8 | Fix the handle with a screw. The length of the screw should be several millimeters longer than the material of the drawer and facade. So, if there are two thicknesses of 18 mm each, the screw is taken 40 mm long. |
Table 5. Attaching doors to drawers
| Illustration | Description |
Step 1 | Using a Forstner drill, recesses for the hinges are made. |
Step 2 | The hinges are inserted into the recesses and leveled using a level. |
Step 3 | Using a thin drill (1.5 - 2 mm), marks for the screws are made. |
Step 4 | The hinges are fixed with self-tapping screws (16 mm). |
Step 5 | The counter strips are unscrewed from both hinges and must be secured to the side of the cabinet. |
Step 6 | Mark 3.7 cm from the edge of the cabinet - placing the strikers at this distance will ensure that the door closes tightly. |
Step 7 | Make marks with a thin drill and fix the strips with self-tapping screws. |
Step 8 | The loops are inserted and tightened. |
Stage 7: installing the countertop
After the bottom drawers have been assembled and secured to each other using intersection ties, proceed to the installation of the tabletop. Install it on the resulting frame, first checking its evenness. There are several fixation methods:
- Using self-tapping screws.
- Using corners.
- Using special fasteners.
End caps protect the tabletop material from moisture
The ends of the tabletop, before installing it, are pre-protected with a metal edge, which will reliably protect the material from moisture.
Table 6. Installation of metal edge
| Illustration | Description |
Step 1 | Silicone is applied to the ends of the tabletop. |
Step 2 | The silicone is evenly distributed over the end. |
Step 3 | Press the metal bar. |
Step 4 | The bar is fixed with self-tapping screws. |
Table 7. Tabletop installation
| Illustration | Description |
Step 1 | The lower modules are connected and placed in a single horizontal plane. |
Step 2 | Drill holes for self-tapping screws. |
Step 3 | Install the tabletop and secure it with self-tapping screws. |
Step 4 | Markings are applied along which the hole for the sink will be cut. |
Step 5 | In the corners of the markings, holes are drilled for the jigsaw blade. |
Step 6 | Use a jigsaw to cut out a hole for the sink. |
Step 7 | Secure the sink using sealant. |
After this, the equipment is connected, drawers are installed and the facades are hung.
Antique style solid wood kitchen trim
An antique solid wood kitchen is a collection of cabinets, countertops, chairs and shelves that showcase the beauty of the natural material. This is achieved in various ways: tinting, patination, brushing, carving, polishing, inlay, painting, etc. Antique pine kitchens are the simplest possible option, and since the material is inexpensive, such a set can be painted in a suitable color .
Antique wooden set
In order for the furniture to “play”, it needs to be provided with a suitable design - finishing of the walls, floor and ceiling.
Walls and apron
A beautiful kitchen in the old style must certainly have an apron made of traditional materials: ceramics, mosaic, terracotta. The remaining walls are usually finished in such a way as to further emphasize that this interior is created in an antique style. For this purpose, cladding with natural stone, ceramics, and natural wood is used. You can expose the brickwork and coat it with a special compound to get a refined stone wall.
Panel on the apron
Painting the walls will cost significantly less. In this case, preference is given to textured compositions in calm natural colors: beige, wood, olive, terracotta.
You can even get by with covering the walls with white acrylic paint, but under no circumstances should you give up the apron.
Floor and ceiling
The most budget-friendly option for finishing the kitchen floor is laminate. For a country or rustic-style kitchen, models are chosen based on solid wood with the widest possible slats or imitation of natural stone. Accordingly, a more expensive alternative is wooden flooring, parquet or cladding with natural stone or porcelain stoneware.
Floor lined with natural stone
For finishing the ceiling, solid wooden beams or their modern replacement - acrylic or polyester moldings that imitate solid wood - are best suited. The Provence style corresponds to stucco molding and a simple whitewashed ceiling, and for a cowboy style, cladding with boards or wooden panels would be a good idea.
Wooden ceiling decor
Trend or tradition?
The use of old boards when decorating the interiors of city apartments, country houses, restaurants or showrooms is considered by many to be a tribute to modern fashion, another trend, which could not have come at a better time at a time in which everything exclusive, unusual, and non-standard is valued. But this opinion is only partly true.
Each person at all times tried to make his home individual, not like everyone else, experimented with styles, furnishings and decor. And of course, from time immemorial, people have used wood to decorate their houses, which added warmth, coziness, and created an atmosphere of comfort and harmony with the outside world. The new houses smelled of wood and fresh resin, but they lacked the atmosphere of life, family traditions and touching memories.
Zoning the dining area by finishing the wall with a wide barn board
Light wooden floor with an aged effect
Only over the years did the boards absorb the spirit of the family, the change of generations, smells, memorable cracks and marks appeared on them, layers of paint changed, forming the so-called patina of time.
New generations, returning to the house of their ancestors, recalled their childhood with nostalgia, looked at photographs of grandparents, young parents, immersed in an atmosphere of domestic serenity, accompanied by the slight creaking of old floorboards. And it became so sad when the old house was being demolished, the fence on which things were dried was dismantled, and the boards were burned in the oven, not a trace remained of the barn, and the leaky boat was used for firewood.
In a rapidly changing world, there was no place for old things, and the glossy shine of plastic, the cold shimmer of metal and glass, the severity of concrete and granite, which replaced natural wood from the interiors of progressive city dwellers, deprived many of the chance to express individuality. History faded into history, and was replaced by luxurious but empty glamor and practical but detached high-tech.
But everything is cyclical, so residents of megacities soon began to miss what the post-industrial era could not offer: home warmth, traditions, harmony. By the end of the 20th century, everything natural began to return to fashion, eco-style and vintage became the favorites of the era, and the reuse of old things acquired its army of followers. The new interiors acquired what they had previously lost: soul, the application of the ideas of harmonious coexistence of man and nature, history and character.
Warm atmosphere of the room thanks to natural materials
Cozy kitchen-dining room located on the attic floor
Modern owners of new apartments and newly built houses make a lot of efforts to give their home a character with history, to create a kind of family nest. Old boards in the interior cope with this task perfectly, playing a completely different role in their renewed life than in the past.
Training video: DIY wooden kitchen ↑
Now you know how to make a cabinet, cabinets, table and other kitchen furniture with your own hands from plywood. As you can see, this is not too difficult and much cheaper than buying a ready-made headset, however, it will take a lot of time to manufacture. If the laurels of a master furniture maker are alien to you and your budget allows you to order an original kitchen according to your own or a sketch proposed by the designer, then turning to specialists will save you from unnecessary hassle and guarantee a high-quality and quick result.
- VKontakte