Drawing with sand on a specially equipped table with lighting is in great demand among children and adults.
You can purchase such a product either ready-made in a store or make it yourself.
Sand painting has many benefits. In addition to developing fine motor skills, people get a lot of positive emotions from such an activity.
Materials
Before you start building a sand painting light table, you need to make a preliminary drawing. This drawing indicates the dimensions of the future product. The materials and necessary tools are selected.
Particular attention should be paid to the choice of manufacturing materials. For the countertop, you need to choose milky (white) acrylic , 5 mm thick. The light will be evenly scattered on it. The advantages of acrylic include:
- resistance to mechanical damage;
- safety in operation;
- durability.
Help : this material does not crack or break even under significant loads. Therefore, you don’t have to worry about your child getting hurt.
Stage 3: Trim the corners
Each corner of our table is reinforced with chipboard blocks. They prevent us from installing thick acrylic. If you trim them, they will serve as a good support for the glass. It is necessary to trim to the thickness of the acrylic; this can be done with a regular mounting knife. Be careful, the main thing is not to cut yourself, if you cut off more than necessary, then it’s okay, with the help of scraps and PVA glue you can increase the required height.
Once we are sure that the thick sheet of acrylic fits perfectly into the bed prepared for it, we can begin painting the inside of the table. It may seem that this is not necessary, but it is not. The white color will help diffuse the light more evenly and increase the brightness of our light table.
Dimensions
There are no specific standards for what size a children's sand painting table should be. Here it is worth starting from personal wishes and the characteristics of the room . If the size of the children's room allows, you can make a fairly spacious and large table. It can be installed in the corner of the playing area. If the room is small, then it is worth saving free space and making a mini table for sand painting.
In any case, the child will be interested in creating his favorite cartoon characters, dogs, cats, both on a large table and on a small one.
DIY light table for sand painting
Hello, dear readers, guests, friends.
Today I want to tell you about one device that we have long dreamed of and now we, happy and contented, can enjoy drawing in the sand. You probably already realized that I’m talking about a sand table with lighting. I had been looking at them for a long time, I even searched online to order Dasha, but every time I was stopped by the cost of the table (everything I liked cost from 10 thousand). So I asked my dad to give Dasha a New Year’s gift - to make such a table. My dad has golden hands, so if he wants, he can do anything! And so dad didn’t let me down and gave Dasha, and what to hide, a gift to me.
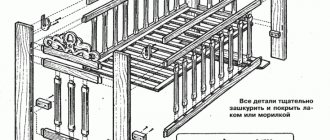
As it turned out, it is easy and simple to do, the main thing is that the arms grow from the right place. It is based on a wooden panel (for furniture, in my opinion), with boards attached to the sides to form a box. There is a sand compartment inside. The inner side of the compartment is 5 cm lower than the outer borders. An LED strip is attached around the perimeter of the inner box and a power supply is attached, from which a cord with a switch comes out. On the sides of the inner drawer there are corners fixed (at the same height as the board) and a thick matte org is placed on top of them. Glass. Already when the box was ready, dad thought that the LED strip should have been made not monochromatic, but flashing with different lights (several modes). But for now we unanimously decided that let it remain like this, and if he gets tired of it, he will improve the table for us. You can put a box like this on legs, but I asked to leave it exactly like this, I like to draw while sitting on the floor, and so does Dasha.
How do we play with the table?
- we just draw lines, patterns, abracadabra, write, try to draw images. Draw with your fingers in the sand or put sand in your fist and draw with sand that pours out of your hand
- we draw plot pictures and act out stories using pebble figurines (they glow so beautifully in the dark)
- we draw patterns with repetition. For example, we visually divide the screen into 2 parts and, in turn, each in his part, one player draws an element, the second repeats it. Then they change places. The result is a symmetrical pattern
- We are trying to come up with different ways to draw with our hands, fingers, brush, spatula, sticks, etc.
Drawing on sand in the dark looks more like a kind of sacrament that brings the participants in the process closer together. It's like magic, a fairy tale created with your own hands. Drawing on sand, including on a sand table, has a beneficial effect on very active, restless children. Drawing like this calms them down and helps them learn to concentrate. This is useful for mothers too