Tips for installing a vanity sink in your bathroom
The furnishings in the bathroom should be stylish and match the overall interior of the room. Each element should provide convenience and comfort, this applies to the washbasin. This element is the main one, so you need to approach its arrangement with particular care. Installing a sink with a cabinet in the bathroom will not take too much time, and this element looks very attractive. In addition, there is now a huge variety of cabinets in color, size, style that will fit perfectly into the design of the room and will suit any size of the room.
Varieties of cabinet models
To meet the needs of customers, manufacturers produce different models for washbasins:
- Rectangular models are available in a strict version. They are often installed in a classic bathroom.
- The corner model looks stylish and compact. The corner of the room is put to good use and additional centimeters of space are freed up.
According to the method of fastening and installation:
- For rooms with limited space, suspended structures are selected. They make the room stylish and transform it.
- Floor-standing ones are in greater demand, especially those with legs. They are installed on any floor covering.
How to choose a place to install cabinets
The washbasin with the cabinet has been selected, now you need to choose a suitable place in the bathroom for its installation. Be sure to consider the dimensions; the product must fit exactly into its place. It would be nice to place it near the bathtub, this will ensure ease of use.
It is better to select the area for installing the cabinets before work on the distribution of communications and pipes begins.
Be sure to remember the recommendations for preparing a place for installing a cabinet:
- measurements are taken of the bathroom room and divided into sections;
- think about where the location of the bathtub, shower, and sink should be;
- be sure to take into account the presence of shelves and drawers. They can become an obstacle to the supply of pipes and fittings for connecting water to the mixer. It is better to provide for this option earlier, move the shelves so that they do not interfere with plumbing fixtures. You may need to trim it a little, but do it carefully, do not damage the structure of the furniture or spoil its appearance;
- in cases where the sewage system comes out of the floor covering, and it is planned to install a cabinet in this area, then in this case everything is simple. In order for the product to fit into the place and not disturb the sewer elements, its bottom must be trimmed. It is imperative that after trimming the bottom, the edges are treated with a protective base.
Furniture installation location
The easiest way to choose where to install a sink that is supported by furniture in the bathroom is to install it in place of an old model of plumbing fixtures.
- At the stage of planning the arrangement of all the interior items of the room, as well as based on the location and distribution of sewer and water supply pipes, the installation location of the structure is selected. Depending on the location of other items, furniture for the washbasin is selected according to size.
- It is recommended to check in advance at what level the outlet of the hot and cold flow water fittings will be located. It is recommended to select a model where the middle shelf will not interfere with the laying of pipes, so that the shelf is lower than them.
- Typically, sewer pipes come out of the floor, so connecting the sewer and siphon cannot be done without cutting holes in the shelves inside the furniture. You need to look at what material these shelves are made of so that they do not fall apart after being exposed to a hacksaw.
How to install
The washbasin for the cabinets has been selected, the place has been prepared, we proceed to the installation itself. Usually this piece of furniture is sold along with the necessary fastening and connecting elements, and sometimes the necessary tools for assembly and installation are included. There is a diagram or installation instructions available. But you are unlikely to have to use a diagram or instructions; usually the design is so simple that you can install it yourself. And if you don’t need to trim, file for plumbing, communications, then this will take a maximum of 1-2 hours.
Mixer installation rules
Before you begin installing the cabinets, you should install the mixer and siphon:
- The mixer should be accompanied by instructions with an installation diagram, with the help of which this process will become much easier. The kit should include several pins, two washers (rubber and moon-shaped), a round gasket for the lower part;
- You need to screw two hoses to the mixer for hot and cold water. You should be especially careful when choosing hoses; rubber hoses have low strength and often break and leak. The best option would be products made of metal-plastic material. Do not tighten it too tightly, otherwise the gaskets will be damaged and the connection will leak;
- Studs are fixed into small holes at the bottom of the mixer;
- install the gasket and insert the faucet into the hole in the sink. And on the bottom side you need to put a moon-shaped washer on the studs, and a rubber washer is placed on top of it;
- The washers are secured with nuts. The nuts are installed on the studs and tightened thoroughly so that the faucet stands firmly on the sink. Some faucets are secured with a large nut on the bottom side for greater reliability;
- after that we proceed to install the siphon. First of all, we check all the parts of the siphon; there may be burrs on them. If they are present, they should be carefully cut off. Otherwise, after installation, gaps will form at the joints, through which unpleasant odors will subsequently pass;
- We put a cover with holes on the drain hole and insert a long screw into the center;
- a receiving-type pipe with a seal made of rubber material is placed under the drain hole;
- The cover and the pipe should be secured with a screw. Tighten the screw as tightly as possible so that the pipe fits tightly enough to the sink;
- the remaining part is collected after assembling the cabinets and installing the sink. A coupling nut with a conical gasket should be placed on the pipe. We screw the top part and secure the siphon lid.
How to make a sink cabinet with your own hands
It is not always the area of the bathroom or some of its specific features that allow the cabinets offered for sale to be placed there. And many people ask the question: “how to make a cabinet under the bathroom sink with your own hands?” We will try to answer this in the instructions below.
To make a bathroom vanity cabinet with your own hands, you will need tools.
Materials
A do-it-yourself bathtub sink cabinet can be made from the following materials:
- Drywall. It is inexpensive, can be waterproof, and products made from it look beautiful. However, a significant drawback is its fragility, so the frame must be made of a more durable material;
- Tree. It is a durable material, but expensive. In addition, it must be impregnated with special solutions to make it waterproof;
- MDF. Widely used for making DIY washbasin cabinets. Due to special treatment, it is water resistant;
- Plastic. It is also not afraid of moisture, has a long service life, but a significant disadvantage is its vulnerability to mechanical stress, as a result of which scratches appear over time;
- Combined bedside tables. For example, the frame can be made of a wooden block, the sides and doors can be made of MDF, and the tabletop can be made of plasterboard.
Use quality materials to make your vanity cabinet.
Finishing and decorating a bathtub cabinet can be done using self-adhesive film, varnish and waterproof enamels or veneer. The latter is the most expensive, but also the most beautiful material.
Design
Any cabinet under the sink consists of the following parts:
- frame;
- table top;
- sidewalls;
- doors;
- hanging parts.
There are many options for making a cabinet under the sink.
The frame, which is the load-bearing part and takes on the main load, is usually made of wooden blocks. The remaining parts that do not carry loads can be made from any other materials, based on the taste and preferences of the owner.
Connections
Prepare the tool you need in advance. Find on the Internet a ready-made drawing of a cabinet suitable for your bathroom. It must necessarily indicate the dimensions of all parts.
Next, to make a sink cabinet with your own hands, transfer the images of the parts from the drawing to the material of your choice using templates cut from whatman paper. Cut out the parts along the marked lines.
After assembling the product under the bathroom sink with your own hands, you can begin processing the finished structure.
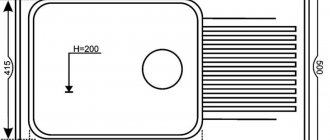
The cutout in the countertop under the sink is done as follows: using a drill, make a hole in the countertop on the cutout line into which the jigsaw blade will fit, and cut along the markings you made.
Before you start work, you should decide on the choice of materials.
Once all the parts are ready, you can begin assembling the frame. Next, attach the countertop to the frame you made, into which you install the sink with the faucet and siphon already assembled.
Installation
Install the structure in its place; for reliability, you can attach the frame to the wall with corners. After this, connect the sewerage system to the siphon and the supply hoses to the mixer. Next, you can install the side of the bedside table in place, install shelves and drawers, and hang doors.
The sink cabinet can also be constructed differently, using slats and boards.
What to do if there are no mounting holes on the cabinet
Sometimes products may not have holes for mounting to the wall. Basically, this problem often occurs with cabinets made in Turkey. Some consumers believe that it is quite difficult to attach this product to the wall in the bathroom and try not to purchase designs.
What to do when the product has already been purchased? Many people think that they can refuse and return it to the seller. Yes, of course, this can be done, but not always. The product may not be accepted, for many reasons. And if it is damaged and has defects, then it will definitely not be accepted back. If, of course, you want to waste time and nerves, then you can try. As a result, maybe they will replace it with a cabinet with holes. And if that doesn’t work, you can try installing a structure without holes.
It can be installed using a simple method:
- ordinary silicone is used as fastening instead of bolts;
- due to the fact that the structure rests on the cabinet, it will firmly adhere to the silicone mixture;
- it is important that the wall surface is strong and its covering is made of high-quality tiles;
- in this case, there is no need to drill the surface of the walls, leaving them in strength and good condition. And the appearance of the design will remain in perfect condition.
Installing a cabinet using silicone is suitable for those who do not want to spoil their bathroom wall covering, especially if it is of low strength. In addition, this installation method is much faster than using bolts and drilling.
Installing a bathroom vanity vanity is a simple process that does not require much work or knowledge. You can do everything yourself without resorting to the help of professionals. The main thing is to choose a suitable design and correctly calculate the place for its installation. With this approach, you can get a comfortable, stylish, functional room.
Installing a sink with a cabinet in the bathroom
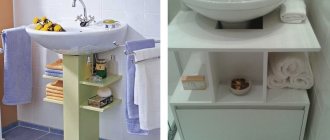
One of the essential plumbing fixtures for a bathroom is a sink. Bathroom washbasins differ in shape, configuration, installation method and connection to communications. One of the most used options is to install a sink with a cabinet in the bathroom, since this model allows you to organize the storage of towels, detergents and various useful items in a convenient place.
Features of installing a sink on a wall-hung cabinet
Hanging sinks are a piece of plumbing fixtures that are attached using special brackets. In most cases, this type of sink is installed in conjunction with hanging cabinets. Such designs save space well and are best suited for a small bathroom.
The most important stage is installing and connecting the sink. All further use of the accessory depends on correct and reliable installation. Before you begin installing new plumbing, carefully dismantle the old one. It is important to disconnect the communications correctly so as not to damage them.
The next step is to choose the installation height of the sink, which determines the ease of use of the product by all family members. The sink itself is usually mounted on brackets, which allows the structure to be more firmly installed. Do not forget to turn off the water before starting any work.
When installing a sink on a wall-hung cabinet, you need to remember that the cabinet will not only decorate the bathroom, but also hold the sink itself. In this case, sinks can be built-in or overhead (installed on top of the cabinet). In any case, all communications will go inside the cabinet.
A wall-hung cabinet with a sink is the ideal solution for a stylish and laconic design of a small bathroom. It is better to entrust the installation of the structure to professionals.
Features of sinks with a cabinet
The advantages of washbasins with a cabinet include the fact that in addition to providing storage space, the cabinet perfectly covers all supply lines, even if they are located slightly away from the bowl. In addition, cabinets are made in various styles and design options, so they can serve as an additional decoration for the bathroom.
Note! The cabinet is supplied both assembled and disassembled. The disassembled cabinet is accompanied by a drawing and step-by-step instructions for its assembly.
Types of sink cabinets
Floor-standing washbasin cabinets can be divided into two types according to the type of design:
- Rectangular: considered a classic and the most common option. Suitable for bathrooms of any size.
Compact rectangular washbasin.
Wide sink with cabinet for large bathrooms. Corner sinks are a more interesting and individual option. In small bathrooms, such sinks allow you to optimize and save space, and in large rooms they emphasize style and status.
The compact corner sink allows you to optimize space as much as possible.
Premium corner basin for large bathrooms.
Features of installing a wall-hung cabinet under the sink
The process of installing a hanging cabinet is considered the most important. This requires special preparation, which includes several steps that must be performed as accurately and carefully as possible. This includes assembling the cabinet itself, neatly connecting it to the sink, and hanging it from the wall.
The process is quite labor-intensive and requires certain skills. Therefore, it is best to contact a professional. You can find an excellent furniture assembly specialist on the website https://remont-po-price.ru/sborka-mebeli/. All work will be done quickly, efficiently and reliably. Prices are transparent, quality is guaranteed! Moreover, you can at the same time order the assembly of any other furniture for the remaining rooms.
If you still decide to install the cabinet under the sink yourself, then we’ll look at everything in detail step by step.
The first step is to check the condition of the walls. The method of fastening the structure itself also depends on the condition and material of the walls:
- If the wall is loose, then a special frame is usually assembled onto which the cabinet is attached.
- If the wall is finished with plasterboard, drilling is done through and special reinforced bolts are inserted. If the plasterboard structure is weak, then the nuts on both sides are screwed on top of special metal plates, which will create additional fastening.
- If the walls are strong but old, then finishing work must first be carried out. The walls are pre-strengthened and leveled with plaster. The surface must dry completely, after which the process of laying the tiles begins. Only after the tile adhesive has completely dried does the installation of the cabinet take place.
Before installing the cabinet, the cabinets are assembled. The assembly process itself is simple, the main thing is to do everything according to the attached instructions. It is also necessary to first check the entire set of attached fasteners and shelves.
When installing the structure, special tools and fasteners are required. The weight of the structure is considerable, and given that various accessories will be stored inside the cabinet, it is necessary to install it securely. That is why it is best to entrust the installation to a specialist - this will save effort and time, and also ensure the quality of the work.
Criterias of choice
In addition to the installation method, when choosing a washbasin and a stand for it, the following aspects are taken into account:
- Overall compatibility of the bedside table and sink with the bathroom design.
- The material used to make the sink table is waterproof and can withstand temperature changes and high humidity.
- All fittings (handles, hinges, legs) are made of plastic or stainless steel so that they do not become rusty during operation.
Advice! It is recommended to purchase a set consisting of a bowl and a bedside table for it. In this case, installation will be quick and there will be no problems, since the seat of the stand ideally matches the shape and design features of the sink.
Attention is also drawn to the functional features of the cabinet under the washbasin. The following additions will be useful:
- A laundry basket attached to the door will further save space in a small bathroom.
Cabinet with laundry basket.
- Fastenings for internal shelves should have several positions so that it is possible to adjust the height of each shelf to the size of stored items or detergents.
- The height of the sink table should provide comfort when washing for every family member, regardless of his height.
- It is desirable to have adjustable legs, which will allow the stand to be leveled and allow cleaning underneath it.
Note! If the bathroom has a heated floor, high legs for any furniture are simply necessary to ensure heat transfer from the heating system.
Determining the optimal installation location
One option is to install a new sink in the same place where the old plumbing was located. But this is not always possible, since the cabinet box most often does not fit into the previously allocated space. And moving the location of plumbing fixtures during repairs is not uncommon. Therefore, it is best to think through the location of all plumbing fixtures, as well as pieces of furniture, at the renovation design stage. To do this, the bathroom is conditionally zoned into several areas, in each of which a device is installed (bathtub or shower, toilet, sink, washing machine).
Based on the planned location of the plumbing, water supply and sewerage pipes are laid, because the optimal supply points are different for each plumbing fixture. When supplying hot and cold water, the location of the fittings for connecting flexible hoses must be calculated so that they are located between the shelves. This will ensure convenient connection and replacement of hoses during operation.
As for the siphon and connecting the corrugated sewer pipe, you often have to cut holes in the shelves to connect it. It is for this reason that it is better to calculate everything in advance and bring the sewer pipe to the level of the connection points to the water supply.
To avoid having to cut holes in the shelves of the cabinet, all supply points must be brought out in advance to a place convenient for connection.
Installation technology
After communications have been connected to the sink installation site, installation begins. Let's consider the main stages and nuances of installing a sink and a floor cabinet with your own hands.
Step 1
If the stand was delivered disassembled, it must first be assembled, strictly following the manufacturer's instructions, which indicate the order in which all elements should be assembled. For the work you will need a set of screwdrivers of different sizes, as well as a hex one.
Step 2
The next stage is assembling the sink, which includes connecting the mixer and siphon.
The mixer is installed in the following order:
- Flexible hoses are connected to the mixer and tightened with a wrench.
- The supplied O-ring is installed in a special groove on the base of the mixer.
An O-ring is installed in the groove on the back of the tap. The hoses are passed through the hole in the sink, and on the back side the mixer, depending on the model, is fixed with two or one mounting pins.
Attaching the mixer to the washbasin. View from below.
Note! To secure the faucet to the sink, a horseshoe-shaped metal washer and a rubber seal are used.
Then a siphon is attached to the sink:
On the upper side, a metal mesh with a plastic pipe is fixed with a long bolt.
The upper part of the siphon is screwed to the sink with a long metal bolt. A bottle siphon is screwed to the pipe from below. Fixation is carried out using a plastic nut and a conical washer, which is first placed on the pipe.
The body of the bottle siphon is mounted on a pipe coming out from the bottom of the sink.
Important! Siphons are supplied both assembled and disassembled. You need to assemble it according to the diagram that usually comes with the kit. If you don't have a diagram, watch the video below.
Step 3
The sink with a siphon and mixer installed on it is installed on the cabinet. Most often, the sink is additionally fixed to the cabinet with sealant or double-sided tape. But an option is possible when the kit includes fasteners from the manufacturer. Fastening the bowl to the wall with studs is not required, but it is better to secure the bedside table with a pair of dowels to the wall through the back wall to avoid displacement.
Then the assembled structure is moved to the wall in the planned location and leveled using adjustable legs. If such an option is not provided and the bedside table is unstable, place plastic pads of the required thickness under the legs.
Note! If pipes interfere with the correct installation of the cabinet, it is necessary to carefully cut out the cabinet in this place and make a recess for communications. This is done based on the specific situation, some examples are shown in the photo below. Be sure to treat the cut areas with sealant or wax to prevent the chipboard from swelling from moisture.
How to properly install a sink with a cabinet in the bathroom?
When installing a sink with a floor cabinet, the procedure is as follows: Place the washbasin on the cabinet. Using a level, make it strictly horizontal - adjust the legs of the cabinet.
- Mark on the wall where the washbasin will be fixed.
- Make holes in the wall. Their depth must correspond to the size of the fasteners used. For tiles, take a feather drill, for concrete - with a carbide tip, and use the drill in impact mode. Fix the washbasin with anchor screws or metal pins screwed into dowels.
- Install a mixer and outlet with a siphon. Place the washbasin on the cabinet and press it to the wall with nuts, screwing them onto the studs. Be sure to place plastic spacers under the nuts to protect the housing from damage when tightening the nuts.
- If necessary, make holes in the cabinet for laying pipes.
- Connect the washbasin to the utility systems. Corrugations or pipes can be used to connect to the sewer system. Rubber seals are always used. To connect to the water supply, flexible hoses with union nuts are used. Install instrument taps on the water supply pipes. Check if there are spacers on the nuts. Connect the hoses to the taps, carefully tighten the nuts and tighten them with a wrench.
- Seal the gaps between the bowl and the wall surface with silicone sealant.
- Open the tap and make sure there are no leaks in the area of the threaded connections. If leaky connections are detected, disassemble the connection, add a thin braid of combed flax to the threads or apply 5-6 turns of FUM, re-tighten the connection and tighten it.
- If desired, attach a mirror to the wall above the sink. Using a tape measure and a level, mark the location of the holes for the fasteners, drill them to the optimal depth, insert the dowels and screw the hooks into them. Hang a mirror on them and check its horizontalness with a level.
Installing a wall-mounted cabinet under the sink in the bathroom has some features, which we will describe below.