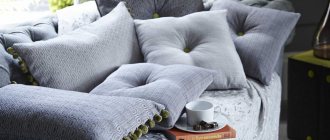
Options for decorative items
To make a decorative cushion in the shape of a cushion, you can take several types of fabric.
They can be combined in a variety of ways. The simplest and most frequently used option is a cross combination of several types of fabric. To do this, at the stage of patterning the outer cover, it is necessary to fold the types of fabric in the required sequence and stitch them so that they form a continuous fabric. The seams must be ironed so that they do not form crumpled parts on the finished product. And after that, on such a colored canvas, make a pattern for the outer pillowcase.
You can use sewn edgings or use them along the end parts of the tie.
To correctly and easily assemble the cylindrical parts of the pillow, you must first sew a round tube. Then take the round end piece and pin it to the pipe, turned inside out all the way around. After this, carefully baste and only then stitch the middle so that the circle does not move and does not gather the cylindrical part.
The rest of the sequence of actions is carried out similarly to the process described above.
Since sewing a bolster pillow at home is quite simple, you can make several products at once. Some of them are for decorative purposes, and the other part is for sleeping properly.
Materials
Over the long period of time the bolster pillow has served people, the tailoring of the uniform has remained virtually unchanged. But the list of fillers has expanded.
Today, modern technologies and natural materials allow you to choose a filler:
- Buckwheat husk - it is believed that it gives the best healing effect. During rest, the neck receives a micro-massage. For people with bronchial asthma, husk is recognized as the best option for its antibacterial and antiallergic properties.
- Polyester is an economical filler option. It is not hygroscopic and does not conduct air well, so it is inconvenient to use in hot weather. To reduce the “greenhouse effect” during use, the roller should have a pillowcase made of natural fabric. The advantage of polyester is its ability to take the desired shape, so all that remains is to fold the roller correctly.
- Polyurethane foam is perhaps the most popular filler today. It does not absorb dust and dirt. It does not harbor mites, mold and mildew. While sleeping on the polyurethane foam filler, it will easily take the shape of the human body. But without pressure, it will return to its previous state. If the need arises, polyurethane foam is easy to clean.
You might be interested in this: Patterns and features of sewing skirts with yoke
Important! It is not recommended to use down and feathers as filler.
The fabric is used twice in this product - for the pillowcase and for the filler cover (nappernik). If the pillow is intended only for sleeping, choose a natural and light fabric. To make this item decorative, the materials can be different, corresponding to the general color of the place. If desired, additional elements are used on the pillowcase - buttons, ribbons, cords.
Story
Today, more and more often you can see not standard rectangular pillows, but cushions in the shape of a cushion. This is not just caused by fashion trends or the desire to take care of health - this pillow design is more compatible with the anatomy of the human body. Even in ancient Egypt and ancient Rome, in ancient Asia, people used such models. On frescoes and mosaics you can see this household item of ancient civilizations.
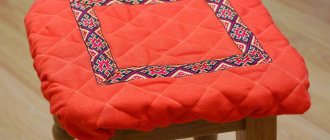
Cushion cushion
Benefits of use
Low physical activity, monotony of work processes, and a sedentary lifestyle lead to spinal deformation and cause diseases of the musculoskeletal system. Osteochondrosis is becoming a disease of young people. During sleep, it is necessary to create conditions for the spinal column to relax and the opportunity to take its natural position - a bend in the cervical region. By using this pillow correctly, you can avoid serious health problems. Sleeping on a bolster will help you avoid headaches, tinnitus, and cognitive impairment.
Varieties
- Decorative
The product can be used as a decorative element for a sofa, armchair, bed and any other seating area. Rollers can be of different shapes - cylinder, horseshoe, bones. They can be made in a funny children's style, in a classic formal style, or in a simple rustic style. You can sew a round bolster on a sofa as a headboard.
Decorative option
- Orthopedic
Orthopedic doctors recommend these pillows for the treatment of spinal problems or their prevention. They are selected in accordance with the parameters of the body - the curvature of the ridge, the length of the shoulder, the favorite position during sleep or rest. You can sew a round bolster for the back or arm and as a support. The neck located on such a support will receive complete rest. At the same time, it remains a decorative element of the room. The therapeutic option differs from a regular pillow in its internal content - the filler should enhance the therapeutic effect. For this you can use the following materials:
- buckwheat husk;
- polyurethane foam;
- latex;
- memorix.
- Antistress
You might be interested in this. Pattern of a children's and adult's hat: sewing order
Pillow with herbs
Rollers for relieving emotional stress are also in demand. They are pleasant to wrinkle due to the filler - foamed polystyrene granules. “Mnushki” help you calm down, take your mind off problems, turning your attention to the pleasant sensations of touching this object.
- Soothing with herbs
If you fill the roller with medicinal herbs, you can also achieve a calming effect on the body during sleep. But before using such a filler, you should make sure that the person has no contraindications to herbal aromas - asthma, pregnancy, allergies, problems with the respiratory system.
The most commonly used are yarrow, St. John's wort, thyme, hops, oregano, sage, geranium, and clover.
Carefully! Oregano, thyme and hops reduce potency in men and can cause abortion in women.
Toy for children
The baby bolster pillow is entertaining and serves as a barrier in the crib. It is best to make this option in the form of a toy, and use fabrics that are natural, pleasant to the touch, and bright colors. For the filler it is worth using natural hypoallergenic materials.
If spots of rash appear on the baby's skin, such a pillow should be removed from the child.
Children's version
Ideas for sewing pillows with your own hands
Now let's move on to the most important thing, that is, the process of making decorative pillows. They can have a wide variety of shapes, sizes, colors, textures. We will give you several options for how to make a pillow from foam rubber, you just have to choose the most successful one.
Heart pillow
She will look incredibly original, gentle, stylish. The pillow itself is the most ordinary, made of two square halves. The most important thing here is decoration:
- It is necessary to cut circles from the fabric. It is very important that it does not crumble, because the edges will not be processed.
- Then wrap one circle around the other so that you end up with a flower.
- At the base, secure the folds with thread.
- When the desired number of flowers is ready, you can lay out a heart from them on the pillow, starting with the outline, gradually completely filling its inner part.
- All that remains is to fluff the flowers with your hands.
Important! Attach the flowers as tightly as possible to make the heart voluminous and thick.
Cushion cushion
This foam pillow, made with your own hands with all the tenderness, care, and love, will help you rest, unwind, and truly decorate your home, diluting it with oriental notes.
The manufacturing process for this product includes three important steps:
- The first stage is the roller. Take pieces of foam rubber, roll them carefully, and sew them together along the long side using a thick, dense thread. Or you can form a hollow cylinder from the pieces and fill it with woolen products inside.
- The second stage is the cover. The main thing is that it sits tightly on the roller, so it is recommended to make it a little smaller in size. Measure the length and width of the roller, add a few centimeters to these values for the seam. As a result, you will receive a pattern that needs to be folded in half and lengthwise so that the front side is inside. Make a stitch on each edge, but leave the middle open. The zipper will be sewn here later. Turn the finished cover inside out and sew a thick lace or decorative braid onto it.
- The third stage is the end parts. It is necessary to cut out several strips of fabric specifically for them, adding one and a half centimeters for allowances. The length of the strips should correspond to the circumference of the roller, and the width to the radius of this circle. Then you should connect the short ends and sew. Baste the ends to the cover, then sew. It is necessary to sew as tightly as possible to the braid. All that remains is to bend and sew the raw edges, thread the cords and ribbons into the drawstring. We insert the roller into the case and tighten the ribbon tightly on the sides. You can sew decorations on top at your discretion.
Bright pillow on the floor
This product will serve you faithfully for many years. Floor pillows are especially popular today, because they not only decorate interiors, but also use them for sitting.
A comfortable pillow can be sewn from triangular fabric sectors. It is important that all sectors are made of the same material, but in different shades:
- It is necessary to cut out the required number of triangles from the fabric and cut off the corners to make the finished product more voluminous.
- Then the sectors are stitched on all sides, both sides are connected facing each other. The main thing is not to forget to leave holes for stuffing.
- All that remains is to turn out the cover, fill it with the prepared filler, and sew up the hole.
That's it, you can sit on the pillow!
Making a decorative pillow with an envelope clasp
The envelope closure is especially popular for pillowcases that are intended for regular nighttime use.
Step-by-step instructions on how to sew a decorative pillow with an envelope clasp:
- Follow Steps 1-3 for the zipper, centering the opening line and adding 4 inches of extra space to the edges of the opening.
- Make a 1-inch double hem along the edge of each additional stretch.
- To assemble the pillow cover, pin the bottom to the top, right sides facing in, lining up the cut edges and overlapping the folded edges. Sew 12mm from the cut edges.
Watch the video on how to sew a decorative pillow with an envelope clasp:
How to sew such a product with your own hands
It is not at all necessary to buy this type of product in a store. Having minimal cutting and sewing skills, you can sew it yourself.
Depending on the style of the room, such sofa decor can be made in the color of the upholstered furniture.
This hand-made bolster pillow will allow you to choose exactly the parameters to suit your own needs, as well as decorate it taking into account the interior of the room.
Before starting work, you should prepare the necessary materials and tools:
- fabric for pillowcase and fabric for base cover;
- threads of the corresponding color;
- decorative elements in the form of cords, buttons, appliqués;
- filler (depending on desires and needs).
Before you sew a bolster pillow with your own hands, you need to make a pattern.
The only important point is that it is not recommended to use down and feathers for stuffing such products.
It is necessary to take your own anatomical measurements, in accordance with the recommendations indicated above. After this, correctly calculate the parameters of the pillow - approximate calculations are also given in the description above.
If you want, you can add various trims along the seam line at the ends of the cover: cord, ruffles, or something else.
Once the dimensions of the bolster pillow are obtained, I begin to create a pattern on paper. This moment is the most crucial, since the correctness of the pattern will determine how comfortable and correctly the pillow will be selected for individual needs.
Having made the pattern on paper, it is transferred to the fabric for the base (napernik).
Then they are duplicated on fabric for a pillowcase, which can serve as both a decorative cover and exclusively a pillowcase for sleeping. It is important to consider that if the pillow is used solely for sleeping on, the fabric of the pillowcase should be as natural and light as possible.
When making a pattern, you need to take into account seam allowances. They should be at least 0.5-1 cm.
This stage should end with cutting out the fabric pattern.
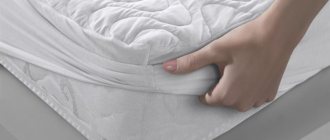
Fold and sweep the napkin.
First, the napkin (bottom pillowcase) is basted, then it is machine sewn along all the seams. Be sure to leave a small area unstitched in order to place the stuffing.
Do your work smoothly and accurately.
First, pin the edges together.
Baste the sides.
Sew the seams using a machine.
Prepare the filling.
Insert the filling into the napkin.
When the filler is compacted to the desired density, you should carefully sew up the existing hole by hand.
Sew up the remaining hole.
The cover is sewn. For ease of use, it can be made with a zipper. This will make it easier to remove and clean the top.
Pattern for a pillow cover.
Sew a pillow cover.
This is what the finished product will look like.
The inner part is placed in the outer pillowcase - the pillow is ready.
How to sew a foam pillow? The whole process will take no more than 15 minutes.
Naturally, a foam pillow is not used for night sleep. As a rule, its scope of application is to install garden furniture, furniture in a gazebo or on a swing on wooden or metal benches.
Foam pillows can be purchased on the most favorable terms online. Meanwhile, if you don’t want to wait for delivery, you can always try to handle it yourself. Moreover, creating a foam pillow requires no more than 15 minutes of your time.
What will be required for the creation process?
The entire necessary instrumental set is described below:
- scissors;
- chalk;
- ruler;
- glue gun;
- a set of needles (if you don’t have a glue gun at hand).
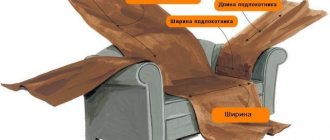
Initially, you need to decide on what surface the future foam pillow will lie on. We are talking primarily about dimensions. Based on the information received, we cut off the required amount of foam rubber.
It is recommended to choose material for the pillowcase that is extremely resistant to mechanical abrasion.
To avoid inconvenience when wrapping foam rubber with material, it is recommended to leave a margin of 20 cm.
Creating a pillow and its decor
You must first make sure that the foam rubber is located strictly in the middle of the material. After that, we start wrapping. We work from edge to edge systematically and carefully rolling up the material, while fixing it with a glue gun.
Thanks to this approach, creating a pillow is extremely fast. However, in order to fit the pillow into a specific design location, it is recommended to add decor to it.
The latter could well be coarse twine or braid. Naturally, we secure them with a glue gun. Note that its use is not appropriate in all cases.
For example, if the pillow is placed outside or on a terrace exposed to sunlight, the pillow may fall apart. After all, the glue in a glue gun is thermal (melts at high temperatures).
When placing a pillow outdoors, it makes sense to stitch it thoroughly.
See also:
Below are slides that are a clear illustration of the described instructions:
Tweet
Pillow for children
A bolster pillow for children must have a specific structure. It must fit the anatomical dimensions of the child and have two sides at the edges. They prevent the head from slipping and will help maintain the spine at the same level.
It is also important for a child to choose the right roller. It is better if it is a product with two sides at the edges.
It is especially important to use it for children suffering from poor posture, headaches, poor sleep and cognitive impairment caused by improperly formed blood circulation in the neck and head.