Selection of design and material
To make a chair, they use ready-made drawings, changing them if necessary: this is easier than coming up with a sketch from scratch. It is advisable to choose designs that have a minimum of connections in order to reduce the risk of product failure.
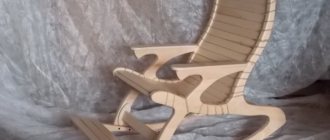
Drawing of an original rocking chair made of thick plywood
Diagram of a rocking chair made from planks, which can be used to make furniture from plywood
Drawing of a rocking chair with a canopy
Diagram of a durable rocking chair made of plywood with solid sides
The choice of material depends on the operating conditions of the future chair.
| Plywood type | Chair installation location |
| FC, FBA, BV | Rooms with moderate humidity |
| FSF, FOF | Outdoors, indoors |
| Pine plywood | Outdoors, indoors |
| Berezovaya | Only inside the house |
The thickness of the sheets for the side and supporting elements is 15 mm, for the manufacture of the strip and back - 10 mm.
Plywood is divided into 4 grades, 3 and 4 are not suitable for creating furniture. The second grade can be used for internal parts that are not visible to the eye. The best choice is the first grade.
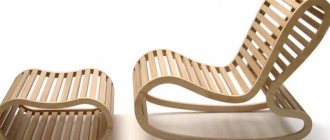
Types of rocking chairs
Let's look at the main types of products:
Classic rocking chairs on regular runners are in harmony with both modern and classic styles. Manufacturing technology does not require extensive experience in furniture production, but the basics of practice must be present. The runners swing smoothly with a small radius, but with strong swing there is a risk of tipping over.
These chairs are made with a low seat for a more stable position.
Rocking chairs on runners with bumpers. If a classic chair needs to be made with an average (normal) seat height, it is recommended to equip the arches with bumpers - the runners are designed so that the ends are curved in the opposite direction.
In this version, the arches prevent the chair from turning over, but getting up from the chair is uncomfortable and hard due to the presence of these bumpers.
Rockers with elliptical arches - chairs guarantee a soft, gentle rocking, but with a large swing there is a risk of tipping over, because of this it is recommended to equip them with bumpers, as in the previous version. For garden plots, we offer the option of elliptical rocking chairs with an awning, which prevents tipping over.
A rocking chair can be small and neat.
Multifunctional rocking chairs 3 in 1 - when sitting down, it looks like a standard chair for level sitting; when tilting back, the runners switch to rocking mode; when reclining further, the chair turns into a lounger.
However, visually such a chair looks bulky and the process of switching from one function to another is inconvenient; sharp jerks of the body are required.
Having considered the main options for chairs, if you have no experience in furniture production, we recommend taking a closer look at the classic version; making a rocking chair is not as difficult as it might seem.
Having decided on the model, it is important to decide on the materials
Features of manufacturing and connecting parts
Some rocking chair designs include bent elements; it’s worth learning how to do this correctly. The parts are placed in a container of water until they are completely wet and become plastic. After that, they are taken out, given the desired shape and fixed in this position. Leave to dry for at least 12 hours.
You can use nails or screws to connect the parts of the chair. You cannot drive or screw in fasteners immediately; you must first make holes at the designated points using a drill whose diameter is equal to the diameter of the screw (nail).
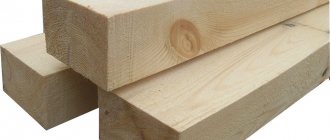
Materials and tools
To make a rocking chair from plywood, you will need:
- blueprints;
- graph paper and pencil;
- several sheets of plywood 1520*800 mm (the exact quantity depends on the design of the chair);
- jigsaw;
- primer, paint, paint brushes;
- fine- and medium-grained sandpaper;
- wood glue;
- milling cutter;
- drill with a set of drills;
- fasteners (wood screws, nails);
- screwdriver or hammer;
- rags;
- plugs for screws;
- scissors;
- mechanic's knife.
Uncover
Before starting work, it is recommended to watch a video where you can see the details of making the chair
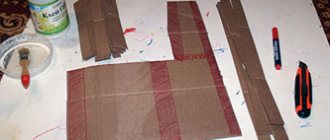
After studying the drawings, transfer them to graph paper. After cutting out the patterns, mark the plywood. It is necessary to place the elements on the surface of the sheets so that the material is used sparingly.
The material should only be cut with a suitable tool:
- for sheets less than 15 mm thick, use a jigsaw;
- more than 15 mm – circular saw.
The sheets are cut taking into account the direction of the fibers - always along. Otherwise, the edges of the parts will delaminate. If it is necessary to make a cross-section, first apply notches to the surface of the plywood using a bench knife.
The cutting tool should not be applied directly to the marking line, but beyond half a millimeter. Then, after sanding the ends of the plywood, the parts will retain the desired size.
Cutting plywood. Chair detail
The edges of each part are treated with medium-grain sandpaper. You should not skip this stage, even if the cut areas look even. There may be small, unnoticeable particles of wood at the edges, which may become embedded in the leather during use of the chair. The surface of the plywood is sanded with fine-grained sandpaper.
If, according to the selected sketch, the parts should have rounded edges, they are processed with a file or special tools: a drill with a milling attachment, a grinder.
Based on the drawings, places for fasteners are marked on the prepared elements. Drill holes with a drill of suitable diameter. It must enter the material strictly vertically. If this condition cannot be met, it is better to drill another hole, retreating some distance from the originally intended point.
After the rocking parts are ready, they are coated with a primer. You should choose antiseptic compounds that increase the resistance of wood to moisture. They wait until it is completely dry, after which they begin to assemble the chair.
Assembly of the structure
To connect the elements of the rocking chair into a single structure, glue and fasteners are used. Due to the high load on furniture, glue alone will not be enough. Nails or wood screws can be used as fasteners.
The parts of the rocking chair are coated with wood glue in places of contact with each other, then additionally fixed with fasteners. The screws are screwed in all the way, slightly recessing the heads into the plywood. The nails are also driven in so that the head is immersed 1 mm into the material.
Finished plywood rocking chair
Excess glue that appears at the joints of parts should be immediately removed with a clean rag - when the composition hardens, it will be difficult to remove it.
After this, the plywood rocking chair must stand for at least a day so that the adhesive composition completely hardens.
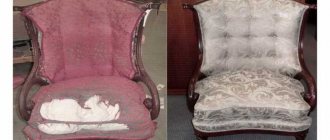
Rules of care
Caring for rocking chairs of various modifications comes down to the following mandatory procedures:
- when using a product with soft covers, it is necessary to promptly remove dust or dirt from them using a household vacuum cleaner or a damp rag;
- in case of heavy contamination, you should try to remove the stains with the same rag soaked in a soapy water solution, and then allow the wet areas to dry completely;
- It is not recommended to leave chairs made of willow in open sunlight (it is advisable to choose shaded places protected from precipitation for their placement).
Removable covers made of various fabrics (suede) are recommended to be washed in soapy water, after which they should be thoroughly rinsed and dried in the open air. In addition to regular wiping with a damp cloth, it is advisable to cover expensive leather upholstery with a layer of glycerin or stearin ointment at least once a year.
fc63a9a597b7cf1d71ea769960acc6b0.jpe
2adf65bd0d0c6624fe009b9c3f56f586.jpe 504bb0f0d81706489020a49071ca260f.jpe 49df798e872bd693178d9ad0578e049a.jpe
Finishing
Having completed the assembly, they move on to finishing.
A plywood rocking chair is decorated using:
- clear varnish;
- alcohol- or water-based stains;
- paints;
- oil or water based varnishes.
Another option is to cover the seat and back with fabric. After the finishing of the plywood rocking chair is completed, the caps of the fastening elements are closed with special furniture plugs. It is permissible to use instead a sealant that matches the color of the surface of the chair.
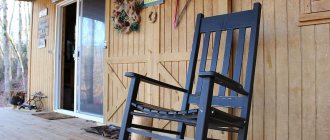
Rocking chair made of plywood with metal crossbars
Rocking chair manufacturing process
A rocking chair made by yourself in a classic style with curved runners will be an excellent option for your first experience in making furniture. Wicker reed elements will also be used, which will create beautiful patterns and comfort during planting.
A rocking chair can easily be made at home.
So, we need 3-layer maple plywood, onto which we will apply pre-created templates and make the frame of the product. You can create a drawing of a rocking chair yourself or search the Internet for ready-made shape options.
We cut out all the elements using a jigsaw and a grinder.
It is very important to carefully treat the surface of all wooden elements; they should be smooth, without burrs or rough areas, therefore, in order for the templates to take the required form, they must also be cleaned with sandpaper
We connect the parts using screws.
Don’t forget that the back and seat of our chair will be decorated with reed patterns, so we leave their central part empty. That is, we only create the frame from plywood. Along the entire perimeter of the resulting frame we make small identical holes at a distance of 1.5-2 cm from each other.
fdbc1008d76d122ca041b0b086bec2d9.jpe
4b0e2077a56ae01797bb7a73b315bf31.jpe
In the future we will attach reed threads to the holes.
After our base is ready, we begin to work with the reed. We interweave it with threads vertically and horizontally throughout the entire surface of the seat, like weaving, and secure it with strong knots in the previously drilled holes.
We perform similar actions with the back of the product.
When the product is formed, all wooden elements must be treated with a protective coating at least 2 times.
After drying, seal with a double layer of varnish.
Let's consider another simple version of the original rocking chair made of plywood. The chair consists of two sidewalls in the shape of a boomerang and transverse rails from wall to wall in the amount of 14 pieces.
The chair is made of plywood 15 mm thick.
To begin with, let's draw out 2 sides of the chair using the template and carefully cut them out according to the markings with a jigsaw. All edges of the sidewall must be sanded with sandpaper.
You should get 2 large “boomerangs”.
Next, from the same 15 mm thick plywood we make 14 rectangular strips 59 cm long and 6 cm thick. We also cut small blocks as supports, their length should be 5 cm.
We glue the supports to the side walls with wood glue and, for reliability, secure each of the bars with a self-tapping screw.
We also attach our guides to these supports with self-tapping screws.
After completing all the above steps, we will have the frame of our rocking chair ready. We treat the sides of the chair with stain in two layers; you can start the second layer only after the first has completely dried.
8f2a67051d59aee5860b7ed4996a0694.jpe f3cf1377520a15766b10f9710b4067ca.jpe bfc463bf3d6af0c8bd5da33de367a2ca.jpe 4caff06ed4841090cc9365b9ee63d 349.jpe da931f62959139edce0588ba2aa134cb.jpe
The ends of the sidewalls can then be varnished or painted with glossy paint.
Our chair is ready.
All that remains is to decorate it. To do this, take soft pillows of the required color or a small flexible mattress and attach it to the frame using ties. Soft elements can be purchased at the store or made yourself. To do this, it is better to take natural fabric as upholstery and foam rubber 5 cm thick.
We cut out the part we need in size from the foam rubber and put a pre-sewn cover on it.
We are sure that making one rocking chair with your own hands will encourage you to conquer new heights, and you will want to make a similar or another rocking chair with your own hands for all family members, so that you can get together on quiet, cozy evenings and talk about events that have happened and plans for the future, slowly swaying on the chairs we made ourselves.
A rocking chair will help you quickly and completely relax.
You can make such furniture according to individual sizes, including children's sizes for the youngest family members. Such evening or morning motion sickness creates a relaxing, calming effect that is so necessary for a person in the modern world. These chairs are environmentally friendly, as they are made from natural materials.
They are beautiful and can decorate your interior in your apartment, on your balcony or in your courtyard.
Most rocking chairs do not require special care; they can easily tolerate cold temperatures. Some materials do not tolerate strong moisture, so such furniture cannot be left outside for the winter.
We are sure that every owner of a rocking chair will consider it his favorite place to hang out.
Making a rocking chair with your own hands is not at all difficult; a minimal set of tools and a great desire are enough.
Installation location
A rocking chair made of plywood is installed not only at home, but also on the street. It is important that the site has a canopy that will protect the furniture from precipitation. Possible options:
- porch or veranda of a private house;
- terrace;
- alcove;
- covered seating area.
If a rocking chair made of plywood will stand in the open air - in the garden, near a pond or in another place - then the structure must be carefully treated with protective agents.
Making a rocking chair is not a very simple process, but it requires precision. Even small deviations from the drawing can disrupt the stability of the structure, so you should be especially careful when cutting plywood and processing parts.
DIY rocking chair made of plywood and rope
Hello, dear readers and DIYers!
Surely many of you have your own favorite chair, but it is very difficult to take it with you to the dacha, or take it out to the garden. In this article, Dekay, author of the YouTube channel "Dekay's Crafts" will tell you how he made a simple rocking chair for relaxing in the fresh air. This chair can also be turned upside down and used as a chair.
This project is very easy to repeat, and all materials can be purchased at a hardware store.
Materials. — Sheet plywood 18 mm thick — Steel stud, nuts, washers M16 — Cap nuts M16 — Polypropylene rope 5 mm — Sandpaper, double-sided tape, masking tape.
Tools used by the author. — Clamps, spring clamps — Hand-held circular saw — Guide for hand-held circular saw — Electric jigsaw — Drilling machine, feather drills for wood — Hand router, set of wood cutters — Open-end wrenches — Pencil, square, tape measure. Manufacturing process. First of all, the author cuts out two identical rectangular blanks from sheet plywood using a hand-held circular saw and a special guide for it. During this process, several plywood strips are placed under the workpieces so as not to catch the surface of the workbench with the saw blade. The saw has a disc overhang limit.
You can make such a guide yourself by reading the following article.
Now you need to cut out two identical parts for the side parts of the chair. To do this, the author fastens the blanks together using double-sided tape. He printed out a template and fixed it to the surface of the workpiece using a glue stick and masking tape.
Large excess sections of plywood are cut using the same hand saw.
Next, both parts are fixed on the workbench with clamps, and the radius elements are cut out with an electric jigsaw. At the same time, the author leaves a reserve of material for subsequent processing.
Precise alignment of the edges is carried out on a belt sander.
With this machine you can also process small internal radii by installing a drum sanding attachment.
Both parts are ready, the author separates them and removes the remnants of double-sided tape. After this, all surfaces are sanded with an orbital machine. You can also round the edges using a hand router and a radius cutter with a thrust bearing. You should also apply a protective coating in the form of varnish, or saturate the plywood surfaces with linseed oil.
M16 steel studs will serve as jumpers for the chair, and they will be secured with regular and cap nuts.
All nuts are tightened with wrenches.
To form the seat and back, the master will use 5 mm thick polypropylene rope. It will take about 200 meters.
Since there is a high probability of the rope getting tangled, he rewinds it from the coil onto his hand.
A loop knot is tied at the edge of one of the hairpins.
Now he begins to wind the rope between the pins, making a turn around each one.
To prevent the coil of rope from accidentally falling apart, the author clamped part of it in a spring clamp. By the way, this process is the longest of all and requires a lot of patience and care.
Having tied the last knot, the author burns the end of the rope with a lighter.
So, the chair is ready. If you place it on a flat side, you get a comfortable chair.
Good mood, good health, and interesting ideas to everyone!
The author's video can be found here.
Source
Become the author of the site, publish your own articles, descriptions of homemade products and pay for the text. Read more here.