25553
If you have a small-sized apartment, where there is not enough free space to place things and wardrobe items, you should make a built-in wardrobe with your own hands, you can remake niches or openings in the walls in a Khrushchev-era building, or equip an attic for a dressing room. This will save space, which is not enough, and money. Of course, this task is quite labor-intensive, but with proper preparation, you can create or remodel a truly convenient built-in structure.
Drafting
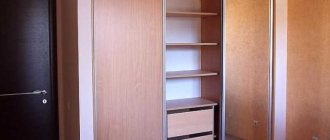
When making a built-in wardrobe with your own hands, the first thing you need to think about is drawing up a diagram and calculating the required materials. All the nuances should be taken into account in the calculation so that the use of finished furniture is as efficient as possible. It is worth considering where cabinets, shelves, hangers and other elements will be located for convenient use of the closet. An important advantage of a built-in wardrobe for owners of Khrushchev is the ability to build it “for yourself” in order to make maximum use of all the free space with cabinets, select the optimal sizes of shelves, and choose the location of all elements.
It would be better if rods for trampolines are built closer to the ceiling, this will allow you to make good use of the cabinet space at the top. Sufficient distance between shelves for clothes is up to 40 cm. If you plan to build in a TV, stereo system or other equipment in the future, you should allocate space. If you are making built-in kitchen furniture, think about the oven in advance. It will require a special place.
It is imperative to make drawings that clearly show how the built-in furniture will look. If you do not have the proper experience in drawing them up, you can find ready-made projects for calculations and manufacturing of built-in structures with the drawings below. It shows in detail how to make a built-in wardrobe with your own hands in a Khrushchev-era apartment, and also experts who understand cabinets or home craftsmen who have already made calculations before when they built a kitchen for a new oven in the country with their own hands or made a corner cabinet with their own hands give useful advice. There will also be photos of finished converted projects. You can take the help of computer programs to design a built-in cabinet with all the smallest details and diagrams.
Important design features:
- Depending on whether the walls and ceiling are smooth in the place where the cabinet is planned to be built, the scope of further work is determined. It is necessary to eliminate all surface irregularities so that the structure is stable and does not collapse;
- all fittings must be the same style and color, located at the same distance from each other;
- Avoid using panels that are too long. They are quite difficult to install and may sag over time;
- Much attention should be paid to the floor. Its surface must be smooth and hard. Parquet or linoleum will not be able to support furniture that is too heavy, and the laminate will move in waves;
- When installing all the elements, it is necessary to take into account that large wooden parts will expand by a couple of millimeters due to exposure to moisture, so you should leave small gaps between them.
If you plan to add glass or mirror elements to the attic closet, it is better to use a special protective coating. It will help protect parts from scratches during use.
Material selection
The material plays an important role when we are planning the manufacture of a wardrobe or remodeling kitchen furniture for a new oven. Indicators such as the strength and durability of the built-in structure are taken into account. The most popular are wood, plasterboard, and wood-containing boards. The pros and cons of each material are shown in the table.
| Material | Advantages | Flaws |
| Solid wood |
|
|
| Drywall |
|
|
| Wood-based boards |
|
|
To avoid the negative consequences of moisture on natural wood, you can treat it with drying oil or a special emulsion.
When choosing a material, you should also take into account in which room the cabinet will be used and under what conditions:
- a built-in plasterboard cabinet cannot be installed in places with high humidity and significant temperature changes. For example, near the toilet, in the kitchen where the oven is built-in, or in the attic;
- MDF and chipboard boards are considered a universal option. They are suitable if you are planning to make a closet in the toilet with your own hands in a Khrushchev-era building, where there is always not enough space, they make excellent built-in kitchens where you can install an oven, also an ideal option for a summer house or attic;
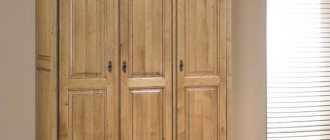
- wood is best used for living rooms or bedrooms. It looks luxurious and presentable in any interior.
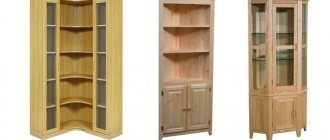
If we are talking about a small room in a Khrushchev-era building, you can think about the design of a corner built-in wardrobe. When arranging an attic house, for example, if it is a summer house, the corner location will also be very convenient.
Drywall
Solid wood
Chipboard
Features and advantages of a winter “refrigerator” under the windowsill
The location for the kitchen cabinet was not chosen by chance - this section of the wall under the window has the lowest temperature in the room in winter.
There are many benefits to having an extra refrigerator.
The advantages of a winter closet include:
- Multifunctionality, rational use of a small area. Kitchens in Khrushchev-era apartment buildings are quite modest, so the issue of saving space is especially acute. A cabinet under the window in the kitchen allows you to store supplies of cereals, canned food, and homemade preparations.
- Low temperature, including in the summer heat. Thanks to the design and placement features, the space under the window opening always remains cool.
- Possibility of redevelopment. If you don't need the cabinet as a place for food, it can be easily converted by installing a heating radiator or regular shelves for dishes.
In Khrushchev-era buildings, the window sill is not only very wide.
The only drawback of the cabinet is the low thermal insulation. With the onset of cold weather, heat leaks due to too thin doors. Therefore, if you decide to remodel, you need to take care of insulation using thermal insulation materials.
The niche under the window can be converted into an additional wardrobe.
Preparing parts and tools
Once you have decided on the design, filling, and materials used, you should look at the diagram again and think about whether you took into account all the nuances before manufacturing. Will you need to add shelves or cabinets, will there be enough space in the closet. Before you begin the construction work itself, you can watch a video about do-it-yourself built-in cabinets, which other home craftsmen have already done. This will help you determine the sequence of upcoming work, the calculation of this or that material and tool.
It is necessary to prepare details for:
- doors;
- guides for wheels if the doors will open according to the principle of a sliding wardrobe;
- rear and side panels, if you will install them;
- roofs;
- shelves for clothes and shoes;
- trempel rods;
- fasteners.
Details
Elements of the room can be used as back, side panels, and floors if the walls are fairly smooth. This will help significantly reduce material costs. In this regard, new buildings are much more convenient compared to Khrushchev buildings. If there are defects or unevenness on the walls, it is better to use a separate structure that should be attached to the wall. A lighter and thinner material is usually chosen as the back panel, since the back side is not load-bearing.
If we are talking about a wardrobe, it is necessary to lay a durable floor in it so that the structure is level and the parts do not wear out quickly. If the cabinet is built into the wall or in the place where there was a niche, you can leave the floor of the room, but it must be level, covered with a suitable material.
As for tools, you should also take care of them in advance so that the process of building the cabinet does not drag on. To work you will need:
- level, square;
- pencil, awl, sharp knife;
- drill with the necessary drills, screwdriver;
- hacksaw for metal.
The set of tools will differ depending on the selected materials, design and location of the cabinet. The preparation of parts should begin with the calculation and cutting of sheets into parts. To do this, you need to draw the necessary elements with a margin of 3-3.5 mm. If you do not have sufficient experience in repairs, working with cutting tools and built-in cabinets, you can order cutting of sheets in a specialized workshop or store. There they will do it quickly, efficiently, strictly according to your sizes. After all the parts are cut into elements, it is necessary to cover the edges with PVC film.
The final preparatory work is the selection of accessories. This includes handles for doors, pull-out shelves, tramples, hooks, “Euro-screws” with plugs.
Tools
Dimensions and drawing
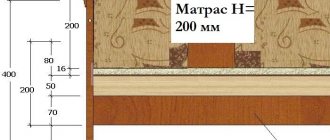
Work on the manufacture of a built-in product must begin by drawing up a drawing. Schemes and drawings are created based on the size of the room and the place where the furniture will be installed, and on the personal preferences of the people who will use the model.
For a built-in structure, it is important that the walls and ceiling are level, since a deviation of even 2-3 mm can affect the quality of the entire product.
The cabinet needs to be drawn from the front. The figure indicates the exact dimensions of the width and height of the product, the dimensions of all shelves and drawers. For a wardrobe, it is necessary to take into account the width of the guides, since these indicators affect the depth of the module.
All dimensions must be calculated with high accuracy.
Door installation
Installing doors is one of the most critical stages in assembling a built-in wardrobe, since it is the doors that represent the façade of the entire structure. When installing swing doors you may encounter the following difficulties:
- if you did not install side panels, but used the wall of the room instead, it will be very difficult to insert elements for furniture hinges;
- An additional tool may be required for drilling large blind holes; not every home craftsman has such a router.
If you plan to install sliding doors, then the easiest way is to attach the guides for them using self-tapping screws, and screw the rollers to the doors themselves. If the floors and canvases are fairly smooth, there will be no problems with installation.
Depending on the material from which the door is made, additional cladding may be required. It can be self-adhesive, PVC film, colorless varnish, etc.
Installing sliding wardrobe doors yourself will require maximum attention and accuracy. Often this design is complemented with a mirror cloth for maximum ease of use. First of all, the rear door is installed; for this you will need screws, screws, rollers, corners, and a seal. The running profiles are secured at the top and bottom. Install the profile handle, corners from below on both sides, and running rollers. The fittings for the front door are attached in the same way.
If you plan to install a mirror, you need to apply a seal along the entire length of the profile; if you plan to insert chipboard, no seal is needed. Lastly, the doors themselves are installed in the grooves of the profiles, and the contents of the cabinet are equipped with tremors, baskets and other useful storage elements. Doors should close and open smoothly, without jerking or unnecessary sounds.
If all stages of manufacturing a built-in wardrobe are carried out as accurately and accurately as possible, then repairing built-in wardrobes will not take very long, and the design itself will only bring convenience and will help keep the house tidy. The video will help you better understand how to make a built-in wardrobe with your own hands. Having better studied the process of how the installation occurs, you will not have to redo anything and everything will work out the first time.
Installation of a compartment door
Pros and cons of hinged wardrobes
Despite the high functionality of folding and sliding doors of room furniture, hinged wardrobes occupy a strong position in interior design. Their design is compatible with a much wider range of materials.
For many years now, designers, when choosing massive furniture, have given preference to traditional shapes and designs. They provide a wide field for the implementation of the most daring ideas and allow you to combine complex decoration with non-traditional materials.
It is believed that only those with spacious rooms can afford a swing wardrobe. However, with proper room planning, such a design will not take up much usable space. Hinged wardrobes are often located in niches or nooks.
Hinged cabinet doors allow you to easily use the entire opening space. Even if the dressing room is in a niche, the doors eat up no more than 2 cm of the cabinet width when opened. Whereas sliding wardrobes take up 10 cm of front space, which can bring certain inconveniences during active use.
One of the most significant advantages of swing doors is noiselessness when opening and closing. This will especially appeal to those who want to buy a wardrobe for their bedroom or children's room. Most sliding wardrobes are very noisy when the roller system moves. Another drawback of compartment doors is clogging of the rails of the moving mechanism. Dust and small debris constantly accumulate in the grooves, which have to be cleaned out with a vacuum cleaner, which is not always convenient.
Despite all the advantages of furniture with hinged doors, it has certain disadvantages:
- Frame-type doors cannot include inserts made of multiple materials. While wood and plastic can be organically combined in a body, this is problematic in doors. As a rule, facade panels are made of glass, plastic or wood. More expensive furniture is decorated with carved elements.
- The large curvature of the floor and walls does not fit well with hinged cabinets. With such deficiencies in the room, it is problematic to adjust the position of the hinge mechanisms. This can lead to an asymmetrical arrangement of the valves and problems when closing.
- In narrow rooms, especially hallways, cabinet doors can cause a lot of problems. When opened, they block the passage and reduce free space to a minimum.
However, when installing such furniture in an ordinary room with a flat floor, problems should not arise.
Important! When installing a cabinet, remember that when open it takes up more space.