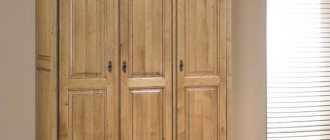
DIY wardrobe. Part 3. Versailles system.
The Versailles sliding aluminum door system for a wardrobe can be assembled by anyone.
In order to make Versailles wardrobe doors, the only thing you need is to simply understand how it’s all done and calculate everything correctly. From the tool you will need:
- drill;
- two drills with a diameter of 5 mm and 10 mm;
- hacksaw for metal;
- Phillips screwdriver or bit for drill RN02;
The Versailles system is a framework system. This means that the doors are a frame with an internal groove around the perimeter, into which you can insert any filling you wish. Glass, mirrors 4 mm thick. or laminated chipboard 10 mm thick.
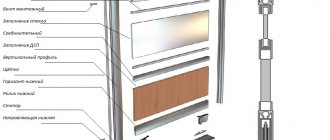
Any door consists of 8 main parts:
- Top beam 0 1 pc.
- Bottom beam 0 1 pc.
- Profile handle 0 2 pcs. It is divided into two types: symmetrical and asymmetrical.
- Bottom roller 0 2 pcs.
- Top roller 0 2pcs.
- Middle beam (optional)
This is what these components look like.
Top beam.
Serves for lining the top of the door. Covers chips at the ends of the filler up to 6 mm in size. depth.
Bottom beam.
Serves for lining the bottom of the door. Has a groove for installing the lower roller. Covers chips at the ends of the filling.
Handle profile.
Used for lining the edges of the door. Acts as a door handle along the entire height of the door. Versailles cabinets do not require additional handles.
Symmetrical handle profile.
For use with symmetrical top roller only.
Asymmetrical profile handle.
For use with asymmetrical top roller only.
Bottom roller.
Installs in the large groove of the bottom beam (pre-assembled door). Only two rollers are installed on each door. The rollers bear the entire weight of the door. Each roller is designed for a weight of up to 40 kg, i.e. one door can weigh up to 80 kg.
The lower roller rolls along special grooves in the lower guide. Serves to ensure soft and silent movement of the door along the entire length of the guide.
The adjusting screw on the bottom of the lower roller allows you to adjust the gap between the door and the adjacent wall (i.e., the wedge that can form between the door and an uneven wall is adjusted and removed).
The spring prevents the door from accidentally falling out of the groove by pressing it against the bottom guide.
Top roller.
Designed to soften the door movement inside the upper guide. The handle is installed on the profile from above. Rollers are divided into: symmetrical and asymmetrical. The choice of rollers depends on the type of profile used (symmetrical or asymmetrical).
Installation of guides
Guides are the final stage of assembling the wardrobe. The main thing is that the size of the rails matches the internal width of the cabinet itself. They are fixed using screws. The step length is indicated in the instructions itself; it is usually 300 millimeters.
The top guide should be installed tightly with the cover. You must first make holes for the screws, if the manufacturers of this furniture have not done this.
The most difficult thing is the installation of the bottom guide, since it is not installed tightly, but at a short distance specified in the instructions, usually it is about 20 millimeters from the edge of the bottom. To accurately determine the size, you can read the size in the instructions, or take one of the doors and place it in the upper guide and mark where the lower wheels of the door go.
The main thing before assembling this stage is that the cabinet needs to be level.
Before screwing on the bottom guides, you need to secure the clamps to avoid broken glass on the door.
Assembly instructions for the VERSAILLES system
Wardrobe system "Versailles"
3. Door assembly
- Take measurements of the opening B, L. For control, it is advisable to do so at several points and cut the workpieces in accordance with the calculation.
- Drill 2 coaxial holes in the upper (at a distance of 7 mm) part of the handle profiles. The inner one is 5 mm in diameter for a self-tapping screw, the outer one is 10.5 mm in diameter for a plug.
- In the lower part of the handle profiles, drill 4 coaxial holes (internal with a diameter of 5 mm for attaching the lower roller and external with a diameter of 10.5 mm for the plug) at a distance of 8 mm and 42 mm from the end of the profile.
- Place the bottom beam, top strip and handle profiles onto the chipboard. Insert the upper rollers and secure the frame with 5x30 self-tapping screws.
- Install the lower rollers into the groove in the lower beam and secure them with screws (included with the rollers) on the handle profiles. Close the upper holes in the handle profiles with plugs.
4. Example of door calculations
For a sliding wardrobe, the internal opening height of which is 2000 mm and the width is 1800 mm. In the wardrobe it is planned to install 3 doors of the Versailles system with asymmetrical handle profiles, as an end cap - Schlegel with a pile height of 6 mm, the filling of which is divided by a middle strip: bottom - chipboard 10, top - glass 4 mm. It is necessary to calculate the dimensions of the doors.
Calculation
- Door height L1=L–40=2000–40=1960 mm.
- Door width B1=(B+(n-1)xb-hx(n+1))/n=(1800+(3-1)x26–5x(3+1))/3=610.67 mm. 611 mm is accepted.
- Length of the bottom bar, top bar, middle bar D=B1–2x(b-1)=611–2x(26-1)=561 mm.
- Length of upper guide, lower guide L2=B–2=1800–2=1798 mm.
- Length of chipboard panel (height size) Y1=(L1-y)/z=(1960-61)/2=949.5 mm. 949 mm is accepted.
- Chipboard panel width X1=D+14=561+14=575 mm.
- Glass length (height size) Y=(L1–x)/z=(1960-67)/2=946.5 mm. 946 mm is accepted.
- Glass width X=D+10=561+11=572 mm.
Installation and adjustment of doors
Our cabinet assembly is coming to an end, this is the final stage. First you need to install the inner door. Even when installing the door, there are instructions: you need to insert the upper edge of the door into the back space and the upper rails, and clamp the wheels from below and place them in the lower part of the rails. He does exactly the same machinations with the outer door.
For close contact of the doors to the side walls, there is a special adjustment screw on the lower wheels.
If it requires lowering the corner of the door, then the screw must be turned counterclockwise. To do this, you need to use a hexagon of a suitable size, usually 4 millimeters.
To reverse the operation, you need to carry out all the steps above in reverse.
After adjusting the doors, when these screws are no longer needed, you need to glue a buffer tape to the edge of the doors to avoid a strong knock on the door when closing or, worse, broken glass on the door.
The very last thing you need to do is remove the film from the glass on the door. With this, the entire process of assembling the wardrobe has come to an end, and it is completely ready for use.
Some cabinets may have some additional components. Such as internal or external tint. Usually it is a regular LED strip, which sticks on its own thanks to the adhesive back side. Its connection is carried out strictly according to the instructions.
Please repost
0
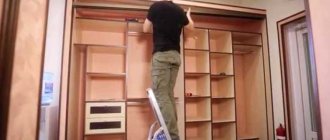
How to assemble a wardrobe yourself (video)
After the decision to buy a wardrobe has been made, the need arises to assemble it correctly. As a rule, the cost of furniture in a store is indicated without the cost of delivery and assembly. This article provides step-by-step instructions with pictures on how to assemble a wardrobe yourself. For assembly you need a screwdriver, a screwdriver, a hex key, and a tape measure.
Wardrobe assembly diagram
When unpacking furniture, try not to damage the furniture itself with the knife. In order to protect furniture and floors from scratches, place the packaging from the purchased cabinet on the floor. Find the assembly instructions. All cabinet parts and all fittings have their own markings. It is also very important to follow the assembly sequence, otherwise you will be forced to disassemble and reassemble the cabinet in the required sequence.
First, let's assemble the cabinet base. Most often it is assembled with furniture corners and confirmations. In this cabinet, the plinth is assembled on dowels and minifixes. We attach the base to the bottom of the cabinet. We hammer in the support nails.
Now we assemble the cabinet body. It is important not to confuse the top and bottom parts. Make sure that the holes for the shelves and hanger rod mounts match the holes on the opposite rack.
This cabinet is assembled with minifixes and dowels.
Until the cabinet is fully assembled, make sure that the attached parts do not tilt, as the fasteners may break off.
We fasten the lid and bottom of the cabinet.
In order to give rigidity to the wardrobe, it is necessary to secure the back wall. As a rule, it is secured with nails. But since the wall often lags behind, it is better to fix the back wall of the fiberboard with self-tapping screws and a construction stapler. Sometimes the wall is simply inserted into the groove.
When installing the fiberboard wall, you must ensure that all corners of the sliding wardrobe are straight. To do this, you need to set the diagonal of the cabinet.
The distance between opposite corners should be the same. Otherwise, the cabinet will stand crookedly and the doors will not close tightly. Now you can attach the back wall of the fiberboard.
We install shelf supports and guides for drawers. We insert shelves.
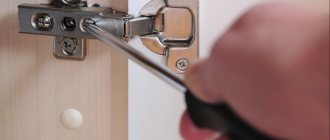
Now you need to install the wardrobe doors. To do this, we attach the guides of the sliding wardrobe doors. Drill holes with a diameter of 4 mm. There are two holes along the edges and in the middle. We fasten the rail with self-tapping screws.
It is recommended to screw the top guide first, and put the bottom one on and leave it unscrewed. We insert the doors, set the indentation of the bottom guide from the edge of the cabinet so that the doors stand straight and screw the bottom guide.
We insert the doors. First we start the upper part of the doors, then the lower one. Use a hexagon to adjust the tilt of the doors. If the cabinet level is set correctly and the doors are adjusted, then the doors close tightly in both directions, see How to properly install wardrobe doors and adjust them.
Now you can glue the sealing brushes. Try not to touch the place where the brush will be glued with your hands, as the fat from your hands will contribute to poor fixation of the brushes.
Most often, the doors of a purchased sliding wardrobe are delivered assembled. Sometimes they need to be collected. Below is a video on how to do it yourself.
Video about how a sliding wardrobe is assembled. Assembly procedure, assembly features, installation and configuration of the sliding system.
In addition to providing services for professional furniture assembly, it provides services for the production of cabinet furniture, wood furniture, and upholstered furniture.
Source