The practicality and functionality of sliding systems is beyond doubt; the only disadvantage of this design of door panels is considered to be high cost. Significant cost savings are achieved when making a wardrobe door with your own hands, based on ready-made or independently drawn up drawings. This type of work is of medium complexity and requires careful planning. The main difficulties arise when selecting components and detailing; if you lack experience at this stage, you should use the help of professionals. All other steps, including assembly or installation, can be done on your own.
Materials and tools
To make a door for a compartment-type cabinet you will need (using the example of a frame hinged system):
- Filling: slab wood materials, frosted glass or mirror with a thickness of at least 4 mm, protected with film.
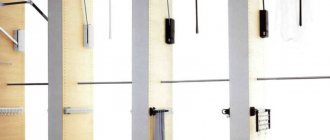
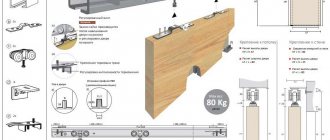
- Upper and lower guides (two-track for standard door installation).
- Side profile C for open handles, H for closed handles.
- Frames for framing a door, including the top one with a channel for screwing in assembly screws, the bottom one with the same channel but with a higher shelf, and the middle one, used when assembling doors from different materials or individual parts.
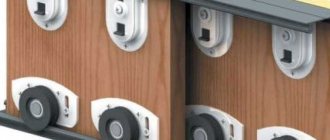
- Upper roller, selected taking into account the type of side profile of the handle, 2 pieces for each sash.
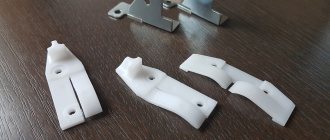
- Support roller mechanism, 2 pieces.
- Assembly self-tapping screws.
- Silicone sealant used in the manufacture of sliding wardrobe doors made of glass or mirrors.
- Schlegel is a sealing strip glued at the owner’s request into special grooves in the side profile of the handle in order to soften the impact of the doors and protect against dust.
Additional elements include stoppers, closers, end caps or locks. Such components are purchased based on the capabilities and desires of the owners and are optional. The same applies to straight and shaped stops used when assembling sliding wardrobe doors from laminated chipboard with your own hands.
Due to the high demands on dimensional accuracy, all panel materials are cut using special equipment at the time of purchase. If this is not possible, an electric jigsaw is used to cut laminated chipboard. The same tool is used when cutting profiles and frames (an alternative is a hacksaw) provided that a special saw is installed. To drill holes in the profile, you will need a drill or drilling machine; to clean its edges, you will need a file with a frequent notch. Installation and tightening of self-tapping screws, door adjustment are carried out using a screwdriver, hex keys and 6 mm bits. At all stages of cabinet assembly, a level, plumb lines and other measuring tools are used.
The main types of doors for wardrobes, their features, pros and cons
Sliding system design
Chipboard
Tinted glass
Frosted glass
Mirror
How to choose material
Before you make sliding doors for a sliding wardrobe with your own hands, you need to decide on the working material.
Important! Many furniture makers advise starting the manufacture of a wardrobe by designing the doors, because this is, in fact, the “face” of the entire structure. And only then you can make the main frame.
Doors are the face of the entire cabinet design.
The first factor that customers consider is most often the door manufacturing budget. The door material can be:
- natural wood;
- glass;
- plastic;
- mirror;
- rattan.
Note! Regardless of the material chosen, it is necessary to correctly calculate the permissible load on the entire structure. If there is excessive load, the roller guides will suffer, and the entire system will not last long.
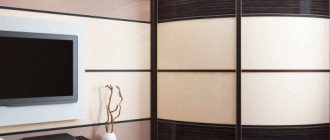
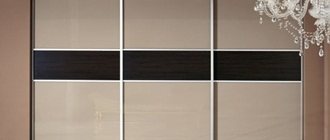
The most practical is considered to be either a blank surface made of natural wood or chipboard (chipboard), or a mirror surface. In many cases, they resort to a combination of different materials, for example, glass and plastic, mirror and glass. A mirror is often glued to a ready-made surface, allocating one of the door bays, or part of it, under it.
Very often, the material for cabinet doors is combined.
Create a drawing
The production of sliding doors for furniture begins with the selection of their sizes. At this stage, you can use ready-made sketches (provided that the dimensions of the room and the design of the cabinet completely match), the calculation results of online calculators, or make the drawings yourself. The initial data are the dimensions of the doorway, the number and method of arrangement of the leaves, the type of the selected system and the width of the guides. Detailing that takes into account the exact dimensions of the components used helps to avoid errors.
The height of the sash, as well as the length of the side profile, are calculated simply: 40–45 mm are subtracted from the height of the cabinet opening (the exact value depends on the type of profile). Several factors are taken into account when calculating width, including:
- The need for a sufficiently tight connection of the sash - when the doors are closed, only one handle should be visible, without overlapping adjacent leaves.
- Correct placement of doors - the doors should not overlap shelves and drawers. With the right approach, the width of the doors is selected taking into account the internal layout of the wardrobe.
- Compliance with the optimal width ratio ranging from ¼ to ½ of the door height. Ignoring this requirement has a negative impact on the stability and reliability of fastening the door leaf.
The optimal sash width is calculated using the formula: (cabinet opening width + number of overlaps × handle profile width): number of doors.
At least 100 mm is allocated for the placement of the sliding system in the depth of the cabinet; the exact value of this parameter depends on the type of guides, the number of sashes and their layout. Special attention is paid to the method of installing the bottom guide; in mortise-type systems, the height of the door leaf is calculated differently; simply subtracting the height of the guides is no longer enough. The same applies to prefabricated structures; the height of their individual elements is calculated minus the dimensions of the connecting profile.
Parameters to measure
size table
Possible options for placing sliding doors
Why are sliding wardrobes so popular?
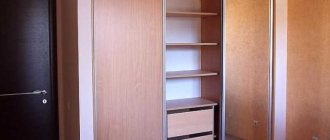
A sliding wardrobe is a spacious and convenient version of cabinet furniture, which is used to store all kinds of things. Inside, such models are quite spacious and can accommodate a lot, a lot of things, although in appearance they do not clutter up the space and can look like part of a wall. Inside, the closet can have hangers and rods for clothes, as well as various drawers, shelves, boxes - all at the discretion of the owner.
Sliding wardrobes have a number of advantages
On a note! You can install a large mirror on the wardrobe doors, which means there is no need to install additional mirrors in the apartment. And this will save free space in the house, which is important for small apartments.
Sliding wardrobes - what is the secret of success
Such cabinets can be installed in any room and can even be used to hide beams or wall projections if positioned correctly. This means that a solution to some of the problems with free space appears again. After all, the same beam located inside the built-in wardrobe will no longer spoil the appearance of the interior and at the same time will not interfere with the use of the wardrobe itself, since it will not take up so much space inside it.
A hinged wardrobe in the bedroom as a practical clothing storage system
Typically, sliding wardrobes are made in size from the floor to the ceiling, which means that all the free space on top will be used. You can make shelves inside and use them as mezzanines . You can't do this with a regular cabinet.
On a note! Not all wardrobes are built-in. There are also those that are produced at the factory and sold as ready-made cabinets. They may have a smaller height, but still remain quite convenient to use due to the absence of the need to swing open the doors.
Standard cabinet with dimensions
Options for cabinet sizes depending on the number of doors and contents
Advantages of sliding wardrobes
- Significant space saving , as well as the ability to use the entire area that the cabinet occupies is most profitable. In addition, you don’t need to think about how to open the doors - you just need to slide them to the side to gain access to the interior contents of the cabinet.
- Amazing capacity . Sometimes the closet seems very small and has modest dimensions, but a lot of things can fit in it.
- These cabinets are universal and can be installed both in the corridor and in the room.
Four-door wardrobe
- This is a multifunctional furniture option that can be used not only for storing clothes, but also for storing household appliances, tools and other things.
- If you wish, and if you make a closet yourself, you can make shelves, drawers, and hangers inside , and all this - in the quantity you want.
- The wardrobe is ideal for small apartments , as it does not “steal” space in the room. In addition, it allows you to hide some of the protrusions and unevenness of the walls.
- This is a reliable option – sliding doors rarely fail and do not begin to creak over time, unlike ordinary doors.
The doors of such cabinets rarely fail
- If the choice is made in favor of a built-in wardrobe, then you can save a large amount of materials . For example, you no longer need to make the walls and ceiling of the closet - you can only install the doors themselves from wall to wall. These same walls will act as the sides of the cabinet.
And, of course, it should be noted that the wardrobe looks beautiful and stylish. It is able to change and embellish the interior of any room, making it much prettier than if a regular double-leaf wardrobe were installed in it. And if all the compartment doors are trimmed with mirrors, then such a solution will visually increase the space of the room, rather than reduce it.
Inside wardrobe layout: two and three doors
Manufacturing stages
The standard step-by-step instructions for making doors for a wardrobe with your own hands consists of three main stages:
- preparation of parts taking into account the selected dimensions;
- assembly of the cabinet itself and door panels;
- installation of all profile elements, fastening of roller mechanisms.
When installing large-sized panels in a wardrobe, work should be carried out in a room where furniture is permanently placed. In any case, cutting or drilling of a metal profile is carried out on a flat, stable base.
Preparing parts
This stage begins with the preparation of door panels, namely cutting slab materials and processing the ends:
- Elements made from chipboard are covered with a special tape using an iron or a hair dryer; elements made from natural solid wood are sanded with sandpaper and varnished.
- Glass or mirror parts are covered with film over the entire area with mandatory protection of the edges with silicone sealant. Properly fixed material should cover the entire perimeter of the fragile inserts and depart from the edges of the frame by 2–3 mm; the excess is cut off at the assembly stage.
- Cutting a profile with guides is often carried out after carefully marking perpendicular lines, exclusively from the back side, without removing the protective film (if any).
- Accidentally damaged edges are carefully sanded with a finely cut file.
- Holes in the horizontal guides fixed inside the wardrobe are drilled with a diameter of 3 mm, 25–35 cm apart.
- Recesses for the final fastening of the frame are made on the vertical section of the handle profile, with an 8 mm indentation at the top, 8 and 42 mm at the bottom.
The recommended hole diameter on the inside is 5.5 mm, on the outside wall - 10 mm. Accordingly, to obtain them during the first through pass, drills with a diameter of 5 mm are used. From the outside, the hole is drilled using a larger diameter nozzle.
When cutting parts, it is recommended to check the parameters of parallel sections. According to the rules, they must completely match. The cut profile should be laid out on the floor or a flat area in order to check the dimensions, mark the drilling points and determine the correct rotation of the handles (relevant when working with the C-profile).
Tips for choosing a three-door wardrobe, placement features
Fixing the guides
Particular attention is paid to installing guides directly in the cabinet. These elements are fixed using plumb lines and adjusted vertically to the nearest millimeter. The upper horizontal guides are fixed first, after checking their evenness - the lower ones. The method of their location depends on the type of side profile. When installing doors with asymmetrical C-profiles, the lower guide is shifted from the facade line until it coincides with the inner strip of the upper guide. When using an H-profile, all horizontal guides are located in the same plane and coincide with each other.
Frame and profile assembly
The assembly pattern of the door leaf depends on its type. When using glass inserts, the silicone sealant is installed first on the end. After this, all elements of the canvas are connected by middle frames. Unlike the seal, which is easily pulled on with your fingers, difficulties may arise at this stage; in particularly difficult cases, the filler is tapped with a rubber hammer (which is not always possible when working with a mirror or glass). The upper and lower frame profiles are secured to the already assembled canvas using similar efforts.
The side profile is installed last, starting from the top:
- To fasten the frame, carefully insert a screw into the previously drilled hole, with the pointed tip protruding 10–15 mm.
- This tip is directed into the groove of the frame upper profile and tightened with a hex key to a 3-4 mm gap.
- The fork of the upper support roller is inserted into the resulting space, after which the screw is tightened until it stops.
- The process of assembling the cabinet doors is completed by securing the bottom of the frame at a distance of 42 mm from the edge and fixing the support roller (in a similar way, but without carefully tightening it).
Characteristics of sliding wardrobes with 4 doors, popular models and designs
Some craftsmen approach the assembly process differently: first they fasten the door frame without filler, after checking the work, this structure is partially unscrewed and filled with glass or chipboard. A description of this method can be easily found on thematic resources; the basic rules for assembling and fixing the profile remain unchanged. To avoid mistakes, it is worth assembling the wardrobe doors, as recommended by the manufacturer of the sliding systems, and clarifying this point in advance.
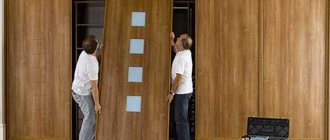
Nuances of installing the structure
Fastening the doors begins with carefully moving the previously assembled doors to the cabinet opening. First, you need to insert the far doors, which are placed on the rear slides of the guides, then, after checking their movement, install the near doors. When installing rail systems, work is carried out according to a simple scheme:
- The upper part of the sash with previously fixed rollers is placed in the grooves of the upper profile.
- The door leaf is raised so that the rollers finally enter the groove.
- The wheels of the lower roller systems are lightly pressed with your fingers.
- The sash is lifted again and secured in the lower profile, the roller mechanism is released and finally fixed. Next, the operation is repeated with the second lower corner.
The installation of roller-type cabinet doors is completed by adjustment. This is done using a hex wrench, which is used to rotate the adjusting screw. Turning clockwise helps the roller come out and raise the sash, counterclockwise helps lower it. Properly installed doors are flush with the bottom track. It is also important to ensure that there are no distortions or vertical deviations in the side profile.
It is easier to install the suspension system on one side: at least 2 double rollers are fixed in the upper part of the special profile (such doors improve reliability and hold more weight), after which the sash easily moves in the desired direction. When the number of leaves is more than 2, there is a need to install a stopper - a plastic corner-limiter attached to the inside of the outer door in order to control the opening width of the doors.
Regardless of the type and configuration of the sliding system, before installing the wardrobe door, it is worth checking the geometry of the doorway . Any deviations from the level are eliminated before fixing the guides. This rule should not be neglected, because the smoother the cabinet itself is assembled, the longer the structure will last.
Characteristics of the suspension system
The hanging system for sliding wardrobes looks good in classic sliding wardrobes, corner and non-standard shapes.
The furniture market offers cabinets with bottom-support and top-support sliding systems. The lower support provides for a mortise or overhead installation method. It allows you to install the canvas to the floor.
The system includes closers that allow you to close the doors carefully.
The suspended design consists of rollers and a guide made of aluminum profile with a special coating. It also has closers that ensure smooth movement of the doors without much effort.
The mechanism includes an aluminum profile with a special coating.
Cabinets with top rails are slightly more expensive. In a top guide system, the mechanism is open. Mandatory design of the upper part of the canvas is required. Usually during manufacturing decorative elements are used to close the mechanism.
This system allows rational use of living space.
Important! Installation with top rails is more complex. Fastening must be done by professionals or if you have certain skills when installing it yourself.
There are several types of suspension systems:
- Roller. The roller is located inside a rail-type guide. Top or bottom roller mounting;
- Frame. The profile is made of steel or aluminum. Aluminum profile is more resistant to abrasion and more durable. Its use is preferable, but it costs more;
- No frame. The system may become deformed due to temperature changes or high humidity levels in the room. The service life is shorter than other types. Cheaper option;
- Radial. They are usually used in products of non-standard configuration.