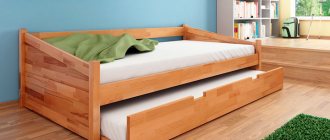
The process of assembling a double bed
How to assemble a double bed according to the instructions? This is quite simple to do. All work can be divided into 4 stages:
- The first step is to fix the side shields at a height of 0.2 meters. This can be done using corners.
- The next step is to secure the footrests. Produced at approximately the same height as the side panels.
- Then you can move on to the most difficult part - installing the ribs. They should be fixed 5 centimeters above the side panels.
- The last step in assembling the bed is to attach the center rib. At this stage, it is important to take accurate measurements and get it perfectly in the center. It is worth fixing it with galvanized corners.
After installing the central rib, the assembly of the bed base is considered complete. The next step is to work on the mattress pad. To make it, you will need to make a frame, and then lay another beam in the center.
After the bed frame is ready, you can fix the boards with self-tapping screws. In this case, you should maintain a distance of 10 centimeters between them. This approach will help reduce stiffness.
The instructions for assembling the Svetlana double bed involve a similar series of actions. Finally, don’t forget to varnish the entire wooden surface of the bed. Usually the drying process lasts 1.5 days, after which you can begin using the furniture you have made.
How to assemble a single bed?
Often a model assembly diagram is included in the kit. However, the general design of all metal or wooden beds is the same. You can make the frame alone, but it is better to have an assistant who will hold the side elements.
Before starting work, you need to check the number of parts and the presence of fasteners that are supplied in the kit. There should be enough free space to allow the bed to be turned over.
To assemble a single bed, you need to prepare the following tools:
- a set of screwdrivers or a screwdriver;
- rubber hammer;
- hexagon.
For metal products, you may need wrenches and pliers.
Headboard and drawers
Self-assembly of the bed begins with connecting the headboard and side walls, which are also called drawers. In most cases, holes for fixing elements are already made at the fastening points. However, if they are not there, you definitely need to do it using a drill and a drill of the required diameter.
Attach the drawers to the headboard at an angle of 90° and secure with euroscrews, confirmats or dowels. If wooden pins are used, the joints should be coated with PVA glue to ensure secure fastening. The euroscrews should be tightened with a hexagon, and the confirmation screws with a screwdriver or screwdriver.
Then the drawers of the single bed are attached to the backrest. If the product has legs, they are installed on the base of the bed at this stage. When PVA glue is used during assembly, remove excess glue with a dry cloth before further work.
Base
Installation of the single bed base begins when the frame is ready. To do this, you need to fasten the transverse bars or lamellas to the longitudinal ones. The slats can be wooden or metal, depending on the model of the bed. They are fixed using self-tapping screws or screws to the frames in several places. The longitudinal parts of the bed are attached to them. Cross bars are inserted into special recesses.
Sometimes the grooves are missing and there may be holes in their place. Fastening can be done using self-tapping screws or self-tapping screws.
Assembly
Now you need to put everything together correctly. The box is installed in the place where the bed will be located. Then the base is carefully laid on top. Everything is fixed using fittings. Caps are installed on the screws to hide the caps.
Bed with orthopedic base
A standard bed includes a frame, base and headboard. There are different types of bed bases. One of them is orthopedic. There are also options for a plywood base, using laminated chipboards, and metal mesh. However, all these options do not lead to good sleep and can be harmful to health. In this case, you should resort to the first proposed solution, but how to assemble a bed with an orthopedic base according to the instructions?
To understand the installation principle, you need to understand the need for this option. The main advantages include maintaining the same weight of parts of the body at the same level. Some people try to place an orthopedic mattress on a spring block, but this should not be done. Otherwise, it risks turning into a flat surface and losing all its functionality.
It is also possible to place the mattress on a plywood base. Surface evenness is the main reason for this choice. However, for orthopedic mattresses, ventilation is important, and a solid base cannot provide it. It is for this reason that there is a need to purchase a special bed with an orthopedic base. Instructions for assembling an orthopedic bed will help you make useful furniture for your home.
Difficulties in assembling a bed with drawers
The question: “how to assemble?” is covered in detail in the previous paragraph, and now we propose to analyze the difficulties that a beginner may encounter when assembling a bed with drawers on his own.
The design of this furniture does not cause any difficulties; they can arise if there are no markings on the wooden parts, or they are applied incorrectly. Without experience in such work, it is difficult to determine the location of the fastener, and in order not to damage the wood, it is advisable to call a specialist who will apply the correct markings.
The second difficult point is attaching the guides. Since the mechanism is located on two different elements (furniture body and drawers), it is important to make accurate measurements and installation. A deviation of several millimeters can disrupt the operation of the device, as a result of which the box will jam when moving or will not be able to move at all. In this situation, you will have to dismantle the system and install it again, taking into account previous errors in measurements.
Another difficulty may arise at the final stage of work, with the installation of the front facades. It is important to place them evenly, aesthetically beautifully, without visible fasteners, because this is the “face” of the bed, forming the overall style of the bedroom. For such work, it is advisable to use liquid nails, which will securely fasten the panel and remain invisible.
We hope that the detailed instructions and tips given in this article will allow you to quickly and efficiently assemble a bed at home and use it with pleasure. You can see other models and methods of assembling them at zlatamebel.ua.
Variety of beds
“How to assemble a Rio 3 bed according to instructions,” even such queries are currently entered into search engines. A thorough consultation when purchasing will help you avoid such questions. It is better to read the assembly instructions in the store. If any difficulties arise, it is better to use the services of specialists.
The extensive range of beds on the furniture market takes into account almost any taste preferences of customers.
The design of such products also varies too much. There are both simple options and very complex ones to assemble. It is better not to try to assemble such furniture models yourself, because they require the intervention of professionals.
Assembly of non-standard furniture products
When you come across modern beds, the question may involuntarily arise: how to assemble a modern bed according to the instructions. The design of furniture products is so complex and original that sometimes even a detailed manual is not enough to complete the assembly. And the service life of the product will directly depend on its quality and correctness.
An incorrectly assembled bed can lead to unpleasant consequences, even if the furniture itself is of high quality. To prevent such problems, it is better to contact professionals. A good option would be for the furniture store to provide a furniture assembler.
For example, the instructions for assembling a fiesta bed cover all stages of assembling the model. However, performing them incorrectly can negate all of its unique features. If you refuse assembly services and do everything yourself, then all kinds of product warranties become meaningless.
Learn how to build your own closet. Instructions here. What to do if your wardrobe is broken? How to repair furniture with your own hands, read this article.
If the bed breaks after self-assembly, you will only have yourself to blame. This process also takes a lot of time: it will take several days from the start of work until the furniture is put into operation.
Source: bitu.ru
DIY double bed: technology
Today, quite often people try to make double beds with their own hands. If you do everything correctly, you can save a considerable amount of money.
A double bed can be made from several types of materials: MDF, laminated chipboard, metal or wood.
A do-it-yourself double bed can be made in about 10 days. This is due to the need to take technological breaks.
The do-it-yourself bed will be made from environmentally friendly materials. To attach the structural elements, PVA glue will be used, which is harmless.
How are double beds made?
An example of manufacturing a structure in which there are no visible connections will be considered.
Materials for work
The following elements will be needed:
Diagram of a double bed with dimensions.
- Nageli.
- PVA glue.
- Self-tapping screws.
- Beam.
- Plywood sheets.
- Nails.
- Steel corners.
- Bed diagram.
The external elements of a double bed are made of MDF 2-3 cm thick. You can also use laminate, but it is recommended to use MDF, because it will not need to be laminated, as a result of which you can do without toxic nitro adhesive. Internal elements can be made of wood or plywood sheets 1-2 cm thick.
It is recommended to order MDF blanks from any furniture workshop. It is better not to buy the sheets themselves at retail prices, because you will need to spend more money. At the furniture workshop they will be able to cut and edge all the elements exactly to size. The edge thickness should be approximately 0.5-2 mm.
From lumber you will need to purchase:
Layout of a double bed with dimensions.
- 8 m of timber with a section of 5x5 cm.
- Several boards 3x10 cm 2 m long.
- 10-20 boards 2x10 cm, 1.5 m long.
All lumber must be edged. Any type of wood is suitable. You just need to cut the boards to size and select the grooves.
If you plan to make a bed with drawers yourself, then you will need to buy sheets of chipboard. In this case, you can use any budget options.
You will also need to select fasteners. This design will not use expensive fasteners.
You will need the following fasteners:
- A large number of 6 mm screws.
- Nails 6-7 cm.
- Angles with steel stiffeners.
All connections will be made with gluing, so it is recommended to purchase phosphated self-tapping screws. PVA glue will adhere worse to smooth fasteners.
Design and construction of a bed with drawers
This concept can be implemented in practice in different ways, you can make one large pull-out tray, you can make several, there are also options when the drawers are arranged in two rows in height. First of all, the choice depends on what things you plan to store here.
Use the drawers as a chest of drawers. They will fit toys and children's clothes.
If we are talking about bedding or other large items, then you will need large drawers. If we are talking about the personal property of the spouses, then in this case it is better to make small cells on both sides of the bed.
So that you can sit on it, pillows, blankets and bed linen are folded and put away in cells.
It is also necessary to foresee the location of the sleeping place in advance, because extending the cells requires free space. For example, if the bed on one side is close to the wall, then there is no point in having retractable mechanisms on this side.
Having made your own bed with drawers, you do not need to install additional cabinets and chests of drawers.
Depending on the mechanisms used, drawers can be divided into dependent and independent. In the first case, we are talking about drawers that slide out using guides, which can be equipped with closers for ease of use. In this case, the boxes are part of the structure.
You can use the saved space to place other furniture or simply leave free space.
It is important to know that the guides have restrictions on the weight load, as well as on the width of the drawers; if you do not follow the restrictions set by the manufacturer, the guides will very quickly fail. The independent type are roll-out boxes, which are separate boxes on wheels; they are not connected in any way to the bed and can be moved around the perimeter of the entire room.
In the niches under the bed it is convenient to store not only linen, but also your favorite books to read before bed, and also use them as bedside tables.
If you have not found a bed with drawers that would be ideal for you, then do not worry, since beds with drawers can be made yourself, based on your personal needs. In order to make a bed with drawers with your own hands, the main thing is to draw up competent drawings.
The design of the bed with drawers is convenient, with details reminiscent of a closet. Additional convenience is provided by pull-out boxes.
Design elements: manufacturing technology
When viewed from the outside, the bed is a rectangular frame consisting of a headboard, footboard and side elements (tsars). Inside there will be a supporting frame made of timber. If you plan to make a large-width bed, then you need to install additional stiffening elements - side members. The timber frame is covered with boards or plywood sheets, resulting in the formation of a sun lounger. It must have openings for ventilation.
How is the back made?
Bed headboard assembly diagram.
The 5x5 cm cross beam is secured with adhesive and self-tapping screws. Cutouts are made in the center for the spar mustache. The distance between the edges of the cutouts is 4-5 cm. It all depends on what kind of trimmings will be used to connect the rigidity of the spar.
The thickness of the back should be 2.5-4 cm. It is assembled using plywood from two panels 2 cm thick. In shields, the boards should be perpendicular to each other. After applying the glue, the structure must be dried for about 1 week. It must be dried under a load weighing at least 80 kg distributed over the entire base. A stain or mordant should be used as paint.
The length of the first beam will depend on the size and installation method of the mattress. If you plan to lay it in a tray, then the length is equal to the width of the mattress plus 7-9 mm. The width of the backrest for the headboard can be made to any width. The width of the footboard is equal to the width of the mattress and double the thickness of the drawers. If the footboard is widened, it will worsen the convenience of the design. If you wish, you can make the footboard high.
It is not necessary to install legs. If you want to install them, then you need to place them under the corners of the timber frame using glue.
How to make kings and spar?
Assembly diagram for a double bed.
The design of the drawer is a T-shaped beam made of a 50 mm bar and a 30-40 mm board. During the assembly of the structure, an adhesive solution is used, fastening is done with self-tapping screws. The length of the block and the board should be the same. For drawer boards, you don’t have to have sawing done by furniture makers. Edged boards 15-20 cm wide are suitable. They will need to be painted with stain in advance. It is better not to paint the inside so that the bed can breathe.
There are two options for placing the timber in height. If the mattress is in a tray, the distance between the top of the block and the top of the board should be 50-70 mm. If the mattress is located on a lounger, then the distance from the top of the board should be equal to the thickness of the flooring.
Holes for the clamps must be made in the base of the lounger. To ensure a reliable connection, you need to make 4 openings in the corners and 2 between the spar elements. There is no need to make fixings for the mattress in the cradle. In most cases, 3 spars are installed in the bed from 4x10 cm boards. Rigidity inserts between the shelves are made from unnecessary elements of a board or block from the frame. There will be approximately 5-6 of them along the length of the spar. The top of the spar flanges and frame bars should form a single plane.
The spar must be assembled using nails and an adhesive mixture. Each insert has 4 nails.
How to assemble a bed?
The backs are installed vertically, after which they are supported by stools. Next, drawers are applied and the squareness of the frame is checked with a level. The assembly is wrapped with rope, after which the diagonals are checked again and the frame is leveled.
Next, places are marked for the dowels that will connect the drawer boards with the backs. Lines are drawn from the inside.
Next, the drawers are removed and holes are drilled in the end parts of the boards. The ends are smeared with paint, the backs are moved apart, the drawers are put in place, after which the backs are tightly compressed.
Next, holes are made in the backs and the base is assembled by gluing the timber. After installing the frame, it must be dried.
The lounger can be connected to the frame using an adhesive mixture and nails. The mattress is installed last, after 24-48 hours.
It’s easy to make a bed yourself if you know the manufacturing technology and have all the necessary materials.
Source: dekormyhome.ru
Checking the configuration, diagram
Remove the parts from the packaging and place the fittings on fabric or oilcloth. Check the integrity of the slats, make sure the bed matches the color, dimensions and configuration. Check the quantity of parts with the delivery documentation. An example of such a statement:
An approximate diagram for assembling a wooden bed purchased in a store:
The standard assembly scheme for single and double beds is no different . There are differences only in the sizes and dimensions of the parts.
The kit should include:
- two side drawers (2);
- footboard strip (5);
- headboard bar (4);
- slatted slats or chipboard (1) as mattress pads.
In some cases, drawers are completed in two parts that need to be connected before assembly (2.3).
Reference
brackets and profiles are used as support for slatted slats , as, for example, in IKEA beds.
What to assemble - choice of design
Before you start assembling furniture, decide what exactly you want and what you can do.
Table with standard dimensions of mattresses
Conventionally, all beds are divided into three types according to the number of seats:
- Single rooms - under a single mattress, designed for one adult.
- One-and-a-half - for a one-and-a-half mattress that can comfortably accommodate one adult.
- Double - for a double mattress designed for two adults.
A separate option is bunk beds, in which the upper level is made single, and the lower level is either single or one-and-a-half.
| Illustrations | Modifications according to design features |
| Static, non-folding structures . This category includes regular beds assembled under a standard mattress. Due to the lack of folding mechanisms, furniture of this type is not only durable, but also easy to assemble. | |
| Transformers . This category includes folding beds, which, like an “accordion” sofa, thanks to a special mechanism, are transformed into a wardrobe, cabinet, table or other furniture. Despite the fact that assembling such furniture is more difficult, a ready-made bed when folded saves free space in the room, which is important when arranging small rooms. |
Which design to choose for self-assembly? If you are making furniture for the first time, I recommend a conventional design without a folding function.
This bed consists of a supporting frame, headboard, footboard, sides and mattress holders. Essentially, this is a large box on top of which the slats are attached and the mattress is laid, so you can probably handle making it.
Source: obustroeno.com
Preparing materials and assembling the bed
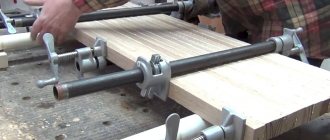
I purchased boards with a section of 5x20 and 5x25 cm. My project also uses 5 cm thick bars, but I did not buy them, deciding to make them from existing lumber, since the wide boards turned out to be of much better quality.
I purchased the wood already planed. It is enough to remove 1 mm from each side to get a perfectly smooth surface.
I used a homemade jointer to sand the sides of the boards.
Now it's time to cut the lumber to the desired length. Since the boards are very long and protrude far beyond the workbench, you have to press them firmly against the tabletop to prevent the machine from tipping over. An extendable miter saw would be useful in this case, but I don’t have one, and the space in the workshop is too small to install one.
Here you can watch the manufacturing process of the bed side rail. A 4x4 cm block, which will serve to hold the slatted bottom, is glued to the lower edge of the side wall on the inside.
Then I made blanks for the legs - bars with a section of 5x6.5 cm, which I cut from the 5x25 cm boards I had.
By gluing the bars together, I got legs for the head of the bed.
After the glue had dried, I smoothed out the glued edges using a jointer.
My original plans were to increase the thickness of the legs after assembling the headboard so that I could freely drill holes in both parts at once. But I changed the sequence of actions, and it soon became clear that gluing the elements of the legs together before attaching them to the headboards was much more convenient.
I thought it would be nice to give the top of the headboard a smooth curved shape. Using the BigPrint program, I made a printout of half the profile and transferred the outline onto the wood.
Most of the headboard is a smooth curve. I used a flexible piece of wood to smooth out the line I drew.
Then I cut out the profile using my bandsaw...
... and smoothed out the defects with a hand plane.
I added rounded edges to all the edges of the headboard. In fact, all open edges of the bed frame are chamfered 0.5-1 cm.
It was decided to connect the legs with the headboards of the bed using “floating” tenons inserted into the grooves at both ends. I made the tenons from oak slats 1.5 cm thick. (The project uses a different fastening method.)
In this photo you can see how I marked the location of the tenons that will hold the headboard elements together.
Once the markings were done, I cut the tenon slots into the bed legs using a drill and mortise machine. I rarely use it, but it's a really good tool for this task.
Having cut out the grooves in the legs, I used a small square to mark the location of the tenons at the ends of the boards that make up the head of the bed.
I cut grooves in the ends of the headboard.
The almost one-and-a-half-meter board, hanging far beyond the workbench, did not cause much trouble. The workpiece remains motionless, however, if necessary, I could install additional support.
Assembled the head of the bed.
The bed frame is quite easy to assemble. Even without glue, the reliability of all connections is beyond doubt. But this is not the final assembly yet, I'm just checking how the elements fit together.
Now it's the turn of the slatted bottom. The slats covering the entire width of the bed (1.5 m) are made of 5x10 and 5x7.5 cm bars. It's mostly used wood that I've been storing for later use.
To prevent the slats from moving, I glued small wooden blocks between them.
I reduced the thickness of the ends of the slats a little so that they would sit slightly lower on the bed frame. At the same time, I did not forget to make sure that the upper surface of all the bars was at the same level.
Thus, even if the slats had different thicknesses, this heterogeneity will ultimately be leveled out, and the upper surface of the plane they form will be perfectly flat.
Now let's get back to working on the headboards. I rounded all the outer corners by cutting off a ~6 mm chamfer.
Then I glued the structural elements together. The photo shows the process of gluing one of the legs to the headboard.
I rounded the tops of the headboard legs to match the curved profile of the headboard.
Then I rounded three of the four edges of these legs by cutting off a 12mm chamfer. In addition, I slightly beveled the lower part of the legs located at the headboard. Thanks to this, the bed can be placed close to the wall, and the baseboard will not be a hindrance.
I glued the headboard together. It turned out to be much more convenient to work on the floor, because the ceiling in my workshop is too low to place the structure vertically on the workbench.
Attaching the second leg, when you need to drive five tenons into the grooves at once, turned out to be a difficult task. I couldn't do it manually...
... so I had to use two clamps, a piece of board and a hammer. Thanks to this simple set of tools, I not only inserted tenons into the grooves, but also eliminated the gaps.
Now we connect the back of the headboard with the side walls. Initially, I planned to screw in the screws holding them together from the outside, but while working I realized that I was able to screw in the screws from the inside, thereby hiding them. I drilled a pilot hole through both pieces and then tightened them together with 60mm screws.
Having made the second headboard in the same sequence, I began to varnish all the elements. I screwed a small piece of wood to the back of the headboard so that it could now stand on its own legs. I placed the remaining parts on my workbench while varnishing. I applied two coats of varnish to the inside of the frame and three coats to the other surfaces. The back of the headboard was covered with four layers, since it is more susceptible to wear.
It's time to transport the bed to its new owner. The fragments barely fit into my Honda Fit, however, the trunk door could not be closed.
And here it is already assembled, with a 25 cm mattress. My friend was delighted. For a long time he wondered how he could make a double bed himself in such a short time. But his young wife really liked the presence of storage space under the bed, where you can place a lot of suitcases, drawers and boxes.
Despite the fact that the author in the video below speaks English, we still decided to publish this video. After viewing it, you will better understand certain points of this article, especially since it is so interesting to watch how others work :).
Material selection and cutting
At the very beginning, the selection of materials is carried out.
Furniture board is used extremely rarely due to its high price, but this material is the best among its analogues. It is durable, environmentally friendly, and easy to work with. It is made from various types of trees, so you can choose for every taste. We will use this material to assemble a double bed, the instructions for which are standard.
Chipboard is much more popular because... has an almost unlimited range of colors, is quite easy to use and very cheap. Thickness and strength can vary depending on the customer’s wishes, so you don’t have to overpay. The disadvantages include reduced strength characteristics and colors, which, despite all the variety, are not able to replicate natural analogues.
Board and timber are typically used as support structures, but there may be fully fabricated options. Even if they are absent in the main design, they will still have to be used for the mattress pad.
Figure 2. Assembly diagram of a double bed with a support panel.
After this, you can choose the type of bed (Fig. 1 and 2) that you would like to see in your room. To begin with, it is better to choose something that is reliable and simple, but in no case to the detriment of appearance. In Fig. 1 shows the optimal option, because there is nothing superfluous in it, and the set of tools and materials is kept to a minimum:
- roulette;
- jigsaw;
- screwdriver;
- sandpaper;
- furniture board;
- block 40*40 mm;
- edged board;
- galvanized corners;
- screws.
The cutting looks like this:
- A headboard of 140*160 cm is cut out. It is advisable to round the corners so as not to catch them during operation, and at the same time not to injure your arms and legs.
- The foot is 60*160 cm. It is significantly lower than the headboard; it is better to round the corners in the same way.
- The side panels are 30*210 cm. You don’t need to do anything with them, but the cut must be made perfectly straight.
- 3 bars 210 cm. They will act as stiffeners, and at the same time hold the mattress pad.
- 3 bars, similar to those cut out earlier, and 2 160 cm each. Formation of the mattress frame.
- 8 edged boards 160 cm. The section of the board 150*15 mm allows you to achieve maximum strength without excessive roughness of the mattress pad.
Instructions on how to assemble a structure purchased in a store
Below: instructions for assembling single and bunk wooden beds, as well as features for assembling Neiden from solid pine from IKEA.
Single bed and one and a half bed
First, lay out 4 parts in front of you: a footboard, a headboard and 2 drawers. Examine the mounting holes and check the location of the fittings with the instructions. To assemble the frame you will need:
- wooden dowels;
- euroscrews;
- plugs;
- bearings.
How to assemble a single bed - step by step instructions:
- Install thrust bearings at the lower ends of the headboard and footboard, drive in the pegs with a hammer;
- Install Euroscrews using an adjustable wrench into the mounting holes along a vertical line on the headboard and footboard;
- Install wooden dowels along the side ends of the drawers - 2-3 pcs. on each side;
- place bearings in the round holes on the drawers: they will cover the Euroscrews;
- combine the frame parts: insert the drawers into the headboard, then fix the footboard to form a box;
- adjust the bearings with a hex wrench, scroll the parts until they stop;
- if the headboard has separate slats, install Euro screws on the top panel;
- wooden dowels are installed on the bottom panel, the parts are connected, the euroscrews are hidden with plugs;
- install the plugs in the round holes on the bottom bar of the headboard, close the screw with a nut, tighten;
- on the inside of the drawers there are holes for fixing a metal profile - it is fixed according to the height of the mattress;
- place the profiles at the desired height, secure with screws (7–8 in total in accordance with the holes);
- take 2 brackets: in the middle there is a hole for a bolt that prevents the part from moving;
- placing the bolts in the middle of the brackets, from the side of one drawer, install them with the holes on each other;
- the beams will be arranged in the shape of a compass, fix the brackets with bolts along the holes on the profiles;
- Place a grid of slatted lamellas on the profiles, tighten the bolts with plastic plugs to secure the lamellas.
Attention
In common types of assembly, the parts are already ready for connection: just insert the drawers into the grooves on the footboard and headboard. Instead of a grating, it may be necessary to lay chipboard. The plates are fixed with self-tapping screws on protruding bars from the inside of the drawers. After placing the mattress, the bed will be ready for use.
Video of assembling a wooden bed purchased in a store:
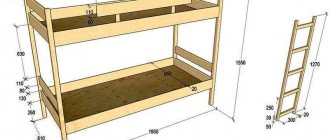
two-tier
To assemble a bunk bed frame from solid pine, you will need:
- 4 support beams;
- 4 longitudinal (long) and transverse (short) drawers.
At the ends of the support beam there are metal elements with grooves - these are the junction points of the structural parts.
Assembly instructions:
- Install 2 longitudinal strips at the bottom and top at the ends of the support beams;
- Thus, it is necessary to connect 4 longitudinal frames and 4 support beams along the grooves;
- as a result, two slats are formed - these are the back and front of the bed;
- connect the walls with 4 transverse drawers, you get a symmetrical box;
- Fix the lamellas on the bottoms of the lower and upper tier with self-tapping screws;
- lay the lamellas end-to-end, and then remove them one at a time: this way you will correctly calculate the step for fixing;
- Install Euroscrews into the holes at the junction points of the drawers and tighten with a hexagon;
- on the footboard and headboard of the upper and lower tiers, 4 more transverse drawers are fixed in the same way;
- on the front side of the bed at the level of the upper tier, a longitudinal drawer is fixed, which is shorter than the others;
- install the staircase support beam perpendicular to its end, place the steps (short bars) along the holes;
- Install Euroscrews into the holes on the stairs and adjust them with a hexagon.
Advice
Having connected the frame parts, tap them with a hammer (preferably wooden). This way you will securely fix them in the grooves before the adjustment stage.
Video about assembling a wooden bunk bed:
How to make a canopy yourself or paint a bed a different color? What are the rules and schemes for assembling such structures as a lift-up, children's, with an attic, pendulum bed or playpen bed? What does it mean to strengthen or strengthen a sleeping place? You can find all the answers to these questions on the pages of our website.
Features and installation diagram of Ikea pine
The kit for assembling the Neiden double headboard contains longitudinal and transverse drawers: they need to be connected to each other with fittings according to the diagram. First, the drawers are formed using wooden dowels, and Euroscrews are installed in the holes.
Wooden dowels are also located at the ends, as well as in the holes of the transverse crossbars. Support bars are attached to the bottom side, as in the figure.
The parts are connected to each other, Euroscrews are installed in the mounting holes at the ends and adjusted with self-tapping screws.
Wooden dowels are installed at the outer ends of the transverse drawers: 2 pieces on each side.
The side drawers of the main frame are attached to the headboard. Euroscrews are inserted into the mounting holes on the back side and adjusted with a hexagon. Plugs are placed in the round holes on the inside of the drawers, which are screwed in with a screwdriver.
Now you need to install a longitudinal crossbar, which will serve as a support for the mattress pad. Wooden dowels are driven in at the ends.
The crossbar is combined with the headboard; on the reverse side, by analogy with fastening the drawer drawers, long Euroscrews are installed, which are closed with plugs and adjusted with a hexagon. Bushings are placed in the holes at the outer ends.
The footboard is a transverse bar. It is fixed in a similar way using euroscrews and plugs along the outer ends of the bed. Euroscrews are placed on the outside of the footboard, which are screwed into bushings.
The frame is strengthened with additional fittings.
The bed is turned over to install the brackets. They are fixed with screws and connect the middle base and side drawers. Two rays are formed in the middle, as in the figure. It is important that the axes are placed exactly in the middle. Screws are pre-tightened on the brackets to prevent them from sliding.
At the last stage, wooden dowels are placed around the perimeter of the frame. They are necessary for fixing the lamella grid.
The video shows the process of assembling a wooden Ikea bed:
Assembling a wooden bed bought in a store with your own hands is quite simple. This will require a minimum of effort and tools. At the assembly stage, do not forget to check the instructions from the manufacturer. First check the package for compliance with the delivery list, and also make sure that the parts are intact.
Installation work
To assemble such a structure yourself, the instructions are always the same:
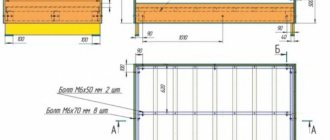
Tools for assembling a double bed.
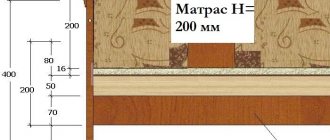
- At a height of 20 cm above the floor level, side panels are fixed to the headboard. Fixation is carried out on the corners in the lower part. If desired, additional fastening can be done through the headboard plate into the rib of the side panel. When performing this step, you will need to make 2 fixation points for each edge. It should be noted that any threaded connection is preceded by drilling a thin hole, because otherwise, the shield will split.
- Now the foot is fixed in the same way. Again, the height should be maintained at 20 cm, which will allow the back plate to rise slightly above the side plates.
- The most difficult stage is the installation of stiffeners (2 pieces). They are attached 5 cm above the base of the side panels. In order to carefully make a hole in it without going out, you need to use a depth gauge on a drill or measure the drill and wrap it at the selected level with electrical tape. The fastening pitch is 30 cm.
- The central rib is not easy to attach. For it, you need to perfectly measure the internal width in order to install it exactly in the center. The height is easily controlled using an edged board laid across. Fixation is carried out on galvanized corners on both sides.
At this stage, the main structure of the bed has been assembled, and you can begin making the mattress pad. To make it, first a frame is made that follows the inner perimeter of the bed, after which another 1 beam is laid in the center directly along the stiffening rib.
When the frame is ready, you can begin to fix the boards on it. Each board is fixed with 1 self-tapping screw on all sides, which will ensure extremely reliable fixation. The distance between the boards is 10 cm, which will reduce the rigidity of the bed, but at the same time the mattress will not fall into the cracks.
After the work is completed, you need to remove the mattress pad and coat all the wood with varnish. If the 2 parts are not separated in advance, they will stick together, after which you will have to split the varnish to separate it.
The standard period for complete drying of the varnish is 36 hours, after which the double bed is moved from a ventilated area where it can be used.
The entire job takes no more than 1 day, but additional time is needed for the varnish to dry.
Source: thewalls.ru
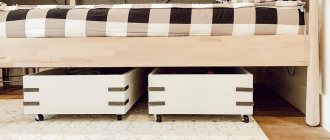
Installation of bed drawers
Drawing of a children's bed-podium.
You must first install a wooden beam around the perimeter of the podium. For fastening from above, boards are used, their thickness is 22 mm. Such boards act as outer panels and crossbars for the bed. For internal parts, it is better to use chipboard sheets rather than boards.
The assembly of the frame, which will be used to install the mattress, is carried out first by installing 47 * 27 mm bars. They are mounted in a horizontal position. Special support bars are already placed on top of them. When installing, it must be taken into account that the load must be distributed evenly. 2 bars must be placed at the edges and 1 in the center; they must be secured with self-tapping screws.
Related article: How I made a curtain from old CDs: master class
For the walls under the drawers, you need to use boards, their thickness is 16 mm. For the bottom, plywood is used, the thickness of which is 10 mm. The boxes must be made in such a way that they completely occupy the entire space under the podium and leave no gaps or voids.
Assembling the drawers for drawers is done as follows:
- First you need to assemble the side and rear walls, for which glue, wooden dowels and screws are used. At the lower inner edge it is necessary to make special grooves with a thickness equal to the thickness of the bottom plywood. The cuts are not made completely, but so that the bottom does not fall out during use. If it is not possible to choose such grooves, then the bottom can simply be nailed to the walls and back using furniture nails, and further strengthened with screws.
- After this, the facades are attached, to which handles are screwed on the outside for opening the drawers.
- If guides for movement are used, then it is necessary to immediately fasten one part of them to the side walls of the boxes, and the second to the inside of the podium frame.
- After assembly, you need to check the reliability of all fasteners.
Double bed 1600×2000 mm with lifting mechanism
I've always liked convertible bedroom furniture. The available space under the mattress allows you to put a lot of things into the bed frame; this replaces a closet or chest of drawers, which is important for a small bedroom. I decided to make a double bed with a lifting mechanism myself.
I have been making furniture in my small workshop for a long time. Having the appropriate equipment and a large set of tools made solving my problem much easier. After a short search in the media, I decided on a bed design with a lifting mechanism and gas shock absorbers.
Tools
First I prepared the tool. Everything you need to make a bed with a lifting mechanism with your own hands is included in the following list.
- Screwdriver for fastening furniture base frame parts.
- Tape measure and metal ruler for marking MDF sheets.
- Drill for drilling holes in metal parts of lifts.
- Pencil for marking.
- Drills for wood and metal.
- Drill and key for confirmations for assembling fragments of the bed frame.
- Iron for edging furniture tape.
- Jigsaw for cutting MDF.
- Clamps (2 pcs.) for fixing housing parts when assembling the housing.
- Hacksaw for cutting boards to required sizes.
- Knife for removing protruding parts of furniture edge strips.
- Set of wrenches and sockets.
- Hammer.
Materials
I purchased the materials needed to make a bed with a lifting mechanism at a building materials supermarket according to the list:
- confirmations – 8 pcs.;
- self-tapping screws 25 mm – 20 pcs.;
- furniture corners (50 × 50 mm) – 4 pcs.;
- metal corner (32 × 32 mm) – 1.4 m;
- MDF sheet 2440 × 1830 × 30 mm;
- fiberboard sheet – 2440 × 1830 mm;
- edged board 1600 × 150 × 20 mm;
- inset frame for a mattress (orthopedic base on a metal frame);
- furniture legs – 6 pcs.;
- edge furniture tape – 10 m;
- gas shock absorbers (425 mm from 800 N) – 2 pcs.;
- metal strip (50 × 3 mm) – 1.3 m;
- PVA glue - tube;
- bolts, washers, nuts – m 6;
- metal bushings (10/16 mm) – 8 pcs.
The entire process of assembling a 160 x 200 bed with a lifting mechanism with your own hands is outlined in the following instructions.