You purchase new furnishings. Prices in stores, of course, make you want the best, but you have to buy. However, you can save significantly when purchasing by assembling the purchased headset yourself.
Having familiarized yourself with photos and videos of assembling furniture with your own hands on the Internet, you are quite capable of mastering this generally simple process.
Tool
To assemble furniture, a minimum set of tools is required. Screwdriver with bits, 4 mm hexagon, mallet, pencil, square ruler, tape measure, building level, awl.
It happens that there are no holes for connections; you need an angle clamp for precise fixation and a jig, as well as a Foster cutter for hinges and drills of various diameters.
Don't make mistakes
Tips for assembling furniture will be useful for beginners:
- Prepare your work area by covering the surface with cardboard from the packaging.
- Before you begin, number the parts and check that they are complete.
- Monitor the accuracy of the markings, because the final result depends on this.
- Check the diagrams and do not confuse the details.
- Tighten the connections firmly, but do not overdo it, so as not to split the body or break the threads; it is better to set the screwdriver to medium tightening force.
- Eccentric coupler Can be used many times, there are no protruding caps on the outside.
- The furniture corner is practically not used, since it is issued on the inner surface of the product, for economy class goods.
- Dowels made of hard wood connect the upper and lower parts of the set to the sidewalls.
- Furniture screws, the main difference is that the head is square with curves, it cuts into the material and does not allow it to turn when tightened.
- Ties for connecting headset sections.
- The confirmat or euroscrew is easy to use, but it requires turning three stages of the hole, or a special drill profile.
Read here - How to make garden furniture with your own hands: the best ideas for making unusual and simple outdoor furniture projects (95 photos)
Tools for furniture assembly
It should immediately be noted that the assembly process will seem more difficult for beginners, since they lack the necessary skills. And until they are well enough developed, it will not be possible to learn how to quickly assemble furniture. However, this is not a reason to give up. Any master in the past was a beginner.
Having decided to assemble previously purchased furniture, you should first purchase all the tools that will be required for the work. It is a mistake to believe that only 2-3 tools may be needed for this purpose. In fact, the work requires a whole set, which consists of different devices.
First let's look at the important types of fasteners that can be used:
- screw tie - it is usually used for assembling furniture made from solid wood or chipboard. This is a high-quality connection that has low cost, so it is often used;
- furniture corners - they can be not only metal, but also plastic, they are easy to install, but at the same time provide reliable fixation. They are used for assembling upholstered and cabinet furniture;
- minifix is another type of connection that can withstand many assembly cycles;
- rafix - it is fixed using two small holes;
- self-tapping screws - the main advantage of fastening is its low cost. However, it is less reliable than minifix.
Sometimes screws with a countersunk head are used for fastening. Many craftsmen give advice on assembling furniture for beginners not only to help them simplify the process itself, but also to improve the result. And these tips often include the use of such screws.
This may be necessary if we are talking about installing a shelf or the back walls of a cabinet, as well as some other elements. As a rule, this type of fastening is never included in the kit by furniture manufacturers. Therefore, you will have to purchase it yourself.
Now let's talk about the tools that you may need. It should immediately be noted that depending on the specific situation, this list may change. Consider a standard set, which consists of the following items:
- screwdriver - you can use it to perform almost all operations in the process of assembling furniture;
- bits for magnetic holders - there are three types of bits, each of which is suitable for working with a specific type of furniture. For example, star-shaped bits are commonly used for mounting household appliances. Of course, we are talking about built-in technology;
- hammer drill, drill and jigsaw - if you need to make holes for inserting any furniture, then you won’t be able to do without these tools.
It is also necessary to prepare a level and tape measure in advance. Instructions for properly assembling furniture often indicate that it is necessary to use a stationery knife.
Before you start assembling furniture, you need to check how accurate the cutting is for the screws. After all, no one has abolished such a concept as a manufacturing defect. Inaccuracies are also possible if the furniture was made by a novice craftsman.
Documentation
For each set of furnishings, the manufacturer usually includes instructions for the correct assembly of furniture with drawings and the order of combining parts, which must be strictly adhered to.
Violation of the established rules risks the fact that the almost finished creation will have to be disassembled, otherwise something will not be put in place.
Let's get started. Let's start with something simple and step-by-step assembly of furniture with your own hands will help you with this.
Furniture material
Wood was once considered the most popular material for furniture. Everything was made from this material: cabinets, beds, chairs, and so on. Strength and durability are the main qualities of this natural material, which has long become something of a canon for furniture manufacturers. But progress could not affect such an area as furniture production.
Over time, pure wood became too expensive a material . In principle, every reader can verify this. Just go to a furniture showroom and ask about prices for furniture made from solid wood. The answer is unlikely to please a buyer with average income. This is already a really expensive pleasure.
However, under no circumstances should you be upset. Humanity has found an alternative to pure wood to reduce the cost of furniture products. We are talking about laminated chipboard. Further, in the article this material will be designated as laminated chipboard.
The buyer can find chipboard sheets with a thickness of 10 and 22 mm . Usually, however, we are talking about laminated chipboard sheets, the thickness of which is 16 mm. They are very common on the market. However, it will not be difficult to find sheets of the required thickness. They are all on sale.
To determine what thickness of sheets you will need when assembling furniture yourself, you just need to know approximately where they are used. To fill the doors of sliding wardrobes, laminated chipboard sheets with a thickness of 10 mm are usually used.
For cabinet shelves, you can use laminated chipboard with a thickness of 22 mm, since in this case the material must have high bending strength. The reader can also take into account the fact that 22 mm thick laminated chipboards can be used to decorate the entire structure.
Almost all other furniture parts are made from laminated chipboard sheets, the thickness of which is 16 mm. Exceptions are facades and doors. It should be noted that laminated chipboard is cut along a guide on special machines .
In principle, you can consider the option of cutting with a jigsaw , but in this case you need to be prepared for the fact that with a high degree of probability you will have to deal with unevenness and chips. It is practically impossible to cut laminated chipboard sheets evenly at home on your own.
How to finish edges of furniture material
When preparing material for subsequent furniture assembly, you need to remember that laminated chipboard has a very vulnerable spot. We are talking about sawing. It is very easy for moisture to penetrate through it, which can lead to swelling of the material, of course, if the master did not take care to provide the necessary protection before assembly.
To provide protection for such a vulnerable chipboard cut, the ends should be covered with special edges. Below we will talk about what types of edges exist and what their features are:
- You should start with the simplest and cheapest option. Melamine edging is indeed the least expensive option on this list, but it is also the lowest quality. This is an option that can only be used as a last resort. You can glue such an edge at home. To do this you will need to use an iron.
- The best option would be to use PVC edges. To save money, a 0.4 mm PVC edge is glued to the invisible ends, while 2 mm PVC is glued to the external ends, which will subsequently experience the effects of friction and constant loads.
- It should be remembered that such an edge can only be glued on a special machine; it most likely will not be possible to do this at home. You will have to glue this edge immediately when ordering the cut of the chipboard.
- ABS edge can be used. It is, in principle, similar to the PVC edge, which was mentioned just above, but has one difference. ABS edge is made of environmental materials.
- You can also use a mortise T-shaped profile as an edge, which, however, is used quite rarely. It is inserted into a groove previously made with a milling cutter.
- Finally, we should mention the overhead U-profile. It can be glued by hand.
Table stand
- We assemble the bottom and sides, taking into account that the cladding is not glued to the rear ends and sometimes a chamfer is chosen. This will help you position the panels correctly.
- We install the upper strips and, having laid the structure on the floor, measure diagonally. They must be the same, then the surfaces will be perpendicular.
- We nail the back wall with nails or, if there are staples, using a stapler, since it is quite expensive to buy for one time, it is impractical.
- We secure the legs and level the box.
- We install hinges and hang doors, adjust their closure.
- We attach the shelf holders and shelves, and install the handles.
Types of laminated chipboard structures
The use of laminated chipboard is widespread in various industries, one of which is furniture production. Laminated chipboard is used not only for the manufacture of simple furnishings, but also multifunctional furniture structures.
Kitchen set in modern style
Manufacturing of facades
The material from which the visible parts of the furniture are made, forming its decorative appearance - facades, must have an aesthetic appearance, match the style and color scheme of the interior, and also be moisture- and wear-resistant. If you need to make a drawer inside the cabinet, you can use a simpler material - 16 mm thick laminated chipboard with a 2 mm PVC edge. If this is the façade of a kitchen unit, then it must be made of beautiful and reliable material.
Minimalist facade of a kitchen unit made of laminated chipboard
The size of the standard facade is 2 mm smaller than the cabinet dimensions on each side. That is, if the cabinet is 60 cm wide, then the front will be 59.6 cm wide.
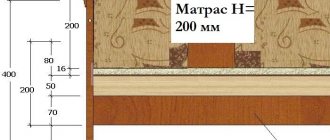
Dependence of furniture parameters and human anthropometric data
Kitchen furniture, first of all, should be ergonomic - convenient, comfortable and safe to use. Thus, floor and low wall cabinets have a height of 71.5 - 72.5 cm (it is worth taking into account the height from the floor to the top of the tabletop - at least 82 cm), and high wall cabinets - 91.5 - 92.5 cm. When manufacturing furniture according to an individual drawing, the anthropometric data of the apartment owner are taken into account when developing the latter.
Basic parameters of the kitchen set
Laminated chipboard facades differ from MDF in that it is not possible to create a relief pattern on their surface. However, this material is perfectly used to create sets in a modern style, the appearance of which requires minimal decor and conciseness. You can increase the decorativeness of the set by using fittings and inserts made of colored or embossed glass.
How to make a kitchen set yourself, what designs are the most convenient and reliable? More details in a special article.
Hidden elements – bottom and walls
To make the back wall of the box and its bottom, laminated fiberboards with a thickness of 3 to 5 mm are used. Their shade is selected to match the color of the chipboard used and fixed with the smooth side inward.
LDVP
Fastening LDVP is most often done using nails or self-tapping screws with a press washer. To prevent the plate from cracking, you must first make a hole for the screw and only then screw it in. When making drawers, a sheet of HDF can be fixed into a groove.
If it is necessary to increase the load-bearing capacity of the product, then the bottom is made of laminated chipboard.
Manufacturing of countertops
A horizontal work plane intended for preparing and eating food, performing activities related to reading books, writing, drawing, using a computer is called a tabletop.
Edge cutting
To design the working surface of the kitchen set, special laminated chipboards with a thickness of 28 to 38 mm, characterized by increased moisture resistance, are used. On their surface there is durable plastic, which is fixed using the “postforming” technology.
This technology consists of lining a chipboard slab with thin-thick laminated paper plastic under pressure and exposure to a temperature of 90 or 180 degrees. The difference is that in the first case, the slab is covered with plastic on the main side and at the ends, and silicone sealant is used to treat the joint of the coating.
Drip evacuation
In the second case (at a temperature of 180 degrees), the plastic completely covers the stove, going around the end of the tabletop, and sticks to it from the bottom, forming a drip tray. This is an important detail that protects the inside of the stove from moisture.
Note! For the manufacture of kitchen countertops, moisture-resistant chipboards are used - they are green when cut.
The most vulnerable point of a laminated chipboard kitchen countertop is the end cut, which must be hidden. In conditions of high humidity and intense operating load, a regular melamine edge will quickly cease to cope with its task. Therefore, aluminum end strips are used to protect the ends of kitchen worktops. There are also corner and connecting strips used to connect several modules that form a single tabletop - they cover the joints, protecting them from dirt and moisture.
Types of aluminum strips
Also, for protective and decorative purposes, a special plinth is used at the junction of the table top with the wall, when a decorative element of the required shade is attached to the guide.
From below, the tabletop is fixed to the floor cabinets using short self-tapping screws and horizontal spacers - this allows you to maintain the integrity of the smooth front surface.
Method of fixing the tabletop
Manufacturing of sliding doors
The sliding wardrobe is very popular - this method of opening the door allows you to save free space, which is important for small rooms. There are many models of sliding wardrobes: straight, five-walled, corner, trapezoidal, radius. Also, the main difference lies in the type of construction - stationary or built-in. In the first case, the cabinet is a box with two side walls and a back wall. In the second case, the side walls may be absent if the cabinet is built into a niche. If it is built into a corner, then you can dispense with one side wall. In this case, part of the load is distributed to the walls.
Basic elements of a wardrobe
The main element of such a cabinet is a sliding door, which, when opened, moves using rollers along guides. A sheet of laminated chipboard is inserted into a profiled frame; to achieve a decorative effect, it can be combined with other materials, separating them using an aluminum profile. The width of one door should not exceed 1 m.
Operating principle of roller guides
The guides along which the canvas moves are installed from below and from above. The upper guide is needed to fix the blade, and the lower one is needed for its smooth movement.
Plastic is used to make the lower rollers. The device is equipped with a shock-absorbing spring and an adjustment screw for adjusting the height. The upper rollers have a rubberized surface.
Accessories for sliding doors
Prices for components for sliding doors
Accessories for sliding doors
In a special article, we will look at the advantages of sliding wardrobes, the main nuances of their installation, and give detailed instructions on how to independently assemble a spacious wardrobe for a small hallway.
Video - Stages of assembling a sliding door at home
Making a drawer
A drawer is a convenient storage element, which is present in cabinet furniture models made from chipboard for any purpose - in a kitchen set, in a desk and office cabinet, in a closet, at the bottom of a bed.
Chipboard chest of drawers with drawers on roller guides
The main element of the design is the guide, which ensures smooth opening of the drawer. There are two types of guides: roller and ball.
The roller guides are fixed to the bottom of the box. Movement occurs using rollers. The peculiarity is that the drawer will not extend completely. If it is heavy, then there is a risk of the drawer falling out when it is opened more than halfway.
The situation is different with ball guides, which allow you to safely pull out the drawer to its full length, while the structure moves smoothly and there is no risk of it falling out.
Ball guides
Table 2. How to assemble a simple roll-out box on roller guides
| Illustration | Description |
Step 1 | One drawer will require two slides on each side. One will be attached to the side wall of the drawer, the second to the inner wall of the cabinet or cabinet. |
Step 2 | When attaching the guide to the cabinet wall, 2 mm are removed from the edge. |
| Step 3 | Fix the guide with self-tapping screws so that their head does not protrude. |
Step 4 | The back wall and sides have an edge on one side and holes for Euroscrews on both sides. |
Step 5 | There is a groove on the facade for attaching HDF. |
Step 6 | The drawer front is fixed to the side walls using an eccentric tie. Screw a “Twister” screw into the hole until it stops |
Step 7 | Wooden dowels are inserted into holes with a diameter of 7 mm, which can be lubricated with PVA glue for reliable fixation. |
Step 8 | The eccentric is inserted with an arrow into the outlet hole at the end. |
Step 9 | The part is installed and tightened clockwise. |
Step 10 | The rear wall is secured using Euroscrews. |
Step 11 | The HDF sheet is inserted into the groove on the reverse side of the facade and aligned. |
Step 12 | Guides are screwed through the HDF. |
Step 13 | The LDVP is fixed to the back wall with several self-tapping screws. |
Step 14 | At the final stage, screw the handle. |
Washing
We fix it in the same way; if there is no opening in the countertop for the sink, we cut it out and install it with sealant. If necessary, we make cutouts for plumbing fixtures.
Check it out here too!
Instructions on how to make a table with your own hands: step-by-step photo instructions, drawings, assembly diagrams for tables of different types for the garden and at homeHow to make a hanging chair with your own hands - 100 photo ideas for chair design, instructions for their implementation. Creating the perfect vacation spot
DIY furniture made of wood: the best photos of solid wood furniture! The process of making wooden furniture: drawings, diagrams, furniture assembly
Installation of sliding doors
Strictly level we attach the upper and lower guides, which should be slightly recessed. We install wheels on the door, insert and adjust their position with special screws.
Results
In the article you got acquainted with the diagrams for assembling furniture with your own hands. We understood how best to organize the work and whether we were able to cope with the task.
Check it out here too!
How to make book shelves with your own hands: drawings and step-by-step photos. Wall shelves, floor standing, portable, Montessori book shelfWe make a kitchen countertop with our own hands: design, methods of application, design options and decor ideas (135 photos and videos)
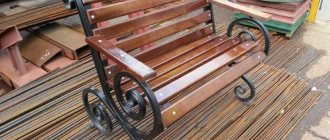
How to make garden furniture with your own hands: the best ideas for making unusual and simple outdoor furniture projects (95 photos)
If you decide, then good luck! In the future, you can help friends and acquaintances, and maybe start your own business collecting furnishings.
Beginner difficulty level
For simple pieces of furniture, you will need a simple tape measure, a hammer, a few screwdrivers (can be replaced with a screwdriver), a drill (situational), a hammer and a few wrenches. All this is enough to assemble the initial difficulty levels.
Read here: DIY coffee table: step-by-step instructions on how to make stylish and beautiful tables