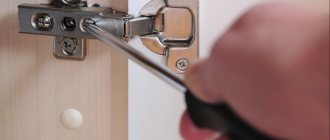
A situation often arises when it is necessary to install a furniture hinge into a chipboard board, for example, when installing a chipboard door. This task involves drilling a hole for a hinge in the chipboard. In this article we will look at what you can use to prepare such a hole and how to install a loop in it.
So, in our case, when making a cabinet from chipboard, a mistake was made - the groove for the hinge was drilled too low, as a result, after installing the hinge in the prepared place, the internal horizontal door cannot open completely. As a result, it is necessary to move the groove slightly upward to eliminate this drawback.
Error in choosing the location for the groove for the hinge
Return to content
Tools and materials
During the installation of furniture hinges for chipboard, we will need the following tools:
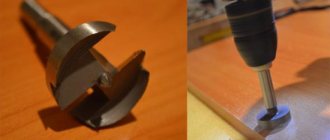
1. Forstner drill with a diameter corresponding to the loop (in our case 35 mm). The drill is a cutter for making a groove for hinges. These drills sometimes come with stops (designed for chipboard thicknesses of 16, 22, 25 mm), which allow you not to worry about how deep you should go;
2. drill;
3. screwdriver.
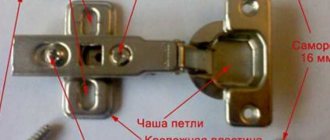
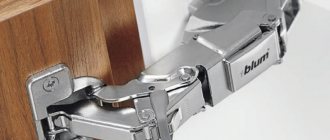
The materials we need are the hinge itself and the screws for fastening it.
Internal furniture hinge for flush mounting, right angle
Screws
Return to content
Article about furniture
I want to tell you how to install furniture hinges on doors yourself.
Why is this needed at home?
It happens that people decide to replace the facade of cabinet furniture themselves, or they bought ready-made frames and had the doors made to order. There is nothing complicated here, it is advisable to practice on a piece of chipboard before drilling a hole on the door.
You will of course need a drill or screwdriver. The hole must be drilled with a cutter with a diameter of 35 mm, also called a forstner drill.
First you must decide how many hinges you will install and their exact location. Place the door in the place where it will be secured. Use a pencil to place crosses in the places where the door will rest against the shelves; hinges cannot be installed here.
Now set aside 22 millimeters from the edge of the door and put a point. This point is the center of a blind hole with a diameter of 35mm. You can core it, that is, make a depression so that the tip of the cutter does not slip.
I advise you to prepare a vacuum cleaner, or drill in the utility room, because the chips fly quite far.
Try to hold the drill with the cutter strictly vertically, do not tilt it at the beginning of drilling. Be careful, the cutter tries to jump off at first, hold it tight. When a small depression is formed, you can slowly rock the drill in a circle. You will notice that the cutter does its job much faster than without shifting the center of gravity.
You should have a furniture hinge on hand to use for fitting. The loop should lie flat in the recess, not wobble, and its cup should not rest against the chipboard. If the hole is not deep enough, the hinge will push out the front of the door when you screw it in place.
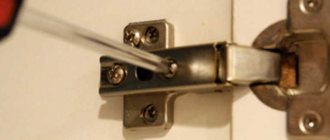
Screw the hinge exactly 90 degrees relative to the door. Self-tapping screws are usually used 16mm long. with a rare thread pitch, must come with hinges included.
By the way, the photographs I used were taken by me while we were hanging the facades on the cabinets purchased at IKEA. The buildings turned out to be cheap, but the facades were overpriced.
We were asked to manufacture and hang MDF doors. We decided to install the hinges locally so as not to end up on the shelf in the closet.
Sincerely, DEZALT designer – Eduard Sukhanov.
PS Sometimes they ask: “And if the loop has a diameter of 26mm, how much should you step back from the edge to set the center?” Retreat 17mm. The main thing is that there is 4mm from the edge of the panel to the beginning of the recess.
All articles
Recommended Procedure
Marking
- The optimal distance between loops and fabric cuts is 200 mm. Lines are drawn at such distances from the bottom and top.
- The canopies are applied so that their edges coincide with them. But the installation of door hinges is carried out taking into account the direction of the door opening (left or right).
- The pencil outlines the outline of the canopy.
- Using a chisel, a sample of wood is taken to a depth equal to the thickness of the hinge cut into the interior (or entrance) door; the surface is leveled.
- The canopy is installed in the prepared “window”, its position is checked and, if necessary, adjusted.
- After this, marks are marked and holes for fasteners are drilled.
This completes the first stage of the insertion. But there are a number of nuances that should not be overlooked.
- The canopy rod should not touch the door tightly, otherwise the mobility of the fittings will be limited; There will be difficulties with closing/opening the door. But you shouldn’t extend the loop far beyond the perimeter of the canvas either. The load on it will increase, the fastenings will gradually weaken, and as a result - misalignment.
Choice
It is better to install universal overhead hinges on interior doors. It is advisable to purchase canopies made of brass, but if the budget is limited, then you can get by with enameled products made of stainless steel or aluminum. If the thickness of the canvas is less than 2 cm, it will not be possible to securely fasten the overlay plates. After a while, the door will begin to creak and become warped. Therefore, for thin door structures, it is best to take screw-in awnings.
3-pin screw-in hinges are most often used for heavy wooden doors. To ensure silent operation and reduce friction in the door structure, purchase models equipped with a nylon insert and a grease ball, which is sealed into the body of the leaf part. For reliable installation, 3-4 curtains are installed on the canvas.
Step-by-step installation of door hinges with your own hands
It should be noted that inserting door hinges is, in principle, a simple job, but it requires precision and accuracy.
You will also need a rather limited set of tools for this. How to do everything correctly is described in this article. Typically, assembled doors do not require the installation of locks and hinges - everything is already done at the factory. Even if purchased
disassembled block, such a service can be easily ordered in the carpentry shop of a construction supermarket.
There, the craftsmen use a special machine and do the work as carefully as possible, and for a relatively low fee. Thus, when there is no self-confidence, we advise you to choose the option mentioned above - inept actions often lead to damage to both the doors and the frame.
Classification of door hinges
Door hinges have several types of classification, which are based on the area of their installation, the method of fixation and the type of mechanism.
If the material from which the door is made is wood or fibreboard, then you will have to additionally choose special awnings for the interior door. Aluminum, steel or plastic door structures are initially equipped with canopies. The classifications apply only to hinges used for installation in wooden doors.
Elevators and lifting mechanisms: types, installation methods
Elevators and lifting mechanisms are designed for tilting doors. With the help of such furniture fittings, doors can open up, down and accordion-style. Lifting mechanisms can be divided into the following groups: folding up/down mechanisms, vertical/parallel mechanisms and accordions.
The first group of mechanisms are gas elevators and lifting mechanisms. They have a simple design and low cost, in addition they are very easy to install. Mechanisms of this type allow you to organize the door opening up and down.
Increase
Fig.36.
As you can see from the picture above, the installation of this hardware is very simple. All necessary installation dimensions are included in the instructions for each mechanism or on the packaging.
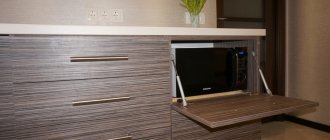
To open the door downwards there is a rather elegant mechanism, shown in the figure below. It allows you to smoothly open and close the door. This mechanism can be used for small facades weighing no more than 9 kg.
Increase
Fig.37.
The main criterion for choosing the described mechanisms is not only aesthetic qualities, but also the weight of the door. Depending on the weight, the mechanisms have different opening forces. If the weight of the door is not provided by one mechanism, they can be installed in pairs, so the opening force will be summed up. The opening force and the maximum permissible weight of the facade are indicated on the mechanism.
Mechanisms for opening the facade upward in parallel, at an angle and accordion are more expensive. However, they can improve the ergonomics of furniture by providing greater access to the contents of the shelves.
The choice of mechanisms also depends on the weight of the facade. The installation of these mechanisms is more complicated, however, if all the installation dimensions and fasteners that are supplied with the mechanism are available, it is unlikely to cause any great difficulties.
Despite the rather high cost of lifting mechanisms of the second group, they have ample adjustment capabilities and a unique system for opening cabinets.
All accessories considered are used for installation on doors. By following the installation recommendations, you are unlikely to have any installation difficulties. Using accessories such as shock absorbers or opening systems, you will have modern and ergonomic furniture in your home that will delight you every day.
- Varieties of planting cup
- Preparing tools
- Drilling a hole and attaching a hinge
Household chores are not only a concern for women. After all, when it comes to repairs, assembling furniture or other “men’s work,” a representative of the stronger half of humanity is obliged to demonstrate his abilities. Therefore, it is extremely important to have an understanding of furniture assembly, the procedure for installing it, and handling tools. This will help a man not only perform such an important job efficiently and quickly, but also impress the fair sex. Everyone wants to be a jack of all trades!
Drilling holes for confirmations
The quality of the cabinet furniture itself as a whole is determined by how accurately and firmly the furniture parts are connected to each other. It is no secret that the structure of chipboard is heterogeneous and when drilling holes by hand, the drill can always move from its original position.
Therefore, holes, when drilled by hand, are still shifted from the original, desired position. This leads to the fact that the connected parts are displaced relative to each other during assembly, and as a result, the assembled furniture does not look aesthetically pleasing and resembles products assembled in a handicraft way.
And also, in order for a through hole in the chipboard to be drilled in one pass and at the same time, chips do not form on the chipboard at the exit of the drill from the reverse side, special expensive drills are needed.
Conductors, which have ready-made holes in a metal template with a certain pitch, help a little in this task. But, over time, the holes, with constant contact with the drill, change their sizes and accuracy is lost. Therefore, so that you, using our services for cutting and edging chipboard and laminated chipboard parts, can then assemble high-quality cabinet furniture that will not be inferior in its characteristics to serial factory furniture, we have put into operation a semi-automatic drilling and additive machine.
The machine is Italian, from the well-known brand VITAP and is most widely used in small-scale production of cabinet furniture. The machine allows you to drill through and blind holes up to 70 mm deep. Drilling is done with special drills and our set of drills is limited to the following diameters:.
By filling out the form you agree to the privacy policy. Thanks to the use of special drills, the holes for confirmation are clean, smooth and without chips. The pneumatic clamp prevents the part from moving when drilling a hole. Drilling holes according to confirmation is carried out both in the plane of the part and at its end; drilling at an angle of 45 degrees to the plane is also possible.
The high precision of drilling by the machine allows the use of such types of hidden connections as minifixes and eccentrics reinforced with dowels, the addition of holes for which manually is very difficult and imprecise. You will find prices for additive and hole drilling services in our price list. If you yourself create a hole fill map for the machine, then please consider the following parameters:.
It is best to make a hole fill map in a specialized program designed for this purpose, which already takes into account all the standard parameters of most drilling and filler machines. If you doubt your abilities, you can entrust drawing up the map to us. Your name. Your phone number is required. Leave an order Your name.
How to install hinges in an interior door
Marking is the first step in inserting hinges into interior doors. On the door leaf you need to retreat 20 cm from below and above, and then mark the starting lines with a pencil. When applying markings, you need to maintain 2-3 mm gaps between the box and the canvas.
In the designated places, using a chisel, the layer of wood on the canvas and loot is cut off. The recess must correspond to the thickness of the hinge plate. Canopies are applied to the grooves made and the places where the screws are attached are marked on the canvas. The same procedure is repeated on the door frame. Using a drill, drill holes in the designated places and use self-tapping screws to secure the hinges to the frame and canvas.
A door up to 80 cm wide, up to 2 m high and up to 5 cm thick can be used normally on two canopies. Structures whose dimensions exceed standard data will be too heavy.
The installation of a third loop is provided for them. It is not placed in the middle, but a little higher to regulate the load on the fittings.
High-quality awnings have a built-in mechanism, thanks to which the adjustment of the hinges of interior doors is carried out using a hex key.
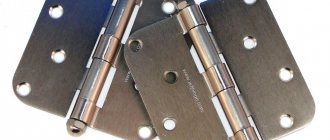
Types of loops
Before buying hinges, you need to understand their features and the designs on the market. This will allow you to choose the right model for your particular case.
First of all, it matters which way your wooden doors open. So, there are loops:
If you have not yet fully clarified this point for yourself, take universal ones.
To determine the type, you need to stand on the side in which the canvas should swing open, and see where its movement will be directed (to the right or left) - the hinges are selected accordingly.
They also differ in material:
- brass (they are flexible and therefore not suitable for heavy sashes);
- alloy (also not very strong);
- steel (the most reliable and durable).
- the most popular type of hinges is card hinges, with fastening plates on the sides;
- corner ones are used for pendulum-type doors;
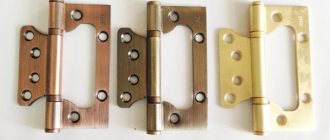
- screw-in (screw-in) plates do not have, but are equipped with threaded pins (suitable for lightweight MDF panels);
- secret – used on entrance doors and not visible from the outside;
- Italian ones are very reminiscent of the furniture we are used to.
They are also distinguished by the type of installation:
- invoices are mounted directly on the surface of the canvas and box;
- mortise ones require flush installation in special recesses;
- screw-in ones only need holes in both the frame and the sash itself.