73812
In order to make a high-quality set yourself so that kitchen furniture made by yourself becomes a source of special pride, immortalized in photographs, you need to at least have an idea of where to start. We suggest you familiarize yourself with the stages of work and what is required for this.
Types of wood for kitchen furniture
When choosing, the rock is taken into account, which will determine the future performance properties of the structure. Thus, there are about 40 different types of wood, some are characterized by increased hardness, which will ensure long-term use of products, while others are characterized by softness. If you plan to make a kitchen out of wood with your own hands, you should consider both types of material, since it is better to make the base of the structure from more durable species.
Important to know: hard wood is difficult to process. For this reason, it is recommended to make some of the structural elements from a softer material. It's much easier to work with.
Hard, durable types of wood include beech, oak, yew, and walnut. Such breeds should be chosen for the manufacture of the frame of the set and shelves.
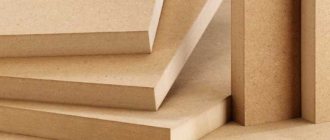
Furniture decoration elements should be made using pine, spruce, cherry, poplar. For the independent manufacture of kitchen sets, a material that is characterized by moisture resistance is used. Solid wood construction of any type cannot last long due to exposure to moisture. However, some types of material retain their properties longer when in contact with water. These include larch, oak, teak, mahogany, merbau.
Deciding on design and construction
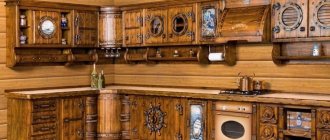
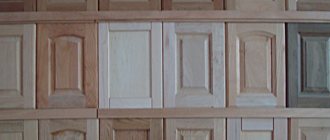
When creating wooden kitchen sets with your own hands, the color scheme plays an important role. The shade of wood can vary from light (beige, milky) to almost black (wenge). If it is important to preserve the natural pattern of the material, you should pay attention to the shade of the wood species when choosing, because after completion of the work, varnishing will be performed. In the case where the structure is planned to be coated with coloring compounds, the color of the wood does not play a role.
In addition, if you are making kitchen furniture from wood with your own hands, you need to think through the design in advance: will these be items with carved elements or in a classic style, without frills. The set is designed in accordance with the general style of the interior of the room. If the owner first creates the furniture, and at the next stage the kitchen design is determined, the style should not contradict the design elements.
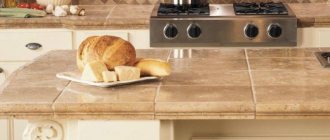
A wooden set, which is varnished, fits best into the interior of a house made of the same material. In this case, all structural elements (kitchen facades, supporting frame, shelves, countertops) are made of solid wood. In order for the working surface to last longer, it is processed much more carefully, since it will be exposed to moisture, aggressive detergents, and mechanical stress every day.
You can combine materials: the back surfaces of the cabinets are made of fiberboard (minimum thickness 5 mm), the bottoms of the drawers are cut out of plywood. The table and stools are made from solid wood.
We take measurements of the premises
To make a kitchen set, you need to check the quality of the surfaces: evaluate how smooth they are, in which areas there are depressions, curvatures, and bumps. For this reason, measurements are taken at three points: under the ceiling, at shoulder level, above the floor surface (5-10 cm). It is necessary to correlate the actual dimensions of the room with those determined from the documents. Based on these data, a decision is made on what type of set should be made (corner, straight), how many cabinets will fit.
In addition, you need to decide on the height of the headset. When choosing a suitable option, be sure to take into account the average height of the residents of the apartment/house. A set of small height looks inorganic. The structure almost always occupies a significant part of the wall; free space is left under the ceiling in case a suspended, suspended ceiling is installed. In the case when the choice is made on a corner headset, measurements are taken using a laser rangefinder. Otherwise, a simple roulette will be enough.
We make sketches and necessary drawings
When making furniture yourself, documentation is also prepared. In this case, it is not necessary to develop a project; it is enough to draw up drawings and installation diagrams for the furniture that will be created. If this is not done, the assembly of the structure, consisting of lower-level cabinets and hanging pieces of furniture, will be carried out with errors: individual elements will not fit together, there will be a significant difference in the levels of the furniture, etc.
If the user has developed abstract thinking, you can do it on your own by drawing up drawings in an isometric projection. Otherwise, it is recommended to use special programs: AutoCAD, Basis furniture maker.
It is important to determine the dimensions in three projections: frontal, side, top view. It is necessary to set the dimensions of the entire structure, each individual cabinet and element.
If you are creating a wooden kitchen with your own hands, you need to remember that this material can be deformed during processing, so the dimensions are set taking into account some error (up to 4 mm in the larger direction). If it is not possible to create drawings yourself, you should seek help from professionals. In this case, the total cost of the set and other furniture will still be lower than the price of the finished structure.
Let's sum it up
A set assembled with your own hands is real!
That's basically all a novice carpenter needs to know. We hope that now you understand how to make a kitchen with your own hands from wood and you have no doubts about your decision. If you still have questions, then we have prepared thematic photo and video material especially for you, in which you will find answers to your questions.
It remains only to remind you of the main thing - after completely assembling your new headset, you will have to disassemble it in order to paint the surface and varnish it. After all components have been processed and dried, the kitchen is reassembled and installed in a pre-designated location.
Gallery
Did you like the article? Subscribe to our Yandex.Zen channel
Great article 0
Required Tools
To make a kitchen from wood, you prepare the equipment yourself. If the user does not have the required tool, it can be rented for a while. This is advisable to do in cases where there are no plans to engage in similar activities again in the future. Required tool:
- screwdriver;
- electric drill;
- jigsaw;
- rule;
- building level;
- tape measure, laser range finder;
- hammer;
- file;
- screwdriver;
- pliers;
- hacksaw;
- plane.
For work, sandpaper of varying degrees of grain is prepared. It is necessary to connect elements made of wood and wood-containing sheets with each other using screws, nails, and self-tapping screws. Fasteners of the required size and type are selected taking into account the type of material. For example, nails are more suitable for a solid mass. Screws, self-tapping screws - universal fasteners. The good thing about a homemade kitchen is that you can create a durable structure using the type of fasteners, as well as their quantity, in accordance with your own preferences.
The process of assembling a finished kitchen
Assembling a kitchen set with your own hands sometimes takes a lot of time. This process is influenced by such factors as the integrity of the manufacturer . Sometimes the assembly instructions contain only general theses and do not take into account that such rules may not be suitable for the installation of various parts.
Incorrect location of factory holes is another problem associated with the question of how to assemble a kitchen set. Assembly is complicated by the fact that the cabinets are not always packaged separately. Some manufacturers wrap each board in packaging. There are times when some of the parts from the upper cabinets of a kitchen set end up in the box where the lower cabinets are located.
Some apartment owners strive to assemble a kitchen set with their own hands. Assembly requires a minimum number of tools , including a standard construction set (hammer, tape measure, nail puller) and electrical appliances.
Reference. A hammer drill is needed to drill into a concrete wall. Among its analogues, it is the most powerful device.
A hacksaw will be needed to cut the countertop and further install the hob or sink . With a screwdriver you can quickly screw a large number of fasteners into the facade, so the assembly process will speed up. The next tool is a hexagon, it is better to purchase a whole set with flat and cross heads. Screwdrivers of different diameters may be needed for assembly.
Furniture manufacturing stages
Before using the boards, it is necessary to sand them and treat them with antiseptics. Wood-containing sheets do not require such careful preparation, since they have gone through these stages during the production process. Of the existing materials for wood processing, stain is often used. The next step is painting with varnish/paint. As an alternative, self-adhesive film is used. At home, processing of blanks should be done before installing the headset.
A work plan drawn up will help you step-by-step make a kitchen with your own hands: first, the lower sections are installed, then the upper ones. The set is assembled first. The manufacture of tables, chairs, and free-standing cabinets is carried out at the next stage.
Lower sections
The cabinets can be a solid structure - a kitchen rack. In this case, they are united by one tabletop, and the visual separation is facilitated by the presence of separate drawers for each cabinet. If you plan to periodically rearrange in the future, it is better to make cabinets that are independent of each other. They can have a common or separate work surfaces with individual sizes. Sequencing:
- the frame is assembled;
- typesetting elements are prepared (door walls, drawers, stationary panels), the necessary holes are made;
- The cabinet is assembled, all elements are connected with fasteners; if there are no errors, the structure is dismantled and the wood is processed.
Rigidity is given to pieces of furniture using metal corners.
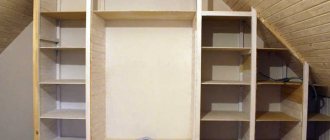
Upper sections
The principle of assembly of these cabinets is the same as in the case of floor cabinets. The difference is that when manufacturing a hanging structure, a rear wall is not provided. It will act as a load-bearing wall during installation. In addition, it is often not necessary to manufacture facades. You can create open wall cabinets. If the facades are nevertheless included in the design, they are fastened in the same way as in the case of floor cabinets. Sometimes they combine different options: open cabinets, pieces of furniture with fronts.
Making a table
First, work on the kitchen countertop with your own hands:
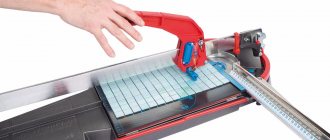
- cut the boards and adjust them to the required size;
- structural elements are connected in any convenient way - nails, screws, glue;
- Grinding, processing, edge finishing are carried out.
A table height of 80 cm is considered sufficient. This is the distance from the floor to the bottom edge of the working surface. The legs are made taking this parameter into account. They can have any shape: rectangular, with carved elements, etc. The most difficult thing to make at home is round legs. These structural elements are connected by jumpers, having previously placed them in the places of future fastening.
Wooden kitchen cabinet
If you plan to install free-standing pieces of furniture, you need to determine their dimensions. This could be a pencil case, the height of which matches the headset. For its manufacture, materials with the same parameters are used as for floor cabinets. The width of the pencil case is often smaller. Assembly principle:
- make a frame;
- walls are installed, and in this case it will not be possible to do without the rear surface;
- at each stage the geometry of the structure is checked;
- the door is attached.
Considering that the pencil case in most cases is characterized by a significant height and small width, it should be connected to floor and wall cabinets, for which 2 holes are made in the side wall.
Assembling a modular kitchen: step-by-step instructions
We will describe the sequence of actions step by step and tell you what nuances to pay attention to at one or another stage of the work. Our instructions are conditional. Some craftsmen have their own vision of the assembly stages: it all depends on experience and preferences. We offer the most common option.
General recommendations for assembling cabinets
The manufacturer includes illustrated instructions and the necessary fasteners for each module. The assembly sequence is clear from the pictures. Each type of module has its own, so there is no point in describing how to assemble each box. However, certain aspects are important to consider:
- If the set includes a pencil case, make sure there is enough space in the room to assemble it in a horizontal position. It is problematic to assemble cabinets taller than human height vertically.
- Start assembly from the bottom tier. After installing it, move on to the countertop, then install the sink, built-in appliances, splashback and upper modules. Assemble the boxes after installing all tiers. Facades and fittings are hung last.
- To check the evenness of the module assembly, lay the frame with the façade facing down and measure the diagonals. the difference between them should not exceed 1.5 mm.
- If a gas or air duct pipe passes through the upper cabinets, a hole for it must be cut before fastening. Treat the edges of the cuts with sealant.
- Lubricate wooden dowels (dowels) with glue for better fixation of the frames.
Be careful. If you make a mistake in assembly and have to redo the work, the fastening properties of the parts will decrease. This is especially true for products made from chipboard.
Nuances of assembling floor stands
Start work from the corner. If you are installing a U- or L-shaped kitchen, first assemble the corner cabinet. If it is intended for washing, the back wall may be missing, or a hole for communications needs to be made in it. Make it as large as possible to provide access to the pipes. Treat all cuts in the cabinet with sealant to prevent moisture from affecting the material. Use a level to adjust the height of the cabinet.
Now line up the rest of the cabinets. Each time, apply a level and adjust the height of the legs. The line must be horizontal and even, otherwise the tabletop will be installed crookedly, which will lead to its deformation.
Fasten the cabinets together with a furniture tie or 30 mm self-tapping screw. The first option is preferable because the screws have a small head. If the load is high, it can be torn out with a piece of the frame. To connect the cabinets, 4 ties are enough.
Separate blog articles are devoted to installing countertops, sinks and wall panels. In them, we consider in detail all possible installation options depending on the design and construction of the products, so in this publication we will not describe these stages of work.
How to attach kitchen wall cabinets
Use horizontal lines to outline the bottom and top borders of the cabinets. They must be hung at a distance of at least 45 cm from the tabletop. If family members are tall, you can increase it to 50-60 cm.
There are two ways to hang wall modules:
- Use the mounting loops that come with the cabinet. Try on the first cabinet and mark where it will be attached. Drill a hole, insert fasteners and hang the module. Align it and mark the location of the second fastener. Then finally level and secure the cabinet. It is difficult to hang even a small box on your own without an assistant; work together.
- Use a metal tire. The product is a solid plank that is mounted on the wall. Devices like hooks are screwed onto the back of the cabinets. The box is hooked onto the rail and leveled. Keep in mind that the cabinets will not fit tightly against the wall. This is a less labor-intensive option and you won't need any help.
Installation of wall cabinets depends on the type of walls: concrete or plasterboard. In the first case, you will need ordinary concrete dowels. In the second there are metal butterfly dowels. We also recommend checking in advance where the guides go so that you can use them as additional support. Sheet plasterboard is not strong, and even with heavy loads, cabinets can fall.
At the last stage of working with wall cabinets, pull them together. To tie the upper models, 2 elements are enough.
The final stage of kitchen assembly
When the frames, countertop, built-in appliances and sink are assembled, we move on to installing doors and handles. First, think about which side is convenient to open the cabinets on and how to arrange the fittings. Try to have the handles on either the right or left side, and not alternately. If cabinets open in different directions, attach the fittings horizontally in the center.
Install the front hinges according to the instructions and hang the doors. Adjust them by tightening or loosening the screws.
As a final step, cover the kitchen legs with a plinth and attach the kitchen plinth along the countertop. Now all that remains is to install the hood. For a gas stove it is installed at a height of 75-85 cm, for an electric stove - 65-75 cm.
As you can see, there is nothing complicated about assembling a modular kitchen yourself. If you bought models with ready-made countertops and an overhead sink, you can handle the job even without special skills. However, we do not call for a complete rejection of the services of professional craftsmen. Each buyer decides for himself what is more important: saving money or confidence in high-quality installation and the possibility of warranty service.