Window decoration with curtains on the ceiling cornice
Ceiling cornices are more advantageous in both practical and aesthetic terms than conventional wall cornices. Firstly, the structure itself is installed on the ceiling. In classic versions of the cornice, installation is carried out in the middle of the wall section, which is located above the window. Thus, the upper edge of the curtains does not completely cover the space under the ceiling, creates an extra horizontal line and makes the walls visually shorter. The ceiling cornice eliminates all these shortcomings.
Hanging curtains on a ceiling cornice is much easier than it sometimes seems to non-professionals.
Secondly, ceiling cornices have many design options and designs:
- Pipes of various diameters, stylized in retro style;
- Thin strings;
- Baguettes that gather fabric into massive folds;
- Practical tires.
Ceiling cornices are a very successful design.
Some types of ceiling curtain rods can cover the top of the curtains using frames, which also come in different sizes, colors, styles and materials. For example, a plastic frame with a shade like the ceiling is suitable for a classic interior. And the minimalism and consistency of modernism will be emphasized by light-colored metal.
For jacquard or country interiors, you can use wooden frames.
Thirdly, cornices can vary in shape:
- Straight,
- Curly (wave, snake, etc.),
- With bends (bay window, multi-row bay window with bends, reverse two-strip bay window with bends, double-row cornice),
- Single-tier and multi-tier.
Ceiling curtain rods have proven themselves excellent in use.
Fourthly, there are many options for attaching fabric to the cornice. They can be presented as:
- Kryuchkov;
- Rings;
- Tires;
- Strings, etc.
In order for the curtain to hang beautifully, the distance between the hooks should not exceed six centimeters.
However, all these types are not universal for every type of cornice. For example, cornices consisting of only one string are best used in rooms where the windows are decorated with light tulle so that the structure can support the weight of the fabric.
Beautifully selected curtains for the ceiling cornice add comfort to the room.
Important! There is only one piece of fabric per row of strings or hooks. Otherwise, the fastenings inside the cornice may not support the weight of all the curtains.
If the interior needs to achieve maximum multi-layering or complexity of window design, then it is better to use a plastic ceiling cornice for curtains of a double-row type fastened with hooks. They withstand dense and heavy fabrics better.
Many rows will allow you to display several types of fabrics and decorative elements on one window.
Bedroom decorations
Accessories for curtains in the bedroom are designed to create a more intimate and peaceful atmosphere in this room. DIY curtain decorations in the bedroom add variety to your personal space.
Decorations for curtains made of beads are appropriate in the bedroom. To decorate curtains with beads, select a group of beads, decorative stones or seed beads that match the color and texture of the bedroom design. Create one or more threads and use them to secure the fabric.
Related article: Do-it-yourself ebb installation
WATCH VIDEO INSTRUCTIONS
Well-chosen flowers will harmoniously decorate the bedroom. Fabric kanzashi look especially good in this room; creating them is easy and pleasant. Another option: delicate satin roses mounted on tiebacks.
How to hang curtains on a ceiling cornice: instructions and description of the process
How to hang curtains on a ceiling cornice with hooks if the structure itself is not ready yet? No, so first you need to go through several stages of preparation and installation:
- Assembly;
- Marking;
- Installation.
It is necessary to measure the length of the ceiling cornice and the height of the room.
Installing a completely assembled cornice, although it requires more time and someone else’s help, is much easier than redoing all the work yourself several times. After all, it is at the assembly stage that it becomes clear what specific length the cornice is needed. And if necessary, you can adjust its dimensions using a hacksaw or return it to the store.
It is necessary to select in advance the appropriate shape and design of the ceiling holder.
Important! At the assembly stage, it is better to immediately secure all the hooks on which the curtains will hang using plugs. After installing the product, this will not be so easy.
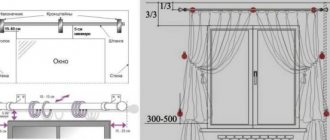
The next stage is marking. To do this, you only need a pencil, a ruler and a building level. Using these stationery supplies, you need to draw a straight line along the entire length of the cornice, constantly measuring the distance from the wall using a ruler. If the cornice has only two attachment points to the wall, then on a straight line you need to symmetrically mark the attachment points.
Depending on the style of the curtain ensemble, a holder with the required number of rows will need to be installed on the ceiling.
Curtain rods are always installed on a hard and stable surface. Therefore, the installation sequence (third stage) is almost the same in all cases. The exception is the method of securing the cornice.
Installation of ceiling cornice
On the home goods market you can find different types of ceiling cornices. They differ greatly from each other both in the method of fastening and in appearance. Among the options for hanging curtains are the following:
- A stick cornice consists of brackets and a rod resting on them. This option is convenient for curtains that have decorative loops, large eyelets that serve as part of the design, or a drawstring that decorates the top of the panel. The ends of the rod are usually fitted with metal or wood tips. These details can be additional decorative elements. Ceiling cornices are appropriate in a classic or Victorian setting and harmonize well with any rustic style.
- Profile varieties allow you to conveniently hang multi-layer curtains: with lambrequins, with additional decorative curtains and ties. The compactness of such products allows you to place up to 4 layers of fabric. This type is very convenient for Japanese curtains and curtains with braid. Suitable for almost any style that requires multi-layer curtains with fixed and moving panels. Thanks to the tips in the form of arcs, it allows you to close the window from the sides. A new product - a flexible curtain rod - allows you to hang curtains comfortably and in an original way to zone a room.
- The string, or string cornice, is inconspicuous. It consists of side fastenings and a thin steel wire stretched between them, along which the curtain moves. The strings can be stretched in several rows to make a beautiful multi-layered curtain. The disadvantage of such curtain rods is that if the length is more than 3 m, the wire sags under the weight of the fabric. String curtain rods are very convenient for thin transparent fabrics: the wire is invisible and does not create the illusion of a low ceiling.
In more detail: “How to hang a ceiling cornice correctly?”
Before hanging curtains, any type of curtain rod must be attached to the ceiling. To do this, you need to prepare the following tools:
- perforator;
- screwdriver;
- measuring instruments;
- plumb line
The length of the cornice for ready-made curtains is selected depending on their width and the owner’s desire to add folds to the curtains. It should also be based on the size of the window or door: the side sections of the curtains are best positioned so that they cover the wall near the window or door frames by 10-15 cm.
The distance from the window on which the curtain will hang must be calculated so that the panel does not interfere with opening the sash, does not touch the plants on the windowsill and is located no closer than 5-7 cm to the heating devices installed near the window.
The width measurements must be transferred to the ceiling and marked. From the straight line drawn between them, lower the plumb line and estimate the distance at which it is located in relation to the central heating convector or plants. If necessary, move the width marks a little further from the window.
Based on these points, you need to install brackets or attach the runners of the profile cornice. For installation, dowels and screws are used, which are included in the kit of each product in the required quantity. Using a hammer drill, you need to make holes that correspond to the fastenings in the bracket or profile. To do this, the part should be positioned so that the straight line marked on the ceiling coincides with the outermost string, rod or track on the profile, then make marks by inserting a pencil or nail into the fastener.
Useful information: “Which one is better to choose a cornice for a suspended ceiling?”
Drill holes for the dowels and insert plastic capsules into them. Attach the bracket to the ceiling and screw the screws into the holes. After installing the curtain rod, you can proceed to hanging curtains.
Methods of fastening to a concrete ceiling
The third stage - installation for a concrete ceiling is carried out using dowel nails or glue, which can withstand from 15 to 80 kg/cm.
Before you begin installing the ceiling holder, you must carefully study the instructions included with the cornice.
To install using adhesive, do the following.
- Preparing the base. It must be freed from all impurities in the form of paint or whitewash.
- Afterwards the surface needs to be leveled and coated with a primer.
- Leave until completely dry.
- When the surface is ready, you need to tackle the cornice itself.
- Glue is applied to the structure with a snake and applied to the ceiling.
The successful installation of curtains will depend on the work done correctly.
Over the next 3 days, the glue will dry out, so it is not recommended to immediately hang curtains on it.
Types of fastening curtains to the ceiling cornice
The method of attaching the curtain to the curtain rod depends on the type of curtain. Some options are universal and allow you to hang any textile.
The more curtains and the more weight they have, the wider the design should be.
The following options exist:
- Ties. You won't always be able to use them. For example, they are not suitable for a loft, minimalist or classic room. At the same time, they will look perfect in Provence or rustic style. Typically, the ties are made from the same fabric as the curtain itself. They can be attached with knots and bows.
- Loops. Outwardly they resemble strings, but can be used in almost any room, giving it a romantic touch. Usually the loops are made from the same fabric as the curtain. But sometimes you can find contrasting color options, as in the photo. They look original in a nursery. This mounting option is convenient and practical.
- Rings. Most often they are used when decorating a room in a classic or techno style. Suitable for tubular cornice.
- Hooks and clips are the most common mounting option. They can be made of plastic or metal. Users note the ease of use. But they may not be suitable for very thin material, as they can leave puffs on the fabric.
- Magnets are an alternative to hooks that will not ruin the curtain. This option will look best on a string cornice.
Ceiling cornices are made from different materials. This indicator directly affects the cost of the product and its performance characteristics.
Attaching a curtain rail to the ceiling
- Determining the length of the cornice. If necessary, you need to remove the excess length with a hacksaw.
- Measure the tire and divide it into equal parts.
- Cut the metal tire into equal parts.
- File the sides.
- Mark locations for anchor bolts and screws, taking into account the features of the ceiling, the weight of the fabric and the number of lines for attaching curtains.
Such fasteners have increased wear resistance.
Important! If the fabric for the curtain rod is light, then the bolts and screws are located at a distance of 60-70 cm. If the curtains are heavy, then it is reduced to 20-50 cm.
- Drill holes.
- Place the tire on the marked line on the ceiling.
- Mark places for fastening.
- Drill holes in the ceiling.
- Attach the splint and secure it.
In order for curtain products to hang in beautiful folds, you need to know how to properly hang curtains on a ceiling cornice using different types of fastenings.
Important! The holes for each type of fastening are different: for anchors the holes in the ceiling and on the bus are the same, but for self-tapping screws they are 1.5 - 2 mm smaller.
When the tire is securely fastened, all that remains is to insert the hooks inside and hang the curtain itself.
Decorative ribbons
Flexible plastic hoods are often used to decorate ceiling cornices. They are produced in the form of thin strips of PVC with a width of 5, 7 and 10 cm. The length is cut to the size of the cornice. Such products follow the contours of the profile, straight or with rounded ends.
The design of decorative tapes for ceiling cornices is quite diverse. There are blends with a smooth and textured surface, white, colored, and with patterns. They imitate the textures of more expensive materials: leather, wood, thin stucco, metal. The surface is shiny or matte, sometimes aged (as if covered with cracks or patina). On some models, an imitation of a metal insert is made.
To attach the decorative tape to the profile, there is a special groove on the back of the lining into which the side of the ceiling rail is inserted. Then the hood is worn along its entire length.
If there are rotating elements, first the tape is fixed to a straight bar, and then the corner parts are connected. Long cornices are assembled from several components, but the decorative tape is installed in one piece.
The mounts for lens hoods are standard, so you just need to choose the option you like. Some products are immediately sold complete with a decorative strip. All structural elements, including the overlay, are assembled before installation and only then the cornice is attached to the ceiling.
Attention! Not all models of ceiling cornices have the ability to attach a hood. If there is no edge on the front side of the profile, you can try to secure the decor with double-sided tape. But this method is less reliable and is only suitable for light, thin linings.
Sometimes a problem arises: it is not possible to put the hood on the ceiling cornice, as it fits very tightly. Then the tape is laid out on the floor with the wrong side up and pressed with a weight along its entire length. The cornice is placed against the hole and they begin to carefully hammer it in with a rubber mallet. If there is no such tool, take a regular hammer and place something soft under the impact site so as not to damage the plastic profile.
Another option is a curtain rod made of fabric with an openwork pattern. It consists of two layers: a dense base and decorative material. The latter is used as curtain fabric (smooth with shine or matte velvety).
The hoods are decorated with carved patterns made on a laser machine, thanks to which the design can contain even very small details. This option looks quite elegant and stylish.
The fabric decorative strip is attached directly to the cornice using adhesive tape, which is included in the kit. Remove the protective film from the self-adhesive base and attach the adhesive tape to the outer part of the profile. Then you just need to apply and press down the decorative trim a little.
Thanks to the composition, the fabric straightens out immediately without forming folds, creases or curled edges. And due to its light weight, the lens hood holds securely and does not sag.
Such tapes are produced in widths of 15 or 20 cm, the length is unlimited. Various patterns and more than 20 colors are available for sale. It is possible to manufacture to order according to a sketch drawn by hand and even from customer materials. Thanks to this, the decor will suit any interior style. Additionally, you can purchase curtain tiebacks in the same theme and color as the curtain rod.
Attention! Fabric hoods cannot be washed. They are vacuumed or brushed with a damp sponge, and if the dirt cannot be removed, they are sent to dry cleaning. To straighten the folds later, iron them, but only from the front side.
How to correctly calculate the length of curtains on tape for a ceiling cornice?
All calculations on how to correctly measure curtains must be made only after the cornice has been installed. This rule works in all cases, regardless of what type of cornice (ceiling or wall).
The beauty of curtains depends largely on how they are hung.
To take all measurements, you need to take a construction tape. Its desirable size is from 3 meters. So that with its help you can calculate not only the height, but also the width of the fabric.
Using a wide ribbon you can form beautiful folds.
As for measuring the length itself, it directly depends on individual preferences. Curtains can be shortened to the window sill, to the radiator, long not touching the floor, or vice versa with a margin, etc. But, no matter what, one general rule applies: measurements should be taken not at the lowest point of the cornice, but at the place where the fabric is attached. Hooks, rings, clothespins, etc. This rule does not work only in cases where the fabric is secured with ties or eyelets.
To make light curtains, soft fabrics are used that lend themselves well to draping.
A special feature of curtains with tape is that they are attached to hooks from curtain tape. They are hidden on the wrong side of the fabric and are one of the key parts of the curtains. Therefore, measurements must be taken taking into account the presence of the tape, and not just the length of the curtain fabric.
Hooks are provided for attaching curtains to a profile cornice.
Photo gallery of cornices with decorative ribbons
Baguette strips and flexible hoods made of fabric or plastic are an easy way to decorate the interior. The pads are easy to maintain and, if necessary, can be easily replaced with products of a different design.
Instructions for calculating the height of curtains on tape
For each curtain length option, there are unwritten rules about how many centimeters they should be from the nearest horizontal surface, namely:
- Shortened curtains should be 1 cm above the window sill;
- The average length of curtains is considered to be 10-15 cm below the window sill;
- Long curtains do not touch the floor and are 5-6 cm above it;
- Extended curtains have a full length from the fastening to the floor, and another 15-20 cm must be added to the resulting size.
The overall decoration of the room can be influenced not only by the quality of the material, but also by the way the curtains are attached.
After the length of the fabric has been calculated taking into account the requirements, it’s time to take care of the curtain tape, with which the curtain fabric clings to the curtain rod. Its standard width is 6 cm, and it has two lines for fastening.
Many curtains on ceiling cornices are fixed with braid.
To ensure that the braid overlaps the hooks and does not add extra centimeters to the main length of the curtains, it is sewn to the top edge of the fabric at a quarter of its width. And the fabric itself is hung from the bottom near row of hooks.
Everything should be in combination and harmony with the decor of the room.
Thus, the calculations will look like this. Having measured the length from the fastening to the floor, the result is 247 cm. We add 6 cm of braid to this indicator and subtract 3 cm to cover the hook or ring on which the product will hang. There remains another 3 cm, which constitute the second row of loops and the place where the fabric is attached. As a result, the canvas is 250 cm. This is the indicator that needs to be indicated when ordering.
It is also worth considering the functional purpose of the curtains, that is, whether they will constantly move apart and close.
Decorations in the children's room
The widest field for the use of imagination is in the children's room. You can create decorations for curtains in a children's room together with your child.
Five ideas on how to decorate a window in a nursery:
- DIY decorations for a lambrequin, for example, in the form of clouds or the sun.
- Applications with fairy-tale characters, for example, from your favorite cartoon.
- Tie-ups of soft toys: a hugging bear or a cat made of felt - it looks unusual and children like it.
- Rag models of boats or airplanes mounted on curtains in a nautical style.
- Stars, flowers, hearts, butterflies of different sizes, matching the color of the interior.
The gender of the child is also important. The interior of a children's room shapes the mood and emphasizes the personality of a growing person. Boys like bright figures, cars, planes and rockets, bright superheroes. Girls will be delighted with cartoon characters, beautiful butterflies and flowers.
When creating your works for window decoration, do not forget to be guided by the requirements of harmony. A room full of details and colors does not need a lot of decorations. At the same time, if the room lacks attractive details, then be bolder in your plans and invent new and unusual decorative decorations for curtains.
The best posts
- How to make tiles with your own hands - master class on making tiles
- How to install mini roller blinds yourself?
- Design of a small bathroom 4 squares: rules for stylish design
- Installing skirting boards: features and nuances of the process
- What happens if you lay laminate flooring on an uneven floor?
- How roller blinds are attached: types and installation rules
- DIY crib for a newborn: drawings according to size with photos
- How to paint the outside of a wooden house with your own hands: choosing paint
Article on the topic: Decorating the hallway with decorative stone and wallpaper photo: stone wallpaper, bricks, video
Basic mistakes when installing cornices and hanging curtains
- Be sure to use plugs and stoppers for curtains so that the fabric is evenly distributed along the entire length.
- Installation by eye is the wrong option. Before installing the cornice, you need to symmetrically mark the junction of the structure with the ceiling.
- Installing the cornice yourself is not advisable and difficult. After all, you cannot simultaneously fix the screws with a hammer drill and ensure that the cornice does not deviate from the line.
- For different ceiling finishes, use different screws. So, for example, for a putty base, plastic fasteners are needed, and for a concrete base, steel fasteners are needed.
- It is important to use an additional ceiling mount in the middle of the cornice if it is medium or large in size.
By choosing a mount that matches your ceiling cornice, you can hang curtains and enjoy a cozy home interior. - The cornice itself must be longer than the width of the window: at least 20 cm on each side.
- The distance from the window to the curtain should be at least 10 cm so that the fabric does not touch the radiator.
- Self-tapping screws must be installed in the wall along with dowels.
- You need to measure the length of the fabric not from the base of the cornice, but from the junction of the fabric and the fastening.
- The main mistake of incorrect measurements is that many do not take into account the width of the curtain tape, which is included in the curtain length indicators when ordering. Thus, most curtains are the wrong length.
At what distance from the floor should curtains hang?
Layout of curtain rods.
When hanging curtains, a very important parameter is the distance from the floor to the curtains, because this value plays a decisive role in shaping the style of the entire interior of the room. Curtains lying on the floor give the room coziness and comfort. Typically this design is used for the bedroom and living room.
The most common option is curtains, the ends of which are at a certain distance from the floor. In most cases, this distance is about 3-6 cm. With this, the ends of the curtains can be protected from contamination. Sewing such curtains is quite difficult, because you need to know exactly at what distance they will be from the floor. The slightest error will lead to the fact that the processed edges will have to be embroidered and remade.
In rooms with low ceilings, this option will not look the best, because it will visually make the room even smaller, depriving it of comfort. Therefore, in low rooms it is recommended to hang curtains so that their edges touch the floor, as this can visually increase the height of the ceiling.
By choosing a suitable ceiling cornice, beautiful curtains and fastenings for them, you can create a magnificent visual effect that can transform your room, making it stylish and elegant.
The best posts
- Crochet round tablecloth: step-by-step description with diagram and video
- How to decorate the walls in the kitchen - the best options
- Sock storage idea
- Do-it-yourself repair of wooden windows with double-glazed windows (photos and videos)
- DIY refrigerator magnet made of nylon: master class with photos
- Do-it-yourself ceiling made of plastic panels - instructions (photos and videos)
- Preparation of lime-based plaster solution
- Properties and qualities of thermowood
Related article: How to choose a voltage stabilizer for a private house and apartment