Sliding door systems
You can make stylish sliding doors with your own hands.
Sliding doors differ from swing doors in the way they open. In this case, the sash moves along the facade and does not occupy additional space. The design is used both in furniture - wardrobes, and as interior doors or a screen in a niche.
Opening the sash ensures the movement of the rollers along a special guide with grooves. This method ensures ease of opening and smooth operation even with a large sash weight. On the other hand, such a mechanism presupposes the presence of technological gaps and the impossibility of a tight connection of the sash. It is installed from the wall at a distance equal to half the width of the guide, and there is no door frame at all. Therefore, the heat and sound insulation of interior sliding doors leaves much to be desired.
A big advantage of such a system is the freedom to choose material and decor. The rigidity of the door leaf is given by the frame or profile, and the vertical position is provided by the guide system itself. As a result, you can use materials for the sash that are completely unsuitable for a hinged one - polycarbonate, mirror, leather.
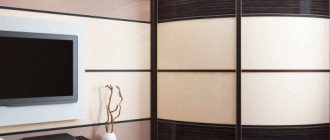
Suspended on the top rail
Doors on the top rail
A one- or two-way sliding system is attached to the wall at the top of the room or to the ceiling. There is no bottom rail here. The displacement is carried out due to the movement of large rollers in the upper rail. The same mechanism ensures the vertical position of the door leaf, that is, the upper carriages bear a double load.
This feature limits the choice of material. It is allowed to install light sashes of small thickness. Otherwise, the fittings fail and the door warps under its own weight. But you can’t put it too lightly: it sways in a draft.
In order for the sash to slide easily without lower rails, it is placed at some distance from the floor. Such an interior door does not provide sound or heat insulation.
Rail sliding
The two-way system includes a bottom and a top rail. The door leaf rests on the lower rollers and moves due to their movement along the grooves. The upper rollers keep the sash in a vertical position. The design, especially if it is an interior partition, is equipped with movement limiters at the bottom and stops at the top. In a wardrobe, you can do without both elements, although stoppers are usually installed.
The two-way mechanism is much more reliable and durable. Here you can install heavy doors made of solid wood, mirrors, and thick silicate glass. Another plus is better heat and sound insulation, since the mechanism includes fewer technological gaps, and the joint density can be increased due to seals.
Installing a sliding double door with your own hands is more difficult and takes more time.
If the sashes are very heavy, double guides are installed for each leaf.
Accessories and components
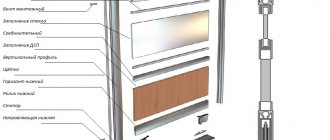
A standard roller kit for creating sliding doors for a sliding wardrobe with your own hands includes:
- profiles framing the sash;
- upper and lower guides;
- rollers, which are selected depending on the selected type of sliding system, profile shape, dimensions;
- accessories;
- filling the door leaf.
Let's look at the components in more detail.
Profiles
The door frame for the sliding wardrobe is made from specialized profiles.
There are several main types of profiles:
- Vertical profile-handle.
- Horizontal bottom.
- Horizontal top.
For the manufacture of profiles use:
- Steel. Stainless steel profiles are distinguished by their affordable cost, good reliability and impressive service life.
- Aluminum. Anodized aluminum profiles are characterized by low weight, good strength, and long service life.
How to choose the right profile for making a sliding wardrobe yourself is described in detail in the video:
Guides
To make a sliding wardrobe, guides are needed. The top one is a profile with one or more tracks along which the upper wheels of each sash move.
The width of the top rail for a sliding wardrobe is determined by the number of tracks and design features. The standard track width is 38.5 mm. Wall thickness – 1.6 mm.
The bottom rail is a profile with tracks for moving the support wheels.
The dimensions of the sliding wardrobe guides are taken from the specification of Aristo sliding systems. When making calculations, use the parameters of the profiles you are using.
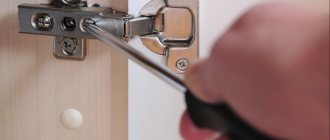
Rollers and accessories
When using closed vertical elements in the frame, upper symmetrical rollers are used.
Each door requires a set of two rollers.
Asymmetrical wheels are used to create the frame of a sliding wardrobe system from open-type standing elements.
As in the previous version, two rollers must be installed on each door leaf.
The supporting lower wheels are responsible for moving the door and take on most of the loads.
The roller is equipped with an adjusting screw and a pressure spring. This element is installed in the lower horizontal profile. Each door requires a set of two rollers.
What other accessories are needed for a do-it-yourself wardrobe:
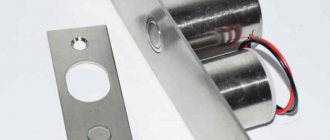
- A spring stopper ensures the sash is locked in the closed position. Installed in the bottom guide.
- Schlegel is a strip of fleecy material that softens the impact of the sash on the walls of the case. It is glued into the groove of the vertical profile along the entire height of the door.
Sliding door mechanism
Sliding doors on 2 rails
The door mechanism on rollers consists of guides and rollers with carriages. The latter constitute a sliding block and are the most important element of the structure. The system is supplemented with limiters that do not allow the sash to come out of the grooves, stoppers and decorative plugs.
There are 3 options:
- Synchronous - both doors move apart in different directions, moving along the wall. Installation of the system is complex and requires a lot of effort to synchronize. The kit includes rollers, rails, hooks, cable and fastening devices.
- Telescopic - 2 or more sashes are moved to one side, covering the facade or another sashes. Each element moves on its own rail. This system is typical for a wardrobe. Disadvantage: for 2 doors you need to install 2 rails with a total thickness of 14 cm. For a three-door design, you will need a guide 21 cm wide, which is already inconvenient.
- Tram - an option for a folding model. Usually equipped with a locking mechanism.
The fittings for the mechanism are selected according to the type of construction and the weight of the sash.
Accessories for sliding structures
Sliding doors have an unusual design, so you should purchase special fittings for them. The handles are not the same as those found on ordinary doors. The difference between such devices is that they are recessed into the canvas. They must be recessed so that the device can freely move from one side to the other and enter the opening that is intended for it. The lock mechanism is designed for vertical latching.
All necessary fittings are included with the finished structure. However, if you want to install handles and locks yourself, you will need to choose them correctly. In this case, it is recommended to seek advice from specialists or search by model in the catalog.
Article on the topic: How and from what to make a birdhouse in the country or in the yard (41 photos)
Advantages and disadvantages
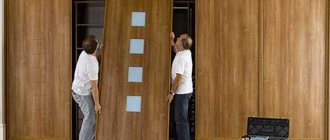
Zoning the living room and bedroom with a sliding structure.
Sliding interior doors have many advantages:
- The sliding system saves space, since opening the sash does not require free space.
- Ease of handling: pushing even very heavy doors is easier than opening them.
- Retractable doors are used not only as interior doors. With their help, niches are blocked and the room is zoned.
- The design is much more original and varied.
There are also significant disadvantages:
- The main disadvantage is poor heat and sound insulation. There is no possibility of a tight connection between the door leaf and the wall or frame.
- A two-way system is more reliable. However, it requires mounting guides with a total width of 7 to 14 cm on the floor. Such a threshold is very inconvenient.
- The latches on this model cannot provide protection.
The variety and decorative possibilities of sliding doors compensate for the shortcomings.
Wardrobe on the balcony: interesting ideas and useful tips
Built-in corner wardrobe on the loggia and a cabinet along the window
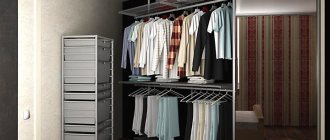
Every family has items that are needed only in a certain season, or are not suitable for placement in a living space. A balcony or loggia in a small apartment is often the only place to store such things. In modern conditions, loggias are increasingly being decorated and turned into a cozy addition to the room. This custom poses the problem of organizing a special space for storing things.
A properly placed closet will organize the space on the balcony or loggia.
Installing a cabinet on the balcony is the best way out of the situation; it will allow you to keep small items in order, and hide large ones from view. Things will always be at hand, conveniently laid out on shelves.
You can choose such a cabinet in any furniture store; now there are many varieties that attract with functionality and variety of design. If the loggia is designed in addition to the main room, it will not be difficult to choose a cabinet option that matches the overall look of the interior.
The disadvantage of buying in a store is the possible size mismatch. This will lead to wasted space, which is precious in small-sized housing.
A long wardrobe placed along the entire window is very roomy and compact
Ordering a cabinet from a furniture workshop will avoid this problem and will also provide a fairly wide selection of models. But of course this method will require more significant costs. Therefore, if you have some carpentry skills, the best solution would be to build a cabinet with your own hands - you will only have to spend money on materials, and the dimensions, layout and appearance can be made exactly the way you want.
Tall two-level wardrobe with hinged doors and an attached cabinet
Differences in design
Complex solution: tall cabinet with doors and open shelves under the window along the loggia
If you decide to make a wardrobe for the balcony with your own hands, at the very beginning you need to decide on its design. There are two main options for cabinet design - straight, the most spacious, and corner, suitable for conditions when there is very little space on the balcony. Cabinets can be of medium size, the height of a person, or occupy space up to the ceiling of the loggia. Both shelving cabinets, which are open shelves, and closed classic cabinets, which protect items from collecting dust, are widespread.
Types of guides
Metal guides for rails
For sliding interior doors, the guide is important. It is a U-shaped profile with limiters. Its standard width is 7 cm, height – no more than 3 cm. The rail is made from the following metals:
- Aluminum is a lightweight, corrosion-resistant metal. This profile wears out little, does not require maintenance or protection, and has its own pleasant color and shine. However, its mechanical strength is relatively low. Aluminum rails are only suitable for lightweight sashes.
- Steel is stronger and more durable. They serve up to 50 years. Steel hardly wears out. However, it is prone to corrosion; in order to protect the profile from rust, the steel is coated with a layer of zinc, chrome, varnish, and polymer paint. The integrity of the coating must be monitored.
Other factors are also taken into account:
- type of roller system and opening method;
- the number of parallel moving canvases - this is how the number of guides is calculated;
- the nature of the support of the sashes - if it is a single-strip system, then the upper rail must be strengthened, as it is subjected to double load.
The bottom rail, even if it is “sunk” into the floor, remains visible. Therefore, when choosing, you need to evaluate its design.
Materials used for the manufacture of interior doors
Modern hardware stores present doors made from the following materials;
- Fiberboard;
- MDF;
- Wood;
- Plastic;
- Metal;
- Combination of two materials.
Each of these materials has its own advantages both in the field of application and in the field of pricing, which is not the last argument when choosing a door.
Read here DIY fence posts - making and installing support posts of various designs (100 photos)
For example, doors made from fiberboard are distinguished by their low cost and low characteristics, in comparison with plastic and metal used as a material for making the door and framing the doorway.
Mounting options
Cassette door design
Parallel sliding doors can be installed in different orders. This affects the design of the mechanism and the material of the valves.
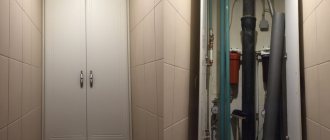
Sliding doors
The most famous option. The sash moves along its guide in both directions. If the structure has two doors, the doors move towards each other. They have a common guide. This is the best option for simple interior doors, since only 1 rail will have to be mounted on the floor, and its width is only 7 cm.
Cassette
With this opening mechanism, the doors look much more interesting. When opened, the sash moves not along the wall, but inside it. To do this, a cavity is formed in the septum. If this cannot be done, a false wall is built. In this case, the sash actually moves along the real wall, but is hidden from view in the plasterboard box.
The design can be one- or two-door.
Cascade
Implement a telescopic opening mechanism. Each leaf moves along its own guide in one direction. For a two-door design you need to install 2 rails, and for a three-door design - 3.
Cascading doors are more suitable for wardrobes. However, with a complex configuration of adjacent rooms - a box on one side, a large difference in the thickness of the walls and interior partitions - this option turns out to be more convenient.
What finishing options can be applied to such a door?
The most common solution for finishing such a canvas is painting or wallpapering. But many manufacturers claim that doors can be finished with almost any finishing materials that are used in the interior. It could be:
- mirror or glass,
- wood veneer,
- wooden lining or panels,
- tiles, etc.
Combinations and combinations of different materials are possible.
Important! When using heavy materials, consider the maximum weight the hinges can support. This can be found out from the company consultant or from the technical documentation for the door.
Photos, examples of hidden doors with various types of coatings
Painting with wall color
Wood veneer Painted glass
MDF panels, imitation laminate
Wooden panels in combination with painting Wallpapering
Wooden panels
Wallpapering
Painted glossy MDF overlays
White paint to match the walls
MDF overlays with milling
Designer painting
Painted glass (lacobel) and MDF inserts
Wood veneer
Texture plaster and painting
Tiles on the walls and painting of door panels
Lakobel different colors
Cresca
Video review
DIY installation
To install a door made of chipboard, polycarbonate, plastic panels, you don’t have to resort to the help of specialists, but follow the instructions. The main condition is to give the sash a vertical position. Therefore, in addition to a screwdriver, hammer, chisel, you need to prepare a building level and plumb line.
First of all, the upper guide is mounted to the wall.
Installation diagram:
- The profile is cut: the bottom guide for a single-door structure should be 2 times the width of the doorway. Install so that the sash completely clears the opening when opening. At the same time, on the other side, 50 mm is left near the opening.
- For a door structure, the guide is mounted so that its middle coincides with the center of the opening.
- Holes for dowels are drilled through the rail in the floor. Insert dowels and fix fasteners.
- Determine the position of the upper guide. To do this, install a canvas in the bottom rail and mark its edge on the wall. Add 70 mm to the value and make a mark; use a building level to check the horizontalness.
- A wooden beam with a cross-section of at least 50*50 cm is fixed at the mark. The upper rail is attached to it from below in the same way as the lower one.
- Install stoppers and other additional elements.
- The door leaf assembled according to the drawing is inserted into the guides: first in the upper rail, since the upper rollers are pressure rollers, then in the lower one. Check the vertical position and freedom of movement.
- A decorative strip is attached that covers the beam and the upper guide.
It is recommended not to immediately secure the top rail tightly. If the sash moves poorly, you can correct its position by changing the position of the upper rail. Final fixation is performed after achieving free displacement.