0
20994
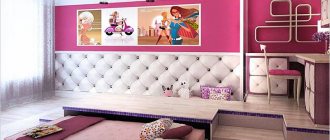
An excellent option for a small children's bedroom would be a two-level bed. It will significantly save space and become a comfortable place for children to sleep and relax. Thanks to the variety of design solutions, an option such as a pull-out bed for two children can become not only a full-fledged sleeping place, but also a functional play corner. In addition to a variety of shelves, drawers and cabinets of various designs, built-in tables and other additional elements, convenient steps and safety rails are mandatory parts of a bunk bed. All models are equipped with comfortable orthopedic mattresses.
Bunk bed project. Step-by-step instruction
With a large number of children, many beds are needed. A wooden bunk bed will solve this problem. Before assembly, you need to draw a diagram of the bed indicating the dimensions of all elements. The height of the structure should be such that the top tier is not directly under the ceiling. Warm air rises here, which can cause discomfort for a sleeping child. Drawings and diagrams are located below each process. Various options are being considered.
The free space from the floor to the mattress of the lower tier should be at least 40 cm. The distance between tiers is 50-70 cm. The length and width of a standard children's model is 180x80 cm.
Preparing material for making a bunk bed
To assemble the bed you need to prepare (dimensions):
- timber 50x50 mm for frames,
- boards 30x150 mm for racks,
- timber 40x40 mm for handrails and supports,
- boards 20x200 mm (wood),
- steel corners,
- furniture bolts,
- screws,
- wood oil
All lumber should be thoroughly sanded before assembling the bed. The tools you will need are a screwdriver, an adjustable wrench and a hacksaw.
Frame assembly
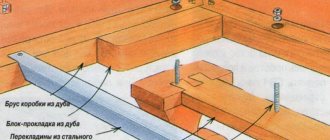
Mattress frames are made first
When assembling them, it is important to ensure that the corners are square. The timber can be fastened using the tenon/groove method with gluing or steel corners
Spacers (at least four) are attached to the bottom of the frames, on which a sheet of plywood is laid or wide boards are stuffed.
Sides are fixed along the edges of each frame. It is best to make them from boards 200 mm wide. The ends of the edge that will be on top should first be rounded and sanded. Fastening is done using self-tapping screws.
Installation of racks
Racks can be made in two ways - from furniture panels or from timber. The second method is preferable, since in this case the lower tier will not be tightly closed (from the ends and from the side of the wall). This will allow the child not to feel locked in a confined space. The length of the beams should be such that they protrude above the plane of the upper tier by at least 40-50 cm.
The racks are preliminarily knocked down in two with transverse jumpers at the level of the height of the backs of both tiers. The prepared frames are attached to them with furniture bolts. To make work more convenient, it is worth pre-fixing temporary supports made of timber to the racks. You can also fill permanent steel corners.
Installation of stairs
For the racks of this structural element, timber is usually used. Steps can be made from the same. But it is better to cut several poles. Cobblestone steps are attached to bolts or angles. The poles are fixed with glue, having previously selected holes for them in the beam of the racks.
The ladder must be secured as securely as possible. It is better to use non-screws and bolts for this purpose. Fixation is usually carried out to the sides of the upper and lower tiers from the end or front of the bed. Photo:
The final stage
To prevent a child from falling down while playing on the top tier, railings along the length of the bed need to be attached to the posts. It is advisable to cover the backs with boards at the ends. All sharp corners of the structure should be rounded and sanded with a grinder with a special disc.
After the bed assembly is completed, all wooden elements are coated with varnish or oil. The latter option is considered more environmentally friendly. It is advisable to additionally bolt the finished bed to the wall.
DIY bunk beds. Video
Add a comment Cancel reply
You must be logged in to post a comment.
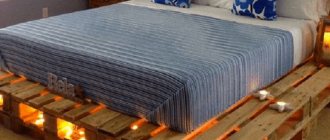
The podium is a modern solution that allows you to delimit the living space. And if a do-it-yourself pull-out bed is installed under the podium, then the functionality of the raised platform doubles. Plus, there is space for small cabinets to store small items. You should not assume that such a structure can only be done in small apartments. This solution will enliven any interior, even in a large room/apartment! Moreover, it never hurts to have an extra bed in case guests or relatives arrive. This design can also be assembled in a rented apartment, because there is no need to raise the floor and make an opening in the wall. So what kind of preparatory work needs to be done to make a pull-out bed and how does the manufacturing process itself go?
Read also: Planting an apple tree in the fall video for beginners
Drawing
Work on creating a two-tier structure begins with the selection or independent development of bed drawings. There are such popular models:
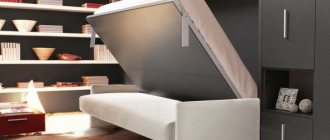
- sofa bed The lower tier is made in the form of a sofa with a back. At the right time, it folds out to form a wide bed. The design is most suitable for older children;
- bed with drawers and shelves. Drawers are mounted at the bottom. The sides can be made in the form of cabinets;
- beds for large families. The most common option is a double first tier and a single second floor. If there are a large number of children, the second tier can be made wide and divided by a partition;
- loft bed. According to the type of two-tier design, you can make a bed only on the second tier. In this case, instead of the lower bed, a workplace for the child is formed.
The traditional design is most widespread. A simple, typical design is made up of the following elements:
- Bed (2 pieces) made of solid wood or chipboard with a thickness of at least 18 mm.
- Frame for installing the stock. It is made of boards and timber. If necessary, cross members are installed to strengthen the bed.
- Legs (4 pcs.) made of wooden beams.
- Sides. On the back side they can be made in the form of backs, and on the side - in the form of decorative sidewalls.
- Ladder for climbing to the upper tier.
Any person can assemble a standard bed. For its manufacture and assembly, it will be necessary to develop separate drawings of all parts (detailing) and an assembly drawing
Particular attention is paid to connecting elements
Reference: the standard dimensions of a sleeping place for a child are 120x60 cm.
Making a car bed with your own hands
When planning to make a children's car bed with your own hands, the first thing you need to do is decide on the parameters of the sleeping place, and be sure to buy a mattress.
Based on its size, you can make changes to the product drawings you like and, in accordance with them, plan a car bed model specifically for your child.
The orthopedic mattress for this model has standard dimensions of 1600x700x100 mm. This bed-car is designed with space for storing toys; it is located under the hood; there is also a large opening drawer on the side, and the back of the bed-car is equipped with a convenient spoiler. The latter is a functional shelf on which you can place toys, a cup of milk, etc. The sides of the bed are made in the shape of a racing car body.
Frame assembly
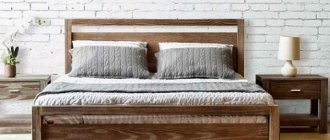
So, now be careful: I begin to describe the construction process itself. I hope that the photos of the bunk bed accompanying my story will help you understand all the details of this project and make my explanations as clear as possible. I do not give the sizes of the sleeping places because they will depend on the sizes of the mattresses that you are going to use
Please note that the mattresses themselves should easily fit into the frames assembled for them, but should not dangle there
The sleeping frames must be made first because their width determines the length of the stair treads. For making frames, ordinary pine boards with a cross section of 5x15 cm are suitable.
I want my creation to have a slightly aged look, so don't try too hard when sanding. I don't need the wood surfaces to be super smooth, but it is still worth removing the factory marks from the wood.
To speed up the process, I decided to use a planer rather than a sander. A few passes, and not a trace remains of the factory stamps.
The frame pieces are assembled together using wood glue and screws using a flush-mounted miter joint. They will be hidden by mattresses and no one will ever see them. A special tool is used to make countersunk holes at an angle. Next, a self-tapping screw is screwed into each hole.
To support the river bottom, bars with a cross section of 5x5 cm are needed. However, for me it turned out to be cheaper to buy 5x10 cm bars and make 5x5 cm blanks from them.
They are glued and screwed to the walls of the frames from the inside.
Typically, a removable slatted bottom is made of 2.5×10 cm or 2.5×15 cm slats. For single mattresses, these sizes can be considered optimal. But I managed to buy 5x10 cm boards cheaper per linear meter than 2.5x10 cm. To slightly reduce the thickness and at the same time increase the stability of the planks, I made cutouts at the ends of each. I made a couple of tools that make it easy to make cuts using just a circular saw. The first device will help you make a cut with a depth of 13 mm.
The second will come in handy when you make a perpendicular cut. This is simply a piece of plywood with a wooden spacer that is attached with a clamp to the end of the rail, which allows you to precisely set the position of the saw blade. As a result, you will be able to make neat and uniform cuts (and you will need the sawn blocks at a later stage).
I made these two devices for the sole purpose of showing you that there is no need to purchase expensive tools (a band saw or a cutting machine with a table) to complete this project. All necessary cuts can be made with a simple circular saw. In fact, this was just a demonstration of the possibilities; I myself made the rest of the cutouts on the ends of the planks using my bandsaw.
The first plank to be laid is the central one. This is the only strip that is attached to the frame using self-tapping screws. The rest are not fixed.
Then small wooden blocks are glued onto the support bars and nailed with parquet nails - scraps left after preparing the planks for the bottom. The purpose of these spacer blocks is to prevent the slats that form the bottom of the beds from moving.
Necessary materials
To make a car bed, you need to prepare the following materials, tools and accessories:
- Pine timber with a section of 50x50 mm. Pay attention to the correct storage conditions for the material - in stacks with layer-by-layer laying, always under a canopy.
- MDF or plywood 16 mm thick and 12 mm thick.
- Plywood 10 mm thick.
- Confirmation.
- Self-tapping screws 80 mm.
- Piano loop.
- Straight forward furniture casters.
- Pencil.
- A brush, wood paints or self-adhesive film with a picture of the car.
- PVA glue for furniture.
- Jigsaw for MDF.
- Electric drill with drills, screwdriver.
- Emery cloth.
What material to choose for making a bed for children with your own hands
In order to make a children's bed yourself, you need to purchase some materials and tools. It is best to make baby cribs from wood with your own hands; coniferous species are suitable for this: pine, cedar, spruce. You can use plywood or MDF. It all depends on your capabilities and abilities.
When making beds for children with your own hands, it is preferable to use natural wood, as it is more environmentally friendly than other materials. Wooden furniture has always been highly valued for its qualities, which include strength, durability of the product, and beauty. When using a wooden bed, children's sleep will be much stronger and more peaceful. But before you begin the creation process, you need to purchase a mattress. Because the stock will be made exactly according to its dimensions
And it doesn’t matter whether you make a bed for a girl with your own hands or for a boy. It is more advisable to buy a mattress in a store
Fortunately, modern industry makes them for every taste.
Choosing a mattress
When purchasing, you just need to take into account some features of the product you are purchasing:
Rigidity. If the child is small, you need a more rigid option so that the baby’s back is secured. For an older child, you can buy a softer product. Double-sided mattresses are also sold, that is, with sides of different hardness. Coconut fiber is used as filling in such products. For children over three years old, the mattress is changed and blocks of independent springs are used, which are inserted into separate pockets, which helps to evenly distribute the child’s weight. Filler. Be sure to read the information about the mattress filling. As a rule, the manufacturer puts the “eco” or “bio” label on its product. Wool is often used as a filler. It is highly undesirable to use mattresses filled with cotton wool or foam rubber. Moreover, they can be passed on by “inheritance” from child to child. Cotton wool and foam rubber tend to accumulate harmful substances, fall off and crumble. Therefore, the mattress becomes uneven and can create problems with the spine. Upholstery
The drapery of the mattress is also important. It is desirable that these are natural materials treated with antiseptic compounds against fungi and parasites
A children's mattress should be easy to maintain, so it would be a good idea to consider having a removable cover.
You also need to take care of purchasing paints and varnishes. you can choose a shade depending on whether you are making a bed for a boy or a girl with your own hands. Well, in addition, you will need to purchase carpenter's glue for the possible connection of parts of the structure being created.
What paint is best to use when painting a crib?
Furniture manufacturing plants usually use oil paints; antiseptic agents are added to them to protect the wood from rotting, and they give the products a bright color. This has a positive effect on the appearance of the product.
The varnishes used to cover the surface of the bed are water-based. They highlight the texture of the wood and are pleasant to the touch. But there is no need to wash the surface treated with such products with active detergents, as it quickly becomes unusable. It will be enough to wipe the surface with a damp cloth. To paint a homemade children's bed, you should buy compositions with non-toxic components.
In this case, a good option might be:
- Water-based paint, also called acrylic. It has increased wear resistance, is not afraid of water and wet cleaning. Has an affordable price.
- Nitroenamel paint. Forms a durable film and dries quickly. The democratic price guarantees that everyone can buy it.
- Water-based paint. Not harmful during use, masks wood damage up to 1-2 mm deep.
- Covering the surface of the bed with oil and wax. It emphasizes the structure of the wood very well and protects it from damage.
Some people want to see the wood texture of a homemade bed without being covered with paint, then it is necessary to use acrylic varnish. It has no pungent odor and can withstand ultraviolet rays. All other varnishes are either highly toxic or short-lived.
All materials can be purchased at hardware or specialized stores and timber trading centers.
How to choose a mattress
When choosing a mattress for a child's pull-out bed, preference is given to products with high or medium hardness, without springs. As a rule, there are 2 types of mattresses in bedroom furniture:
- anatomical - comfortable, taking the shape of the child’s body, but providing only moderate support for the spine;
- orthopedic - inferior in softness and comfort, but superior in health safety.
Criteria for choosing a mattress for a children's bed, tips for parents
A bed with an orthopedic mattress is definitely worth purchasing for children with spinal diseases. They are also indispensable for poor posture, which is not uncommon lately due to the craze for gadgets.
The standard depth of a mattress in a bed with pull-out berths is 5–13 cm. The thickness for the upper tier can be any. For the lower one, it is selected based on the height of the roll-out part, taking into account the proximity of the floor. In general, the thicker it is, the better. An exception is made for rooms with heated floors. There is no need to be afraid of the proximity of heating elements, but the requirements for the thermal insulation properties of mattresses in such rooms are reduced.
It is advisable that the mattress be 5 cm higher than the top edge of the bed.
Particular attention is paid to the filling of products and the quality of the mattress cover. Preference is given to hypoallergenic materials with good air permeability and low shrinkage: bamboo or coconut fibers, latex, high-quality polyurethane foam. The mattress cover should be as breathable as possible, but waterproof. Experts advise choosing products with antibacterial impregnations and membrane layers. The number of washes withstand is checked separately: the higher this indicator, the better.
Rules for choosing a children's mattress
Anatomical mattress
Orthopedic
Bamboo
Coir
Latex
Polyurethane foam
Decoration of the structure
The main decoration of a two-level bed can be a non-standard side. For furniture intended for boys, it can be made in the shape of a racing car and painted under the starry sky. For girls, a castle-shaped side (with a rounded top or curly towers) is more suitable. A universal option would be a side consisting of honeycombs in the shape of sea waves.
Hanging garlands on it and covering it with themed stickers will help you decorate a homemade 2-story bed. A very interesting decor option using LED garlands and ribbons. They can simply wrap around the frame or be located near the stairs to highlight them. You can install overhead battery-powered lamps in the form of flashlights on the furniture frame. To decorate a wooden bed painted in different colors, it will help to mount on the wall a row of paintings in similar colors or in wooden frames painted to match the color of the bed.
What materials are used for the frame?
There are many types of wood suitable for making a bed.
Let's look at the main ones.
Unglued board (solid). This is a very expensive and difficult material for beginners to use in manual work, requiring special preliminary preparation. To work with arrays, it is better to have some experience. The advantages of using it are that the manufactured products last a long time and are beautiful. Considering that children grow quickly, this requires a reconsideration of the issue of their placement, therefore it is very uneconomical to use expensive material to make their furniture.
Planed boards, timber, edged boards are the most common materials in furniture manufacturing, characterized by ease of use.
When selecting them, it is only important to take into account the quality of drying in order to exclude structural damage in the finished product.
- Fine wood fraction in the form of a board (MDF). It is a completely safe material with the same formaldehyde emissions as the first two types of materials. One of the peculiarities of working with MDF is that when drilling it does not form sawdust shavings, but dust. Usually MDF sheets are laminated to give an aesthetic appearance. If you use MDF without decoration, then you need to at least varnish them. As a rule, cutting parts from this material is ordered in workshops where there is special sawing equipment. Craftsmen can also glue the edges at the cut points.
- Wood chipboard (chipboard). Since the release of formaldehyde from such material is increased, with the exception of class E1 boards, the products require an airtight coating. Features of use: the material is easy to cut, but does not hold fastenings at all. It is best used in the manufacture of lightweight structural elements that will not be subject to load. Chipboard, pre-coated with laminate, is suitable for the manufacture of backs and finishing panels.
Step-by-step process for making a bunk bed with your own hands
Frame making
First, you should measure the mattress, the shape of which corresponds to the size of the bed. If the design includes a sofa, then the lower part of the seat is measured.
The process for creating a frame is as follows:
- Creating side panels - tsarg. To do this, two boards of different widths are fastened together at right angles to resemble a shelf.
- Attaching bars to the panels, between which boards will later be placed to hold the mattress.
- Fastening all four bars using tenons or self-tapping screws.
- Attaching boards between beams.
First, the bed frame is made.
If using a sofa, it must be attached to the box. For this purpose, side supports are prepared, which are two vertically located bars, pulled together by other bars, smaller in size. There should be two such supports, for both sides.
The boards are fastened using either tenons or lugs, which are treated with wood glue. The elements must be connected very firmly to prevent the frame from weakening during operation. Afterwards the box is dried.
Back
It is best to make a slatted version of the back by adding slats to the frames of both tiers. They allow you not only to hold the bed, but also to protect it from contact with the walls. The back of the lower tier is often made soft, which allows it to serve as a sofa.
To make the backrest, you will need boards pressed tightly together or a furniture panel equal in width to the frame, as well as dowels for connection. The slats must be attached to the back of the box by drilling holes in both elements and connecting them using dowels.
The backrest is made of closely spaced slats.
Side boards and stairs
For the side walls, divided into a headboard and a backrest, you will need two sanded boards (one slightly narrower than the second) and four side slats. The headboard is attached as follows:
- Installing the boards for the headboard into the slats on the sides.
- Connection between back and headboard.
- Making lamellas, lattice or mesh to support the mattress.
- Attaching the slats to the inside of the box.
- Preparing the frame for the lamellas and positioning it on the inner plane of the tier.
- Overlay the slats on the frame in increments of 5-7 cm.
- Chamfering the outer ribs using a hand plow.
Finally, the side boards and stairs are made.
When attaching the backrest, you need to change the arrangement of the boards, installing a narrow board on top and a wide one on the bottom. Thus, the height of the narrow headboard board should coincide with the wide back board.
The staircase can have a different number of steps, be located straight or at an angle, and also be placed on different sides of the bed. Its assembly consists of the following steps:
- Installation of two parallel bars, which are the bases and guides of the stairs.
- Attaching steps. First, the lower one is fastened to the backrest, and then the rest are placed one above the other. The steps should be inserted into the bars.
The staircase is made in two stages.
There are such types of step connections as recess, external and metal corner. In any case, the fastening must be hidden, which will protect the child.
The staircase is also equipped with a handrail, which is a board attached to the frame. It is selected taking into account the easy grip of the child's hand.
Legs
The legs can have different sizes and shapes, calculated to ensure maximum structural reliability. Most often, round, square or carved legs are used, which can be secured from the outside, from the inside, or by inserting them into the frame.
The legs are made from bars and can be of any shape.
To make the legs, bars 50-100 mm thick are used, which are connected in pairs. The result should be a shelf-type end, with the length of the leg matching the height of the upper tier fence.
Bunk bed decor
It is necessary to think about decorating the bed before starting production, as it can significantly change the project. If you have certain skills, you can make furniture in the form of a car, a house or any other object. A simpler, but no less popular option is to equip the bed with a wall bars, rope and bars. It is also common to install a slide for a quick descent.
Ideas for decor can be very diverse.
Making a bunk bed yourself is a rather labor-intensive and painstaking process. However, with some skill and care, you can get a unique and high-quality product.
Method for making a bunk bed
Some of the most inexpensive materials are pine boards and timber. It is from these that we will make a two-story bed.
Material calculation
When making a bed, you need to keep in mind that not only a child can sit on the lower bed, so the distance to the bottom of the upper bed should not be less than 85 cm. The size of sleeping places in the case of purchased mattresses is determined by their width and length. If you make your own mattresses from two layers of foam rubber in a thick fabric cover, then the dimensions are taken based on personal preferences.
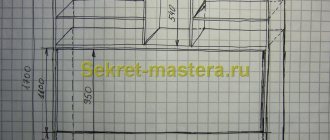
The figure below shows the individual elements of the bed, and the table shows the purpose, dimensions and number of pieces.
1 — vertical posts (legs); 2 — external linings for the racks; 3 - boards of the supporting frame; 4 - upper and lower headboard strips; 5 — central headboard bar; 6 — side guards; 7 — staircase railing; 8 - steps of the stairs
| Qty | Size, mm | Name |
| 4 | 38x76x1730 | Vertical racks |
| 4 | 38x76x1730 | Blanks for external linings for vertical posts |
| 4 | 38x140x2030 | Bed support frame boards |
| 4 | 32x44x1850 | Longitudinal mattress support bars (not shown in the picture) |
| 24 | 20x76x1000 | Transverse mattress support slats (not shown in the picture), cut in place |
| 8 | 20x140x914 | Upper and lower headboard/footboard slats |
| 4 | 20x90x914 | Headboard/footboard center slats |
| 1 | 20x90x1510 | Stair railing |
| 3 | 20x64x482 | Stair steps |
| 2 | 20x90x1800 | Fence railings, cut to the required size during installation |
Assembly units
A bed is furniture consisting of several assembly units, which are then assembled into a single unit. Identical parts can be cut by holding them together with a vice or clamp, so they will turn out absolutely identical. Before assembly, you need to make sure that all wooden parts are cleaned, smooth and free of burrs. It is better to work with a special wood sander or grinder.
1. Headboard and footboard
These are two almost mirror-like elements. The difference is that the fence rails are built into the footboard as shown in the pictures below.
Detailed layout with dimensions of headboard and footboard
Installation order: 1 - dowel 8 mm; 2 - the stand and backrest slats are drilled simultaneously; 3 - this part is attached after assembling all other parts of the headboard
2. Elements of the supporting frame
To assemble two supporting frames, you will need four prepared boards - the longitudinal components of the frame. To ensure the reliability of the structure, the longitudinal strip must be glued to the board and additionally screwed with screws to the middle of the thickness of the board. Between the bars glued to the longitudinal support strip of the mattress, transverse slats will be laid - the base for the mattress.
Design and dimensions of the supporting frame board
3. Details of stairs and railings
The railing of the fence is simply a processed board, the railing of the stairs is a board with a cut for mounting on the frame. Places for fastening the steps must be marked in advance, and make sure that the screws for fixing them do not fall on the frame screws.
1 — cutouts 38 mm; 2 — places of fastening of steps; 3 — stair steps, 3 pcs.; 4 - fence
4. Frame assembly
The footboard and headboard are connected at the bottom to the boards of the supporting frame using screws. After this, the transverse slats and mattress holders are laid, and the outermost ones are filed in the corners for tight installation. There is no need to secure them. The second tier is assembled in the same way.
5. Assembling stairs and railings
The stairs and railing are simply fixed to the frame with screws. If desired, the fence can be made on the side of the wall - for the lower and upper beds. Then you will need four more planks.
Now the wood can be painted and varnished, mattresses can be laid - and the bed is ready!
In conclusion, we suggest watching a video about making a bunk crib for real princesses.
Video. Part one
Drawings and tools
As for the drawings, they need to reflect every single parameter of the future bed. You should not rely on your memory - during the installation process you can forget about some element or lose sight of the value of one or another parameter, and then all the work will go down the drain.
The following must be noted on the drawing:
- bed dimensions;
- assembly diagram;
- aspects of connecting nodes.
Drawing of a bunk bed with steps and drawers
All assembly units must be marked. This is the headboard and footboard, a support frame with 4 points of support, its longitudinal components, as well as sides and a ladder.
As for tools, the list may generally include a jigsaw, sandpaper or sander, drill, screwdriver, tape measure and pencil. You may also need glue, varnish or paint, a primer mixture for wood, etc. In addition to the wood itself, you need to buy bolts and screws, as well as corners that will be needed to fasten the elements.
Floor finishing
Carpet finishing
The completed frame should be beautifully finished. To do this, the entire surface must be treated with a wood primer, for example, drying oil. The surface must be dry. Then paint the surface in two layers.
If you don’t like painted surfaces, you can lay carpet on the floor of the podium. To do this, distribute the carpet evenly over the surface of the podium. Press it along its entire length with a heavy object. Then make markings that will exactly follow the outline of the entire structure. In places where the bed platform has rounded areas, work extremely carefully and carefully. Use a sharp knife to cut carpet. Each edge can be further processed, for example, with a braided cord or something else. When you have completely adjusted the carpet to size, it should be laid with glue so that it does not move.
Read also: How to grow avocados at home
This is how a pull-out bed is made. In literally four square meters you can organize a workplace on the podium and a pull-out bed under it. As you can see, making a pull-out bed is not that difficult. It just takes a little patience and effort.
Recommendations and nuances
A staircase in the form of drawers is one of the safest designs
To ensure that the result – a bunk bed for children’s sleep and rest – is pleasing and lasts for a long time, construction professionals advise taking into account the following nuances:
- To make an attic-type bed from wood, parts of different sections are used. Work begins with assembling the left end element
- A pull-out bed (often used in rest rooms in kindergartens) can be assembled from MDF sheets with a thickness of 19-22 mm
- The wooden structure is fastened using tenons and chops, which are pre-lubricated with wood glue, or using ordinary metal screws
- The backs of the tiers should be made soft to eliminate the risk of the child hitting himself in his sleep.
- For reliability and strength of the structure, both tiers are attached to the wall with metal corners
- A transverse rail is installed in the frame to give the frame rigidity
- Traditionally, a staircase has 3 steps, but sometimes it is advisable to make more steps, and as children grow older, change the distance between the elements
- To give the structure stability, the lower tier is placed on the fifth leg, which is placed in the middle of the transverse beam of the base
- It is preferable to connect wooden parts using an oblique flush joint
- For greater safety, the stairs are made inclined, with railings, and anti-slip pads are glued to the steps
For stability, the two-tier structure is screwed to the wall and “placed” on the fifth leg
Whatever model and design is chosen for self-assembly, the main thing that attention is paid to is the accuracy of calculations and the quality of the materials used. Safety, reliability and convenience characteristics come to the fore when assembling children's furniture.
If you take the measurements correctly and the work itself is careful, then a bunk bed assembled with your own hands will not be inferior in performance characteristics and service life to factory models, and will surpass them in design.