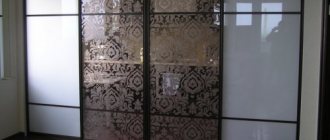
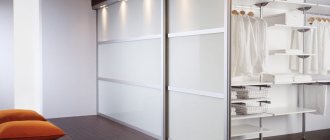
Doors for sliding wardrobes: recommended sizes
If we talk about strict restrictions on the size of doors for a wardrobe, then there are none. You can make any length and width. But there are recommended parameters determined based on operating experience:
- The minimum width is 50 cm. Nothing prevents you from making the canvas narrower, but when moving it will warp, as a result it may even jump out of the guides.
- The maximum width of the sash is 110 cm. In this case, considerable effort has to be made in order to move it.
- The optimal width is 60-90 cm.
- The profiles come from the factory with a height of 5.5 m, and in stores they are usually cut in half. So there is a real opportunity to make doors for a sliding wardrobe of the required height. At high heights, you just need to pay attention to the rigidity of the handle profile.
- The number of compartment door leaves is selected based on the optimal width. Choose them so that they do not block access to the cabinet contents.
Almost no size restrictions
Assembly of the structure
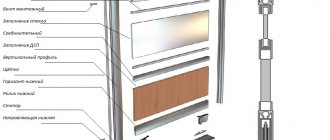
To assemble a sliding wardrobe with your own hands, you need to prepare the following elements:
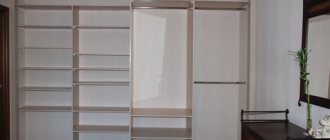
Elements of a typical sliding wardrobe.
Cabinet hardware:
- confirmations for 6.4x50 - 100 pcs.;
- plugs for confirmations - 50 pcs.;
- plastic corners - 20 pcs.;
- universal screws: 3.5x30 - 50 pcs., 3x16 - 100 pcs.;
- tar nails 1.2x25 - 1000 pcs.
The sliding system must be ordered separately according to the drawing data.
Accessories for assembly:
- glass shelves 500x200 - 4 pcs.;
- oval pipes 2x750, 1.5 linear meters;
- flanges for the rod - 4 pcs.;
- telescopic guide elements 450 mm - 4 pcs.;
- 128 mm mortise handles - 4 pcs.;
- shelf holders for glass shelves - 12 pcs.;
- adjustable legs - 6 pcs.
Related article: We store things on the wall: organizers, buckets, baskets and other storage ideas
The sliding wardrobe is assembled with your own hands in this way:
- First, the base with special adjustable legs is assembled. The bottom is turned upside down, drawers and all 6 legs inside them are attached to it around the perimeter.
- Along the bottom, the base must be additionally reinforced with special plastic corners or confirmations; self-tapping screws are used for the legs.
- Next, the side walls of the structure and the central partition are attached, and the cabinet lid is installed on top. Assembly is best done not in a standing position, but lying on the front of the future cabinet. Previously, markings for fasteners are made on the surface of the parts according to the drawn up diagram, and holes are drilled (through and non-through).
- After this, the back wall is nailed. It is imperative to check that all angles are right and that the structure is not warped. The cabinet rises to its original position, you can begin installing shelves and clothes rails.
- Guides are installed for the drawers, the drawers themselves are assembled, and installed in place.
At this point the main stage of assembly is completed, all that remains is to check the stability of the resulting body and the reliability of all fastenings. When the installation is completed, you need to start hanging the sliding doors.
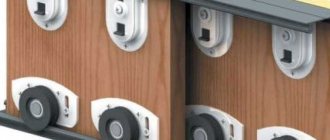
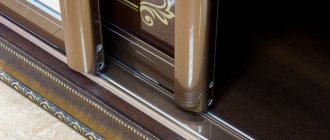
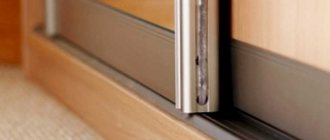
Guides for sliding doors
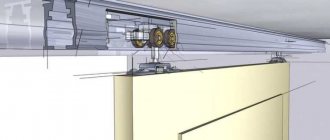
As you understand, the sash is not everything. Guides are needed along which these very doors will move. There are two of them - upper and lower. In appearance they differ significantly.
Top guide for wardrobe door
The bottom guide is made of metal
When installing the door, first insert it tightly into the upper guide, lift the sash all the way and place the lower rollers in the corresponding slot. The entire structure is shown in the following photo.
Assembly diagram
Materials and tools
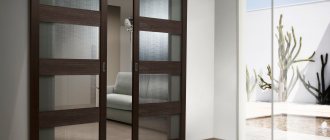
To make a door for a compartment-type cabinet you will need (using the example of a frame hinged system):
- Filling: slab wood materials, frosted glass or mirror with a thickness of at least 4 mm, protected with film.
- Upper and lower guides (two-track for standard door installation).
- Side profile C for open handles, H for closed handles.
- Frames for framing a door, including the top one with a channel for screwing in assembly screws, the bottom one with the same channel but with a higher shelf, and the middle one, used when assembling doors from different materials or individual parts.
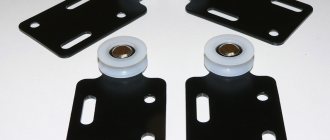
- Upper roller, selected taking into account the type of side profile of the handle, 2 pieces for each sash.
- Support roller mechanism, 2 pieces.
- Assembly self-tapping screws.
- Silicone sealant used in the manufacture of sliding wardrobe doors made of glass or mirrors.
- Schlegel is a sealing strip glued at the owner’s request into special grooves in the side profile of the handle in order to soften the impact of the doors and protect against dust.
Additional elements include stoppers, closers, end caps or locks. Such components are purchased based on the capabilities and desires of the owners and are optional. The same applies to straight and shaped stops used when assembling sliding wardrobe doors from laminated chipboard with your own hands.
Due to the high demands on dimensional accuracy, all panel materials are cut using special equipment at the time of purchase. If this is not possible, an electric jigsaw is used to cut laminated chipboard. The same tool is used when cutting profiles and frames (an alternative is a hacksaw) provided that a special saw is installed. To drill holes in the profile, you will need a drill or drilling machine; to clean its edges, you will need a file with a frequent notch. Installation and tightening of self-tapping screws, door adjustment are carried out using a screwdriver, hex keys and 6 mm bits. At all stages of cabinet assembly, a level, plumb lines and other measuring tools are used.
Features of sliding systems for sliding wardrobes, their varieties
Sliding system design
Chipboard
Tinted glass
Frosted glass
Mirror
Size calculation
When assembling a sliding wardrobe door yourself, there are two options. The first is to measure the opening, think about how many doors you want to have and contact a door manufacturing company with this information. Just make sure they sell the parts without paying for assembly. The manager himself will count all the necessary materials for you, give you the dimensions and announce the amount. It's simple. But you will have to purchase everything from this office, i.e. choose from what is available.
The second way is to calculate everything yourself and look for the necessary components from different companies. It’s more complicated and more expensive, but there’s a wider choice. For those who do not like simple paths, we will describe the calculation of the components.
Doors
Calculate the width of the doors so that when closed, only one handle is visible, but it should not cover the door leaf itself. For a sliding door with two leaves, you calculate it like this: measure the width of the opening, add the width of the profile and divide in half. This will be the width of the sash.
For example, the opening is 1600 mm, the width of the handle profile is 26 mm. We get 1600 mm + 23 mm / 2 = 811.5 mm. Please note that the width of the handle profile is taken arbitrarily. It can be different in shape and, naturally, in width. When making calculations, substitute the width of your chosen structure.
Profiles may be different, so they must be measured individually
To calculate a tricuspid one, you will need to add twice the profile width and divide by 3.
Example: opening 2100 mm, handle width is the same - 26 mm. We count: 2100 mm + 2*26 mm / 3 = 717 mm.
Everything is easier with height. Subtract 40-45 mm from the height of the cabinet and obtain the required height of the sash, as well as the length of the side profiles. That's all about the dimensions of the sashes.
Filling
Since the filling is in a frame of profiles, we subtract twice the profile width from the total width of the sash. We do the same with the height - subtract the height of the lower and upper profile.
Measuring the width of profiles
So, the width of our sash is 811.5 mm. The measured width of the handle profile is 18 mm. Since the handles are placed on both sides, we double this figure. We get 36 mm. Total filling width 811.5 mm - 36 mm = 775.5 mm.
We also calculate the height: let the initial one be 2350 mm, the width of the upper profile 12 mm, the lower one 48 mm. Total filling height 2350 mm - 12 mm - 48 mm = 2290 mm. This is if the filling is solid and it is laminated chipboard, which does not require a silicone seal. If the sash is a solid mirror or glass, the thickness of the sealing rubber must be subtracted from the found height. It is 1 mm, but since it is put on around the perimeter, it takes up 2 mm in general - above and below. In this case, the filling height is 2290 mm - 2 mm = 2288 mm.
If the sash filling consists of fragments, the thickness of the connecting profile is also subtracted. It is also approximately 1 mm.
Profiles
The height of the vertical profiles of the frames is equal to the total height of the sash. The width of all horizontal ones is calculated depending on the width of the handle: from the width of the sash we subtract twice the width of the handle (there are two of them).
How to measure handle width
Let the handle width be 26 mm. We get the width of the vertical profiles: 811.5 mm - 26 mm*2 = 759.2 mm.
Manufacturing stages
The standard step-by-step instructions for making doors for a wardrobe with your own hands consists of three main stages:
- preparation of parts taking into account the selected dimensions;
- assembly of the cabinet itself and door panels;
- installation of all profile elements, fastening of roller mechanisms.
When installing large-sized panels in a wardrobe, work should be carried out in a room where furniture is permanently placed. In any case, cutting or drilling of a metal profile is carried out on a flat, stable base.
Preparing parts
This stage begins with the preparation of door panels, namely cutting slab materials and processing the ends:
- Elements made from chipboard are covered with a special tape using an iron or a hair dryer; elements made from natural solid wood are sanded with sandpaper and varnished.
- Glass or mirror parts are covered with film over the entire area with mandatory protection of the edges with silicone sealant. Properly fixed material should cover the entire perimeter of the fragile inserts and depart from the edges of the frame by 2–3 mm; the excess is cut off at the assembly stage.
- Cutting a profile with guides is often carried out after carefully marking perpendicular lines, exclusively from the back side, without removing the protective film (if any).
- Accidentally damaged edges are carefully sanded with a finely cut file.
- Holes in the horizontal guides fixed inside the wardrobe are drilled with a diameter of 3 mm, 25–35 cm apart.
- Recesses for the final fastening of the frame are made on the vertical section of the handle profile, with an 8 mm indentation at the top, 8 and 42 mm at the bottom.
The recommended hole diameter on the inside is 5.5 mm, on the outside wall - 10 mm. Accordingly, to obtain them during the first through pass, drills with a diameter of 5 mm are used. From the outside, the hole is drilled using a larger diameter nozzle.
When cutting parts, it is recommended to check the parameters of parallel sections. According to the rules, they must completely match. The cut profile should be laid out on the floor or a flat area in order to check the dimensions, mark the drilling points and determine the correct rotation of the handles (relevant when working with the C-profile).
How to properly assemble a wardrobe with your own hands, step-by-step tips
Fixing the guides
Particular attention is paid to installing guides directly in the cabinet. These elements are fixed using plumb lines and adjusted vertically to the nearest millimeter. The upper horizontal guides are fixed first, after checking their evenness - the lower ones. The method of their location depends on the type of side profile. When installing doors with asymmetrical C-profiles, the lower guide is shifted from the facade line until it coincides with the inner strip of the upper guide. When using an H-profile, all horizontal guides are located in the same plane and coincide with each other.
Frame and profile assembly
The assembly pattern of the door leaf depends on its type. When using glass inserts, the silicone sealant is installed first on the end. After this, all elements of the canvas are connected by middle frames. Unlike the seal, which is easily pulled on with your fingers, difficulties may arise at this stage; in particularly difficult cases, the filler is tapped with a rubber hammer (which is not always possible when working with a mirror or glass). The upper and lower frame profiles are secured to the already assembled canvas using similar efforts.
The side profile is installed last, starting from the top:
- To fasten the frame, carefully insert a screw into the previously drilled hole, with the pointed tip protruding 10–15 mm.
- This tip is directed into the groove of the frame upper profile and tightened with a hex key to a 3-4 mm gap.
- The fork of the upper support roller is inserted into the resulting space, after which the screw is tightened until it stops.
- The process of assembling the cabinet doors is completed by securing the bottom of the frame at a distance of 42 mm from the edge and fixing the support roller (in a similar way, but without carefully tightening it).
How to choose components for a wardrobe, useful tips
Some craftsmen approach the assembly process differently: first they fasten the door frame without filler, after checking the work, this structure is partially unscrewed and filled with glass or chipboard. A description of this method can be easily found on thematic resources; the basic rules for assembling and fixing the profile remain unchanged. To avoid mistakes, it is worth assembling the wardrobe doors, as recommended by the manufacturer of the sliding systems, and clarifying this point in advance.