Selecting fabric and filling for the seats of chairs and stools
At the very beginning, you need to choose the right material from which the pillow will be sewn. For it, it is worth taking durable and wear-resistant materials, such as rep, teak or satin. In the case where the furniture is planned to be used outdoors (in cold conditions), it is better to use felt fabric or old jeans.
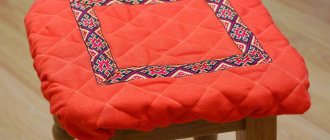
Pillows for chairs
Additional Information. Cushions can be made not only for chairs and stools, but also for armchairs, sofas and other furniture. The only difference will be the size of the product.
After determining the color of the future craft, you will need to choose a filler for it. In this case, you should pay attention to the following characteristics of the material:
- Elasticity.
- Resistance to deformation.
- Durability.
- Environmental Safety.
Based on the given criteria, it is recommended to choose holofiber, padding polyester or foam rubber. The best option would be latex.
Filler
Mounting options
You can attach a cushion to a chair with your own hands in different ways. The most popular option is lace-style ties. But there are other methods.
| Type of fastening | Peculiarities | How to do it |
| Ties (ropes) | The ties must be made from the same fabric as the product itself; in some cases (if the seat is plain), it is possible to choose a contrasting option | A pair of thin ropes are attached to the corners. They are tied in a knot under the seat of the stool |
| Velcro | Over time, they become dirty and cease to perform their function, so they require periodic cleaning. | Four Velcro strips are sewn to the edges by hand or machine |
| Elastic bands at the corners | The fastening should not be too tight | A drawstring with an elastic band is sewn to the seat, then the product is put on the chair and aligned around the perimeter |
Varieties of high chairs for bathing babies in the bathroom, manufacturers
Any fastening is sewn on only after the seat itself is sewn. After this, the product must be tried on and aligned. The cover should not cover the seat. An option that is too spacious is also bad, it will slide.
You can use colored ribbons made of any synthetic material as ties. Before working, you need to singe the ends so that the fabric does not fray.
Ties
Velcro
Rubber bands
Color selection
When choosing the color of a cushion, you should not be guided only by the color of the furniture. You can choose a fabric of a color that will look harmonious with curtains, wallpaper or other interior items.
Pillow colors
But first of all, the color must correspond to the purpose of the product. If you just need it for convenience, then it is better to choose calm, neutral colors. When you want to add some zest to the design of the room, you can choose a bright fabric with an unusual pattern. Sewing threads are chosen in the same color as the material from which the pillow will be made.
You might be interested in: Ways to narrow and sew jeans on your own at home
Taking into account the style of the room
The design of such practical accessories should not go against the overall style of the room. To complement the space in Provence style, it is optimal to choose cotton pillows. Their execution should be simple and concise. Models in discreet, calm pastel shades will fit best into the interior. The accessory can be decorated with a small embroidered ornament or a floral pattern. Also, these versions can be decorated with ruffles, flounces or lace.
If decorative pillows for chairs are chosen for an oriental style, it is optimal to rely on options made from expensive fabrics. Such accessories should be bright and shiny.
As for the decorative decoration of these versions, it is recommended to bet on:
- embroidery with gold threads;
- rich fringe;
- colorful cords;
- luxurious brushes located at the corners of the product.
Many needlewomen strive to sew such an unusual accessory on their own. Knitted or crocheted versions are no less attractive and popular. Such products organically fit into Russian-folk styles and rustic trends in the interior. At the same time, such textiles are very pleasant to use and extremely easy to care for. Models knitted from thick yarn are easy to wash. Versions created using patchwork technology will be no less impressive.
Preparing the ties
First of all, the ties are needed to prevent the pillow from sliding off the seat. But sometimes they can be used as design elements for a product. To make ties, beautiful ribbons, laces, ropes and just strips of fabric are suitable.
Ties
After completing the preparatory work, select your favorite master class on sewing a pillow and then all actions are carried out according to the instructions. It is worth considering the simplest manufacturing option, which even a novice needlewoman can handle.
DIY photo of chair seats
How to make a table with your own hands: materials and tools for work. Drawings of the future table, assembly features. TOP 100 photos of popular options for homemade tables - kitchen, coffee, writing- How to make a mirror with your own hands? Mirror made of bronze and steel, aluminum, foil. Step-by-step instructions with photos: selection of material, trimming, silvering, applying a protective layer
How to make a countertop with your own hands: materials and tools for work, assembling formwork and frame, preparing and pouring concrete mortar, facing the countertop
Do-it-yourself stone tabletop: step-by-step master class with photos! Preparatory work, drawing creation, materials and toolsDIY wall clock: 80 photo ideas for inspiration. DIY wall clock design - bright clocks made of plastic spoons, clocks with a moon print, eco-clocks made of moss, cork wood, knitted cuckoo clocks, clocks made of a piece of plywood
DIY rocking chair: types of rocking chairs and materials, process of making a rocking chair. 75 photo ideas on how to make a beautiful and comfortable chair yourself
DIY floor hanger: materials and tools for work. Extraordinary photo ideas for creating a hanger - a hanger in the form of a tree, hangers made from natural elements, a hanger in the form of a ladder- Kitchen chairs: review of the best new products and modern design
Do-it-yourself furniture restoration: restoration ideas, affordable design options and a master class on updating old furniture (120 photos and videos)
Read here - Do-it-yourself wooden chair: main varieties. Selection of materials, specifics of wood preparation, features of structural parts. The procedure for assembling the chair. 75 photos + master class with video!
Help the site, repost 
0
Pattern
Making a pattern for a chair seat is not difficult. To do this, determine the dimensions of the seat for which the accessory will be made. It is worth considering that after stuffing with filler, the dimensions of the product decrease, so the fabric must be prepared with a margin of a couple of centimeters on each side. You also need to decide what shape the finished item will be. A round pillow is more versatile - it will fit almost any stool or chair.
Round pillow
After calculations and measurements, a figure of the chosen shape is drawn on a sheet of paper and cut out using scissors.
Additional Information. To ensure that the pattern exactly matches the dimensions of the seat, you need to use tracing paper. It is applied to the surface and outlined with a marker.
Seats: from simple to complex
Even a housewife who does not have professional skills in using a sewing machine can make this accessory. There are very simple solutions and those that require special perseverance.
New role for an old rug
This is an elementary option, but it allows you to immediately acquire a large number of identical seats. Products can be repainted or decorated. To begin with, you need a template that follows the outline of the seat of the chairs. It would be better if they were made of thick cardboard. The measured and cut piece is placed on the underside of the carpet and outlined with chalk. Add a couple of centimeters around the perimeter so that the seat can completely cover the piece of furniture.
The thickness of the rug determines whether it can be filled with filler. If there is a desire to make the seat softer, the pieces are sewn only on 3 sides, retreating 2 cm from the edge. After stuffing, the last side is stitched, the edges of the soft seat are decorated with braid or braided with thick thread.
Simple seat cover
To create a simple soft seat, in addition to the template, you will need to purchase:
- two types of fabric - upholstery and for the back;
- cotton bias tape;
- filler (for example, synthetic winterizer).
After making a template that follows the shape of the chair, it is used to cut out three blanks for each seat - from both fabrics and filling. They are folded into a “sandwich”, the middle of which is padding polyester. Parallel and perpendicular lines are applied diagonally on the face or back to fix the filler.
The layers are fixed with pins, then the lines are laid according to the resulting markings. After this operation, the shape is adjusted using a template and the excess is cut off. Places for ties are marked on the future seat. They are made from strips of upholstery fabric. Sew the ties into the marked places, sew the pillow around the perimeter, and at the same time decorate the edges with trim.
Patchwork seat
The technique called “patchwork” has been familiar to many for a long time, but they have no idea about it. It is based on unnecessary scraps, leftover cuts, from which very original products are made.
Take a piece of material, approximate dimensions 1x1 m. Line it from the inside out into strips (width 6 cm, length 10-20), then cut. Arrange the patches according to the drawings. Then two parts are cut out - from fabric for the bottom and filling, leaving a margin of 6 cm. Separately, ties are made for attaching to the chair.
Small pieces are sewn together. The resulting strips are connected into a square. Iron the seams from the inside out. The seat is assembled in layers - the lower part, the filler, the cheerful top. Fasten with pins and trim using a template. A braid is sewn around the perimeter, covering all layers, and ties are fixed in the corners. Lastly, the seat is quilted diagonally. If desired, add frills made of light fabric.
“Hook” seat: two ways
Such a product is always beautiful, and the work does not take much time. The main thing is a successful selection of threads and a color scheme that matches the interior.
- Round. Those that have this shape, complemented by a multi-colored radial ornament, are popular. First, a chain consisting of 5 loops is knitted, then it is closed into a ring. The second row is done with a double crochet. After several of them, the color of the thread is changed, this is done every 4-5 rows. Having reached the desired size, knitting is completed. If there is a need to fix it on a chair, it is better to use braid or tape of suitable colors. Crocheted ties are not recommended; they are extremely short-lived, as they tend to stretch quickly.
- Grandmother's Square. This option has 2 methods of knitting. You can immediately build one product, but no one forbids you to create a seat from several small squares. Begin knitting by casting on 6 air loops and closing the ring. 16 double crochets are knitted through it. The next row consists of the same columns, but they are separated by two air loops. Next, repeat the previous row. The corners of the seat are made from 4 double crochets, but they are separated by three air loops.
To knit such seats, take thick threads from wool, knitwear, satin fabric or denim, cut into thin strips - 0.5-1 cm.
Inedible "biscuit" and "bonbon"
You will have to tinker with this seat for a long time, but it looks great. It consists of small square pads, each of them is stuffed separately. This look is especially good for square stools.
For example, there is furniture with dimensions of 30x30 cm. After making a standard template, a square with the following sides is cut out of the main fabric - 32x32, always leaving at least 2 cm for allowances. Stepping back from the edges by a centimeter, draw a grid with the same components - squares with sides 6 cm. There will be exactly 25 pieces.
From other pieces of variegated fabric, cut out squares with a side of 11.5 cm; there should also be 25 of them. Before further work begins, they are laid out in the desired order. Then, having drawn up a suitable pattern, they are sewn separately, leaving one open side, then in strips of 5. After receiving 5 strips, they are pinned to the lined base, adding folds to each pocket, making sure that the lines match.
Finally, the squares are tightly stuffed with filling and sewn up. In order to disguise threads and seams, sometimes they use a pillowcase made from the same squares and sewn on top. The most interesting option is to sew the strips on the base, from the wrong side. This option will deprive the product of untidiness. The final touch is sewing on the edging; lace looks better here. Any fabric can be used for the back side, even denim will do.
Pompom seat
An original seat, which does not require the craftswoman to master a crochet hook and knitting needles, can be built in this simple way. For it you need to purchase suitable yarn or unravel 2-3 sweaters that have served their purpose. The second option is even more interesting, since the pompoms will turn out curly and multi-colored.
Having determined the color and shape of the future seat, we begin making pom-poms. The yarn is wound directly onto your hand or onto a sheet of cardboard. When the ring has reached its maximum thickness, it is tied in the middle and the edges are cut.
The balls are connected with knots and placed on a long thread in order to lay out a certain shape from these garlands. Or attached to a craft net. A base is sewn to the back side to hide the thread knots. You can make two parts at once for a pillow with pompoms. By connecting them with a seam and adding filler, you can easily get an original product - a voluminous seat that children really like.
Do-it-yourself chair seats do not require any special skill from the housewife, however, accuracy and thoroughness of work are the main conditions. This video will tell you how to make a high-quality, cute and unique thing:
https://www.youtube.com/watch?v=2_7WvodwD5w
Step-by-step sewing instructions
You can sew pillows with your own hands according to these step-by-step instructions:
- The pattern is marked and cut along the contour.
- The filler material is applied to the pattern and the element of the required size is cut out. After that, fabric is applied to the resulting part, and two identical parts are cut out of it with an allowance of 1.5 cm for the dimensions of the filler.
- The edging is stitched and attached to the top piece of fabric. The two pieces of the pillow are then folded together, pinned, and stitched together. There is only a small pocket left to insert the filler. All allowances, undercuts and corners are turned inside.
You might be interested in Simple life-size Tilda hare patterns
Stitching a pillow
- Mark the required number of places where the ties will be attached. The material from which they will be made is selected and cut to the required length. Each piece is then folded in half to form a ring and sewn onto the underside of the pillow.
Ties
- The resulting cover is carefully ironed and filler is stuffed into it. After which the hole is removed. To do this, the edge is leveled, the allowances are folded inward and sewn with a hidden seam.
- If the option of making a quilted pillow is chosen, then at this stage all other seams are sewn.
- If necessary, the pillow can be decorated with additional elements.
Stages of work
When working, you must follow a strict sequence of actions. If the stool is square, measure the length and width of the seat; if it is round, measure the diameter. The pattern should take into account the necessary seam allowances - up to 2 centimeters on all sides, at least 1.5 cm. The height reserve and reserve for sewing in the filler are approximately the same. The step-by-step instructions are as follows:
- Creating a pattern (you can use a ready-made one, adapting it to specific seat sizes).
- Cutting a circle or square from the filler to the required length and width.
- Sewing elements and finishing edges.
- Sewing in elastic.
- Attaching the filler to the seat on the chair.
How and how to reupholster a chair with your own hands, step-by-step procedure
The nuances of tailoring depend on the type of fastening. If the cover for a stool made by yourself has the shape of a square, ties are sewn in at the end, gathers are formed at the bottom of the circle and an elastic band is inserted there. Step-by-step instructions for the first option:
- Place the lining face to face with the main fabric.
- Insert the laces and hand sew them onto the seat.
- Machine stitch, leaving the bottom part untouched.
- Turn the finished product inside out.
If the seat is round, the sequence of actions will be slightly different. The elastic band is attached to the fabric from the inside. While sewing, it is gently held, and the product itself is slowly rotated in a circle. The cover is stuffed with foam rubber (sintepon), placed on the stool and straightened out so that there are no wrinkles or distortions anywhere.
The final stage of sewing chair cushions is decorating the product. The most common option is finishing along the edge using decorative tape. Small tassels or fringe made of thick woolen threads will also look original. You can use an applique made from any patches of matching color for decoration.
Create a pattern based on measurements of the chair seat
Cut a template from cardboard
Prepared Items
Place the filler between two textile blanks
Apply the markings with a ruler and pencil, it will be easier to stitch along it
Secure with clamps
Quilt the workpiece according to the markings
Trim protruding edges according to template
Mark the locations of the ties
Stitch around the perimeter for easy basting
Baste the binding, leaving ties on both sides
Secure corners
Ready seat
Secure the product to the chair
Sewing using the patchwork technique
This technique involves making a pillow from several pieces. For this purpose, fabrics of different colors, textures and even sizes are taken. The more each detail differs from the rest, the more interesting the finished product will be.
Patchwork
After selecting the materials, the pattern is prepared. It all depends on your own imagination. You can make flaps of the same sizes and shapes, or you can make them different. After the pattern is completed, the resulting pieces should be carefully sewn together so that the resulting shape of the future pillow is obtained. The inner side of the product is made using the same method or from a single piece of fabric. The resulting parts are carefully ironed.
A padding polyester cut to size is applied to the front side and attached to the fabric. Then both sides of the pillow are applied to each other with the outer sides and sewn together. There remains only a small hole through which the product is turned inside out. After which the pillow is ironed again, and the remaining hole is stitched with a hidden seam.
Important! To ensure an even seam when using a sewing machine, it must be worked slowly. Then, when wrinkles appear, there will be time to smooth them out.
Getting started sewing
First of all, you will need to take the dimensions of the surface of a chair or stool. Then it is advisable to make a pattern according to its shape. To do this, just outline the contours of the seat with chalk or a pencil - a piece of cardboard or, in extreme cases, a sheet of newspaper will do. It should be borne in mind that the thickness of the pillow will require an increase in size. Usually an allowance of 15-20 mm is given. Only after this can you start sewing.
First you need to measure the surface of the seat.
Since all such products are sewn according to the same principle, a typical sequence of actions is given below:
- Obtaining initial blanks. Using the patterns made in advance, you need to cut out two identical pieces of fabric. Before cutting, you should ensure that the pattern includes all possible tolerances.
- The edging cord is pinned along the allowance line and sewn on a machine.
- Short ribbons are sewn in the right places (usually at the corners). Subsequently, they will play the role of ties.
- Connect the front (top) and back parts with pins. Determine the part of the contour that will be adjacent to the back. Sew 3-4 cm from each edge. A zipper is sewn into the resulting opening.
- The remaining sides are stitched. An important point here is that you need to process as close to the edge as possible.
- After this, the resulting shell needs to be turned out and, through the hole (where the zipper is), insert the filler. In some cases, it is stitched additionally to avoid the formation of lumps and matting.
The process of sewing a pillow consists of several stages.
Decoration
Whatever option for making pillows is chosen, they can later be decorated with additional decorative elements. But here it is worth considering what this piece of furniture will be needed for. If the pillow is needed only as a room decoration, then it can be decorated with beads, beads, sequins and much more. If it is used for its intended purpose, then it is better to discard such elements.
You might be interested in Clothing patterns for newborns: what you can sew yourself
Applications
To ensure that nothing causes inconvenience when sitting on a chair, you need to decorate the pillows with materials that are not too bulky. These can be various applications, fringe or buttons. The latter not only decorate the product, but also keep the filler from clumping.
Buttons
It is better to cover buttons with fabric. The color is chosen like the pillow or one that matches it. After this, the surface of the product is marked so that the decorations are located at an equal distance from each other. In the indicated places, the buttons are firmly sewn to the pillow.
DIY pillows
Thus, it can be seen that it is quite easy to sew seats on stools with your own hands. It is enough to stock up on the necessary materials and patience. And ready-made decorative elements will subsequently decorate and update the appearance of the apartment.
What's the best way to decorate?
A common way to decorate a finished pillow is to add braid or fringe. To do this, you need to sew a piping around the perimeter. In addition, you can decorate the ribbons with which the product is attached to the chair frame. Another interesting solution is to decorate with the addition of cord or frills.
You can decorate the pillow with braid or frills.
A special decoration option is the use of buttons. This method is considered separately because it is combined with ensuring uniform distribution of the filler inside the pillow. Usually an equal number of buttons are taken and sewn to the surface on both sides at equal intervals. In this case, the thread should be stretched well so that a characteristic depression is formed.
Important! When decorating, it is not recommended to use bows, ruffles, rhinestones and other overhead elements!
