Often the toilet in a typical apartment is more than modest in size. Communications - pipes and riser are located along the wall behind the toilet. During the repair process, they are hidden inside the box, but access to taps and meters must be ensured. You can install a technical hatch, but a much more practical solution would be to use the free space behind the toilet to the maximum. How to make a toilet cabinet with your own hands? We'll look at it in detail in our article.
DIY toilet cabinet
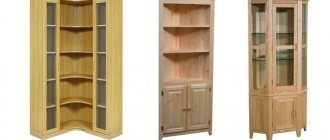
Types of lockers
A small cabinet, 300 - 400 mm deep, can easily fit behind the toilet. You can pick up a wall-mounted model in a furniture store, but it’s worth considering that visually the bathroom will seem even smaller. If there are no other options, then preference should be given to light materials. You will also need to take into account the material of the walls and their load-bearing capacity. In this regard, it is better to choose a lightweight design, abandoning models made of chipboard or MDF.
Locker options
A simple design can look original
If there are pipes behind the toilet, they can be hidden inside the built-in closet. Or rather, the cabinet is organized inside a box made of sheet material - chipboard, plywood, gypsum board. The cost of such a cabinet will ultimately be less, and the aesthetic component will be better - the room will seem spacious, free of furniture. Even a beginner can make both the frame and the facade of such a cabinet: the niche will only need to be equipped with shelves and doors.
Option for masking communications in the toilet
When choosing a toilet cabinet model, consider the following:
- The manufacturing material must be moisture resistant, since condensation often accumulates on the pipes.
- Pipes, valves, meters must be located in an accessible place.
- The dimensions of the structure are chosen in accordance with the area of the toilet.
- For a wall-mounted model, high-quality fixation on the wall must be ensured.
- The internal space should be rationally used for storage.
- The external appearance of the structure should organically fit into the interior of the room and be functional.
- The depth of the structure is chosen so that the product does not create interference or discomfort in the toilet.
- The structure must be equipped with ventilation holes.
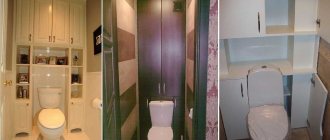
Below are options for arranging a cabinet in a small toilet.
Built-in cabinet
Louvre doors
Solid wood doors
Cabinet in Provence style
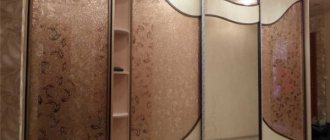
Mirror doors visually increase the space
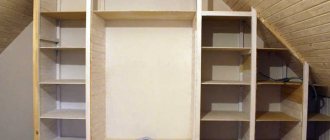
Closet in the toilet from floor to ceiling (or almost)
The cabinet for the toilet room can be a separate piece of furniture. It has a distinctive design that cannot be confused with anything else. At the bottom of the toilet cabinet there are two narrow and high cabinets, which stand at a distance of 50-60 cm from each other. Above them there are one or two sections with or without doors. These are already solid sections with hinged doors.
Various designs: the same idea - maximum use of all available space
The parameters of these cabinets depend on the dimensions of the room. You will not see such products in stores, only individual orders. The same laminated chipboard will not be too expensive, and there is plenty of space for storing chemicals.
There are models that are more economical in terms of space use: in the lower part there are only racks, open and closed shelves are located above the toilet cistern.
If the shelves are only on top
The option presented above is good when the load-bearing capacity of the walls is insufficient to support conventional wall shelves. If you have a partition made of plasterboard, porous or lightweight concrete, you can look in this direction.
Material selection
When choosing a material for making a cabinet, its operational properties are taken into account. The material must be:
- Resistant to mechanical stress.
- Light.
- Moisture resistant.
- Aesthetically attractive.
- Easy to care for.
- Eco-friendly.
"Book" doors
Note! If wood is used to make a cabinet, then at the preparatory stage it is treated with impregnations that increase its moisture resistance.
Table 1. Suitable materials for making a toilet cabinet.
| Name | Description |
Drywall (GKLV) | A moisture-resistant type of drywall is used. This material is easy to process and install. Fastening occurs on a wooden or metal frame. You can install built-in lighting. Drywall is not afraid of moisture, condensation, is not subject to rotting, and is an environmentally friendly and safe material. After treating the joints and priming the surface, drywall can be painted, wallpapered, plastered and covered with any materials. |
Plywood | For premises, choose plywood that is resistant to moisture and deformation. The thickness of the sheets must be at least 14 mm. The material is lightweight and easy to process. |
Natural wood | Wood is used to make the frame of the structure. It is important that it is properly dried and treated with protective moisture-resistant compounds. Wood can be used to make cabinet facades or doors. |
laminated chipboard | Laminated chipboards have a dense monolithic front layer that reliably protects the material from moisture. The advantage of the material is a wide range of shades, textures, patterns and the ability to apply photo printing, which allows you to create a unique toilet interior. The design turns out to be massive and heavy, so it is important to pay special attention to the method of fixing it on the wall. |
Aluminum | It is used to make a frame when attaching plasterboard sheets. It is important to ensure high-quality protection of the material from corrosion. Some interior styles can use a metal hanging drawer. |
Plastic | The material is light and moisture resistant. Has a wide range of colors. |
The thickness of the material should ensure sufficient reliability of the structure, but at the same time not make it massive.
Prices for moisture-resistant plywood
Moisture-resistant plywood
Development of a design drawing
Any design, even the simplest one, needs detailed elaboration. Creating a drawing will allow you not to be distracted by calculations and correcting errors during work.
Detailed design drawing
First, you should draw several sketches, choosing the location of the cabinet, its interior space, and the design of the facade. Then it is necessary to measure the height of the room and the width of the free space behind the toilet so that it becomes clear what dimensions of the structure are acceptable in the existing conditions. The drawing shows the location of pipes and other communications, linking their position to the corner of the room.
Sketch drawing
Taking into account the data space obtained during the measurement, a detailed drawing is developed, which shows the location of the cabinet, communications and access to them, frame features, top and bottom covers, shelves, doors, places and methods of fastening individual elements.
The principle of fastening the frame and shelves
Note! Depending on the chosen design, its frame can be installed along the entire wall or above the barrel.
The width of a typical toilet varies between 820 – 850 mm, so the installation of shelves with cutouts for pipes (about 250 mm) occurs across the entire width of the room.
There are several door design options:
- Traditional swing doors require free space for opening.
- The sliding sash does not require free space.
- Roller shutters can be used as a shutter, the blade of which moves up and down along the side guides.
- The interior space can be closed with blinds or curtains.
Mirror swing doors
Installation of a swing model
Before installing the doors to the shower stall, you need to study the instructions from the manufacturer, check the equipment, the integrity of the mechanisms and fittings. You need to start work by preparing hand and power tools and consumables.
Tools and consumables
To install door partitions you will need:
- tape measure, spirit or laser level;
- electric drill;
- drills measuring 4.76 and 5.55 mm;
- 4.76 mm diamond bit for making holes in tiles;
- tile screws;
- dowels;
- hammer;
- adhesive tape;
- marker for marking;
- silicone sealant.
After preparing the tools and consumables, you can begin installing the sashes.
Installation process
Installation of swing structures is carried out in strict sequence. The tightness of the system and the ease of its operation will largely depend on the quality of work.
Algorithm of actions:
- Assembling the metal frame, checking the vertical posts using a horizontal level.
- Marking the holes for fixing the frame. The marks must be accurate; their subsequent adjustment is problematic.
- Drilling holes in the wall. Please note that tiles are fragile. To avoid damaging the cladding during the drilling process, you should work with extreme care. To reduce the risk of tile breakage in the initial stages, the number of revolutions of the drill is reduced to a minimum.
- Installing plastic dowels into the drilled holes.
- Applying sealant to the edges of the frame in contact with the wall. After this, the frame base is installed in the place intended for it and secured with screws.
- Installation of side panels and hinges, hanging the door. The installed sashes should hinge outward on the left or right side.
The last step is to apply a sealing compound for plumbing fixtures in the places where the guides come into contact with the walls. The glue must dry - this will take at least 24 hours. It is not recommended to use the shower during this time.
Video instruction
The step-by-step process of installing a swing door with your own hands is demonstrated in the video.
Manufacturing process
There are different ways to rationally organize the free space behind the toilet.
Option 1: shutter shutter
The simple design involves the installation of 3 shelves and ordinary window blinds, which will hide the contents of the cabinet from prying eyes.
A simple option: shelves behind the blinds
Table 2. Step-by-step installation instructions.
| Illustration | Description |
Step 1 | On opposite walls, guides made of a metal profile 280 x 270 mm are fixed. |
Step 2 | A profile of 600 x 270 mm is installed between the guides. |
Step 3 | The profile is installed horizontally. |
Step 4 | The metal elements are fixed together using screws, having previously drilled a hole for them. |
Step 5 | Markings are applied to the wall to indicate the location of the profile. |
Step 6 | To fix the profile on the wall, pre-drill a hole using a hammer drill. |
Step 7 | The profile is fixed with dowel nails. |
Step 8 | Crossbars cut from the profile are installed below. |
Step 9 | Metal corners are fixed under the shelves on the wall. |
Step 10 | To fix the corners, dowel nails are used. |
Step 11 | Liquid nails are applied to the back side of the starting profile. |
Step 12 | A small amount of liquid nails is applied to the surface of the guide. |
Step 13 | The starting profile is glued. |
Step 14 | To ensure a tight fit of the starting profile and its reliable gluing, the bar is additionally secured with paper clips. After the part is glued, the paper clips are removed. |
Step 15 | The riser pipe will be covered with PVC plates. To do this, measure the distance between the guides. |
Step 16 | The panel is cut out and installed in the starting profiles. |
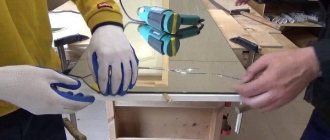
Step 17 | Using a jigsaw, shelves of the required width are cut from laminated chipboard. |
Step 18 | The shelves are fixed to the corners. |
Step 19 | Blinds are ordered according to individual sizes. |
Step 20 | The blinds are applied and the points for the holes are marked. |
Step 21 | A hole is drilled at the marked point. |
Step 22 | Fix the fasteners and hang the blinds. |
If the length of the blinds is too long, the excess slats can be easily removed
If it turns out that the blinds are too long, then proceed as follows.
Table 3. How to adjust blinds to size.
| Illustration | Description |
Step 1 | They pull out the rivet. |
Step 2 | Cut the thread. |
Step 3 | After removing the excess slats, the finishing strip is installed in place. |
Step 4 | Tie a knot and place a decorative rivet. |
Prices for different types of blinds
Blinds
Option 2: wall cabinet
To make a wall cabinet, you will need to take measurements of the room, make a drawing, and determine the quantity and dimensions of all parts.
Wall cabinet without back wall
Table 4. Step-by-step instructions for installing a wall cabinet.
| Illustration | Description |
Step 1 | You can cut the parts yourself or order it from a furniture shop that provides a similar service. |
Step 2 | To assemble the cabinet, you will need to purchase mounting tools and other accessories. |
Step 3 | Work begins with preparing the holes. |
Step 4 | First use a 2 mm drill, and then drill the hole with a 5 mm drill. |
Step 5 | Holes are also made in the end parts of the panels. |
Step 6 | Assembling the frame. |
Step 7 | Holes are drilled to fix the central strip, which will divide the frame into two parts vertically. |
Step 8 | Drill holes and insert shelf holders. |
Step 9 | The shelves are fixed using confirmations. |
Step 10 | Determine the location of the handles. |
Step 11 | Drill holes for dampers. |
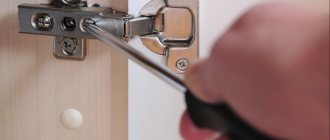
Step 12 | Drill recesses to fix the hinges using a Forstner drill. |
Step 13 | Fix the loops. |
Step 14 | The hangers are secured with glue and self-tapping screws. |
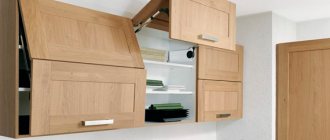
Wall cabinets
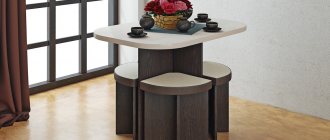
Above the toilet you can hang a regular wall cabinet of suitable width and height. This could be part of a kitchen unit or part of a hallway. You can find a suitable example in any modular collection. You will only have to cut holes in the back wall for sewer and water risers, but this modification is not difficult.
Wall cabinet above the toilet: heights and fronts are different...
If you are concerned that the exposed cut may be damaged by moisture, you can take self-adhesive melamine furniture edge and apply it to the cut. A simpler option is painting or coating with a water-repellent sealant.
The height of the cabinet above the toilet may vary. As you can see in the photo above, the models can be hung on two or three shelves (total height is about 70 cm) or on five to seven shelves (total height is a meter or more). The most important condition is that the cabinet should not block the ventilation hole . The second point: it should not interfere. That is, there must be access to the flush button, and while sitting on the toilet you should not hit your head on the door. Based on these considerations, the dimensions of the wall cabinet in the toilet are selected. Since the parameters of the toilet bowl, cistern and installation of the entire structure are different, the depth of the cabinet can be from 35 to 60 cm.
What are the doors made of?
It is the doors of the toilet cabinet that determine its appearance and the perception of the interior as a whole. It is recommended to choose the material and design of the doors taking into account the design style of the room, as well as its color scheme.
Table 5. Varieties of valves.
| Sash type | Description |
Swing traditional ones made of sheet material or solid wood. | The doors are solid and smooth. Fittings are used as decoration. Suitable for modern styles - laconic and discreet. |
typesetting | Inside the wooden or metal frame of each sash, slats of the same thickness are located close to each other in a vertical or horizontal position. |
Louvre | Just like stacked doors, these are made of slats, but there is a small gap between the slats to ensure ventilation of the interior of the cabinet. Can be made of wood, plastic, aluminum. |
Sheathed | An insert made of glass, plastic, or any sheet material is placed in a wooden or metal frame of the sash. |
Perforated | Made from MDF. Perforation ensures ventilation inside the cabinet. Can have any design. |
Note! There should be no gap between the doors; they should open easily.
Video - How to make a toilet cabinet yourself
Video - Method of arranging a locker in a toilet
Decoration methods
At the final stage, it may be necessary to give the structure a more attractive appearance. For example, plasterboard structures must be painted, pasted over or covered with decorative materials.
Hidden locker
If the cabinet doors are wooden, then you can emphasize the texture and preserve the natural pattern of the material by treating the wood with a transparent varnish, which will also make the surface of the structure moisture resistant.
Lacquered door
Before varnishing the wood, it can be tinted, giving it the desired shade.
If the cabinet is made of plastic or chipboard, then no additional finishing is required. The main thing is to initially choose the right shade and texture of the product.
Doors made of laminated chipboard
To make shelves made of sheet material look neat and protected from moisture, decorative melamine or PVC edges are applied to their ends.
Edge tape
Properly selected fittings will help to emphasize the design of the sashes. Handles are chosen taking into account their convenience and appearance - color, size and shape matter.
Accessories for sashes in modern stores are presented in a wide range
There are no secondary rooms in the apartment - even a modest-sized toilet should fit organically into the overall design of the house or apartment, be comfortable, safe and functional.
You may be interested in information on how to disassemble a single-lever mixer. In a special article we will analyze step-by-step instructions for disassembling the crane, as well as diagnostics and repairs.
Sliding door in shower
The installation of sliding structures is similar to the installation of swing doors. The process uses the same tools and consumables.
Accessories
These include a number of elements:
- Rollers. They are designed to open and close doors. High-quality components are made of metal. Plastic products are less reliable.
- Seals. Necessary to ensure the sealing of the shower stall. They are laid in places where cracks may form. Seals are made of moisture-resistant and elastic materials that are resistant to wear.
- Guides along which the rollers move to the right and left.
You need to carefully consider the choice of spare parts, since the mobility of the valves and their sealing depend on them.
Door installation
To get started, you need to select a drill, measuring tool, marker, fasteners and sealant.
Algorithm of actions:
- Installation of 2 vertical profiles. During the work process, you need to take preliminary measurements and apply markings.
- Fixing rubber seals on the side windows, lubricating them with sealant and inserting them into vertical profiles. The canvases must be inserted carefully and evenly so as not to damage the edges.
- Connecting vertical and horizontal profiles using a screwdriver and self-tapping screws.
- Screwing the corners of the side flap holder to the horizontal profile.
- Attaching the rollers to the door (4 upper and 4 lower) and installing the door into the guides.
- Fastening fenders to a horizontal profile.
- Fixation of sealing rubber bands and adjustment of sashes.
The final stage is sealing the joining seams with plumbing sealant. If there is excess composition, it should be removed immediately with a soft cloth. Dried sealant cannot be removed without damaging the surface.
Installation video
The video instructions show how to install sliding doors in a shower stall with your own hands.