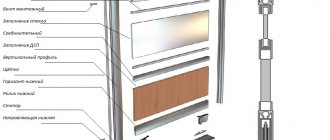
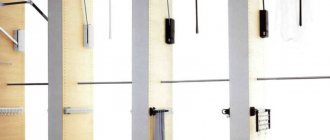
Applying an edge
If you have never done edging, then watch the lesson first. Thanks to a special tape, it is easy to process the edge, that is, the place of the cut, yourself. Detailed step-by-step instructions are included with the material. There are craftsmen who recommend edging on parts involved in the visible zone. But on the other hand, the edge protects the cutting area from moisture and dust.
Simply apply the tape yourself by securing the adhesive side and heating it with a hot iron to ensure adherence.
Please note that we are not talking about a professional tool - an ordinary household iron. It is recommended to heat the material on mode “2”
Be sure to wear gloves to avoid burning your hands. After cooling, the excess tape is trimmed and cleaned with fine-grained sandpaper or a special whetstone that has a soft side and is low-abrasive. Edge around the perimeter of all structural parts.
PVC edge
Creating a Project
Before you start creating a drawing of the future structure, it is important to determine the place where it will be installed. At this stage, the following points should be taken into account: the number of shelves, drawers (if required)
All this will allow us to develop the most detailed project.
It is important to observe the following nuances:
- Not all apartments have standard, smooth walls and ceilings. This is why measurements should be taken from all sides, especially when designing a built-in wardrobe.
- The depth of the finished cabinet should be at least 60 centimeters. Otherwise, such shelves will not be spacious.
- Measurements should be immediately transferred to the drawing in order to correctly calculate the amount of materials.
- If necessary, you should first level the floor in the place where you plan to install the cabinet.
- To apply markings, you must use a building level, a square and a tape measure.
The diagram of a corner cabinet is drawn starting from the sides, because they are load-bearing and represent the appearance of whole boards. Then you should determine the height of the structure (usually from 2.2 meters).
Only then do you need to calculate the dimensions of the horizontal parts and the rods (if it is a wardrobe). Most often, large shelves are installed at the top of the cabinet, and a bar directly in the corner. The last step is to add additional designations to the diagram where mirrors, lighting and other elements will be located.
Design (drawings with dimensions and calculation of the number of parts)
Before you make and assemble a wardrobe yourself, you need to sketch out a sketch of the future furniture. We recommend choosing a model that is simple in shape, and we will show you how to do this using an example of a simple design. To do this, we will create a diagram with dimensions. We'll leave the corner and radius models to the professionals.
As the main material for making the body, we will take 2 MDF boards 2070 x 2800 mm and 1220 x 2800 mm, 16 mm thick. We will make the back wall from LDVP sheet. It can also be made from plywood.
Frame
The dimensions of the sliding wardrobe will be as follows: length – 1800 mm, depth – 450 mm, height – 2300 mm. A distance of 250 mm was left to the ceiling (with a vertical room size of 2.5 m). A wardrobe built into a wall niche is usually designed to fit the ceiling. If you are interested in how to make a sliding wardrobe with your own hands, follow this link: XXXX.
Let's draw the layout of the parts of the load-bearing planes of the furniture. It will look like this.
Layout diagram of sliding wardrobe body parts
1 – Top panel 1800 x 450 x 16 mm; 2 – sidewall 2268 x 450 x 16 mm (2 pcs.). 3 – rear wall 2300 x 1800 x 3 mm (LDF). 4 – frame base 1800 x 450 x 16 mm.
The height of the side panels is 2268 mm because the walls are located between the top and bottom panels, the total thickness of which is 16 x 2 = 32 mm. Hence the length of the sides will be 2300 – 32 = 2268 mm.
Selection of cabinet body filling
So, the internal space of the cabinet will have the following dimensions:
- length – 1800 – 32 = 1768 mm;
- height – 2268 mm (see sidewall size above);
- the depth is equal to the width of the side walls - 450 mm.
Wardrobe detailing
After we have decided on the main dimensions of the wardrobe body, we need to choose its contents. We will place 6 shelves, two drawers inside and install one partition. Don’t forget: in order to correctly calculate the parts, you need to take into account the thickness of the side walls and partitions - 16 mm.
Partition (5) and shelf (6)
The size of the partition will be 2268 x 350 x16 mm, and the size of each of the 6 shelves 16 mm thick will be equal to:
- length 1800/2 – (16x3) = 1752/2 = 876 mm;
- depth – 350 mm.
Drawers
We will place two movable boxes in one of the compartments of the wardrobe. Let's enclose them between two pieces of MDF, one of which will be a shelf.
Box assembly diagram
The front panels of the drawers (7) will be 4 mm smaller in width than the opening between the partition and the sidewall. The height of the facade will be 200 mm, width – 872 mm.
The frame of 1 drawer will be made of 4 planks. 2 longitudinal boards (9) length (350 – 16) = 334 mm, width 140 mm. 2 cross bars (8) length 872 - (16x2) - 20 = 820 mm, where 20 mm is the thickness of 2 drawer systems of 1 drawer, 140 mm wide.
For drawers, multiply the number of slats by two. From a sheet of HDF we cut out the bottoms (10) with dimensions of 334 x 852 mm (the bottom covers the thickness of the longitudinal strips).
Accessories
For the base plate we will need 6 furniture legs.
Leg
In the left compartment of the cabinet we will install a rod for trempels to the width of the opening - the crossbar made of a metal profile will be mounted on 2 supports installed in the sidewall and partition.
Barbell
In the right section from below to the top shelf, we will screw the retractable frame for tramples (see drawing below).
Pull-out hanger
For the drawers we will select two arched handles. It is better to choose handles with 2 attachment points.
Drawer handle
We use ball guides as a drawer drawer system.
Drawer guides
Based on the selection of details, we make a drawing of the filling of the open space of the wardrobe.
Drawing of a sliding wardrobe frame with filling.
Non-standard solutions
Sometimes the type of room requires a non-standard solution for installing a cabinet. For example, for a hallway with a dead-end or narrow shape, it is better to use a built-in structure. This option is more economical. The role of the side and rear walls in it is played by the walls of the room. The components are also fixed on them. Such modules do not have an independent ceiling and floor. To make a built-in wardrobe, you only need doors, guides for them, durable fittings, additional structures, and fasteners.
The height of such a wardrobe, as well as the width, depends on the size of the niche. Doors are designed to fit the distance from floor to ceiling. The depth can be adjusted as desired. Layout of a suspended ceiling in a built-in structure is not recommended.
This model of wardrobe will help you use every centimeter of space to your advantage. But you will have to disturb the decoration of the walls.
Another non-standard option is sliding wardrobes with built-in appliances or furniture (TV, bed, computer desk).
When installing a system with TV, the equipment is either hidden behind sliding doors or part of the system is made open.
With the help of the latest technologies, it has become possible to mount a TV in a closet door. For its manufacture, a special, more durable material is used, which significantly increases the cost of the product.
You will be interested in: Features of building a house from foam blocks: the advantages of the material and its characteristics
Using a wardrobe in a children's room, you can intelligently divide it into a sleeping area and a work area.
Arrangement of a corner wardrobe
The corner model occupies a non-standard room area. Its interesting design complements the interior in an original way. It is great for small rooms, capacious and roomy.
The shape of a corner wardrobe can be:
- L-shaped. Occupies walls and the corner between them.
- Trapezoidal. Asymmetrical option.
- Diagonal. The inside has a triangular appearance. It is usually installed between windows or doors on adjacent walls.
- Five-walled. The most massive option.
The large depth of a corner wardrobe can be not only a plus, but also a minus. Therefore, its internal layout is thought out to the smallest detail.
It is better to allocate space in the corner for a rotating stand or a two-level bracket with hangers. In the deepest part, hang seasonal clothes or those that are rarely worn.
The outer spaces are equipped with shelves and drawers. If the closet is in the hallway, then you should place shelves for shoes below.
Often corner models require additional lighting inside.
What to assemble a wardrobe from
You can choose different materials to make furniture. But this must be done before design, since the assembly process may vary slightly.
Natural wood
This is a traditional material used to make furniture. In this case, not the best choice. The boards for assembling the cabinet must be thoroughly dried and soaked in special solutions: water-based polymer emulsion or hot drying oil. In addition, their surface must be free of any defects: knots, cracks, etc. Considering that the wooden surface is hygroscopic, it is not recommended to use it for the manufacture of built-in furniture. The wood will warp due to changes in humidity inside the niche.
Photo: Instagram almaty.mebel.kz
Lining
You can use various options: MDF, PVC or wood. It should be taken into account that the slats that make up the sash are inserted into a wooden frame. The wood from which the frame is assembled is selected only when it is dry and without defects. The lining is adjusted to size, the boards are glued together. This complicates the assembly process somewhat. In general, this solution is quite appropriate, but only for cabinet doors. It is often used for built-in structures.
Photo: Instagram alyance_naydi_kzn
Wood panels: MDF, chipboard, fiberboard
Perhaps the best choice for DIY cabinet installation. The materials have all the advantages of wood, but are completely insensitive to changes in humidity. High and medium density slabs are chosen for work; they are best suited for this. It is enough to simply cut the slabs into pieces of the required size. It is optimal to use cutting services for this.
Photo: Instagram good_wood_shop
Plywood
You can use standard or laminated sheets. The latter have an attractive appearance and are considered more environmentally friendly. The material is available in the form of slabs of various thicknesses. When working, you should take into account some softness of the sheets; when installing self-tapping screws, the plywood may be deformed. Therefore, it is recommended to use special gaskets.
Choosing material for the frame, walls and shelves
When drawing up a drawing of a wardrobe and selecting components, it is important to determine the material for the structure. The parameters of the room’s moisture resistance, temperature conditions, and fire resistance are taken into account. Building materials are needed that are strong, durable, and wear-resistant. Common raw materials for compartment-type structures:
- wood;
- drywall;
- MDF, chipboard;
- plywood;
- furniture panels.
Tree
Wood is a strong, durable material. However, raw materials are not used to construct cabinets for the pantry and loggia due to low moisture resistance. The material is optimal for furniture in the bedroom or living room. It is recommended to treat surfaces with drying oil, a transparent waterproof emulsion. It is necessary to take into account the high cost of natural wood and the need for regular treatment of the material with varnishes and impregnations.
Drywall
When designing a plasterboard cabinet, it is necessary to take into account the complexity of processing the building material. The raw materials are massive and difficult to cut into elements. The structure will require an additional stable base or frame for the cabinet. It is optimal to make the sashes from plasterboard, and use plywood or wood to decorate the shelves. Plasterboard sheets quickly deform under the weight of things and crack from dry air.
Fiberboard, chipboard, MDF
A do-it-yourself wardrobe in a hallway is often constructed from sheets of MDF, fiberboard, or laminated chipboard. The materials are wear-resistant, lightweight, durable, easy to process and install. The raw materials are resistant to high humidity and changes in temperature conditions. Manufacturers offer different shades and textures of building materials.
For cabinets, laminated chipboard sheets with a thickness of no more than 16 mm are used; design solutions should be simple to prevent cracking and deformation.
MDF boards are environmentally friendly, easy to process, and come in a wide range of shades and textures. The raw materials are practical, affordable, and complemented by glass inserts.
Chipboards are budget-friendly, strong, durable. The material is produced with a wood-imitation finish of different types of wood, laminated, and painted with clear and tinted varnishes. The material is used for cabinets of different configurations.
Plywood
Plywood cabinets are strong, durable, versatile, and can be decorated, varnished, and painted. The sheets are made from soft wood and are easy to process and cut. Laminated sheets with water-resistant characteristics are optimal for apartments. When screwing in self-tapping screws, the slabs may be deformed; experts recommend using washer-shaped gaskets.
Furniture panels
The wardrobe in the hallway can be made from furniture panels. The material is low priced and aesthetically pleasing. The panels are based on different types of wood (oak, birch, alder, linden). The required thickness for the cabinet is 1 cm. Furniture panels are combined with plywood. The facade and frame of furniture are made from panel materials, plywood is used to construct drawers and shelves. For durability, the products are supplemented with seals that prevent dust penetration, ensure reliable fastenings and silent operation.
How to make a wardrobe for your bedroom with your own hands?
By properly managing the space and choosing the right showcase for your home, you will help improve the atmosphere and create true home comfort, because the living room is designed to have a pleasant time with friends or family.
What types of display cabinets are there for the living room and what should you pay attention to when choosing them?
Purpose
The main function of a display cabinet is, without a doubt, decorative. Therefore, ordinary kitchen utensils are never stored here - only the most expensive ones. Thanks to this piece of furniture, you can divide the living room into several zones, display and protect precious things from dust, such as:
- valuable gifts;
- services;
- elite alcoholic drinks;
- rare collections, old family photographs, etc.
Kinds
Today in stores you can find display cabinets of various interesting designs, shades, dimensions and devices. The choice of showcase will largely determine its harmony with the design of the living room. In terms of production quality, cabinets differ from each other in three main parameters:
- Material.
- Device.
- Style.
Material
All display cabinets for the living room are made of wood, as well as mirrors and glass with metal or plastic processing. Thus, the following types of wood are used to produce this furniture:
- ordinary or valuable wood species, such as birch, oak, pine, etc.;
- MDF;
- Chipboard: varnished, painted, etc.;
- laminated chipboard;
- VENEER.
It is worth noting that the display cabinets do not use ordinary glass, but reinforced glass using a special technology so that it does not burst under heavy loads of heavy objects.
Style
For each style there is a specific purpose, that is, for which rooms this or that showcase is most suitable. For example, for a small living room, it is recommended to choose light-colored furniture that visually enlarges the space. The right choice of display cabinet largely depends on the style of the living room itself, which come in several main types:
- Minimalism. Fully glazed display cases look harmonious with such rooms, opening up the space even more. Primitive cabinets made of chipboard, MDF or plastic with the least amount of finishing will also go well together.
- Classic. This style will always be in trend as it represents wealth. As a rule, this is handmade furniture.
- Modern. In such living rooms, stylish display cabinets with laconic shapes and luxurious patterns and decorations look best.
- Scandinavian. It is made with an emphasis on environmental friendliness and naturalness, so the cabinet should be chosen in light and cool colors.
- Country. Creates a warm and cozy atmosphere in the living room, provided by natural materials.
Device
Since living rooms vary in size and may contain different numbers of other pieces of furniture, manufacturers offer customers three types of display cabinets depending on their design:
- Modular. Designed to divide a living room into zones or highlight individual interior elements using modules that can be quickly and easily disassembled, assembled, replaced or swapped. These display cases look best in small spaces.
Mounted. This type of cabinet is installed on the wall, but you won’t be able to put many items on it, since a maximum of five shelves are attached to the wall. Angular. Saves a lot of space, especially in small living rooms, where corners are often left free.
A display cabinet is one of the few interior items that will never go out of fashion and will always be relevant for creating an exhibition of memorable and valuable things in your home.
WE PLAN AND DRAW YOUR DREAM CLOSET
Things are stored in closets. There are wardrobes in our houses. The dream is to store things in such order that you can create your wardrobe in three minutes. And he is responsible for saving time around the clock - a super-spacious dream closet designed for 5 plus people.
The dream wardrobe is bought in a store or ordered from a workshop. But first you must remember to carefully plan each shelf and hook. Draw a plan. And only after that don’t be afraid to spend money on a purchase.
Do you think planning your closet is easy? I want to upset you. It will be difficult for an unprepared person. If I move a stack of sweaters from place to place thirty times a year. If I can't find the skirt I need. This means one thing - the closet is not thought out. Let's draw again!
And in order not to make any more mistakes, and especially not to throw money into the abyss, I wrote 1200 words about how to come up with each person’s own dream closet. I drew a lot of illustrations and am grateful for every “thank you” that I receive endlessly.
For work projects, I draw cabinets down to the last cubic centimeter. Together with our customers, we seriously discuss every storage system in their home. It doesn’t matter if it’s a closet or a dressing room, a small pantry or built-in shelves in niches.
Wardrobe for individual execution. Author Oksana Panteleeva. 2021 Implemented project
All cabinets are made at the factory. The algorithm is simple: I prepare sketch solutions, then surveyors go to the house or apartment. Next, the designer develops a storage system in accordance with the selected materials and filling of the cabinet. Then we coordinate again, sign the drawings, send them to work, wait, receive and rejoice at finding happiness.
But what if it is impossible to ask for help from professionals, and there is no hope for a manager in a furniture salon. Or are you planning to buy Pax at Ikea, where everything is sold in parts (cases, shelves, hooks) and you have to put in a lot of effort to get the cabinet of your dreams?
There is only one answer: you need to prepare and draw the closet yourself.
Photo of the cabinet. Completed project by Oksana Panteleeva's studio
It doesn’t matter what kind and where you plan to put the closet, the main thing is that it meets the objectives: convenient storage and quick search for things
10 steps to draw the perfect closet. Complete each one and I guarantee success!
Step 1. Understand where the closet will be located, for what purpose it is intended and what things will be stored there.
I divide cabinets according to this principle:
- The closet is shared between husband and wife.
- A closet just for him or just for her.
- Children's wardrobe.
- The closet is shared by the whole family.
- Wardrobe for outerwear only.
- Wardrobe for all clothes, excluding outerwear.
- Wardrobe with mezzanines or without mezzanines.
The first step is important - it’s one thing if we are planning a closet in the hallway for outerwear and quite another if it is located in the bedroom. A clear purpose of the cabinet is a 50% guarantee of success.
Useful on the topic: How to arrange a small hallway.
Step 2: Understand the actual size of the cabinet that will fit in your specific space. You can think and dream about many things, but reality will offer other options.
An ill-thought-out closet is a disaster. Especially if you try to fit everything and even more into it. In the same place, the same closet will hold 10 coats, but will never hold 10 fur coats. Because the volume of fur coats and fur coats is different. And they occupy a different number of centimeters on the hangers. Let’s avoid mistakes, read the article to the end and draw an ideal storage system.
Useful on the topic: How to properly install a cabinet in a niche
illustrations by Oksana Panteleeva
Step 3. Sort all items for storage.
Divide things into: those stored on hangers and those stored on shelves. Dresses separately, T-shirts separately.
At first, the action may seem nonsense, but this is the only way you will understand how many shelves you need for: sweaters, T-shirts and how many hangers you need to buy.
Advice from personal experience: divide your things into piles, piles, take a tailor's yardstick and measure them. In 2009, I painted a hundred sheets and it looked like this:
“My sweaters – 5 pcs., a stack of 20 cm.
My husband’s sweaters – 10 pcs., a stack of 34 cm. My husband’s suits – 10 pcs. – I need 50 cm for the hangers of my dresses – 20 pcs.
“Can I throw out half of it?” Step 4. Throw away everything unnecessary.
Feel free to send anything obsolete to the landfill. Approach the process of getting rid of old, irrelevant things critically. Today there is a lot of talk on the topic of “suffering from materialism,” so let’s not suffer, but save space.
Haven't worn the item in the last six months or a year? Give to friends, charity or recycling. Old items will be accepted at the HM store and in return they will give you a discount coupon. As Diana Balashova says in an article about asceticism: “I bought a bag with new things, and threw away the same bag at home.”
Read Diana’s full article about love for space on the blog pages here .
Step 5. Measure all lengths of things.
Don't be surprised by this step and don't skip it, please! Dresses and coats, raincoats and men's suits - everything has its own length, which will tell you how much space to allocate inside the closet.
The difference between a long evening dress and a men's shirt is up to 100%. And if you are the happy owner of a collection of floor-length dresses, then be sure to think about a separate compartment. The length of the dresses will be the main parameter, since under no circumstances should the hems be allowed to lie at the bottom of the closet.
Step 6. Think about how to store hats and small accessories.
Review the options for storing ties, handkerchiefs, and belts on the Internet and choose the most convenient one. I advise you to create an account on Pinterest and put the photos you like in separate folders.
Determine the main thing for yourself: in this closet you will store caps, hats, small accessories, or they will find another place in the house.
Step 7. Think about how blankets , pillows, and large out-of-season items will be stored.
Usually in closets there are mezzanines, the topmost shelves, or deep drawers at the bottom, similar to the principle of a chest of drawers, for “large size”. If there is no separate storage room for storing such things, then we plan shelves in the closets. Don't forget guest pillows and winter blankets.
We remember that there are useful vacuum bags on sale that are convenient for storing bulky items. They take up much less space on a shelf or inside a drawer, because your vacuum cleaner and a special valve will work wonders, remove excess volume, and with it save centimeters in the closet.
Step 8. Think about where we store suitcases and large bags.
The suitcase also needs to be stored somewhere. If there is only one closet, then you need to allocate space for bags and suitcases. And following the rule of “saving space” and caring for space, we remember that we always store something “sometimes necessary” inside the suitcase.
I keep bags and backpacks in my suitcases that I use when traveling. The swimming mask and snorkel also live in the suitcase.
Step 9. Consider storing sports equipment.
Skis, boots, poles, skates - everything needs a place. In addition, you must take into account all the manufacturer’s recommendations for storing sports equipment.
For example, I was faced with the fact that expensive alpine skis should be stored only in a certain way: either on special mounts, or strictly in a horizontal position. And I solved a real problem: how to find a place in the customer’s apartment to satisfy the manufacturer’s requirements. Everything was thought out before purchasing the cabinet - this is important.
I have a storage room in my apartment where I store bicycles and skates. We always rent skis.
Step 10. Think about shoe storage.
Shoes, as experience has shown, are the most painful place when it comes to storage. When this article was first published (the first edition was in 2014), there were a lot of complaints about the main illustration. How dare I suggest storing shoes with dresses! No one noticed that this was just an illustration of the size range of things, and not a guide to action.
We are different.
Some people store shoes in their original boxes and put out-of-season sandals in the closet. Someone loves beautiful shoe boxes with transparent walls in a common closet, and does not change their places in spring and autumn.
When possible, I prefer a separate shallow closet just for shoes over all options.
There are plenty of options. Force yourself to count the number of shoes at home. Decide on your preferences and find the perfect boot and shoe storage option for your family.
10 steps behind and now the finest hour has come! Let's get to work: take paper, a scale ruler and a pencil.
We draw the perimeter of the cabinet. Its length, height. We immediately decide on the opening system: swing doors or sliding doors.
An example of the “perimeter” of Emma’s closet with 6 hinged fronts, which should fit into a niche 300*270 cm and 65 cm deep:
Important:
The depth of a standard cabinet with hinged doors is 60 cm or 600 mm.
If your closet is shallower in depth, please note that the hangers will be positioned differently.
Wardrobe with sliding doors – 70 cm. The exact depth depends on the technical characteristics of the sliding system you have chosen. Please note that today manufacturers have a good choice; the “coupe” system is not the only one and not the best.
The standard size of hangers is 50-55 cm .
Next, distribute the cabinet compartments according to the opening of the doors. Pay attention to this so that you never do this:
example of a cabinet from the resource www.extension-renovation.fr
The interior organization of the cabinet is good, and the doors open in such a way that it is inconvenient to use.
We distribute things according to your measurements, which we talked about above. Or turn to Ernst Neufert's textbook, where you will find the basics for designing cabinets. ( * Ernst Neufert is a German architect, architectural theorist. “Building Design,” one of his most important works, has become a reference book for me and my colleagues.)
Since I cannot draw each of you an individual dream closet, the basics of E. Neufert and my article will help you do this yourself.
Basics. Part I. Man:
It is important to know how much space a person takes up on average when: trying to reach the top shelf of a closet, or looking for something on the lowest one, or if he stands on a stool. This has a lot to do with the cabinet design process. See illustration:
I redrawn the pictures from E. Neufert's textbook so that they perfectly illustrate where the hand of a person of average height can reach.
It can be seen that dresses and coats can be placed at a height of 2 meters, and if higher, then you need to buy a furniture pantograph.
Basics. Part II. Cloth:
We measure all clothes.
It is clearly seen that, for example, one dress can be from 140 to 165 cm (let me remind you - these are very average clothing sizes, so I advise you to try on your dresses), and 5 dresses on hangers in a row will take up 30 cm on the crossbar.
If the trousers are stored folded, they will take 120 cm. And if they are stretched out, then 140-150 cm.
Make the height of the space above the crossbar at least 5 cm
.to use the hanger comfortably.
A convenient shelf height for low shoes is 17-20 cm.
, if shoes are stored in their normal position and not on special stands.
For high boots, leave a free space of up to 50 cm high
.
The average height of a boot is 40-41 cm.
Small items: socks, handkerchiefs, underwear are best stored in drawers or baskets. I love drawers with good bottoms and easy opening. In the designed cabinets I put drawers that, instead of regular handles, have a cutout for the arm.
This is a great and smart article.
I think there are no more questions about why we count all our dresses and measure the length of fur coats in order to draw a closet.
Don't forget to leave room for a new dress, so that even despite the advice - do not clutter the space. Dreams should come true, and if today your dream is a new dress, then you need to buy it!
Emma also counted the outfits and found a place for dresses and hats. As a result, she ended up with this drawing:
The drawing is conditional; it is not a guide to action, but a basis for further work. Now it's time to go looking for a cabinet manufacturer.
There is an article on the blog: “How to find the ideal manufacturer of your dream kitchen” - I advise you to read it and learn the basics that are suitable for finding a cabinet manufacturer.
Do full work not only on the wardrobe. Housekeeping also requires attention.
Wardrobe for individual execution. project by O. Panteleev. 2021.
Today we had a conversation on a super topic: how to plan and draw a closet yourself.
You learned:
- 10 steps you need to go through to achieve your goal - a good, comfortable wardrobe.
- We received a visual aid in the author's unique illustrations by Oksana Panteleeva
- We were inspired by beautiful drawings and tips.
Therefore, no excuses can now be accepted - draw your cabinets, send them by email to the blog “on the wave of decor, so that we fill the gallery of our readers’ achievements!
And another article to help: Organizing your closets is the key to success.
me in front of the new cabinet from Silver Home 2021. Postscript:
This article received a second edition in 2021. New illustrations and new tips. The first edition received hundreds of reposts and was very popular on the Internet. I kindly ask you not to steal articles and illustrations, do not erase my name and blog name from the pictures. Those to whom I address know what I am talking about. If you want to use the materials, I don’t mind, but an active link indicating the resource and author is required. It is not difficult. You will be respected.
Each article is written personally, illustrations for the articles are drawn by me myself. Each article takes a lot of time and effort, once again I ask you to respect the work. Let's live in peace! Thank you!
And thanks for your attention! Stay with me, be sure to share with your friends, wait for new interesting articles! AND…
GOOD LUCK WITH THE REPAIR!
The blog “On the Wave of Decor” is a non-commercial project and is created only by the author. If you appreciated the article and liked it, I would be grateful for a little financial support. Thank you!
Types of corner cabinets
In order to create a unique, functional design, furniture makers are experimenting with different shapes of cabinets. There are the most popular product configurations that should be studied before drawing.
Table No. 1. Types of corner cabinets.
| Illustration | Description |
| Such structures are installed in the corners of small rooms. In this case, most often they are fixed directly to the wall - this shape allows you to properly smooth out the corners. The cabinet does not have full side walls, so its shelves are triangular. | |
| In this design, there is a wall on one side. Therefore, such a cabinet is considered more practical than the previous option. There is more free space inside. | |
| One of the most popular forms of cabinets. The design consists of two parts that connect at the corner. Such products are distinguished by their spaciousness. | |
| A special feature of the design is the presence of small but functional side walls. Due to this, additional modules can be placed inside the cabinet. |
The most difficult design for self-production is a triangular or trapezoidal cabinet - due to the fact that the product involves the presence of diagonal elements, which it is advisable to prepare in the presence of a professional.
Table No. 2. Types of corner cabinets according to installation method.
| Installation method | Description |
| Hull | Such cabinets require a back wall; they are not tied to just one place. If necessary, they can be quickly transferred. |
| Built-in | The cabinet is assembled and secured directly in the place where it is planned to be installed. It is quite difficult to move such a structure to another place. |
| Modular | The design consists of several sections that are assembled into one cabinet. Such products can be dismantled and rearranged quite quickly (if necessary). |
The designs differ from each other and in the type of doors. They can be hinged or sliding (compartment). In the first case, door leaves should not be made larger than 45 centimeters, otherwise the load on the hinges will be too strong. In the second case, the doors can be quite massive, even more than 45 centimeters wide.
Step-by-step manufacturing and assembly instructions
The first stage is marking:
- First, take a ruler or tape measure and measure the full length of the cabinet in the place where you are going to install it. The easiest way to do this is from the corner of the room, then one of the side walls will be the corner wall of the apartment;
- From the resulting point, draw a vertical line from top to bottom to indicate the border of the wardrobe. To make the line more even, you need to take several measurements from the corner at different height levels and make marks with a pencil, which you then connect with a line;
- then you need to measure and draw another vertical line - the border between the department with shelves and the department with a hanger. A wooden post will be installed along this line to separate these departments;
- Now mark the height of the shelves on the resulting lines, making marks on both sides with a pencil.
The second stage is to install the fasteners:
- take the fasteners, attach them to the resulting lines and mark the places where you need to drill holes in the wall;
- a dowel-nail must be driven into each resulting hole;
- We attach the fasteners to the wall with self-tapping screws.
The third stage is installation of the internal filling of the wardrobe:
- to secure the dividing post, place it on the fastenings and screw them to them with screws;
- To install the mezzanine, first of all we draw a line horizontally using a level and a pencil. Next, on the resulting line we drill holes for fastenings - two in each compartment and on each side; Dowel-nails are driven into them and the fastenings are fixed on the wall. Secure the mezzanine to them using self-tapping screws;
- To install the side wall of the cabinet, measure the height of the room as accurately as possible and try to adjust the wall to the result obtained. Install it and attach it with self-tapping screws to the existing fasteners;
- we mount the shelves: mark their installation locations on the side of the wall and on the dividing post, install two fasteners on each side and place the finished shelves on them. Attach using self-tapping screws;
- The second compartment of our closet is reserved for things on hangers, so we need to install a metal pipe there. Purchase round fasteners according to the diameter of the pipe, attach them with self-tapping screws to the wall and the middle dividing post, if necessary, cut the prepared pipe, insert it into the fastenings and secure.
Stage four – installation of false panels:
- false panels are installed at the bottom, top, side and near the wall. Each of them is drilled in several places, placed where installation is planned and marked with a pencil where it is necessary to make holes in the wall;
- Dowels are inserted into these holes, and the false panels are attached to them with self-tapping screws.
Fifth stage (final) - installation of doors and guides:
- To install the guides, you need to measure their desired length and adjust it to size. Afterwards, using self-tapping screws, they are fixed on the false panels - top and bottom;
- Installing doors requires a certain skill and accuracy. Attach the rails to them, but do not tighten them too much to allow the rollers to move more freely. The door is inserted first into the guide from above, then into the guide from below. Set them up to move freely along the rails. It is advisable to stick soft pile on the side of the door to prevent noise from impact and to avoid damage to the door;
- thoroughly check the quality of installation of all parts and the operation of the doors. If everything is in order, the job is finished!
Wardrobe parts table
| Constructive | Item no. | Name | Size, mm | Material | Quantity, pcs |
| Frame | 1 | Top panel | 1800 x 450 x 16 | MDF | 1 |
| 2 | Base | 1800 x 450 x 16 | — « — | 1 | |
| 3 | Back wall | 2300 x 1800 x 3 | LDVP | 1 | |
| 4 | Sidewall | 2268 x 450 x 16 | MDF | 2 | |
| 5 | Partition | 2268 x 350 x16 | — « — | 1 | |
| Filling | 6 | Shelf | 876 x 350 x 16 | — « — | 6 |
| 7 | Facade | 872 x 200 | — « — | 2 | |
| Boxes | 8 | Longitudinal strips | 334 x 140 | — « — | 4 |
| 9 | Cross bars | 820 x 140 | — « — | 4 | |
| 10 | Bottom | 334 x 852 | LDVP | 2 | |
| 11 | Barbell | 872 | Metal | 1 | |
| Accessories | 12 | Pull-out hanger | Set | — « — | 1 |
| 13 | Base legs | Set | Plastic | 6 | |
| 14 | Retractable guides | Set | Metal | 2 |
How to adjust the hinges on a cabinet door yourself: detailed instructions