19183
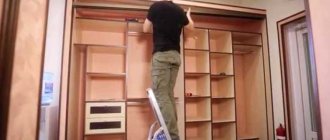
A sliding wardrobe made of plasterboard will help to visually divide the room into zones, which is easy to manufacture and does not require special skills, because it is made from available materials. Using a closet, you can create your own room design, as well as provide your household with additional storage space.
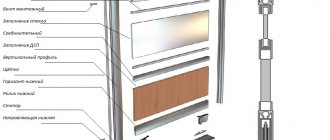
Cabinet drawing
The creation of furniture begins with its drawing. A detailed diagram of the installation and arrangement of the wardrobe elements will help to avoid mistakes during its assembly. You need to determine the location of the future structure: in the hallway, bedroom, as well as in other rooms, you need to take into account the distance from the windows to the door, the height of the ceiling.
Form a body from profiles and cardboard. Design the future content and make a list of accessories for this. The sliding door system is created from traditional materials and will be independent of the frame design.
Having determined the dimensions of the built-in wardrobe, transfer them to paper. Draw the position of the shelves and partitions. Calculate the required amount of materials and prepare the tool.
Tools
To make a cabinet body from gypsum plasterboard, you will need the same tool as for normal work with drywall:
- metal ruler and tape measure;
- level and plumb;
- drill-driver;
- perforator;
- metal scissors;
- hammer;
- end plane;
- marker or pencil;
- construction knife;
- hacksaw for metal;
- jigsaw;
- brushes;
- spatulas.
As you can see from the list, the tools are standard, quite often found in every home.
Materials
Based on the drawings, draw up a specification of materials necessary for installing the body and filling the wardrobe:
- drywall;
- metal profile;
- screws and dowels;
- damper tape;
- polymer mesh (serpyanka);
- putty (starting and finishing composition) and primer;
- water-based paint;
- vinyl wallpapers.
Depending on your taste preferences, you may need one thing: either wallpaper or paint.
Drywall
The choice of cladding material must be treated with extreme caution. The design of the shelves takes on the vertical load from the things placed on them, sometimes quite weighty ones. Therefore, it is better to take gypsum board with a thickness of at least 12.5 mm.
To cover a metal frame, it is enough to use sheets 8 mm thick. We advise you to purchase sheets of plasterboard of the same cross-section: this way you will not have any difficulties in covering vertical and horizontal metal surfaces. There will always be an opportunity to cut an additional piece from the entire stock of cardboard. Therefore, choose all cardboard according to the maximum end size - 12.5 mm.
If you decide to make a built-in, free-standing cabinet in the bathroom or kitchen, then use moisture-resistant plasterboard. This also applies to all damp rooms.
Expert opinion
Bashir Rabadanov
Technologist at the furniture company Woodband
Even on a glazed balcony or loggia, I recommend using plasterboard sheets to assemble the cabinet.
In any room, furniture located near a frequently opened window is also made of moisture-resistant material.
Speaking of dimensions, retail chains sell plasterboard sheets in the following sizes:
- length from 2 m to 4 m;
- width from 1.2 m to 3 m;
- thickness from 6.5 mm to 24 mm.
Based on the dimensions of the gypsum board you have chosen, we make a cutting drawing of all the cladding elements of the wardrobe box. It will help to avoid shortages or excess material. Allow an additional 5% of the total cardboard area for defects or accidental damage to parts during their manufacture.
Metal profile
Galvanized steel profiles for drywall are available in several types. These are UD, CD, CW and UW rolled products intended for the formation of partitions, suspended ceilings and cladding of wall enclosures indoors. Some of them are needed for the installation of supporting elements, while other long lengths are used to make the connecting parts of the frame, ensuring the rigidity of the entire structure.
From the entire assortment, we will select the profiles that you will need to install a wardrobe made of gypsum plasterboard.
UW (MON and PNP)
Guide profiles limit the horizontal framing at the top and bottom of the box. UW slats are fixed to the floor and ceiling using dowels. If, when installed in a niche of a built-in structure, the height is less than the distance from the floor to the ceiling, the upper belt of the box is attached to the walls.
A similar method is used if it is necessary to fill the entire width of the wall with the structure. The profile is mounted vertically with shelves facing the inside of the room.
Steel slats are available in the following sizes:
- length – 3 m;
- shelf height – 40 mm;
- base width – 50, 65, 75 and 100 mm.
For the cabinet, we select long-length profiles with a wall width of 65 mm. If the furniture is small in size, then slats with a wall of 50 mm can be used as guide profiles.
CW (PS)
CW posts form vertical metal support members. Their ends fit into the UW rail guides. The rack profile transfers the entire load from the filled shelves to the base of the room. Dimensions of steel products:
- length – 3, 3.5, 4 and 6 m;
- shelf – 50 mm;
- wall – 50, 65 and 75 mm.
In our case, we use a profile with a wall of 65 mm. The edges of the sides are slightly curved, the wall has longitudinal grooves so that the length has increased rigidity and increased load-bearing capacity.
CD
We use UD strips as connecting elements of the frame and to create supports for shelves. The products are manufactured with a length of 3 m, a shelf height of 27 mm and a wall of 60 mm.
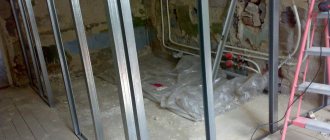
Installation technology
At the first stage of installation, you need to design the frame of the future cabinet:
- we begin to make the frame from its general outline;
- on the floor we apply the starting profile guides to the diagram line;
- We place a shock-absorbing tape under them to prevent the transfer of vibration from the floor to the entire structure;
- fasten them with self-tapping screws;
- you can install a rail for sliding doors on the floor if you plan to make a wardrobe;
- Then we can attach the guides to the walls and ceiling. With a corner design, the guides are attached to the walls and corner;
- all horizontal elements are fixed with special fasteners (crabs);
- then at a distance of 50 cm it is necessary to install suspensions;
- then rack-mount vertical profiles are installed on them.
After all this, you should make a frame for the shelves:
- To do this, take short profiles of the required sizes (cut from longer ones);
- They are attached to the frame using self-tapping screws.
Ready frame
Note! Openings for built-in drawers must be completely smooth and with right angles. At this stage, if there is backlighting in the drawing, wires are drawn for spotlights.
Self-tapping screws and dowels
Using self-tapping screws for gypsum boards and fastening metal profile elements, you will need screws 10 and 30 mm long.
The steel parts of the supporting structure are connected to each other using screws using a screwdriver. Long fasteners are used to secure gypsum board sheets to metal. Use dowel nails to secure the supporting structure to surrounding concrete or brick fences. Drill the metal and the wall with a hammer drill, then hammer in a dowel consisting of a screw inserted into a PVC tip. Typically, fasteners with a length of 30–40 mm are used.
Frame assembly
Creating a cabinet or shelves from plasterboard begins with assembling a frame that will serve as the base. For this process, you need to use profiles (they are small and narrow, which allows you to create smooth lines and transitions), which will be fastened using a screwdriver and self-tapping screws. It is worth noting that the distance cannot exceed 25 cm (it directly depends on the desired strength; the smaller the distance, the stronger the plasterboard shelves).
The next step is to begin attaching the guide profiles, which are designed to create volume. To make the shelf more durable and reliable, the guide profiles must be attached to the ceiling using dowels.
Putty and primer
There are putty compositions for starting and finishing gypsum board coatings. The building materials market offers dry mixtures and ready-made putty. The advantage of dry compounds is that you have the opportunity to always prepare the amount of putty required at this stage of work. The powder must be diluted with warm water and mixed thoroughly.
You will use the starting mixture to cover the drywall joints, seal the screw heads and secure the protective corners on the outer and inner sides of the frame cladding.
Once the starter coat is dry, apply primer to the entire cardboard using a brush. The mixture is sold in glass or plastic containers. The product will strengthen the paper base and the surface layer of gypsum.
Using a spatula, treat all surfaces of the gypsum board with the finishing compound. This coating is also applied with a spray gun, which forms a high-quality smooth surface of the cardboard.
Final Steps
The base is done, you can move on to the next stage - plating and final finishing of the cabinet. But first, it would not be amiss to carry out an additional check - to push it and try to shake the erected structure. If there is swaying, then the base should be strengthened a little more, for example, with pieces of the remaining profile.
Sheathing plasterboard sheets will not be difficult if the design was done correctly. When the size of the cabinet is significant, then, as a rule, it is sheathed on the outside and inside, and to give additional strength it can be sheathed in two layers of gypsum board. For small furniture, only one coat is sufficient.
In addition to the sheets themselves, to attach them you will need:
self-tapping screws (metal screws 25 mm long),
screwdriver,
metal knife,
stationery knife,
pencil, pen (what will be used to mark the plasterboard),
metal corner,
reinforcing paper or plaster mesh (the last two points are used to make the corners more aesthetically pleasing, “even” and strengthen them from destruction).
Initially, the sheets are installed around the perimeter, and then they are attached to the rest of the frame.
Typically, screws are placed at a distance of 20 cm from each other (but no more). Place a special limiter on the screwdriver so that when screwing it does not damage the sheathing material, the screw head should not go too deep, a maximum of 1 mm. The joining of sheets should not be done tightly, joint to joint; it is necessary to leave a small gap of 2-3 mm.
You can cut a plasterboard sheet evenly quite simply using a table. Lay out the canvas, make cuts at the ends, place the sheet on the edge of the table so that the marked line protrudes slightly beyond the edge, hit the surface with your palm (but not too much). The gypsum board should break along the intended line. All that remains is to cut the cardboard with a stationery knife.
The cabinet is almost ready, all that remains is to prime and putty, install rails for the doors (if necessary), equip the shelves (if they are made of a different material), install the doors and final decorate.
A set of tools and materials for the final stage:
Painting mesh;
Finishing putty;
Spatulas;
Primer;
Sandpaper for grinding or grater;
Final finishing materials (wallpaper, tiles, self-adhesive film, mosaic, tile);
We recommend: How to hang a shelf on the wall
Rollers, brushes;
Containers for solutions;
Furniture fittings, doors, shelves, lamps, switches, sockets (if necessary).
As soon as the painting mesh is glued to the joints between the sheets, you can begin to putty. All screw holes and gypsum board joints are filled with finishing putty, then the surface is sanded, if necessary, a second layer of putty is applied, then the cabinet is primed and finally decorated.
The final steps in creating drywall furniture are the most creative.
How the cabinet will ultimately look depends only on the designer’s design ideas and his financial capabilities. This is a real “canvas” that will withstand any design delights and almost any finishing materials (even the heaviest tiles), because essentially the canvas consists of two layers - cardboard and hardened gypsum dough . Finishing can transform any structure so that a person who does not know how it was built will never guess what it was made of.
The widest selection of building materials, from wallpaper to photo wallpaper or various self-adhesive films, from paint and plaster to various decorative coatings, from tiles and mosaics to ceramic products, makes it possible to create the interior of your dreams, which will be suitable for living.
Step-by-step instructions for assembling the box and filling it yourself
| Step No. | Photo | Process description |
| 1 | We determine the location of the wardrobe. Furniture should not interfere with the passage of people and prevent the full opening of doors and windows. The corner closet is conveniently located opposite the entrance to the room. | |
| 2 | We mark the dimensions of the box on the floor, ceiling and walls. To do this, we use a pencil, marker, tape measure, metal ruler and level. | |
| 3 | According to the drawings and specifications, we cut the steel profile into the required sections using metal scissors, a hacksaw or a jigsaw. | |
| 4 | In accordance with the markings, we fix the UW guide profiles to the floor and ceiling with dowels. | |
| 5 | Having installed the racks, we fasten them with self-tapping screws to the top and bottom rails. Now you need to attach the vertical elements to the walls with dowels through perforated strips of hangers in increments of 40–50 cm. | |
| 6 | We install the transverse frame slats. They are inserted into racks and secured with self-tapping screws using a screwdriver. The crossbars are fixed in such a way that the openings between the shelves are at least 300 mm high. This is the optimal size recommended by furniture assembly specialists. You can maintain a different distance between the shelves. | |
| 7 | In the clothing compartment, you need to attach a rod to the metal crossbars of the box on which the tremels will be hung. | |
| 8 | To divide the contents of the closet into compartments for shelves and for outerwear, install a partition. Assemble it in the same way as the side walls of the box. | |
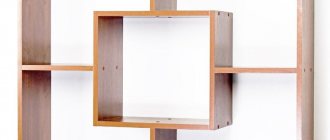
| 9 | You can also assemble the metal frame of the partition cabinet. Often a homemade wall is made open to delimit (zoning) a nursery, living room or room for another purpose. In this case, the structure can be used as an open bookcase. A plasterboard wall is often placed in the corridor to store everything that gets in the way in living quarters. | |
| 10 | If the box does not reach the ceiling, then you can make a straight arch, which fills the space between the ceilings. Make the arch from a metal frame covered with sheets of plasterboard. | |
| 11 | Mark the sheets of drywall using a tape measure and a metal ruler. Draw marking lines with a pencil or marker. | |
| 12 | Drywall cutting can be done in two ways. In the first version, cardboard is cut with a jigsaw. But this is not very convenient to do without a large workbench or table. You can cut the material directly on the floor. Place any flat length (beam or board) under the cut line. Applying a ruler, cut the markings shallowly with a construction knife (3–4 mm). Then, pressing with your hands on one side of the sheet, achieve an even break of the cardboard. If you have no experience in this matter, then it is better to practice on unnecessary scraps of material. | |
| 13 | Treat the ends of the facing elements with a plasterboard cross-cut plane. This work can be done with a sanding mesh secured with clamps to a special block. | |
| 14 | First, attach the shelves to the cabinet frame with self-tapping screws. After this, sheathe the vertical surfaces of the box. | |
| 15 | When installing shelves with a width of more than 50 cm, secure additional cross beams from the CD profile. Cut the ends of the crossbars with scissors, separating the shelves from the wall at a distance of 60 mm. Bend the ends of the shelves outward at a right angle. Then secure them with self-tapping screws on the side surface of the rack, and attach the end of the wall with a self-tapping screw to the base of the rack profile. | |
| 16 | To ensure that the thickening of the side surface of the rack does not interfere with the cladding, the contact area of the drywall must be sharpened with a plane or rasp. | |
| 17 | Apply primer to all surfaces using a brush. | |
| 18 | Use starting putty to cover the joints, cladding seams and cover the screw heads. Attach the screws so that their tops are recessed into the drywall. | |
| 19 | Cover all treated areas with sickle tape. Treat the ribbons with the starting mixture. | |
| 20 | Install the corner profile, covering it with a spatula and putty. | |
| 21 | After 24 hours, treat the drywall with a finishing compound. Clean up any imperfections with a mesh or fine sandpaper. | |
| 22 | Paint the entire box with a brush again with primer. | |
| 23 | At your request, the entire structure can be painted with a water-based composition or covered with vinyl wallpaper. | |
| 24 | Once the work is completed, proceed to install the sliding doors. To form the frame, use boards or timber with a width equal to the cross-section of the metal guide rails. | |
| 25 | Install the wooden frame almost close to the vertical posts of the box. It is necessary to maintain a gap of 1–2 mm. This must be done so that dynamic loads from the movement of door panels are not transferred to the drywall. Otherwise, the cladding material may crack and subsequently collapse. | |
| 26 | If the floor and ceiling have an ideal horizontal surface, then you can get by with installing only timber racks. Attach the guide strips of the sliding system with dowels directly to the horizontal railings of the room. | |
| 27 | The gap between the door frame and the coupe body must be filled with damper tape. | |
| 28 | It is advisable to attach swing doors to the bodies of small cabinets. If you nevertheless decide to install such doors on a plasterboard structure up to the ceiling, then you cannot do without installing a wooden frame. |
Advantages and disadvantages
A plasterboard cabinet has a number of advantages over other types of similar products. First of all, it is worth noting the fairly low cost of its production. This is where the advantage of drywall comes into play. It is inexpensive, and also leaves virtually no unused waste during operation.
In addition, plasterboard cabinets can be placed in any room. They can be corner, placed on one of the walls, or even serve as a kind of partition, dividing a large room into living and sleeping areas.
A properly made and well-assembled cabinet can withstand significant weight, which allows it to be used as a pantry for storing a variety of supplies.
A plasterboard cabinet has many advantages
Finally, you can quite simply and inexpensively change the appearance of such furniture. Re-painting wallpaper, repainting a cabinet or, finally, changing the configuration of decorative trim while renovating a room is quite simple and inexpensive.
However, plasterboard construction also has certain disadvantages. First of all, it is stationary - the cabinet cannot be moved. So it is unlikely that it will be possible to radically rearrange the furniture in the room. In addition, the cabinet does not allow storing sharp objects, such as construction tools. Indeed, despite all the strength of the structure, this is hampered by the fragility of plasterboard, which is poorly resistant to cuts and impacts.
Finally, standard hinged doors cannot be used in drywall cabinets. After all, any awnings will eventually pull out of the drywall. So you will have to limit yourself to sliding doors or roller shutters.
Only sliding doors can be used in such cabinets
Cabinet-table made of gypsum plasterboard for TV
The principle of assembling a TV stand made of plasterboard with a frame made of steel profile remains the same. It should be noted that the cabinet needs to be made mobile. To do this, we assemble a floor frame from a guide profile. Install furniture legs in the corners. They can be monolithic or equipped with wheels.
Then assemble the entire metal frame. Attach a plasterboard table top to the top frame. It can be made semicircular or rectangular.
After puttying and painting, secure the doors. Hinged planes can be made from other materials (chipboard or MDF).
It is easy to give the cabinet an original design that will harmoniously fit into the interior of any room.
Finishing
Next, the cabinet is puttied along the joints. To do this, first use tape, and then use high-quality putty. Afterwards, the plasterboard cabinet must be left until the putty has completely dried.
The next stage is painting the plasterboard cabinet, covering it with wallpaper or attaching a decorative covering. After the paint has dried, the cabinet is almost ready. Only the door remained. There are three ways to go here. You can order a ready-made door at the factory, make it yourself from a metal profile, or install roller shutters on the cabinet.
A cabinet assembled with your own hands will cost half as much as buying a finished product. And in terms of strength and performance, such a cabinet is superior to any mass-produced product.
Features of installing gypsum plasterboard cabinets for kitchens and bathrooms
In these rooms, due to high humidity and temperature changes, unfavorable conditions are created even for furniture made from gypsum plasterboard. This. If you decide to install such furniture, then it is better to place it away from the stove, refrigerator, sink, shower or bathtub.
Advantages of making furniture from plasterboard
It is not for nothing that plasterboard furniture is very popular among the population. This phenomenon is facilitated by the following positive qualities of the material in question:
- Easy installation of structural elements. You don’t need a lot of experience in handling tools; furniture manufacturing is available to anyone who wants to assemble a wardrobe from gypsum plasterboard.
- If we compare the cost of manufacturing a wardrobe from MDF and assembling furniture of similar dimensions from metal profiles and plasterboard, then savings can amount to up to 20% of the total costs.
- The ease of joining steel elements, cutting them, and cutting sheets of cardboard allows us to quickly produce a cabinet of the required dimensions and with the required contents.
After reading the article, you should have no doubt that drywall can be effectively used to make furniture. Despite the apparent fragility, gypsum plasterboard in combination with metal profiles can be used to make quite strong and reliable cabinets.
Varieties
You can make different models of cabinets from plasterboard. They are equally suitable for a large living room or a small bedroom. The main thing is to correctly calculate the dimensions of the furniture at the project development stage.
| Type of furniture | Internal filling options |
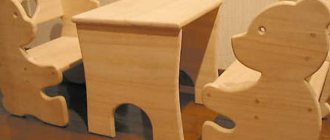
| Wardrobe partition | Toys, light books, stationery |
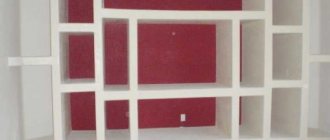
| Wardrobe wall | Any content |
| Coupe with sliding doors | Bed linen, tablecloths, towels |
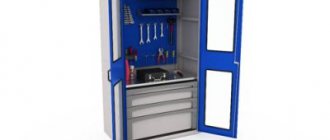
| Mini dressing room | Clothes, shoes, accessories |
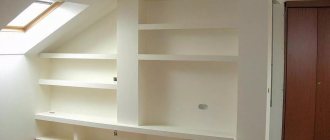
| Open shelving | Landline telephone and household items such as keys, magazines and newspapers, pencils and pens. This furniture will fit well in the hallway |
Instructions for making DIY chipboard furniture for beginners
You can place several drawers at the bottom of the cabinet. They can be locked with a key or opened freely. The shelves, if desired, can be glazed to prevent dust from accumulating on them.
Do not place heavy household appliances on plasterboard shelves. Large metal objects (dishes, figurines, souvenirs) also fall under this ban.
Wardrobe partition
Wardrobe wall
Coupe with sliding doors
Mini dressing room
Open shelving