The final stage is decoration
The sofa is the most important piece of furniture. We gather there with the whole family, relax after work, watch TV, and sometimes it’s just great to lie around, covered with a cozy blanket. Its color scheme is significant in the design of a room.
How to make an old sofa sparkle with new colors?
To begin with, you can change the area around the furniture, for example, change the wallpaper or stick photo wallpaper. Picturesque prints will look original. They decorate pillows - choose some image and apply it to the cover. This is best done in a workshop.
You can sew stripes or squares yourself, using fabrics of different colors, or combine them.
The most ideal option is to replace the cover. If you don't want to sew it yourself, buy it at the store. Now there is a very large selection of different colors and models. They have different features, including water-repellent, and even ones that are resistant to the sharp claws of your pets. Well, the simplest option is to cover the sofa with a blanket or two.
This will create a cozy atmosphere that sets you up for relaxation.
Pillows with new covers of different colors will add some zest to the sofa. Saturated shades are best placed in the center, neutral shades are preferable at the edges. If you like a style such as eclecticism, then feel free to use all your imagination - combine incompatible things. Sofa cushions can be square, round or triangular, large and small, of different colors, different fabrics, even fur.
The color of the pillows can be matched to the curtains, lampshade, and chair.
Reupholstering furniture is a fun activity that does not present any particular difficulties. The main thing is to do everything according to the rules, and you will have original old furniture at home that will serve for many years to come.
How to decorate
The updated kitchen corner can be left unchanged or decorated. Several popular decoration options:
- decoupage;
- pillows with contrasting covers;
- adding bright accents in the form of rollers or blankets;
- decoration with inserts made of genuine leather or suede;
- use of knitted capes;
- hand painted;
- fastening plywood ornaments.
For decoration, stencils are used that will help you apply designs of varying degrees of complexity onto wooden panels. The use of fringe or tassels is no longer relevant. A repeating pattern is applied to the arms, legs and small plain elements.
You should not use more than two ways to decorate a kitchen set. Too much decoration will ruin the appearance of the corner. It is better to opt for a more concise option.
The decoupage technique should be used with caution. For decoration, one color scheme and one type of pattern are used. If the kitchen already has furniture or appliances decorated in the same way, then it is better to abandon this idea. Otherwise, the appearance will be rustic and rustic.
Even a novice craftsman can reupholster a kitchen corner. The main thing is to strictly follow the step-by-step instructions, do the work carefully and without haste. Updated furniture will decorate the kitchen.
Kitchen corner made of chipboard: step-by-step instructions
Let's look at how to make a kitchen corner with your own hands, consisting of 3 elements: a short and long sofa and the part connecting them.
Selection of materials
To make the base of a kitchen corner with your own hands, you can use plywood or chipboard.
The following is used as upholstery for the kitchen corner:
- Synthetic fabric. The material is affordable, colorfast, and easy to clean.
- Microfiber. It has increased resistance to moisture, practicality and is slightly susceptible to contamination. A kitchen corner upholstered with it will not need restoration for a long time.
- Leatherette. Easy to care for, does not absorb water, can be wiped with a damp cloth.
As a filler, you can use foam rubber (a budget solution) or polyurethane foam - it costs more, but retains its shape better.
You can learn more about the best way to upholster a kitchen corner in the video.
Materials and tools
To make a soft corner you will need:
- jigsaw (if you plan to cut sheet material yourself);
- metal furniture corner;
- edge for ends;
- wood glue;
- pencil;
- nichrome thread;
- drill and set of drills;
- scissors;
- fasteners (dowels, confirmations);
- piano hinges;
- furniture bearings;
- construction stapler;
- roulette;
- hammer.
When making a corner for the kitchen with your own hands, you start by cutting the chipboard.
Making a long sofa
The kitchen corner of this model consists of 3 elements: two sections and a connecting corner piece.
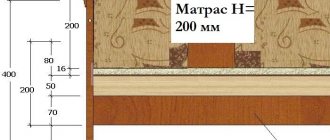
The back, seat, bottom and wall of the niche, back rest bar are made of polished chipboard, the remaining elements are made of laminated chipboard. You will need 2 pieces of sidewalls, other parts are cut out in 1 copy. The dimensions of each element of the corner structure are visible in the drawings.
Procedure for making and assembling a sofa:
- Mark the parts for milling. In the places where the fasteners will be located, make dots with a pencil and drill holes.
- The ends of the sidewalls are closed by gluing an edge to them.
- At the ends that will be in contact with the floor, thrust bearings are secured, fixing them with self-tapping screws.
- Move on to assembling the niche. Take the front panel, wall and bottom of the niche, connect the parts using confirmations.
- The sides of the niche are closed by securing the previously prepared sidewalls to them.
- The seat bar is screwed to the wall of the niche. It is fixed to dowels.
- The seat is installed; it will be liftable; hinges are used to attach it to the bar.
- Secure the backrest blank using dowels.
- Mount the top bar on the back, with a thrust bar underneath it. The elements are secured with additional two metal corners.
After the assembly is completed, they move on to the upholstery.
2 pieces are cut out of foam rubber. Thick foam rubber can be cut evenly using nichrome thread; material less than 5 cm thick can be cut with a knife.
For the back, a piece is cut, the length of which is equal to the length of the chipboard sheet, and the width is made 4 cm larger. Fix it so that 2 ends are covered with foam rubber. Glue is used for fixation.
For the seat, cut out a blank that is equal in length to the seat and 2 cm wider in width. Fasten so that the front end is closed.
Then the upholstery fabric is cut. You will also need 2 parts - for the back and seat. They need to be cut in such a way as to completely wrap the top sides of the particle board along with the foam rubber, while leaving a few centimeters of fabric on each edge, which is attached to the chipboard using a stapler. Staples are driven in every 2 cm.
First, fix 1 long side, then, slightly stretching the fabric, nail the opposite side, then move on to the sides, straightening the material.
Short sofa
They cut out the parts from which the sofa will be assembled, focusing on the drawings.
The sides, the front side of the niche, the seat strip and the top backrest strip are made of laminated chipboard, the rest are made of polished chipboard. You will need 2 pieces of sidewalls, 1 of other parts.
The process of assembling a short sofa is similar to making a long one.
Connecting part
This element will connect the short and long sections into a corner sofa.
From chipboard 16 mm thick you need to cut out:
- 2 thrust strips for the back;
- a workpiece that will be installed at seat level;
- trapezoidal part of the back, which will be located in the center;
- side parts of the back.
- First, connect the side parts of the backrest to the central one. Dowels and confirmations are used.
- Attach 2 stop strips to the back, securing them with dowels and metal corners.
- The structure is connected to the side parts of the sofas.
- The seat is upholstered using foam rubber and fabric.
- They fix it between the sides of the sofas using confirmats and metal corners.
The soft corner is ready.
Selection of materials
The most popular types of material for covering a furniture corner for a kitchen are tapestry, velor, artificial or genuine leather. To increase service life, give preference to the most durable fabrics.
Choose good materials for upholstering the soft corner.
Genuine leather is an expensive material, but at the same time it is a very durable material that will last you a very long time. Foam rubber is usually used as a filler. It is advisable to use a denser and taller one, then the furniture will be more comfortable and voluminous.
In order not to rashly buy too much and update the corner at minimal cost, you need to carefully measure it and draw a pattern.
It is also worth preparing several pieces of plywood, as they may be useful for replacing damaged frame elements. In addition, prepare the glue that you will use to glue the filler.
Use high-quality filler to restore the soft corner.
How to fill and upholster the seats of kitchen corners
The hard wooden seats of sofas and stools are not entirely convenient for a comfortable time at the dining table, so before making a kitchen corner
, care should be taken to purchase suitable filling and upholstery fabric. Pads made of polyurethane foam (PPU), otherwise foam rubber, specially designed for these purposes, can make the seats soft and elastic. The most suitable grades of sheet foam rubber ST1825 and ST1836 of the standard softness group are considered. It is best to use them in mutual combination, since the use of only one soft polyurethane foam of the ST1825 brand will lead to deformation of the seat and a rapid loss of its shape and elasticity.
Foam rubber parts cut to size are glued to the seat and back with any synthetic glue. This prevents the material from moving out when covered with decorative material and prevents the filler from getting lost during operation.
Selecting the appropriate upholstery for furniture elements will help to organically fit the kitchen corner into the interior of the room. When choosing materials, it is worth remembering that all items in the kitchen are exposed to dirt and high humidity much more often than usual, so special requirements are placed on such materials. Among the wide range we can highlight the most used ones.
- Faux leather. Modern technologies make it possible to obtain materials with improved consumer properties - they are pleasant to the touch, hygroscopic, wear-resistant and do not emit harmful substances. Leatherette upholstery is visually no different from natural leather, as it imitates its texture and can have a different color scheme.
- Arpatek. The uniquely durable upholstery fabric, which was developed specifically for upholstery of car seats, resembles perfectly crafted soft leather. The fabric retains its original color for a long time, as it is not afraid of ultraviolet radiation and is easy to clean, without leaving stains from natural juices and wine on its surface.
- Microfiber. It is not for nothing that it is called furniture suede, as it imitates its natural counterpart as closely as possible. Practical and durable fabric has dust- and moisture-repellent properties, allows air to pass through well and does not deform when stretched.
- Scotchgard or thermojacquard. Fabric with special impregnation, which gives the material special properties - resistance to pollution, protection from dirt and dust, oil- and water-repellent qualities. The applied layer of transparent synthetic protector preserves the threads from premature abrasion and increases the mechanical strength of the fabric.
If you plan to restore the kitchen corner with your own hands and reupholster the worn-out seat material, then you should not forget about traditional upholstery fabrics - cotton, corduroy, jacquard - which are not so practical, but quite suitable for upholstery. No special preparation of the material, for example, sewing or overstitching, is required. It is enough to cut it to size, wrap it around the part, picking up the hanging corners, and secure it with a stapler, fixing the staples in increments of several centimeters.
The kitchen corner is part of the room design that meets modern interior design trends. This type of furniture is a functional addition to the standard kitchen furniture set. It is installed in the corner of the room, serves as a number of seats and acts as additional space for storing household items. The corner is supplied disassembled, which implies its subsequent assembly on site. In the absence of a qualified specialist, you can assemble a kitchen corner with your own hands.
Stages of work
Upholstering a corner in the kitchen does not require any special professional skills.
All you need is caution, accuracy, endurance and patience. Before reupholstering a piece of furniture, you need to carefully think through the algorithm of actions and follow it
How to make your own kitchen from furniture panels, instructions
Removing the upholstery
It is recommended to remove the staples securing the upholstery to the frame with an anti-stapler. It is better not to use a knife for this, since parts of the fasteners may remain on the wooden elements; they can only be removed with pliers. Then the filler is removed. Developers often glue foam rubber to the base. Using a sharp knife, carefully clean the top layer, completely removing all fragments of material.
To remove the upholstery you need to:
- remove the seat from its hinges using a screwdriver or screwdriver;
- dismantle the backrests;
- separate the box from the legs;
- remove fasteners and accessories;
- remove the staples;
- get rid of the filler;
- clean the frame.
Removing the seat
Removing the backrest
Separating the box from the legs
Removing Staples
Getting rid of filler
Stripping the frame
Cutting fabric
You will not be able to get a good result if you initially cut the fabric or cut the stuffing incorrectly. It is best to use the same material as a pattern. In a situation where the new sheathing has a high density, it is necessary to add 2 cm to the linear measurements. A flap that is too small will not allow the material to be pulled over the frame, leaving a tensile allowance. As a result, the fabric will deteriorate and the furniture will need to be restored again. It is also necessary to leave allowances for the hem. The filler is usually simply cut along the contour of the part of the product to which it will be glued. To maintain the shape, 1 cm is added on all sides during cutting. When fastening, glue or staples are used.
Calculation of filler amount
Foam rubber is most often used as a filler. This material is relatively cheap and convenient, but it absorbs unpleasant odors. Therefore, when reupholstering kitchen furniture with your own hands, it is necessary to replace it. The amount of filler is calculated in the same way as fabric - measuring old foam rubber. The thickness is selected taking into account the type of furniture.
Frame repair
Before restoring a corner, it is necessary to inspect each element and determine wear. Applying the correct markings and carefully performing each operation helps to minimize difficulties during assembly. Restoration of a wooden frame is carried out as follows:
- dirt is removed;
- the previous coating is removed;
- sanding is performed;
- fill cracks with glue;
- dyeing is done;
- the result is fixed with varnish.
The nuances of choosing and installing LED lighting for kitchen cabinets
It is worth remembering that painting also includes a preliminary primer, so the color will lie more evenly. Repairing frame elements is a necessity when reupholstering a corner in the kitchen. Parts of the structure that have become unusable must be repaired or replaced. If there are minor chips or cracks, they can be filled with glue.
Cleaning from dirt
Removing remaining coating
Sanding the frame
Filling cracks with glue
Painting, varnishing
Padding
The procedure is performed step by step:
The foam rubber is attached to the frame with glue or staples. The cut material is placed face down
The structural part is placed on top. From all sides the fabric is carefully pulled towards the middle. You need to make sure that there are no distortions. Fixed with a stapler in 4 cm increments.
Attach the filler with a stapler
Cover with fabric
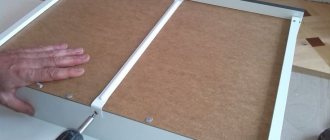
Assembly
The reupholstered kitchen corner is assembled in the reverse order. In places where there should be fastenings, it is better to drill holes in advance, this will prevent damage to the structure. Initially, the folding elements are fixed with hinges. Then the resulting structure is attached to the pallet, and only then the supports are attached to it. Next, the seat and backrest are mounted to the first side panel, and then to the second. The legs are installed at the very end.
Since kitchen furniture wears out quite quickly, reupholstering corners is a popular procedure. You can turn to professionals or do everything yourself. It's not difficult even at home
It is only important to carry out all the calculations correctly. An updated kitchen corner makes it possible to save money and revitalize the interior
Screwing the hinges
Assembly of the structure
Required Tools
The master will need the following tools:
- hammer;
- drill-driver;
- mites;
- spanners;
- stationery knife;
- glue;
- stapler;
- anti-stapler;
- scissors;
- marking tool.
All of the above is a minimum set. If the design is too complex, then additional tools will be needed. The consumables used are staples, glue, chalk, and furniture nails. If the condition of the furniture is completely deplorable, then you will need suitable fasteners, a jigsaw, sandpaper, and a pry bar. A screwdriver and wrenches will help you disassemble the structure. An anti-stapler and a knife are useful for removing upholstery.
The filler is not always easy to remove. If the manufacturer glued foam rubber, you will have to remove it with a knife and then clean the surface. High-quality glue will allow you to glue the upholstery (a special one is used), and a stapler will allow you to secure the fabric (furniture nails will also work). A knife is recommended for cutting material, and scissors and chalk are recommended for cutting.
Types of kitchen sofas
After choosing materials for the sofa, you should decide on its functionality and type. After all, such furniture differs in shape, design and appearance.
Functionality
The sofa makes the kitchen not only more comfortable, but also practical. Such furniture is often used not only as seating, but also for other purposes.
What functions do sofas perform:
- Storage space. Make niches in the seats or drawers under them. Less commonly, they organize full-fledged shelves that serve as an extension of the back or armrests of the structure.
- Countertops. They can be located on wide armrests or the back of furniture. Another option is reversible seats, which have a hard covering on the inside.
- Sleeping area. Folding sofas are the most difficult to make at home. However, such furniture is used not only as a seat, but also as a bed.
Form
The shape of the sofa can also be different:
- Straight. This sofa is the easiest to make. As a rule, it is small in size and takes up little space.
- Corner. The sofa is placed in an area that is rarely used. Therefore, despite its dimensions, it does not reduce the free space in the room. At the same time, it has a large number of seats.
- U-shaped. These are sofas that have 3 sides, perpendicular to each other. Capable of accommodating a large number of people. Suitable for spacious kitchens.
- C-shaped. Resembles a corner sofa, but has a curved shape. A roomy sofa that adds originality to the interior.
There are sofas of fantasy shapes. Usually they look appropriate only in spacious kitchens.
Mechanisms for folding options
If there is a need to manufacture transforming sofas, it is worth deciding on the mechanism that is responsible for unfolding the structure:
How to tighten it with your own hands?
To restore a kitchen corner yourself at home, you need to understand the sequence of actions of this process. It is worth considering the main stages of remodeling old furniture and its complete transformation.
Removing old upholstery from a kitchen corner using a staple remover or a tool you have at home for removing furniture staples. It is better not to throw away the material; it will be useful for cutting new upholstery. Remove the old layer of foam rubber so that there are no residues. If the foam rubber was glued, then it will be possible to remove it completely only with the help of a knife. Cut out new upholstery using old samples. The new pattern must exactly match the one that was previously eliminated, otherwise replacing one with another will be problematic. It is best to mark the edges of a new product using chalk or a bar of soap so that you can easily erase the incorrectly made part
When cutting out a pattern, it is important to leave 5 cm on each side to make starts that will tuck during attachment to the furniture frame. It is recommended to buy material with a reserve so that during cutting there will be enough of it.
If there is anything left after creating the patterns, you can use the fabric for its intended purpose and update chairs or stools, and, if desired, make soft cushions for the future kitchen corner. The finished templates are sewn together using a sewing machine. It is worth making several seams to maximize the strength of the structure and prevent it from coming apart in the future. Repairing a kitchen corner also involves replacing the soft component, so it is necessary to lay new foam rubber and secure it. For fixation, you can use various glues: construction glue, from a gun or “Moment”. If there is no desire or need to attach the soft component to the frame, you can connect it to the upholstery, securing it with furniture nails or staples. The final touch will be putting new covers on the kitchen corner and checking their size. If something needs to be redone, there is still an opportunity for this. As soon as everything is in place, the most important stage begins, in which you should not rush - this is attaching new upholstery to old furniture. You can work using an industrial stapler, which quickly and securely fixes staples to the base of furniture. The staples should be spaced quite often, at least 4 cm between each of them, otherwise the material will begin to turn out, which will spoil the impression of the work performed. If you managed to sheathe all the parts of the kitchen corner frame, then you can put all the parts together, put the furniture away and try to use it.
Working step by step, you can achieve the desired result and update old furniture in the kitchen, completely transforming it, and, if desired, radically changing it.
To learn how to reupholster a kitchen corner, see the following video.
Is it possible to reupholster other furniture?
You can reupholster the old upholstery on other furniture as well. Nowadays, there are many specialized companies offering restoration services for sofas, armchairs, chairs, stools, ottomans and other pieces of furniture.
In addition to the soft corner, you can also upholster other pieces of furniture with this fabric.
Thus, reupholstering a kitchen corner with your own hands will allow you not only to update the appearance of the furniture, repair damaged parts, but also to give a special individual style to your kitchen, while saving a significant amount of money.
Add bright colors to your kitchen to freshen up the interior.
Furniture decorated with your own hands will create a special atmosphere of home comfort, which is so important. After all, it is in the kitchen that the family gathers after a long day of work to eat, chat and share impressions; it is in the kitchen that close relatives and friends are often invited, who will be pleasantly surprised by the new thing.
Take care of your upholstered furniture to extend its life.
How to properly cut new upholstery ↑
The old adage about the need to measure seven times and only then cut when reupholstering a kitchen corner is truer than ever. Moreover, you need to know some of the nuances of how to correctly measure and cut new upholstery for a kitchen corner. So, you need:
Dismantle the old upholstery, i.e. remove the old covering from the kitchen corner. Then, using a tape measure or measuring tape, measure all the parameters of the cuts - the height and width of the pieces of fabric. All measurements must be taken according to the maximum length of the bends. The measurements were taken. We purchased new material. You can proceed directly to cutting. To do this, the fabric needs to be laid out in one layer, and pieces of old upholstery placed on top of it. The contours of the cuts on the new fabric are outlined with special chalk or an ordinary piece of thin dried soap - this strip is easily removed by ironing the fabric or wiping it with a slightly damp cloth. It is also advisable to leave about 5 centimeters on each side for the hem of the fabric. If the fabric is not monochromatic, but has a clearly defined pattern, then you need to ensure that the patterns are combined on the sections that will be located next to each other. Also, during cutting, you need to determine the so-called share thread - this is the fabric tension thread
It is important that in all areas of the fabric such a thread is located in the same direction, for example, everywhere in width or height.
It is convenient to cut parts on a large, flat surface. If you don’t have one, you can sit on the floor at home
Advice: incorrect calculation of fabric can negate all subsequent work and result in additional expenses. Therefore, novice craftsmen are recommended to make the most accurate calculation of the fabric in the following way. It is necessary to take any unnecessary old material on which all the pieces of previously removed upholstery are laid out. If there is no suitable fabric, you can lay out the pieces of fabric on a large table or even on the floor. After this, it is enough to measure what width and length a piece of new fabric is needed.
We make a cape for the corner
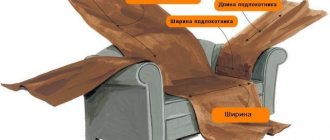
The cape is a simplified version of a replaceable cover for kitchen furniture. Products are manufactured in several styles and models. They can be roughly divided into covers that completely cover the sofa and partially protect the furniture from rubbing.
A blanket that partially covers the kitchen corner does not require much effort to create or special sewing experience. It is enough to measure the width and height of the back, seat and armrests of the kitchen corner, then transfer the measurements to the fabric.
This accessory is created on the principle of a transformer. Each part of the corner cape is cut out separately and sewn into one piece only at the folds.
Each part is secured with adhesive tape or ties.
Any tailoring begins with measurements. Then a pattern is made and then transferred to the upholstery fabric. The product must be basted and tried on.
When choosing the option of sewing a cover, you need to take into account the style and interior of the room, the possibility of combining the cover with other kitchen furniture. Bulky fabric that hangs down to the floor and large decorative elements look out of place in a compact and small room.
The bench should create a feeling of coziness and comfort, so it is better to give preference to practical covers that partially cover the corner.